Crafty Storage and Workspace, All in One!

You know I love a good bargain, and you know I love to craft, but those two things together make me positively giddy. I’ve been eyeing this craft cabinet for some weeks now, waiting for it to go on sale. Lucky for me my patience paid off because not only did it go on sale for 15% off, but I had an additional coupon for 10% off and got FREE shipping – saving around $100. I almost swooned!

I can’t wait for this sucker to arrive and get assembled so I can finally have a dedicated crafting space! Now I can spend more time crafting instead of hauling my supplies to whatever area I’m working in.

Although I originally planned to repurpose a large armoir cabinet into a crafting station, I came to realize that I tend to craft at the dining room table or kitchen island so I can watch TV or chat with the hubs at the same time. Because of that, having a piece that could accommodate a moveable work surface and storage became the priority. That ruled out a huge armoir and made a hutch or dresser the likely choice. I’d considered refinishing several thrift store pieces, but they all had minimal storage due to large drawers that wouldn’t suit my supplies well. When I saw this I knew it was perfect, although I will admit I’m NOT a Martha Stewart fan. Unfortunately, I hadn’t found anything that could compare for the price.

I plan to add large casters to the legs so it can be moved out into the living room where I can see the TV or into the center of the studio for more room when working on something large. And you know I’ve got big plans to organize all my supplies by categories into those fantastic shallow drawers, where they will be away from little customer’ fingers and puppy paws. Granted, I won’t be able to fit all of my supplies and my entire fabric stash in here, but I tend to only pull out the fabric I’m working with at the time anyway. I plan for my fabric to live on shelves in the guest closet, where they are easily accessible and out of the way.

I’ll likely add some sort of shelf or cabinet above this piece so I have a spot to store all the display pieces I use at craft shows, but that will come a bit later. And I’m thinking of doing a bulletin board between the shelves and the work surface so I can pin up inspirations and rig some system of storing the little pieces of whatever project I’m currently working on.

Hopefully I’ll get a tracking number soon so I can obsess about when it will arrive a little more concretely. Watch for a post in the coming weeks once it’s here and set up! ☺
Gettin’ Crafty

I’m happiest when I’m creating something. Although I have two creative jobs – a full-time gig as an event planner and a side photography business – I still see crafting as my ‘hobby’. I call this hobby Thrift D’ Creations and share it with a Facebook page and an Etsy shop, where I sell my wares.

I have also showcased my work at local craft bazaars for the past several years, but the cost and time involved became overwhelming. So I decided to limit myself to two shows a year – one in the fall for Christmas and one in the spring for Easter and Patriotic holidays. Luckily, now that we’ve moved to a new city, I’ve found two such shows just 15 minutes from home. Both have reasonable booth fees and draw a sizeable audience, which is not always the case, so I’m thrilled to be involved.

Tomorrow is my spring show, the Gifts Galore Bazaar, which benefits the Cystic Fibrosis Foundation. Held at a local high school, there is room for over 70 vendors, including everything from hand-made items to Tupperware.

Besides creating all the inventory for my booth, the biggest investment has been determining how I’d set up my booth. I decided to split a booth between my photography and crafting so it’s a business expense. I had originally planned to use free bi-fold shutter doors I’d gotten on Craigslist as a backdrop for my booth, but then I spotted a gal at a recent show with this display.

Display

I asked her about it and she demonstrated it quickly. The simple design folds up for portability, but includes several shelves can hold LOTS of stuff! GENIOUS! And because the materials were basic the cost would be minimal as well.   So I did what I always do. I showed the hubs. And that wonderful man made it happen, just in time for the show!He also rigged up some pipe stands that I can hang canvas drop cloths as backdrops from for the other two sides of my booth.  I’ve been so busy making inventory for the show I haven’t had time to get a picture of either just yet.  I plant to post a picture on my Facebook page after I get all set up tomorrow, so be sure to like my page so you see it!  I’m excited to see how it all comes together on-site, but I’m sure it will look great and all the other vendors will be envious.  And don’t worry, those shutters I mentioned earlier will find a new purpose come my Christmas show thanks to some Pinterest inspiration! 😉

Hanging at the Scarf Bar

Although I’m still working scarves into my regular wardrobe, I’ve somehow amassed quite a collection.  I used to have a scarf organizer similar to this that hung from the closet rod, but I found that it was too full and I couldn’t easily find scarves that were buried under those on spots higher up.

My next option was draping them in a row over the closet rod itself since I had extra space to use.  This worked pretty well, but I worried that the wooden rod would snag the scarves as I pulled them off if I was in a hurry.

So when we removed the builder’s towel bar to use hooks in the Master bathroom I had a light bulb moment.  I asked the hubs to hang the bar in the closet below my crown molding shoe racks instead.  He looked at me like I was mad until I explained what I planned to use it for.

A stud finder and a couple screws later, I now have a pretty and functional scarf bar in my closet.  I love the location because it’s right next to my mirrored jewelry cabinet which I stand in front of to decide on accessories for each outfit.  And because it’s right under my shoes I can see how everything will coordinate as I pick out options.

Scarves

Scarves2

Now my scarves have a place to belong and I have back extra rod space to fill! It’s the simple things in life that make us girls happy isn’t it? 😉

Scarves3

Kiss My Glass

I recently discovered a local artisan who does stained glass pieces and ordered this beautiful whale for my mom’s birthday.  The hubs catch a glimpse of the piece before I shipped it off and was a bit upset that we weren’t keeping it, so when the artist posted a new pattern of two whales with special multi-colored glass I knew I wanted one for our home.

Even though she follows a pattern, each piece turns out a bit differently, due to the glass variations and hand crafting.  She can also create custom pieces like this, which I’m remembering for later! 😉

I decided to hang our whales in the guest bathroom, where I have all the nautical décor.  I had been feeling like there were too many fish in there with the fish plates on the wall and the hanging fish in the window.  I simple adore my fish plates, so the hanging fish had to go.  Now the glass whales hang in their place look a million times better!  Plus the colors coordinate perfectly with everything else in this space.

Whale2

Whale

The artist calls her side business, Kiss My Glass Alaska.  Isn’t that the most perfect name ever?!  It was so great that I had to borrow it for the title of this post!

You can see other designs she’s done on her Facebook page and while you’re there be sure to click like so you see future creations too!

I’m a huge proponent of supporting small business, especially as a small business owner myself!  These kitchen table shops make a huge impact on the economy and directly support American families, rather than line the pockets of corporate tycoons.   And it doesn’t hurt that they make the world a prettier place too!

Planning by the Yard!

As I mentioned in my last post, I’m ready for warmer temps and the chance to get the yard landscaped. I’ve already shared my plans for the vegetable garden that will fill the alcove between the house and the garage and mentioned that we plan to add a deck off the Master to match the one off the Family Room, with a stone patio between for the hot tub and fire pit.

We also plan to fence in the cleared area behind the house and along the side, which will be hydroseeded to create a lawn for the dogs. We decided on using the hog panel fencing with a strand or two of electrified rope I have from an old horse pasture back home to keep what belongs in, in and what belongs out, out.

I’m considering planting my berry bushes along the bedroom side of the house within this fence so they are protected from wildlife, but I might need to add a layer of protection from the dogs since Tequila has figured out how to pick her own berries and I’m sure it won’t be long before she teaches Stoli and Bacardi! I’m anticipating blueberries, raspberries and salmon berries if possible. My strawberries will be grown in the freebie barrel I picked up last summer.

I also plan to install posts around the yard which will become mounting spots for Tequila’s favorite toy, the over-sized balls on a rope that Uncle Mark and Auntie Mere sent some time ago. This set up should prove much tougher than tying it to a tree branch, which only lasts a few minutes. I also want to use the posts of the fence to hold bird houses and feeders in strategic spots where we can see them from inside the house. I’m sure Luna will appreciate that.

Our wine bottle tiki torches will return, although I’m not sure if they will be hung on the remaining fence posts or from the posts of the pergolas we’d like to have over the decks. The pergolas might not happen until next season, so I may start with some on the fence and add more once the deck covers are finished.

Out front, I plan to do flower beds on either side of the front porch, with a walkway of some sort to garage. Because we intend to use the space off the front corner of the house for extra guest or trailer parking I anticipate adding an odd shaped area of grass between that and the front flower beds. I also want to DIY one of these pot fountains between the garage and the front door. Since my vegetable garden will take up most of my ‘gardening’ time I want these beds to be filled with bulbs and annuals that bloom in sequence such as:

  • Tulips
  • Daffodils
  • Iris
  • Daisies
  • Hydrangea
  • Lilacs
  • Salvia
  • Lavender
  • Hosta
  • Basil Lime (natural mosquito repellant)
  • Smoke bush

My rain garden will be located just down the driveway in a lower-lying area to collect run off rain water. I’m envisioning this space being my ‘cutting garden’ with:

  • Fireweed
  • Wild geranium
  • Forget Me Nots
  • Lupine
  • Daisies
  • Iris
  • Campola
  • Salvia

Here’s my horribly simple rendering of the birds eye view of all this glory. It’s not exact, but you get the idea of what’s going where.

Landscape

I anticipate there will be some trial and error with different plants in various locations, so feel free to make suggestions if you know of things that grow well in the Pacific Northwest, particularly Alaska!

Spring Fling? More Like Break-up!

SpringTomorrow is the first official day of spring, but we do everything a little different here in Alaska, including Spring. When you live near the Arctic Circle spring doesn’t include pretty little green sprouts popping up after misty rain showers. Here, spring brings a continued chance of snow, slushy roads edged with puddles and grey everything – not the 50 shades kind either.

Spring is known as “break-up” season in Alaska, because that’s when the ice on the rivers starts to break apart and move downstream. In fact, traditions are based on it. Many native villages hold contests for residents to guess when a wooden tripod placed on the thawing river will fall as the ice below it gives in to rising temps. It’s usually the talk of the town and you’ll find everyone available on the river bank watching, because it’s what you do in rural Alaska.

One of the things I love most about Alaska is the change of seasons, but now that the beautiful snow of winter is melting and we’re left with wet, slick ice splotches I’m ready to fast forward to summer’s greenery. Maybe it’s spring fever because I didn’t get a “spring break” like the school kids did. Or maybe I’m just eager to get my garden set up and my landscaping installed.

I have big plans for the yard, including hydroseeding a lawn for the dogs, flower beds near the front door and several birdhouses with feeders nearby so our feathered friends stay. Watch for a post on the full plan soon. But none of that can happen until the ground thaws and the warm temps are consistent. Until then my ‘yard pretties’ will remain stashed away in their cabinet in the garage and I’ll continue to day dream about the pretty flowers I’ll be planting.

Feelin’ Lucky

Because neither of us have Irish heritage and we aren’t big drinkers, St. Patrick’s Day isn’t a huge to-do in our home.  Regardless, I still like to put up a little green here and there.  I usually round up whatever green and gold décor pieces I have lying around and mix them together with the small stash of stereotypical St. Patty’s theme items like leprechauns, gold coins and rainbows I’ve accumulated over the past few years.  Here’s what I came up with this year to bring a bit of luck to our home.

On one side of the mantel I used a framed Irish phrase I found online and printed with some Celtic graphics for a border along with some green and gold accents.  The other side holds my newly thrifted green vase with some white hydrangeas, another gold votive and our pretty D monogram which has hints of gold to it as well.

2

1

The button rainbow I created a few years back fit perfectly on the little side table between the chair and couch.  A little potted succulent next to it added a bit more green.

9

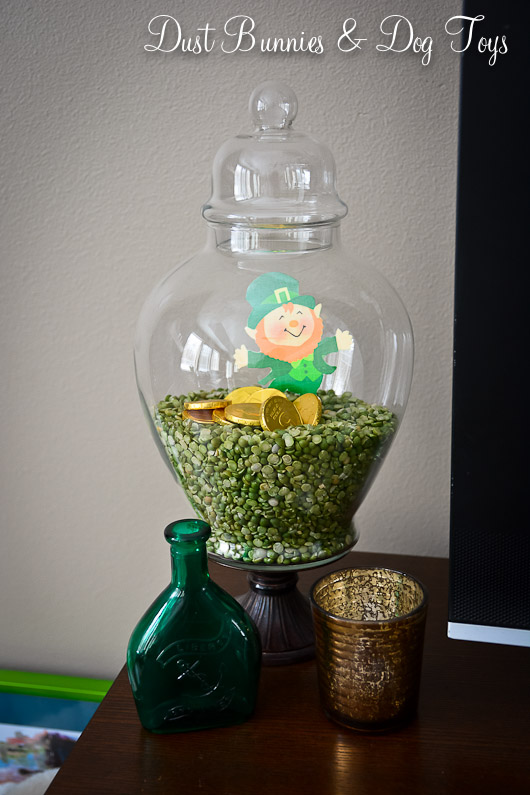
The space on either side of the TV got a little attention with more mix and match green and gold.  Split peas in a glass jar keep my little leprechaun contained with his gold.   I also paired a white crock I picked up at a thrift shop recently with faux clover I found on sale at JoAnns last month.  A pretty green bird and some more gold votives finished off the look.

3

4

I made this blarney stone back when we lived in Kodiak and love how it looks with gold coins in this pretty cloche which I placed on the buffet in the dining room.

7

More split peas in a white tray with white pillar candles makes a super simple, but elegant centerpiece.

8

The entry way was the refuge for all the left over green and gold, which I compiled into two little vignettes around my green filled Scentsy .  It was also the perfect spot to hang my lucky leprechaun sign.

5

6

And of course I had to make a little green bling for myself to wear today!  I put this small pin on my green cardigan and have a larger version on my coat lapel.  Irish or not, I’m not getting pinched! 🙂

10

Do you do something fun or unique to celebrate this fun holiday?  Leave a comment and tell me about it!

Dog Tired

I’m a night owl by nature.  I detest getting out of bed and require hitting snooze at least twice before doing so.  Given the choice, I’d stay up all night and sleep till noon.  But that’s not feasible with a full-time job, a commute and two side businesses.  Plus I typically feel guilty about wasting half the day when I do sleep in on the weekends, although that’s a rare occasion these days.

The hubs new work schedule is 6 am – 2 pm, which means he’s up at 3 and leaves around 4. After two decades in the military he’s pretty much able to function on any schedule, so this doesn’t seem to bother him much.  He is pretty good about keeping the noise and lights to a minimum when I’m still asleep, but I do still usually wake up at some point during the process.  While that’s not a huge issue, when I go to bed at 10 pm and don’t typically fall asleep until around 11, it does cut into my rest cycle.  And now that I’m in my 30’s my body isn’t as game to function on a measly 5 or 6 hours of sleep anymore.  So I decided to try something new.

For the last week I’ve gone to bed at the same time my hubby does, around 9 pm and get up at 4 am just as he’s leaving for work.  That means I should get around 7 hours of sleep each night.  It also gives me an hour of uninterrupted time each morning to work on my side businesses before getting ready for my full-time gig.

For the most part it’s working well.  There have been a few nights where circumstances had me up a little later than my new self-imposed bed time, and I actually gave up my extra morning time to sleep a little more one day due to this.  But getting up and moving, then putting my brain to work before setting about my normal routine has me feeling more awake and productive during the day.

I think it will take a bit longer for my body to fully adapt to the new schedule.  I’m usually tired when I get home after work, but then I get a second wind an hour or two before bedtime and have the urge to stay up and attack things on my to do list.  Unfortunately, that gets me recharged about the time I’m supposed to be winding down.  I still try to be in bed by 9, although I usually end up surfing the web on my iPad or watching TV to relax before actually falling asleep around 10.  And that means I’m back to my 6 hour sleep pattern, so I’ll need to be more diligent in starting the wind down process a little earlier.

Or maybe I just need to take a page from my hubby’s book and nap when I get home each evening since that apparently works for him and Stoli.

DogTired

Granted, his job is much more physical than mine, but I still feel “dog tired” and wish I could just kick back and catch a few winks.  Unfortunately, my brain just won’t let me until at least a good chunk of my to-dos are done.  And if I try to ignore those tasks I just lay there thinking about when I’ll do them, so I might as well just get it done. The hubs calls that “being an over-achiever.”  I just call it being me. 🙂

Pinterest Pass/Fail Roundup

Not many posts on this blog don’t mention Pinterest, so I figured it was high time I do a recap of which Pinterest projects were considered ‘pass’ and which were a ‘fail’.  So let’s look back and see just which is worthy of it’s own “nailed it” joke.

Passes:

  • Pantry Spice Rack – Although we deviated from the original design a bit, it still worked perfectly.
  • Cache Pot – Still the easiest Pinterest project ever, although I’ve found that the glue dots don’t hold quite as well as I thought they would and opening the jar can be a bit of a pain since it seals so tight.  I’m still trying to figure out a bag system so the inside won’t rust, but overall it does what it’s supposed to.
  • Mason Jar Soap Dispensers – We’ve had a few of the pump heads pop off, but I blame that on the quality of the item.  I’ve screwed them right back on and they worked fine. 
  • Crown Molding Shoe Racks – These turned out a little different than I envisioned but they are working great.  Now I just have to get around to painting them!
  • Washer & Dryer Pedestals (post coming soon) – I love having the washer and dryer raised.  Unfortunately, our platform was damaged during construction and hasn’t been fixed yet, which is why the post hasn’t happened. 
  • Closet Laundry Baskets – Still one of the best Pinterest finds in my book.  We again deviated a bit from the original design, but it works for us and that’s what matters.
  • Baby Shower Diaper Cake – Granted mine wasn’t quite as pretty as the Pinterest version, but it got lots of ooohhhs and ahhhs at the party.
  • Cupcake Stand – I love how this turned out, although the hot glue wasn’t strong enough to hold for transit back and forth.  I plan to reattach the pieces with a stronger adhesive when I need such a piece again.
  • Party Punch – Yummy and simple.  Can’t beat that!
  • Upholstered Guest Headboard (pre-blog) – It was so simple I showed the hubby a picture and he did it one afternoon before I got home from work without any direction.  Our design was similar to this, but with different fabric.
  • Kitchen Island Glass Insulator Pendant Lights – Still one of the most visited projects on this blog and one of my favorites.
  • Permanent Marker Removal – Who knew!  And it works!
  • Desk – It’s still not my dream set-up, but it works for now and it’s sure better than a folding table!
  • Gold Toed Shoes – I’m not sure mine are as cute as her’s, but I might be a bit self critical.
  • Curly Bun Updo – A success from a fail.  Gotta love that.
  • Lemon Blueberry Bread (pre-blog) – This recipe has created addicts and raised over $300 for charity!  I bet it’s original creator never imagined that.
  • Stove Cleaner – I certainly don’t miss the flat surface stove, or cleaning it.
  • Natural Cleaners – I actually need to make up another batch of DIY Febreeze because I finally ran out. Love how both work and plan to continue using them.  I also started using the DIY makeup brush cleaner recipe and am pleased with that as well.
  • Terrariums – These suckers did so well that the plants literally outgrew their containers and had to be replanted.  A few didn’t survive the transplant, but that happens.
  • Drop Cloth Curtains (update coming soon on how these are being used at the new house) – So glad I found this idea now that we have SUPER tall windows!
  • Magnet Bobby Pin Holder – A close runner-up for easiest project yet.  And it works like the dickens.
  • DIY Laundry Detergent (post coming soon) – I wanted to use the recipe for a while before talking about it, but so far so good.  And it’s not that complicated to make either.

Fails:

  • Ombre Shirt Dying – This project didn’t turn out all bad, but it certainly didn’t end like I thought it would, which is why I’ve classified it as a fail.
  • No Heat Curls – Epic failure.  Maybe it’s the magic of YouTube or minimal detail on web cameras, but whatever it is, my hair does not respond well to this method.  Seems I’m destined to get my curls the time-consuming old fashioned way (shakes fist in the air)
  • Rug Stop Silicone – I’ve seen this idea all over Pinterest, and with two rambunctious pups running around it seemed like an easy solution to a constant problem.  Unfortunately, it did NADA for our sliding rugs.  However, the store bought rug stop under the entire rug does seem to do the trick.

And the winner of the “nailed it” award is….No Heat Curls!  It was so horrible I couldn’t even take a picture of it! LOL

Now that I’ve rounded up the good and the bad and the down-right ugly, it’s obvious that the majority of the ideas I find are acceptable passes.  I guess that means my Pinterest addiction isn’t that bad after all. 😉

Cast Iron Charm

Medallion

I found these pretty cast iron medallions at a local antique shop recently and knew I wanted to use them in the Master bathroom, although I wasn’t sure exactly how.  I considered making hooks out of them for our towels, but didn’t want them to be covered up most of the time.  I also thought about attaching them to a board and making a piece of art, but that didn’t feel right either.  Finally I decided that putting them above the window over the tub would be just right.

Medallions2

They also made a great visual anchor for the hanging terrariums I had the hubs put up in here.  I think they fit perfectly with my eclectic Alaskan spa theme in this space.  I’ve been incorporating a few Moroccan pieces and patterns in this space and these medallions follow that trend, without being over powering.

MedallionsWall

I’ve got a few more projects planned for this space, but will showcase what’s been done so far when I do a whole house tour in the coming weeks. 🙂