It’s State Fair Time!

The approach of fall means it’s state fair time.  The last time we went to the fair was 2 years ago, when we went to attend a concert.  That was our motivation to attend this year as well, this time to see Josh Turner – one of my favorite country artists.

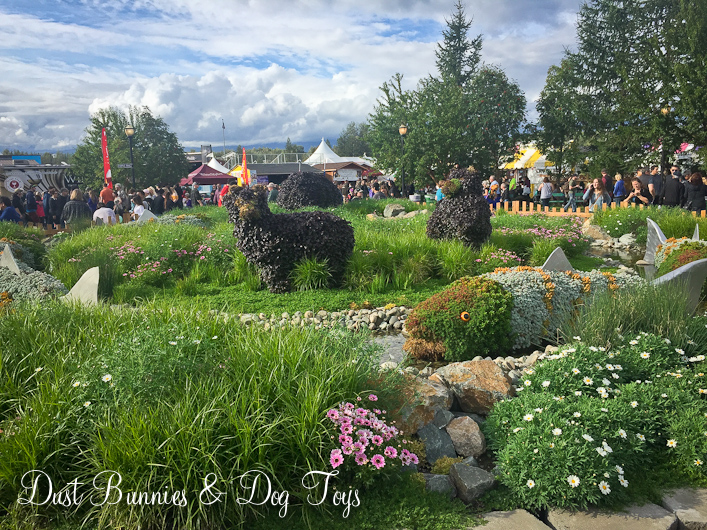
We arrived a little early so we could experience the fair before the concert and I made a bee-line for the livestock pens like I usually do, with a pause to check out this year’s garden display in the center of the fairgrounds.  This year’s design used simple plant types to create an amazing bear family and a stream of salmon.

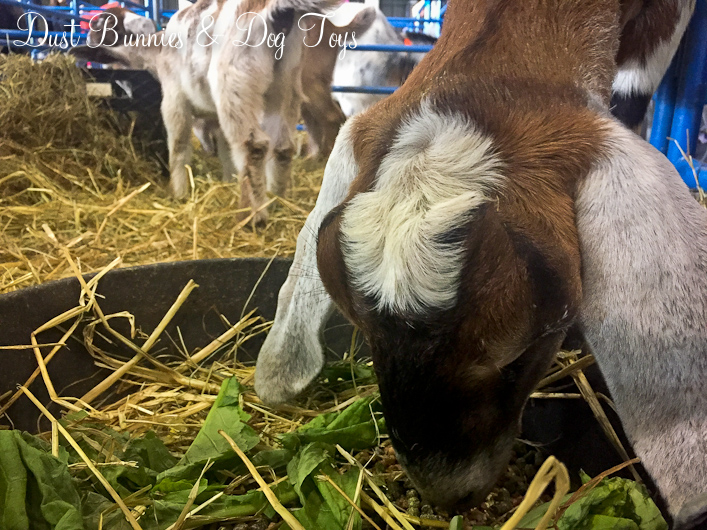
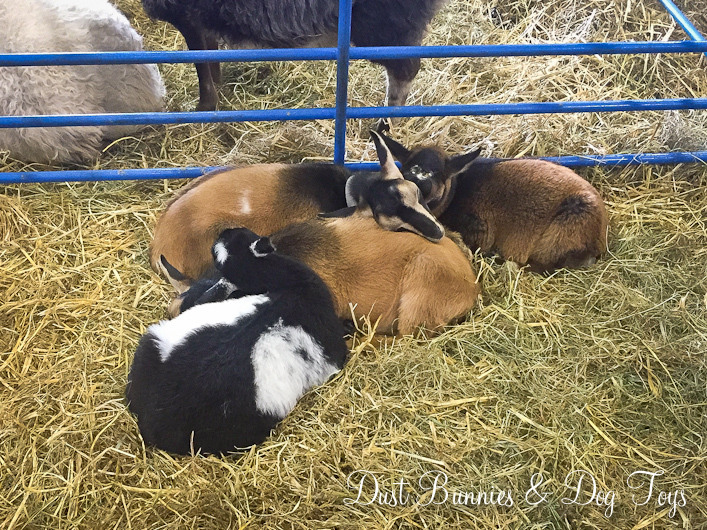
Inside the livestock barn we spotted this unique art entry that took top honors.  You can see why!  I’d love to have something similar in my garden!  We wandered the rows of livestock stopping to talk with the 4-H and FFA exhibitors to encourage them in their upcoming time in the ring.  Of course I had to stop and visit every goat!  There were several breeds represented, but my favorites have always been Nubians, with their big floppy ears.  There were a couple of groups of sleepy goats all curled up together that were pretty adorable as well.

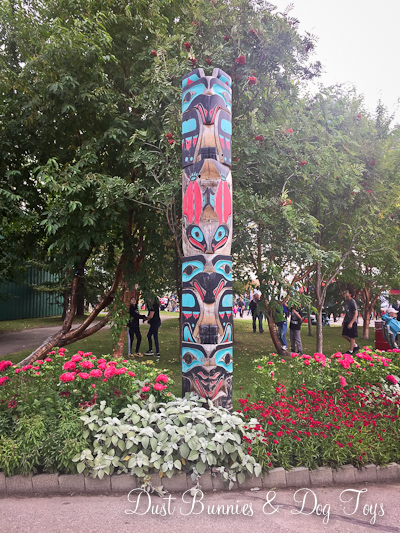
After watching a few of the livestock classes in the ring, I made a quick stop in one of the large halls nearby before heading to the concert to support a local vendor I’ll be working with soon.  On the way I spotted this great totem pole, which I’ve never noticed before.

We also stopped to get my fair must-have – funnel cake with raspberry topping!  Even thought it was messy to eat, and the developing breeze kept blowing the powdered sugar all over my outfit, it was delicious and so worth the mess.  The Hubs chose a steak taco, which he shared a bite of.  It was pretty yummy too.

Then it was time for the main attraction – the concert.  The opening act was The Last Bandoleros, who had a Tejano style mixed with rock.  I didn’t know any of their songs but now that I’ve heard of them I’ll have to learn a bit more about them.

And then that gorgeous country crooner put on quite a show. Unfortunately they don’t allow DSLR cameras at the concert, so I had to make do with my camera phone – but I wasn’t the only one.  How many camera phones do you spot in the picture below?

Mr. Turner and his velvety voice put on an amazing show.  The weather turned chilly and windy during the concert and both the Hubs and I had been fooled by the nice weather earlier in the day and had foregone jackets.  That just gave us a reason to snuggle and keep moving to the beat to stay warm.  It was pretty funny to watch Josh and his band rub their hands together to try to ward off the chill between sets.  They even commented how this was quite a change from the heat of the deep south they are used to, but they didn’t let that keep them from keeping us all entertained.

While we’re not typically fond of big crowds, parking was a nightmare and everything was expensive, it was all worth it to hear that wonderful voice in person – and yes it sounds as good in person as it does on the radio ladies! 😉

Have you made it out to your local county or state fair?  Leave me a comment to share what your favorite fair activity is!

Advertisement

Green House Sitting Area

Now that I spend a lot of time at the green house I decided to make a little spot to sit and take a break when I’m tending the garden.  It will also be the perfect spot to enjoy the new flower bed I’m putting in along the shed.

The spot is between the green house and the berry patch, just at the crest of the hillside as it starts to go down.  It’s a simple set-up that came together easily, starting with the chairs, which I found on the buy/sell page for $20.  When I got them they didn’t match – one was red and the other was tan.  If they had both been tan I probably would have left them as is, but since I wanted them to match I picked up a couple cans of spray paint for plastic to make them teal instead.

Apparently I was in such a hurry to get the project rolling that I forgot to take a before picture of the red chair, but here’s the tan one prior to it’s makeover.

And here it is while drying.  The paint went on easily and because it has a built in primer there was no prep work other than a light cleaning to remove any built up dirt.  It’s been about a month since I painted them and they seem to be holding up quite well.

I had a curbside freebie wooden stand I’d snagged while getting some other freebies off Craigslist and thought it would make a fun little table between the chairs.   You can check out a before picture of this little thing on Instagram.  I first tried to paint it white but the wood soaked up the paint inconsistently making it look splotchy.

I dug through the paint cabinet in the garage for an alternative and found two cans of grey spray paint.  The darker color seemed more uniform, although still not perfect.  I figured it would weather anyway so it just adds a bit of character and you can’t beat free paint!

To pull it all together, I added a couple of pillows from my stash for the backyard, along with some planters I’d filled earlier in the season and a citronella candle to keep the bugs at bay.  Not a bad little spot to relax for around $30 (chairs & paint)!  I may add a little shelf on the bottom of the table next season, but for now it works just fine.

We plan to cover the whole open area around the green house with landscape fabric and gravel over the labor day weekend, which will really finish off this space.  Now I just need some extra time to go out and enjoy it! 🙂


Well Float My Rope and Ring My Bell

Yesterday I mentioned making driftwood garlands, like the ones I saw in Homer, but today I’m sharing a similar project I did recently that also has a bit of a nautical flair.  This little project has been in the works for years.  It started when I picked up a batch of wooden floats used for fishing more than 2 years ago.  I only had six and every project I thought up required more so they sat, waiting for more to be found.  Then I happened upon these cool vintage metal floats at Junk Bonanza and decided to pair them together but still didn’t have quite enough to complete the project.

I spotted a pair of metal garden bells in a catalog for $20 and knew they’d be perfect at the end of a line of floats.  Unfortunately the company wouldn’t ship to Alaska so I had them shipped to my Mother-In-Law and picked them up when we visited earlier this summer.  To fill out the rest of the rope I picked up several cork floats from Alaska Picker for a few bucks each.

I used some woven rope I already had in my stash from another project and started with a loop tied with a knot.  I fed the floats onto the rope in a set pattern and tucked the loose end of the rope from the knot at the loop into the center of the first float.  At the bottom I just made a knot and then tied the rope that came with the bell into the knot, again tucking loose ends into the last float.  It was so easy, I did both ropes while watching a movie with the Hubs and it took less than 20 minutes.

The Hubs added hooks we had left over from another project on the front corners of the green house so I could hang the ropes easily and take them down for the season quickly.

Here’s the rope on the other side, where I’ll have a large metal horse trough planter next season.  Right now it’s serving as a brooder for the baby chickens we picked up yesterday!  Get a peek at them on Instagram or Facebook.

The bell on this side is a little smaller than the other, but has the same style and finish.  They don’t get much movement in this spot so they stay pretty quiet, but when they do chime it’s a pretty soft sound that’s soothing and just right for a garden.

I’ve still got several projects to tackle out around the green house before we close up the yard for the winter and I’m already putting together the plan for what we’ll plant and do next year.  Until then these float ropes add a little bit of Alaska style whimsy to the garden and make me smile every time I see them.  One more project checked off the list. 🙂

Exploring Homer

This past weekend I headed down to Homer to photograph a wedding and had a couple of hours to explore before the ceremony.  It was an absolutely gorgeous day, which was a welcome change to the constant rain we’ve had in south central Alaska for the past several weeks.

Since I was only in town for a few hours I opted not to rent a car.  Instead I decided to focus my sightseeing on the Spit, which is easy to walk.  Although I’d been to Homer before I hadn’t had time to wander and check out all the little shops so this was a rare treat.  I started at the Seafarer’s memorial which is dedicated to those who are lost at sea.  Fishing is a big part of this region and with that comes the risk of not making it back to safe harbor.  The base of the statue was covered with trinkets and messages from loved ones and friends of those honored here.  Nearby there is a bell that is tolled during ceremonies when names are added to the plaques contained in the memorial.

Nearby the memorial was this uniquely decorated laundromat for an RV park.  The wall had an eclectic assortment of things from the region including buoys, urinals used as planters and even a petrified moose leg.  It’s definitely one of a kind!

My next stop was the iconic Salty Dawg Saloon.  I waited several minutes to get an unobstructed shot of the lighthouse style building and original log cabin.  I also took a quick tour around the inside of the cabin, which is virtually wallpapered with messages written on money and a variety of other items.

Back outside I took a peek at the less famous side of the Salty Dawg, which had an adorable free form garden containing a variety of nautical accents.

The shops were grouped in clusters up and down the road, including this batch which were built on a pier over the waterfront.  It reminded me of the Outer Banks in North Carolina where I used to visit often when I lived on the east coast.  Looking out from the deck of the pier you can see RV’s parked near the shoreline.  Since the Hubs wasn’t with me I texted him to say that I wanted to plan a long weekend road trip in an RV here next summer.

I popped into one of the shops on this boardwalk called Sunken Treasures.  They had a great inventory of nautical and Alaskan items including these fun signs.  The sunny days one is sooooo me! 🙂

One of their shop windows had cracked and rather than try to hide it they had embraced it and added an inspirational quote to follow the curve of the crack, which mimicked the curves of the mountains across the bay!

Out on the deck were several spots to sit and enjoy the food options available.  Most included some sort of repurposed fishing equipment, like this table.

A little further down the road was this cool cabin style store, which looked like a cross between an Alaskan Mountain Man’s hunting lodge and a Viking Hall.  I almost came home with one of the cute stringers of carved fish displayed out front, but decided to save my money for another trip we have coming up.

Up and down the main road were a variety of artistic and unique signs, including this massive milepost and hand-painted Salmon Dawgs ad.

I had to chuckle at the ingeniousness of this shop owner’s signage, which can be changed by just moving the velcroed N to indicate if they are open or “nope”…

Another shop I stopped in, called the Blue Urchin.  There were a lot of unique items here too, but the ones that I fell in love with were small vintage style bells that will be added to the ends of driftwood garlands I plan to make from driftwood collected on our many adventures.  In fact they had one just like what I’ll be making for sale in the shop, so I snapped a picture for inspiration.  I’ll share my finished garlands when they are done.

Another fun thing I spotted was this classic truck parked outside one of the many small eateries.  There were two older gentlemen standing nearby discussing the truck who were surprised I showed interest until I told them I have a 1955 F-100 at home. 😉

After my sightseeing was done I made my way to the end of the Spit to have lunch on the deck at Lands End, where the wedding reception would be held.  On the way there I passed the ferry terminal docks which were occupied by a swarm of seagulls who were in constant chatter.  All I could think about was the Finding Nemo scene were all the seagulls chant, “Mine. Mine. Mine!”

The sun was out in full force when I made it to the hotel.  I’ve stayed here with my family when we traveled through Homer to take the ferry to Kodiak.  It’s THE landmark for the Homer Spit.

I snagged a table out on the deck with a fantastic view of the bay and watched the boats go back and forth.  Although I couldn’t enjoy a cocktail since I still had work to do it was a much enjoyed little break with my Dr. Pepper fix.

While waiting for my lunch I spotted several sailboats crossing the bay.  It was so peaceful to watch them glide across the water in contrast to the fishing boats that powered toward the marina leaving waves in their wake.

Lunch was a cup of clam chowder and this amazing caprese stuffed mushroom.  It was just the right amount to keep me full until dinner at the reception.  And it was well complimented by the sunshine and surf.

It was only a couple of hours, but it was a wonderful little mini-vacation as summer begins to wrap up.  I hope we get to enjoy a few more beautiful sunny days like this before the white stuff arrives!


Adding Chippy Charm to the Deck

Is anyone else still coming to terms with the fact that it’s already mid-August?  While blog land and Pinterest fill with everything fall, I’m clinging to the last bits of summer.  It’s been a rainy one here and while that’s great for my plants I’d prefer more sunshine during summertime.  Luckily, I’ve had plenty of projects to distract me, including this spot on our deck where I created an extra seating and planting area with an old bench that I picked up at the Junk Bonaza show last fall.

It was a steal at just $30 and I knew it would look great on the deck – plus it can double as a photo prop for large families!  It’s the perfect amount of chippy paint and classic lines for my style.  I placed it under the dining room windows and flanked it with our whiskey barrel fountain and a wooden barrel we picked up on our last trip to Portland.  Then I added in plants and a bird house to finish off the look.

This arrangement brings so much color and life to this side of the deck.  Most of the plants I used are in pots with minimal or no drainage so being under the eave of the house is a smart choice, plus they all have a rustic vibe to them so they pair well with the worn bench.

I’ll be enjoying this pretty set up as much as possible for the rest of the summer, even if that’s only until the end of the month.  I can’t wait to figure out similar areas on the new deck off our Master bedroom next summer.  That deck is almost done, so I should be sharing it with you soon!


Adding Function to the Laundry Room

Today I’m sharing a quick addition I made to the laundry room.  Now that we’ve got the counter top finished and the sink operational I found that we needed a spot for a hand towel to dry your hands.  I’d been eyeing this vintage industrial style shelf and towel bar for a while so when I spotted it for a good price I ordered it quickly, figuring it would either work in here or the guest bathroom.  Due to shipping costs I had to have it sent to my Mother-in-Law’s house and wait to pick it up until our trip earlier this summer.

This spot has had several variations since we moved in.  First I had some DIY decor here, then there was a rustic laundry sign, but I decided to sell that and have a different one made for the wall above the board and batten on the other side of the room where the tobacco baskets are currently.  Those will move to the guest room above the new headboard.  I plan on making that change this winter, when there’s not so much going on in the yard.

The metal look ties in perfectly with the DIY drying rack the Hubs built me above the window.  I styled it with one of my faux succulent planters and a blue mason jar that I’ll be filling with vintage clothespins.  I may add a few other little things, but will let those “find” me in the coming months.  You can’t tell from this angle but the bottom of the shelf is an open style wire so whatever I use on it will have to be big enough that it does’t fall through.

As you can see from the winkles in the towel, it’s been getting plenty of use and it’s just the right size for the wall without blocking my DIY soap pump in the corner.  One more project done, and you know functional decor is my favorite kind! 🙂

Going Farmhouse in the Kitchen

I’ve been switching up the decor in our kitchen for a more simple, farmhouse style and had this idea for a sign over the pantry.  Everywhere I looked I saw “EAT” and “KITCHEN” but I wanted one that said Dry Goods, because that’s what’s in the pantry!  I considered making one myself but life has just been too busy for that project and things won’t slow down anytime soon.  So when I spotted the style of sign I wanted for a great price at one of my fave local shops, Brown Chicken Brown Cow, who you may remember from the recent vintage market, I asked the owner if she could do a custom version.  She said yes and because she’s awesome she even kept it at the same price as the other signs she already sells!

It turned out awesome.  She made it to the dimensions for my specific spot and gave me a choice of colors so it was just what I wanted.  It’s the perfect addition to the cabinet top decor changes I’ve made so far.

On the right side the large white platter stayed where it was, as did our personalized cutting board, but the fruit basket was swapped out for this large breadboard and a vintage wicker wrapped jar.  I picked both of those up at an antique shop outside of Portland on our recent trip for a great price.  I’ll be sharing more of that shopping trip soon.

The other side kept several of the same pieces as before, just rearranged.  The wine rack I had in the corner was sold and I picked up this cute copper bucket that I’d been eyeing at Target for months for just $2 on the local buy/sell page.  That’s a 90% savings from the original price!

It sat empty for a while, but when I won an Amazon gift card at work I ordered my favorite purple pens and several bunches of faux lavender.  As soon as they arrived I knew they belonged in the copper tin.  I love the contrast of the colors and textures and am even happier that it’s something that can stay up year round.

I still may rearrange a few things as I find other items just right for this space, but for now I’m pretty happy with how it’s looking.  I’d love to hear your suggestions on moving things around or items to add, so leave me a comment if you have ideas!

Purdy-ing Up the Chicken Yard – Again

Remember when I decided to make the chicken yard pretty last year?  Well I’m at it again.  This time I went with planters that are up high and out of ‘chicken reach’ so they should be pretty safe.

I didn’t want to spend a lot for this little project since it is just a chicken yard and I am a self-proclaimed bargainista, but I still wanted it to be cute.  I’d seen wall planters made of various materials and realized they were just simple pockets of fabric.  I’m not a sewer so I brainstormed what might provide an inexpensive, already sewn fabric pocket.  Then the light bulb went off – a fabric shoe organizer!

I snagged this one at Fred Meyer for around $10.  I only needed 4 pockets but I figured it the idea panned out I could always make more for other spots too.  It was an added bonus that it was a cool grey fabric rather than the typical canvas ones I’ve seen that would show dirt immediately.

Luckily each row was exactly 4 pockets!  I cut off one row, leaving the seam and trim at the bottom.  From there I cut down the center of the stitching on the trim between each pocket to create 4 individual pockets.

I filled each with dirt and a plant while on skype with my mom on a sunny afternoon and then recruited the Hubs to help me hang them.  We folded over the top section of fabric for a bit more strength and just screwed them into the post using deck screws.

Although the screws are noticeable from the side angle, they blend in when you look at the planters from the front of the yard which is the typical way they will be seen.  Plus as the plants grow they should help hide them even more.  Hopefully they will have enough time to really fill in and start to trail over before the season wraps.

I also decided to give the block planters at the bottom of the posts another try.  The canvas curtains I made last summer didn’t survive well so this time we used scrap clear panels left over from building the green house.  It keeps the sight lines open for both the cluckers and the dogs, but prevents the chickens from decimating the plants.

The chickens were not to pleased with this innovation and kept trying to  peck at the leaves through the plastic!  They eventually gave up and went on about their clucking business elsewhere in the yard.  This time around I filled the blocks with mint, transplanted from the rain garden where it ended up after being in the herb container 2 summers ago.  Those who have grown mint, know it is super hardy so it can take some tough love, will return year after year and should spread to fill in a bit more.  I will have to watch that it doesn’t spread out from the blocks but it’s easy enough to remove if I catch it early so I’m not to worried.  Plus it will help keep things smelling pretty – because this is a chicken yard and there is always a constant supply of “fertilizer”!

Because we used scrap panels each is a bit different size so the panels don’t all line up with each other.  It doesn’t really bother me in person but looking at this image I really notice it.  If it still bugs me in a few weeks I’ll have the hubs cut the two larger ones down to match.

I put another clear panel on the front of the yard and added marigolds there for a bit of color.  Now if I could just get that darn walkway covered with gravel like I’ve been planning this space might start to really look complete.  Hopefully that will happen before the end of the season, but if not it will be on the list again next summer. 🙂

Herb Rack Update

I promised to provide an update on our indoor herb planter once we got some real plants in it, which proved to a be a bit more difficult than I anticipated.  It took a while to find what I was looking for at the various stores in town and then several of the plants didn’t do well so I replaced them.  As you can see below that still didn’t keep a few of the plants from failing again.

I think they just weren’t getting enough full or direct sun to thrive.  There were a few that seemed to do ok.  The bay plant did pretty well and the sweet basil did better than the spicy basil.

After replacing several of the plants 2-3 times I gave up deciding that the location just wasn’t getting enough light for herbs.  I moved the remaining viable plants outside on the deck to a raised planter (which you may remember from last season) so they are still nearby for use when cooking or grilling, but stay out of reach of the dogs.

They seem to be doing pretty well out here, and both varieties of oregano have grown since I moved them out here.  The basil and bay have stayed about the same, I think just from the shock of transplant.

I’m a little bummed that the indoor option didn’t work out as I was pretty excited about having fresh herbs all year long, but I’ll be sure to preserve some of these so they can be used throughout the winter instead.  I’ve already got a new plan for the space in the dining room where the rack was – but I’ll have to wait until after our trip back east this fall to put it together.  I’ll be sure to share that once I do.  In the meantime I’ve filled the rack with faux succulents left over from another project since all the IKEA plants are now in use in other spots.  Find me on Instagram to see how it looks today.

Save

A Daybed in the Office

Remember the cool daybed and trundle the Hubs built for the Foster room?  Like I often do, I changed up the plan – deciding to do bunk beds in that space instead.  The trundle idea was cool, but would be annoying to pull out every day if we had siblings placed with us and it was a tight fit so it would be difficult for younger children to manage.  That left the daybed ‘homeless’ until I had the brilliant idea to move it to the office as an extra seating.

This corner was originally my backdrop storage and set-up space, but I found that I’ve only used it once as I typically go to clients’ homes for shoots or use outdoor locations.  Sometimes the Hubs sits in the office with me to chat while I work on photos but it’s not very comfy to sit in an office chair for long periods.  Having a little daybed where he could stretch out and relax a bit seemed like a great idea.  I moved my backdrops to the guest closet with a fun little hack I’ll share sometime soon and that opened up the whole corner for the day bed.

Luckily, the bunk bed we got on the buy/sell page came with one mattress so I could keep the mattress I had on the trundle frame with the daybed when it moved to the office.  It was also the perfect opportunity to test out a bedding set I’ve been considering getting for the Foster room, called Beddys.  It’s an all-in-one set that includes the blanket, bottom sheet plus top sheet and zips closed on either side, making it easy for young children to make their own bed – especially on a bunk bed.  They are a little pricey, but I found the set I wanted on sale and considering that they include all of those items in one unit it’s not a bad deal.

The inside blanket is made with this plush minky fabric that is super soft to the touch.  You just zip down the side of the mattress to pull down the sheets and then zip it closed in the morning when you get up.  It’s a great option for the Foster room so I’ll be buying those sets in the fall when we finish up some other projects – although I’ll be watching for another good sale since this time I’ll be buying two!

I added some big fluffy pillows I picked up at Home Goods during our recent trip with the heart pillows I got from the Dollar Spot at Target back around Valentines and my favorite button monogram pillow to make it cozy.


It turned out to be the perfect little nook to hang out in and put the space to work since it wasn’t really being utilized before.  I’ve even used it a couple of times for my weekly Skype dates with my family.   Plus it’s an extra spot to sleep if we ever had a big group come visit and since this room now has the barn doors, it’s got enough privacy to function as a temporary bedroom if we needed – although there are no window treatments so guests would need to keep that in mind. 😉

I’d love to hear what you think of our little multi-function daybed made from an old industrial cart, so leave me a comment below!

Save