Purdy-ing Up the Chicken Yard – Again

Remember when I decided to make the chicken yard pretty last year?  Well I’m at it again.  This time I went with planters that are up high and out of ‘chicken reach’ so they should be pretty safe.

I didn’t want to spend a lot for this little project since it is just a chicken yard and I am a self-proclaimed bargainista, but I still wanted it to be cute.  I’d seen wall planters made of various materials and realized they were just simple pockets of fabric.  I’m not a sewer so I brainstormed what might provide an inexpensive, already sewn fabric pocket.  Then the light bulb went off – a fabric shoe organizer!

I snagged this one at Fred Meyer for around $10.  I only needed 4 pockets but I figured it the idea panned out I could always make more for other spots too.  It was an added bonus that it was a cool grey fabric rather than the typical canvas ones I’ve seen that would show dirt immediately.

Luckily each row was exactly 4 pockets!  I cut off one row, leaving the seam and trim at the bottom.  From there I cut down the center of the stitching on the trim between each pocket to create 4 individual pockets.

I filled each with dirt and a plant while on skype with my mom on a sunny afternoon and then recruited the Hubs to help me hang them.  We folded over the top section of fabric for a bit more strength and just screwed them into the post using deck screws.

Although the screws are noticeable from the side angle, they blend in when you look at the planters from the front of the yard which is the typical way they will be seen.  Plus as the plants grow they should help hide them even more.  Hopefully they will have enough time to really fill in and start to trail over before the season wraps.

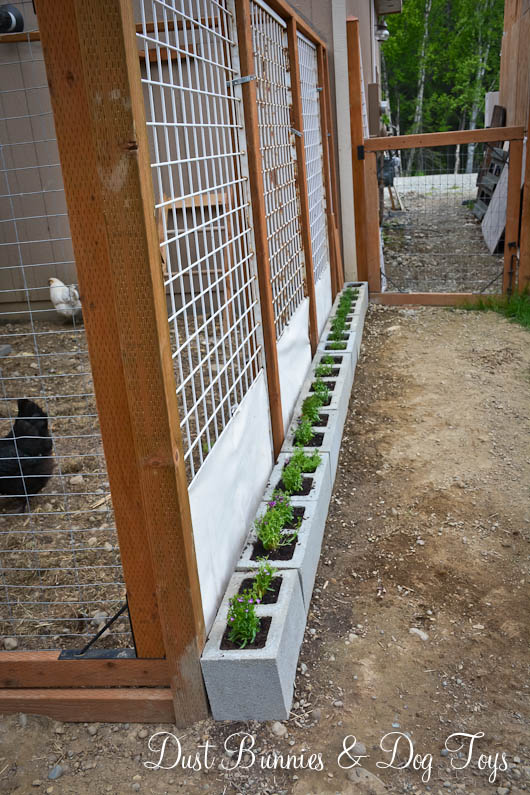
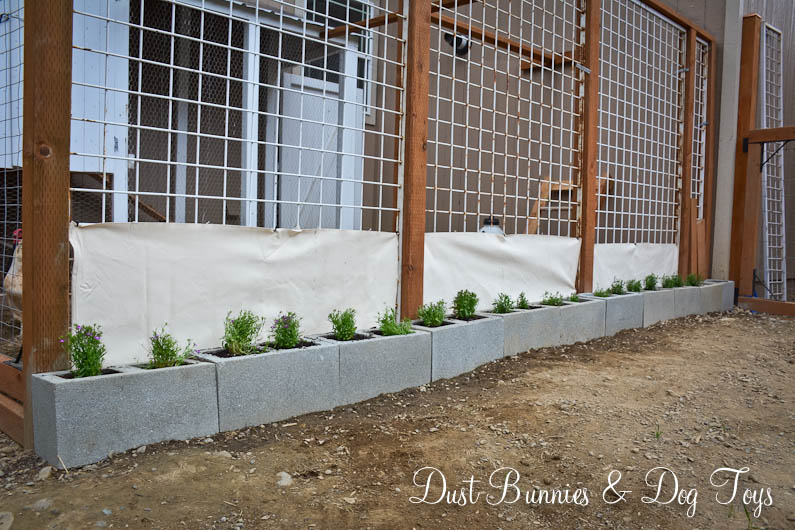
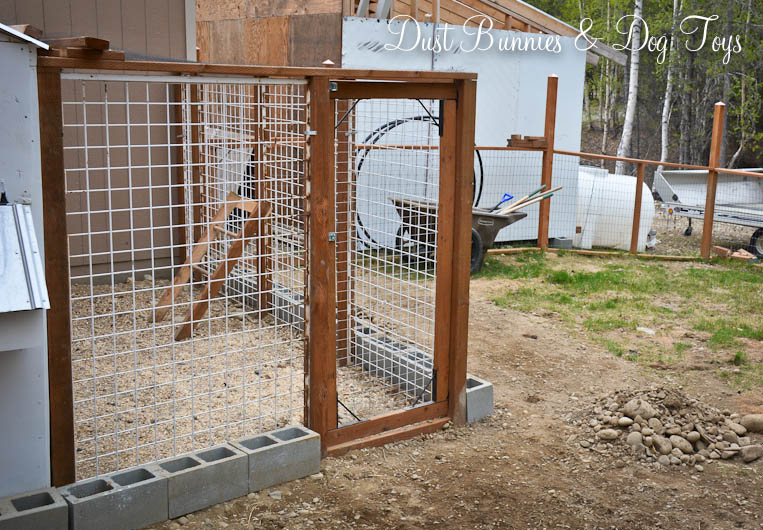
I also decided to give the block planters at the bottom of the posts another try.  The canvas curtains I made last summer didn’t survive well so this time we used scrap clear panels left over from building the green house.  It keeps the sight lines open for both the cluckers and the dogs, but prevents the chickens from decimating the plants.

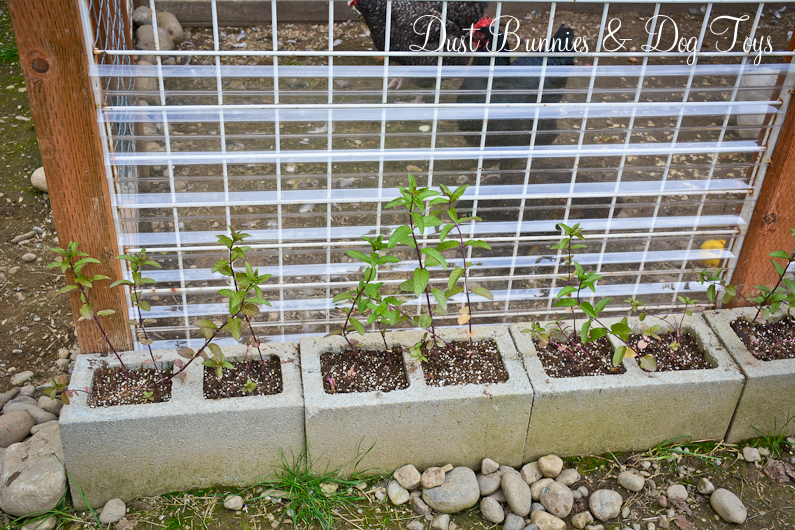
The chickens were not to pleased with this innovation and kept trying to  peck at the leaves through the plastic!  They eventually gave up and went on about their clucking business elsewhere in the yard.  This time around I filled the blocks with mint, transplanted from the rain garden where it ended up after being in the herb container 2 summers ago.  Those who have grown mint, know it is super hardy so it can take some tough love, will return year after year and should spread to fill in a bit more.  I will have to watch that it doesn’t spread out from the blocks but it’s easy enough to remove if I catch it early so I’m not to worried.  Plus it will help keep things smelling pretty – because this is a chicken yard and there is always a constant supply of “fertilizer”!

Because we used scrap panels each is a bit different size so the panels don’t all line up with each other.  It doesn’t really bother me in person but looking at this image I really notice it.  If it still bugs me in a few weeks I’ll have the hubs cut the two larger ones down to match.

I put another clear panel on the front of the yard and added marigolds there for a bit of color.  Now if I could just get that darn walkway covered with gravel like I’ve been planning this space might start to really look complete.  Hopefully that will happen before the end of the season, but if not it will be on the list again next summer. 🙂

Advertisement

Big Plans for the Coop!

Hi there!  It’s been a busy couple of weeks around the DBDT household.  I had to travel around the state last week for my day job and have been playing catch up ever since.  Luckily the weather is finally turning warmer and the snow is melting, so the Hubs and I have been working on cleaning out the greenhouse and getting it set up for it’s first season!  I’ll share an update on that project soon.  The other big project on my radar at the moment is the chicken coop.

The Hubs added the roof to the chicken yard in the fall, which was a great improvement over the thin netting we had originally.  The new metal paneling has held up well over the winter.   Because it’s open panels allow the snow to fall through we had to shovel out their yard a couple of times during the snowy season and now that things are melting it’s getting pretty soggy in there.  Unfortunately there’s not much drainage in this spot so I’m planning to till up the ground and add in some gravel or sand to help with that for future seasons.

Last summer I added the cinder blocks along the edge of the yard as planters.  The canvas curtains I made to keep the cluckers from demolishing the plants didn’t work as well as I hoped, so I’ve tossed them and will be getting some clear acrylic panels that can slide into the space between the blocks and the metal fence panels.

That will keep the sight lines open for both the chickens and the dogs, but they can be easily removed when I want to give the cluckers access to the greens I’ll be growing in the blocks for them.  I gave up on having flowers here and late last season planted grass seed in the blocks along the side of the yard instead.  I’ll plant lavender and mint along the front blocks since those are more protected by the hen house wall.  Hopefully those aromas will help keep things smelling fresh on this side of the yard and provide herbs to freshen their bedding too.

I’d like to make some kind of hanging pocket planters for each of the posts down the side of the yard where I could have some trailing flowers.  The cluckers won’t be able to get to the plants that high up and it would help make things a little prettier.  I’m also thinking about making some kind of hanging planter for the wall at the back of the run since it’s a big open space there.

Of course the big to-do with the chicken yard is installing a gravel walkway from the deck steps to the coop and then over to the gate on the side of the house.  I’ve got lawn edging that we picked up last year that should be enough to do this distance, but I’ll have to wait for the ground to dry out so we can get the wheelbarrows of gravel back here.

Another functional improvement is to level out the area in front of the run’s door and add pavers in that corner to help with the mud that develops there.  Luckily I have pavers I picked up last season to get that project started as soon as the ground allows.

I also plan to do a few simple updates like adding a tire under the hen house with sand for the cluckers to use for dirt baths.  That should keep them from making holes in their yard for that purpose.  I’ll add a few stumps in the yard and some branches across the back corner for them to roost on and have a spot to get up a bit higher and see the surrounding area.  I’d like to dress up the storage cabinet and side of the hen house a bit with some trim to give it a more finished farmhouse style look and am considering adding metal to the cabinet roof so it matches the run and helps the cabinet last a bit longer.  And if I get time to get really fancy this might be the season I get a sign made for the coop!

I considered adding a compost area in the yard so the ladies can help break down the materials, but I can’t seem to find a plan that works in the space we have so I’m currently planning to have a compost tumbler behind the green house instead so it’s convenient to dump kitchen scraps the chickens won’t eat and their coop bedding.

I’m hoping to start some of these tasks this weekend if the weather continues to cooperate so stay tuned for an update post!

A New Roof for the Chicken Yard

6

Hi everyone!  I hope you had a wonderful Christmas.  Now that we’re through the big holiday I thought I’d catch you up on several projects that happened around the house in the past few months as we prepared for winter.  The first was replacing the netting over the chicken yard with something sturdier.  The netting had started to tear in several spots and had actually come loose from where it was attached to the wall of the house, leaving our flock vulnerable to attack from above.  The Hubs wanted something more permanent that would stand up to snow, so he found these metal fencing panels at a local fence company.

2

First he removed the old netting (note the large ball of it on the roost to the right in the photo above).  Then he cut the panels to fit the space and zip tied them together where there were seams.  He also used zip ties to secure the panels to the support beams of the run.

4

Over by the run door he had to get creative to make enough room for the door to open but still work against the laundry room window.  He decided to create an angled panel for this section and it works pretty well.

3

He had to trim down the hen house doors so they open underneath the support beam on the front of the run.  It’s so much nicer being able to open these doors all the way without worrying about the edges catching the netting overhead!

5

He also added a small metal flashing to act as a gutter along the roof of the run.  This keeps the large amount of water that comes off the run’s roof from flooding the chicken yard, which was a constant problem this summer.  Now it drains right over the blocks I placed around the yard.  This might be too much water for the plants in the blocks next summer, so I’ll have to watch it and decide if I need to set up a water barrel to collect the water and reuse it for the chickens or watering the garden.

1

We may eventually cover the panels with clear plastic roofing panels, like those used on greenhouses, to help reduce water pooling more but for now the upgrade is the perfect protection for our cluckers and blends in well with the panels we used for the sides of the yard.

snow

And it’s been holding up to the snow very well, even when it gets a bit thick.  Looks like another great job by the Hubs!  It’s a good thing he found me so he has reasons to use all those mad skills he’s got. 😉

Save

Purdy-ing Up the Chicken Yard

F-Full

Part of my plans for the yard this year included adding flowers around the new chicken yard.  I placed cinderblocks around both sides of the yard so I’d have a built in row of planting spots and picked up a couple flats of lobelia at the nursery just for this area.

1

Tequila stood chicken watch while I planted.  Things were looking so pretty that even the hubs commented on the new flowers and I was feeling pretty happy with the project.  That is until those fluffy cluckers attacked said flowers and had picked them down to the base before I finished planting the other side!  I quickly placed boards against the fence so the chickens couldn’t see or reach the plants anymore in a desperate attempt to save those that had been hacked.

2

But this was NOT the look I was going for.  The hodge podge of boards constantly got knocked over and landed on the plants themselves which was just as damaging as the chickens pecking them.  So what’s a chicken momma to do?

3

Well a crafty chicken momma makes protective curtains!  I dug out some thick sail cloth material I had in my fabric stash and cut it to size to fit between each of the posts.  A couple of simple slits along the top gave me a spot to use a zip tie to attach it to the panel and keep things taunt.

F-Full

It’s not the fanciest option, but it looks and works better than the piled high boards.  And it didn’t cost me a cent!

F-Tie

The curtains are just low enough that the chickens can still see out when standing on the ground and just high enough that Brinley can’t see in unless she stands on the blocks.  She can still see through the door so that’s become her new viewing spot, which keeps her out of the plants as well.

F-back2front

I did have to replace a few of the plants, but now things are looking pretty good.  I didn’t make a curtain for the small panel at the back, since those two blocks will hold grass that I’ll let grow just for the hens.  They are temporarily blocked with two small boards, but once they establish I’ll take them down periodically so they can enjoy fresh greens.

F-f2b

I also got the walkway along the chicken yard cleared of the rock piles that had been there (hint, those are being used for another project that I’ll share soon).  We’d like to put down pavers or some other permanent pathway from the deck to the gate, but that’s probably a project that will happen next season.  For now having a clear established walkway functions just fine.

I’m sure the chickens don’t appreciate my crafty genius solution, but that’s ok.  I plan to take the curtains down at the end of the season and let the cluckers have at the remains of the plants since they are annuals anyway.  Then I’ll wash the fabric and store it away for next year.

I’d love to hear what you think of my little project to pretty up this utilitarian space in our yard, so leave a comment below!

Save

Cluck Club Update

6

There are some new faces in our chicken coop!  We brought home four new hens after seeing an ad on Craigslist from someone who was moving and couldn’t take them.  The ad mentioned that they were already laying eggs so I contacted the poster to find out if they were social.  He responded via text with a photo of his young son holding one of the chickens.  He knew his children would be upset that the chickens were going to a new home but after I described our coop and setup he was sure that they would be happy with us, so we arranged for the hubs and I to stop by after work and pick them up before the weekend.

8

The new ladies have settled in quite well.  We kept them separated from the other chickens the first day and tried to introduce the two groups the next, but it was very clear that the two would not do well together so we found a new home for the previous flock with another local chicken family where they could be free range and happy.

5

We did keep Miss Biscuit who was at the bottom of the pecking order in the last flock as evidenced by her missing feathers and ruffled appearance.  It seems she holds the same position with her new coop mates but after a few squawks and flaps she knows her place and gives them space so everyone seems to be getting along well.  The dogs are loving their new siblings and often go stand at the fence just to watch them.

4

These new ladies are very social and friendly.  They come right up to us and stop and wait to be picked up when we come near them.  They were also in right in the middle of things as we did a little tweaking on the yard this weekend, checking out the ladder, hoping in and out of the hen house as we were working in it and inspecting every little detail.

7

I leveled out the piles of dirt left from the trenches the hubs dug when he installed the chicken yard, so now everything is mostly level and ready for the grass to grow back.  I pulled as much of the rock and gravel as I could out of the dirt while leveling so those piles will be added to the landscaping going in around the back deck.  I also added cinderblocks around the entire perimeter of the yard which will be planted with lobelia soon to attract potential prey for our flock, and just make things a little prettier.

1

The hubs added a few boards over the hen house doors to hold the netting up so it doesn’t catch on the tops of the doors when they open.  It’s not the prettiest setup but it works for now.

2

My favorite new chicken is Charlotte, an Easter Egger who has these fun fluffy feathers around her face and lays greenish blue eggs!  The hubs’ favorite is the black and white chicken, Fluffy.  We may change their names once we get to know their personalities more, which we’re doing quickly thanks to their willingness to be held and petted.

3

The change has brought a new color variety to our egg cartons too!  Biscuit continues to lay her speckled brown eggs, while the two black chickens, Split and Splat, lay dark brown eggs.  Fluffy lays a light brown egg which is actually a white egg with small brown spots when inspected closely, and of course Charlotte’s green egg.  Sure makes our old plain white eggs seem kinda boring!

EGGS

Next up for the coop is some touch up painting, tilling the yard and creating a fun sign for the fence while the hubs builds a new storage area for their food and treats.  Watch for future posts as those projects are completed!

The New Chicken Yard

Z

Today is the 3rd anniversary of the blog!  It’s amazing to think of how far we’ve come since this journey began, but I’m glad you’re here to share it.  To celebrate I’m sharing a big project that the hubs recently did, the new chicken yard!  Although their coop was pretty big we spoil our critters and wanted them to have lots of room to spread their wings and do their little chicky thing.  Plus happy chicks = constant egg production so we’re all about keeping these ladies happy.

1

To get things started the hubs rented this mini excavator to dig a trench around the perimeter of the space.  Although I’m practicing no-spend April he isn’t and since it was his idea and project it doesn’t impact my no-spend goal.  He did have costs for the equipment rental, posts and concrete but the main panels were freebies from Craigslist last fall and we had a gate building kit left over from installing the yard fence so he did save where he could.

2

The dogs were pretty interested in this new contraption and wanted to hop on for a ride.  When they realized that wasn’t going to happen they decided to hop into the side by side which was parked nearby with supplies in the back.  Apparently Stoli thought he was going to drive Tequila and his expression when I told him he couldn’t reach the pedals was priceless!

3CMDR

3CMDR2

Here’s how things looked once the trenches were dug.  Like with any project it always looks worse before it looks better.  The chickens were pretty interested in what was going on and watched from inside the coop run, hoping we’d let them out to investigate.

3

4

Next came installing the posts and panels.  The hubs cut a groove in the sides of each post so the panels would nest in the groove for added stability.  I felt bad that I wasn’t able to help much with the install due to photography sessions but I will say he did an amazing job for putting this together almost 100% on his own.

5

Above is what things looked like when I left for sessions and below is what I saw when I got home that evening!  All of the posts and panels were installed and concreted in which makes the entire thing SUPER sturdy and predator proof.

Concrete

Concrete2

A few days later I helped install this thin bird netting over the top so that eagles and owls can’t attack from above.

Net

And here’s the finished project with the gate installed.  I’ve started lining both sides of the yard with cinderblocks, which I’ll plant with simple flowers to make things pretty and attract flying insects the chicks might enjoy catching.  It will also help keep the digs a foot back from the fence when they come to visit, which I’m sure the chicks appreciate.

Z

Now that they have more space I moved their outdoor roost and dirt bath tub from the run out into the yard. The hubs also plans to build a new storage area for the chicken supplies to replace the plastic one we currently have and I’m planning a few aesthetic improvements such as a coop sign, pavers next to the coop door and planting a rose bush to help keep the area smelling pretty too.

I don’t think the chicks will notice most of those things but I’ll appreciate them. They are just happy to have more freedom and room to run around but they are still creatures of habit and all gather back in the hen house each evening to roost, which makes this momma happy. 🙂

A Cluck Club Update

1

Happy New Year!  I hope you had a fun and safe celebration.  Here at the DB&DT house we welcomed two new members to the cluck club on New Year’s day.  Although we started with 4 chickens we lost one when some of them decided to jump the fence of the expanded yard off their run back in the fall.  We’re not sure exactly what happened, but believe the younger dogs saw them out and attempted to ‘play’ with them which led to one chicken having a heart attack as there were no obvious wounds or blood when she was discovered.

Since then the three remaining hens have been kept in their contained run and have been doing well, even with the below 0* temps we had for a stint.   Since there was room for a few more we decided to add two.  Luckily the same friend we got the original group from was still downsizing his flock so we didn’t have to worry about bringing in hens from a different batch.

6

The new ladies are settling in and learning the routine of our roost pretty quickly. We give them scraps to scratch and peck through every evening so the original group come running when we open the door, but the newer hens weren’t too sure about coming down the ramp with us and the dogs around.

3

Eventually they figured it out and joined in the exploring for special treats.  We’ve named them Chicken Patty and Chicken Dumpling, continuing our “chicken foods” theme.

2

Patty is the black hen looking up in the center of the picture above and dumpling is the mostly white hen also looking over her flock mate’s fluffy rear.  Everyone seems to get along, but I’m sure there was some adjustment in the pecking order when we weren’t looking.

4

Since our original group started laying we’ve been getting eggs about every other day.  Some are white and some are brown, but they’ve all been tasty.  One day I discovered this massive egg in the nest box!  It was twice the size of the eggs we had been getting and had a wavy shell.

Egg2

It was so big that we couldn’t even close the egg carton!  The two eggs in the foreground are store bought, the slightly smaller one on the right in the background is the egg that is seen next to the giant above.  Although both the hubs and I have raised chickens before, neither of us had ever seen anything like it before.

Egg

Eventually we did crack it open just to see what the heck was going on with this monster egg.  Inside we found a second egg, shell and all!  We asked our vet about it and she explained that this can happen when an egg forms but the hen doesn’t lay the egg and a second egg forms around the first egg!

Egg3
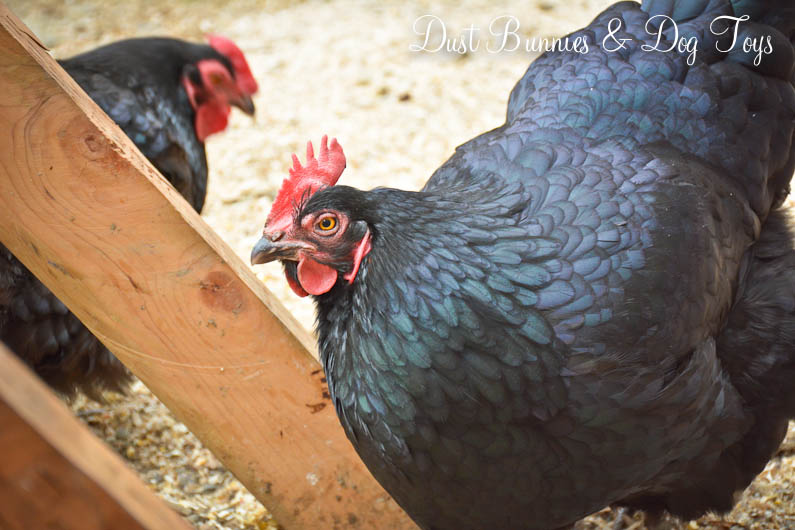
Apparently our hens are super fertile because in addition to this unique egg, most of theirs have also been double yokes.  We don’t plan to increase the flock via hatching (hence no rooster), so as long as that fertility means they continue to produce eggs regularly we’re happy.  But I’m curious if any other backyard flock owners have had similar discoveries.  I’d love to hear about them if you have!

The Cluck Club

Chicks2

Over the holiday weekend we added some new members to our family!  Welcome (from back to front) Biscuit, Nugget, Fil-a and Curry.  And they have some fancy new digs courtesy of the hubs handi-man skills!  Here’s a quick photo tutorial of how it went together.

1

He started with two side panels of framed wire, to form the main area which serves as a run for the chickens to move around in.  He added more framing for what would become the hen house floor at the rear of the coop.

2   3

Next he added sides to the hen house, followed by foam insulation.  He also extended the floor of the hen house past the framing to make an area for nesting boxes.

4After insulation was added to the floor, the nesting boxes starting to take shape at the back of the hen house.

5

Then he added dividers to make three separate boxes so the ladies have a bit of privacy when laying.

6

Next he added a roof to the nesting boxes that can be lifted for collecting eggs.

9This puppy is well insulated so the chickens will stay nice and warm when the weather dips below 0 during the winter.  With insulation foam sandwiched between layers of wood on all of the walls and floor it should be pretty cozy.

7

And if you’re wondering if it’s sturdy, Stoli and his 70 some pounds of muscle can guarantee that it is!

10

Once the main parts of the walls were in, he added the roof panels.

12

13And from the side it was really starting to look like a coop!  If you notice, we moved the coop forward a bit so there’s more room at the back because the clean out access for our septic line is right next to the house and should we ever need to use it we wanted some room to work.

11

At my request, he added a covering of linoleum material on the entire hen house floor to make cleaning the coop out easier.

8And here’s the finished project – after several weeks of work!  Unfortunately, it rained here for most of the holiday weekend so I wasn’t able to paint it before we brought the chickens home, but once the weather improves for a few days all of the wood will get a coat of bright white, which should give it a true farm house feel!

FinishedCoop

The nesting box roof got a metal covering to match the rest of the coop and keep the elements at bay.

NestBoxCover

You can see most of the inside of the hen house when the small roof is lifted – a feature I’m sure I’ll appreciate immensely when checking on them during the winter.

NestBoxViewIn addition to the nesting boxes, the hubs installed an inside roost for the hens to use when the weather gets colder.

FinishedNestBoxesThe two side doors open wide to give full access to the inside of the hen house which has a light to provide both warmth and stimulation to continue laying throughout our dark winter.

FinishedHenHouseHe also installed a feeder made of PVC pipe and a water bottle with a nipple at the bottom so both stay as clean as possible with minimal waste.

FeederNWaterI’d never used poultry water nipples before, but they operate on the same mechanics as a rabbit water bottle and the chickens had some at their previous home so they already know how to use them.

FinishedWaterA ramp to access the hen house from the run and a large branch for an outdoor roost made it chicken ready.

RunEveryone was very excited to meet the chickens.  Even Luna came out to welcome them, although she stayed out of the dogs way by perching herself on the nearby ladder.  To give the chickens some breathing room from their four-legged siblings we fenced off the main part of the coop with some large metal grates we got for free on Craigslist a while back.  We’ll leave these up for a while until everyone is used to each other.  Until then they are under almost constant surveillance, but they don’t seem to mind too much.

ChickenWatchers   ChicksWatchFinalEventually I’ll add pea gravel around the coop so it doesn’t get super muddy, but for now we’re just happy to have the coop mostly finished (sans painting) and chickens inside it.

ChicksAlthough they aren’t free range like they were at their last home, I have been giving them yard cuttings and table scraps to dig through which they seem to enjoy.  And we all enjoy watching them settle into their new home. 🙂