Repurposed Bin Planters

Today I’m sharing another couple of planters I mentioned in my recap post.  These cuties were made from old conveyor belt scoops that I got from Alaska Picker.  The first I snagged at the AK Picker Day sale – right after finding the garage sale milk can.  I hunted high and low for more of them but someone else had beat me to them.  So when I spotted another at the Alaska Chicks Vintage sale I immediately claimed one.

The first still had a section of conveyor belt attached, but the second was mounted to a piece of old barn wood.  I wanted them both to match so I had the Hubs remove both the belt and board so I could mount them on new boards.

The Hubs cut me two pieces of wood from some scrap we had from another project and I dug out my outdoor teal paint to give them a couple coats.  A little distressing around the edges gave them the perfect rustic look.  The Hubs attached the bins to the new boards and I had this cuteness!

I wasn’t sure where I was going to use them at first but when I came out and saw the big open area on the chicken coop expansion I knew they’d look great there.  After I painted the coop the Hubs drilled some drainage holes in the bottom of the bins and put them up with a couple of screws. I filled them with purple alyssum to finish them off.

I absolutely adore how they turned out.  The combo of teal, rusty metal and purple flowers makes my heart do a happy dance.  And it’s perfect for decorating a chicken coop – not to fussy but not to messy either.

I still have a little painting to do on the lower part of coop and the Hubs plans to finish off the storage area door with siding to match the rest of the coop.  I’ll share more about the expansion and new set up once it’s all done.  We also plan to fill the area in front of the coop with pavers and pea gravel to finish everything off.

Of course neither the chickens nor the dogs – or the cats for that matter – care about any of that.  They just like having a window where they can see each other face to face.  But this doggie/chicken/kitty momma is happy to have a pretty space for them all.
New DIY Shelves for Crafting Storage

This project had been bouncing around in my head for quite some time, so when the Hubs was in the mood for a project I decided it was the perfect opportunity to direct his motivation to this update.  I’d previously had a ladder shelf in this spot holding all my crafting projects, but it wasn’t super sturdy and it didn’t really fit my style so I wanted to replace it with an industrial style rolling bookcase.  I showed the Hubs this and this style to give him an idea of what I wanted and we talked through the pros and cons of the two.  He took a few measurements and within two days I had this beauty.

I forgot to get a picture of it as bare wood, but I’m sure you can imagine it.  This is what it looked like with two coats of the same grey stain I used on the barn wood frames he made me. He spray painted the metal corner brackets he’d picked up for the project and added those to complete the look.  And here it is all filled and in use!

With the new shelves done I was finally ready to hang the “create” art I got forever ago.  It looks great with the shelves and coordinates with the dark bed frame and baskets.  Now that it’s up I’ll have to share the story behind it soon.

My often used paints and stains found a home on the top shelf for easy access.  I reused the baskets I already had and filled in the extra spot with a gym basket I already had as well.

I’m still debating painting the screw  heads on the corner brackets, so I’ll live with it for a while and if it bothers me in a few weeks I’ll make them match.  The Hubs also got wooden dowels to make faux steel rods along the back of the shelves like the inspiration pieces had, but we haven’t added them yet.  I really liked that detail, but because I’m using baskets rather than styling it with decor they wouldn’t be super noticeable, so it may not be worth doing.  I’ll decide on that eventually. 🙂

This whole area has seen several updates since we moved in 4 years ago including revamping the shelvespainting the cart knobs, adding the craft paper rollmoving the day bed out to this space and adding the DIY frame.  I’m loving how it’s all looking together.  And how it compliments the wall-to-wall desk on the other side of the room, which has also seen several updates since this post.  I’ll have to share that soon!

If you’re looking for more tutorials for these style of shelves, check here, here, here, here and here.  It’s a popular style so there are many variations available out there.  I hope yours turns out great!

Adding Function to the Laundry Room

Today I’m sharing a quick addition I made to the laundry room.  Now that we’ve got the counter top finished and the sink operational I found that we needed a spot for a hand towel to dry your hands.  I’d been eyeing this vintage industrial style shelf and towel bar for a while so when I spotted it for a good price I ordered it quickly, figuring it would either work in here or the guest bathroom.  Due to shipping costs I had to have it sent to my Mother-in-Law’s house and wait to pick it up until our trip earlier this summer.

This spot has had several variations since we moved in.  First I had some DIY decor here, then there was a rustic laundry sign, but I decided to sell that and have a different one made for the wall above the board and batten on the other side of the room where the tobacco baskets are currently.  Those will move to the guest room above the new headboard.  I plan on making that change this winter, when there’s not so much going on in the yard.

The metal look ties in perfectly with the DIY drying rack the Hubs built me above the window.  I styled it with one of my faux succulent planters and a blue mason jar that I’ll be filling with vintage clothespins.  I may add a few other little things, but will let those “find” me in the coming months.  You can’t tell from this angle but the bottom of the shelf is an open style wire so whatever I use on it will have to be big enough that it does’t fall through.

As you can see from the winkles in the towel, it’s been getting plenty of use and it’s just the right size for the wall without blocking my DIY soap pump in the corner.  One more project done, and you know functional decor is my favorite kind! 🙂

It’s Curtains for the Foster Room

Before we left for Hawaii, we checked one final project off the list – installing a curtain rod in the Foster Room.  You may remember these green curtains from our Master some time ago, but when we replaced them with something new (seen in the background here) I stashed these away thinking they might somewhere else.  Looks like I was right.  To be honest they aren’t really curtains – they are actually table cloths, as are the new curtains in our room.  I prefer to use table cloths because they are less expensive, typically dirt & moisture resistant and come in long lengths to fit our high ceilings.  Plus they are washer friendly so I can take them down and run them on the sanitary cycle to help combat my severe allergies.

RoomFull

The curtain rod is more industrial pipe just like what we used on the bed and other projects such as this, this and this.   We’ve found that this is best option for window treatments in our house since the dogs and cat like to play in the fabric occasionally and kept ripping the screw mounted brackets of traditional curtain rods out of the wall.

Curtains

The hubs put the pipe pieces together with a 90* elbow on each end to give a bit of depth and made sure to put the curtain rings on before mounting – that’s a key step in this style of rod since it’s more permanent.  Luckily the ring clips add a little extra length to the overall effect and making taking the curtain down or switching them out super easy.  Here’s a closer view of the pipe and ring clips.

CurtainsClose

Now we just need to install a closet system and finish up this side of the room.  I’m on the hunt for a small dresser for the left side of the bed since the side table I picked up and revamped isn’t working out the way I planned it.  I’ll share that project soon as well.  The closet is next to that space on the right of the bed where the stools currently are.  I’m planning a fold down desk in that spot, which can also be a chalkboard!  Someone gave us a second twin mattress for the trundle under the industrial cart bed, which was a little thicker than we planned for so we’ll have to adapt the trundle frame to fit a bit more clearance.

Bed

The fabric you see at the bottom is the thin blanket currently protecting the sheets from the bed frame.  Although it works, the color isn’t right for this space so I’ll swap it out for something else when it’s all finished.  I think we already have a blanket that will work, but I’ve got to test it out before I commit it to this purpose.  Luckily having a blanket on the trundle eliminates the need for a bed skirt so it serves two purposes, and you know how much I love things that pull double duty!  The two standard pillows against the wall work for the main bed and trundle while the king pillow in front is an extra in case there are friends who stay over with a sleeping bag.  I plan to let the children who stay with us pick out throw pillows to add to the bed so they can show off their personality and interests a bit, then have something they can take with them when they leave our home.

I’m loving how this room is coming together and the fun industrial vibe it’s developing.  I’m hoping to have it wrapped up in the next month so we can start the final preparations to become foster parents.  It’s going to be a big change but I’m sure it will also bring big rewards for both us and those who’s lives we’re about to be a part of.

Storage in the Foster Room

CratesFront

As promised, today I’m sharing what’s underneath the art display boards in the Foster Room that I showed you yesterday.  I created a fun storage cubby system with simple wooden crates which can hold books and toys.  I got the idea from one of my favorite blogs and originally planned to mount the crates on the wall like she did, but wanted the option to use them occasionally as props for photo sessions occasionally so instead I opted to just stack them on the floor.

Crates

I was a little worried that the baseboard would make the bottom row stick out more than the top row and leaving a small gap behind the crates would make them unsteady which could be a safety issue around children but when I set them up they felt pretty sturdy. I figured only going two rows high keeps things at kiddo level so there’s no need to reach or lean on them and keeps the center of gravity on he whole group low so I’m not worried about it.

Wall

It coordinates with the art display boards well and is just as flexible since we can change up what’s in each cubby to fit each child’s interests.  There is also a digital frame in the lower left crate where we can load pictures of things that they like, which should be a fun project to do together when they arrive to get to know them and serve a dual purpose as a nightlight.   The wide openings are perfect for storing books and the toys I’ve started collecting such as the adorable elephant a co-worker knitted and one I found on Etsy years ago.

CratesPhants

I also ordered this peg doll set which should be interesting for a wide range of ages.  Since we don’t know who will be placed with us I got both the boy and girl sets which can be played with separately or paired up.  The cute purple crab in the back is something from my days working at the YMCA that I’ve kept.  I thought it was something fun a child might like and since it’s made of Styrofoam it shouldn’t be dangerous for them to play with.

CratesPeg

Next to the crates I put some mega blocks in a basket for easy access and clean-up.  I found a large bag of them on the local buy/sell page for a few dollars and likes that they are larger so they won’t be a choking hazard for smaller children.  Next to that is a bean bag I used to use for newborn sessions before I got my professional poser pillow.  I think it makes a fun little reading spot right next to the book storage.

WallFull

Since I bought the crates on sale and with coupons good for a percentage off a single item, gathering enough to make the cubbies required several trips to Michaels but it was worth the savings – especially since I go there often for my day job and can make a separate personal purchase while there! I used stain I had left over from the Moose Mount Board in the guest room for both the display boards and the crates so that was an additional savings.  Next up are the window treatments, which I’ll share tomorrow!

Craft Paper Roll Holder

4

Although it’s been quiet here on the blog it’s been crazy busy around our house recently.  I’ve got multiple events going on at work, we’re preparing for the holidays, everyone wants family photos for their holiday cards and I’ve been crafting up inventory for a holiday bazaar this weekend.  I’ll be sharing some of those projects once I have time to take photos and do some writing, but in the meantime I wanted to share a little project the hubs did for me recently.  I keep a roll of craft paper around for projects and wrapping, so I wanted an efficient way to store it yet have it at the ready when needed.

6

The solution was a simple metal bar mounted just above the craft cart which can hold the roll. It consists of a flange, a short piece of pipe, a 90 degree elbow, a length of pipe and a finishing cap. The hubs put it all together and located a stud to secure it to so it’s super sturdy.  Although I’d envisioned it positioned in the center of the cart, having it off to one side actually works because it provides a spot for my task light.

5

Since the end is open it’s easy to slide the roll on and off if I need to use it elsewhere or refill it.  The industrial pipe ties in with the open shelving above the desk on the other side of the room and wasn’t too expensive to put together, which makes me like it even more.  And it will come in very handy when I start wrapping Christmas presents soon! 🙂

DIY Industrial Vintage Laundry Dry Rack

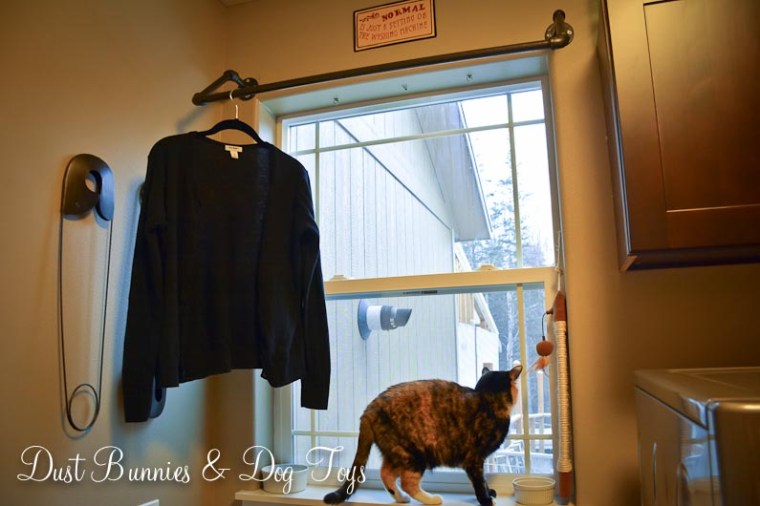
2Today I’m sharing another industrial pipe project the hubs recently did for me – a dry rack in the laundry room.  I often have sweaters and tops that need to be dried flat, but since I don’t have a space to do that I usually hang those items on a folding dry rack over a vent in the adjacent dining room.  Unfortunately the hubs like his jeans to air dry and are often occupying the folding rack when I need to dry sweaters so my solution was a permanent rack in the laundry room over the sink.

1I originally asked for a bar straight across but the hubs determined that in order to get the best stability we’d have to place the bar higher than I originally thought so he created a small drop down in the design to compensate for the higher spot.  Luckily, I’m pretty tall and can reach the hanger up to catch the rod with the hook easily, so the height is no problem for me.

3

As you can see I’ve already put it to good use. It does infringe on Luna’s eating space a bit, but I think she secretly likes hiding behind the clothes when the rack has several items on it and as long as she can see out the window she’s a happy camper and I’m happy to have a space that functions and looks awesome. Thanks honey! 🙂

Shared on Knick of Time’s Vintage Inspiration Party!

Rustic Humble Sign

4

I spotted this large sign at an estate sale we attended this summer and immediately wanted it.  Unfortunately, the auction was done “by the pallet” and it was the only thing on the pallet I wanted so when the price went up I bowed out.  When I spotted the winning bidder sorting through the rest of the pile I figured it was worth a shot to ask if they wanted the sign and if they would be willing to sell me just that item.  He replied with “$20 and it’s yours.”  Needless to say I quickly dished out a $20 and practically skipped away with my sign.

Once I sat down with it I realized it wasn’t a true antique.  Instead it was a paper print on a metal base and because the auctioneers had taped across it to secure it on the top of the pallet the original buyer had realized that the tape was ripping the paper decal as you tried to take it off.  I was pretty bummed but decided to give it a shot.  I slowly worked the tape off so it wouldn’t damage any more of the decal and was able to get the entire strip off without further damage.

Once I got it home I Modge Podged the ripped section, which left a thin white line on either side of the tear.  To disguise that I took some wood stain and applied it lightly to the area wiping it off quickly.  A few coats made it blend right in.    You can still spot it if you look for it, but otherwise you’d never notice.  I decided to hang it in what will become our Foster Child room above the closet.  Being up high helps hide the blemish and I thought it was a great sentiment for a child’s room.

5

I’ve got some other exciting revamp/DIY plans for getting this room set up. We need the room to be gender neutral, so I’m going with an industrial/vintage style that can be personalized a bit for whoever comes to stay with us. I’ll be sharing those details over the next few weeks, so stay tuned!

Shared on Knick of Time’s Vintage Inspiration Party #209!

A Simple Change

4

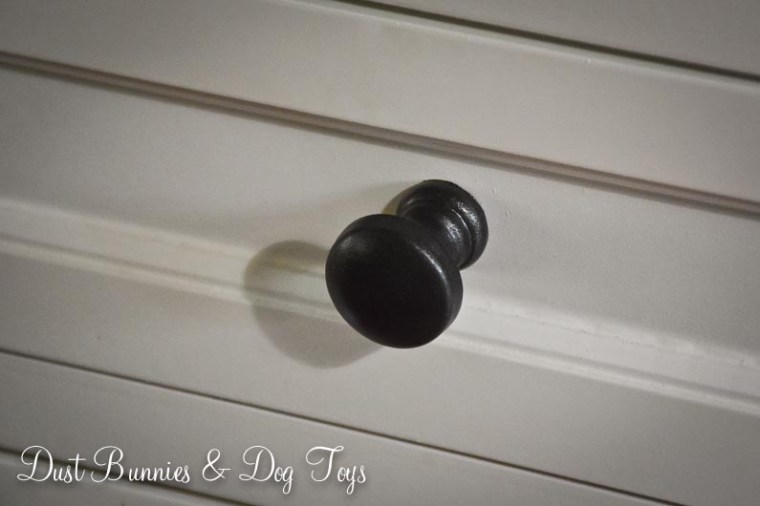
Ever since we finished our farmhouse desk and industrial shelves in the office I noticed that my craft cart wasn’t quite coordinating with the new look so I decided to switch out the knobs for something more vintage or industrial.  I searched online for a while and found some really cool options like these railroad spike heads and these numbered numbered pulls, but the $8-9 a knob price tags were a bit more than I wanted to spend on this project.  So I did what any bargainista would do – I used spray paint!

1

A few quick coats of my trusty ORB spray paint and I had some industrialesque knobs for FREE!  It made quite a difference when I reinstalled them.

2

They add a bit of dimension to the piece now, where before it felt kind of flat.  It makes me fall in love with this great piece of furniture all over again.

CraftDeskB&A

I’m considering tweaking a few other things in this corner to work a bit better and add a bit more industrial style but I’m enjoying how well it coordinates with the rest of the room now – and didn’t cost a dime!

Finished

Linked to The Scoop @ Cedar Hill Farmhouse, The Everyday Home, Confessions of a Plate Addict, and White Lace Cottage.