DIY Measuring Cup Storage

Hooks5

I’ve been meaning to do this project for some time now and finally checked it off the list this past weekend while the hubs was sleeping of a cold and I needed something quiet to work on.  Our stacked measuring cups always seemed to be in the way in the cabinet, so I decided it was time they found a different home, one that didn’t cause extra effort when grabbing things in the cabinet.  Since there was a little extra room on both sides of the spice rack the hubs installed on the pantry door and that’s often what we’re measuring with these cups I figured that was a logical spot for them.  A few small hooks on either side of the spice rack was all I needed.Hooks1

The hooks screwed right in, although I did create a pilot hole with a finishing nail and hammer to get things started. I placed each cup as I went so I could eyeball how much space to leave between it and the next.Hooks2

Here’s how the first side looked a few minutes later.  All but one of the set fit on this side.

Hooks3

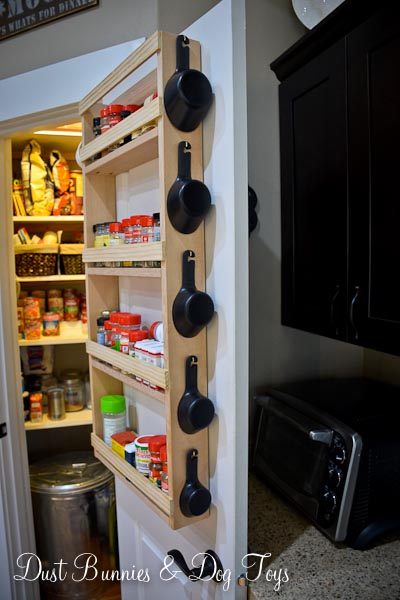
So I put the remaining cup on the other side with our odd duck extra from an old set that is handy to keep around.

Hooks4

Unfortunately the way they were hanging you couldn’t see the measurements with out taking them off the hook.  A metallic sharpie marker took care of that problem.  We’ll see how well it holds up to the washer, but I’m thinking it should be ok since they will have plenty of time to cure and dry before they go in for a spin.

Hooks6

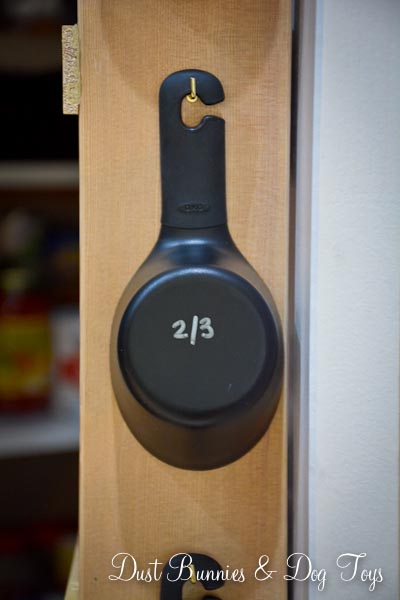
It might take a bit to get used to the sound they make as they sway against the wood when you open and close the pantry door, but I’m fine with that when it comes with improved organization.  Simple, inexpensive and efficient.  That’s my kind of project!

Shared on Tatertots & Jello’s Link Party Palooza.

Advertisement

Finishing Touches in the Pantry

Thanks to a great BOGO Free sale and gift cards from Christmas I recently finished up the pantry.  Because I wanted to add some more baskets now that we had more room, I decided to replace the ones we’d been using since we were in Kodiak – which will be repurposed in the studio and the spare room.

5

I also picked up some tiered racks for things like olive oil, bbq sauce, etc, and added a lazy susan next to it for the spices that didn’t make it into the spice rack.

7

6

Additional turntables in the remaining corners created accessible storage for drink ingredients, sauces and jellys.

8

9

10

The hubs made use of the wall space next to the door by hanging the cooling racks and fryer scoop.

12

Just like he did in the guest bathroom closet, the hubs added an additional light to the pantry for those items that are on the lower shelves.

11

Up above there is room for the rotisserie, a basket with spare grease cans, the hubs’ cast iron pan, paper towels and a basket for storing plastic bags.  I went back to get that big basket after the BOGO sale, and ended up getting a super deal because it rung up on clearance for much less than what I anticipated paying with my 40% off coupon!

14

The bottom of the pantry became home to the dog food and recycle containers, with room left over to store my soda habit.

13

My final pantry project was the jars for our sugar, flour and other staples (seen in the picture above).  It was a fairly simple project.  I picked up several of these screw top jars on sale at Fred Meyers.

1

I put them right to use and had to come up with a quick temporary labeling system until I had time to make something pretty.  So I grabbed my trusty dry erase marker and hand wrote each item.  That of course didn’t last long.

2

Based on that, I knew I didn’t want to do the cute chalkboard labels I see all over Pinterest.  Instead I decided to create vinyl labels for each with my Silhouette.

3

They turned out pretty nice!  I love that they are easy to read and should hold up to repeated use.  Plus they look pretty spiffy all together on the shelf.

4

And that’s our pantry.  It’s the perfect marriage of organization and inventory, which not only makes me giddy, but keeps the happy as well.  I think that’s a sign of a project well done. 🙂


Gettin’ Spicy!

As a hobbiest chef, my husband has LOTS of spices.  We’re talking more than the tiny spinning thing on the counter can hold.  In our old rental, he filled the cabinet above the stove and even had some rows double stacked!

So I knew that our new kitchen needed to have some way to organize this stash of spiciness and of course turned to trusty Pinterest, where I found this DIY pantry door spice rack.  I then promptly had a Gru ‘light bulb’ moment.  I showed it to the hubs, who was definitely game to build something that not only put his spices within easy reach of the stove, but also gave them a dedicated space to stay.

1

Please just ignore that tool pile on the counter behind the door.  With all the on-going projects I’ve lined up for the hubs, I have set aside my twitchy OCD ways and agreed to keep tools in the kitchen for quick access – that is UNTIL the major projects are done, which should be fairly soon!

He followed the building plans with a slight modification.  He used freebie paint stir sticks from the orange box store instead of dowels for the front retaining rungs.  Told ya, he was smart! And he’s becoming quite the thrifty DIYer.. of course not counting the tools he’s recently acquired.  😉

2

I will probably paint it white at some point, but for the time being it works just fine a’ natural.  Now if only our measuring spoons had cutesy little holes to be hung on the side!  Mental note: be on the lookout for clearance heart measuring spoon sets after Valentines Day.

It’s Pantry Time!

The pantry was the second project on our to-do list upon moving in.  It’s kind of necessary to have a space to store all your food before you can get the rest of the kitchen in order.

Although I had planned out the Master closet in detail, I hadn’t fully worked out the plan for the pantry, so the hubs and I sat down and thought about the types of food we’d be storing and how tall certain containers typically are.  That helped determine the height needed for each shelf and then we just fit as many shelves as possible in the space we had.

The materials were fairly simple: prefab melamine boards and 1x2s.  The hubs used the 1×2’s as cleats along the side and back walls, then cut the boards to size and placed them on top.

Pantry1

Pantry2

Pantry3

He secured each with screws into the cleats and then used his new Kreg Jig tool to join the two boards together where they met. There was a bit of trial and error, but overall it turned out pretty darn well.

Pantry4

The pantry also doubles as our recycling station, with containers for paper, plastic and cans on the floor along the back wall.

PantryRecycle

Because I’m a soda fiend, I knew I needed a can crusher or I’d be emptying that bin every week.  We found this one for just $10.

PantryCanCrusherBox

The hubs mounted it on the wall inside the pantry, just above the trash can that holds the cans.  It works really well, but we’ve discovered that if you dent the can just a bit it relieves a great deal of pressure, thus requiring less effort to completely crush the can.  The dogs are still not fond of this strange new noise making device, but I’m loving the efficiency of it.

PantryCanCrusher

We also purchased a large galvanized trash can to hold the dog food so we didn’t have to squat down to scoop it out every time anymore.  Now we just lean!  This was the last can the store had and we got it for $5 off because of the dent in the lid, which when you put it on the right way is in the back under the shelf and not even noticeable anyway!

PantryDogFoodDent

PantryDogFood

There was still room left over once I loaded everything in!  Guess we’ll have to do some bulk shopping soon and put it to use!  I still have some organizing to finish up in here and want to get some bins to hold onions and potatoes, but overall it’s done and functioning well, so we’re calling it finished for now.

PantryFinished