 So apparently tomorrow turned into a week – but that’s how life happens around here. Soon the projects that are pulling my attention in 200 directions will be complete and I can refocus on celebrating the holidays.
Ironically, I was feeling about the same way when we took our quick trip to Denali several weeks back. Too much going on and not enough hours to get it done, but in desperate need of a break to recharge. Fortunately winning the Denali Road Lottery gave us just that opportunity. If you haven’t heard about the lottery here’s a quick recap – the general public pay to enter the lottery for a chance to purchase a day-long permit on one of four selected dates. You can get the full details on the program here. Both the Hubs and I entered this year and I won for a date in late September. In that area of Alaska, September could still be fall but often, it’s the beginning of winter weather so we knew we could experience either.
The scenery was definitely fallish on the way to Denali from the Mat-Su valley. The views reminded me of Colorado, but on a much grander scale.

 We went up the day before our permit so we could make the most of the trip. We stayed at the McKinley Chalet just outside of Denali. As we entered the lobby to check in I spotted this statue of Balto the famous sled dog from the Iditarod.
 Once we were checked in and had dropped our stuff off at the room, we made our way over to the welcome center at the park to purchase our permit pass for the next day. While standing in line I heard someone call my name and turned around to see a lady who had retired from the company I work for in line behind me. We’ve run into each other on adventures like this a few times since she’s retired, so we had a good chuckle over it.
I had been to the welcome center once before but hadn’t had time to wander and explore, so I enjoyed checking out the many displays they had, including this large exhibit that had lots of information about the wildlife and local ecosystem.
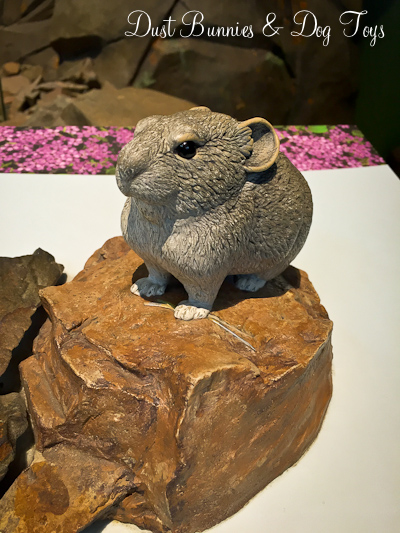
 Of course we had to take a selfie with the giant moose, since you can’t do that in real life! Other interesting animals were the adult and baby mountain goats, marmot and pika, which I’d never heard of before.


 This display of the different types of volcanic rock in the park reminded me of similar exhibits we saw in Hawaii.
 It was nice to see the local plants on display since most of them were now gone for the season outside.

 Other displays explained how researchers track the movements of predatory birds in the region and monitor the fault lines that formed the landscapes surrounding the park.

 We headed back to the hotel to get dinner and enjoyed the view from the dining room as we leisurely ate and chatted about the sights.
 After our bellies were full we wandered out to the lookout on hotel property where a vintage tour vehicle was on display. It was nice to see the time and effort the preservation groups had put into rescuing a piece of the park’s history so future generations could appreciate it.


 Next, we hit the tourist shops where we tried out several crazy items like this mountain man hat that hid half the Hubs face when he tried to photo bomb me!
 There were also plenty of Alaskan puns on everything from T-Shirts to wall decor. Here were a few of our favorites.


 After we had our fill of shopping we went back to the hotel where we decided to spend the rest of the evening at the new Denali square. We browsed the artist gallery and the small shops around the amphitheater before snagging a spot at one of the many fire pit tables with a view of the mountains.
 We sat enjoying the crisp air and the view as sunset faded. Eventually we ordered a few drinks and some very yummy beignts with caramel sauce as dessert to our earlier dinner. In fact they were so good, we had to order a second round!

 We stayed well after dark to chat with a group of tourists from the east coast of the US who joined our table. We had lots of laughs as we shared the difference between real life in Alaska and what they see on TV.
The next morning we met up with friends we’d invited to join us on the road lottery and had breakfast together at the hotel before heading into the park. Not far past the welcome center we spotted this big guy in the brush.
 As did several other park visitors. He was apparently quite used to this chaos and wandered across the road right between the groups of cars before heading on out into the next field.

 A little further up the road we spotted a flock of ptarmigan who were already switching to their winter camouflage, which made them stand out against the colorful vegetation.
 Soon the snow that had been forecasted made it’s appearance with a dusting over the low brush. While not the look we were hoping to see, it was pretty in it’s own right.
 Now that there was snow on the ground we spotted these tracks on a hillside and all pondered what animal might have made them.
 We soon discovered the answer and watched as this ptarmigan darted up the hillside.
 It paused at the ridge to look back and before we knew it one had become many!


 The weather made wildlife sighting quite difficult so we continued on to the Eielson Visitor center where there were several antler displays around the building. The first was a caribou set that would have overlooked the view of Denali if it had been a clear day. The most impressive was the two bull moose antlers that were locked together after their rutting battle led to them getting tangled. Unable to pull free of each other, the encounter eventually led to both o their deaths.


 The weather was cold and wet so we turned around to head back toward the park entrance. Along the way we spotted a group of moose we’d seen on the way in and decided to sit for a bit to see if they’d come any closer. All we could see of the bull was the very tips of his paddles above the brush, just visible through the misty snow.
 The cow on the other side of the same knoll was easier to spot. She was very aware of the bull’s proximity and was keeping a close eye on her two yearling calves nearby.
 Eventually the bull decided to come out of hiding and show off his enormous rack. The distance made his size a bit deceiving, but as the men in our vehicle noted very vocally you could sit a full grown man in his paddles and still have room to stretch!

 We left the moose to woo his cow and headed down the road were we spotted a bear crossing the road in front of several cars on the hillside above us. By the time we got to the same spot he was more interested in foraging in the brush, so all we could see was the top of his back.
 We came back through the lottery check point and were amazed at the difference in climate from one area to the other as we looked back across the landscape at this pull off.
 There were several more wildlife sightings before we left the park including this strutting male grouse who caused another slowdown in traffic and a small herd of caribou, including a few who had radio transmitters like the ones described in the exhibit at the welcome center.

 A bit further, we encountered a massive traffic jam which meant there had to be something big nearby that was causing everyone to stop on the road. I hopped out to investigate while the Hubs navigated the congestion. A few steps from the truck I spotted antlers in the brush. At first I thought they were a shed from a bull last season, but then I saw them move and realized they were still very much attached.
 I rounded the bend to see this cow standing nearby and a few more steps brought the bull into full view.

 He was absolutely stunning there in the colorful grasses. He didn’t seem to interested in his crowd of admirers and neither did his female companion. So when the Hubs had finished making his way through the congestion I bid them farewell and hopped back into the truck.
 We headed back to the hotel so our friends could pick up their vehicle and head home for a final exam the next day. While we were in the parking lot with them we noticed just how dirty the truck had gotten on the back-country roads.
 The mud was so caked on that you couldn’t even read the magnet sign for my photography business on the tailgate! I took the rare opportunity to leave a message for other highway travelers as we headed home, much to the Hub’s dismay.
 Although our friends had to head out, we decided to enjoy one more meal with the view. Since the Hubs was driving, I ordered my new favorite liquid libation. Made with an Alaskan wine, this drink is a very simple sangria mixture which is probably why I like it so much. In fact we bought a bottle of the wine used so I can have them at home occasionally and will know what to buy when this one runs out!
 It was the perfect ending to our little get away. And thanks to the very nice ranger at the welcome center who pointed out that we could buy an annual pass for the same price we expected to pay for the per head pass this time we can come back to enjoy the park again through next September! Although we won’t be able to access the entire road system, it would be nice to see the park in the other seasons and compare the differences. There just might be a few more weekend getaways coming up next year to this destination! 😉
Save
Save
Save
Save
Save
Save
Save
Save
Save
Save
Save
Save






 Other displays explained how researchers track the movements of predatory birds in the region and monitor the fault lines that formed the landscapes surrounding the park.


