DIY Faux Barnwood Frames

I recently picked up two great prints from one of my fave Alaskan artists thanks to a promotional sale she was running.  But I wanted rustic frames for them.  I tried a few from the local stores, but they either didn’t fit the prints the way I wanted or weren’t rustic enough.  So I turned to Etsy, where I found several options but again wasn’t sure on the sizing.  The Hubs overheard my frustration trying to confirm size and shipping costs, looked at the styles I was considering and then proclaimed, “I can make that.”  I quickly said OK! and searched Pinterest for a tutorial.  I found this one and made adjustments for the size of our prints.

I somehow forgot to get a picture of the frames before I stained them but I’m sure you can imagine it.  Here’s how they looked after the first coat of stain.

I used stain I had on hand from a previous project.  While it was pretty it wasn’t quite barnwood enough for me so I decided to add some grey I also had on hand.

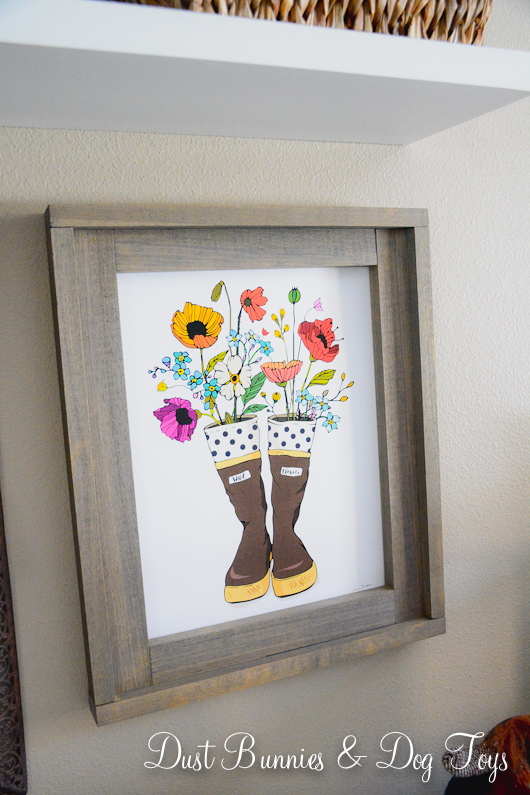
And here’s the result!  We both love how it turned out.  I had a few spots still to touch up, but this was pretty darn close to what I’d been looking at on Etsy.  It wasn’t true barn wood, but at an investment of around $13/frame it gave me the look I wanted without extra shipping costs.  Plus it was the perfect custom size for what I needed.

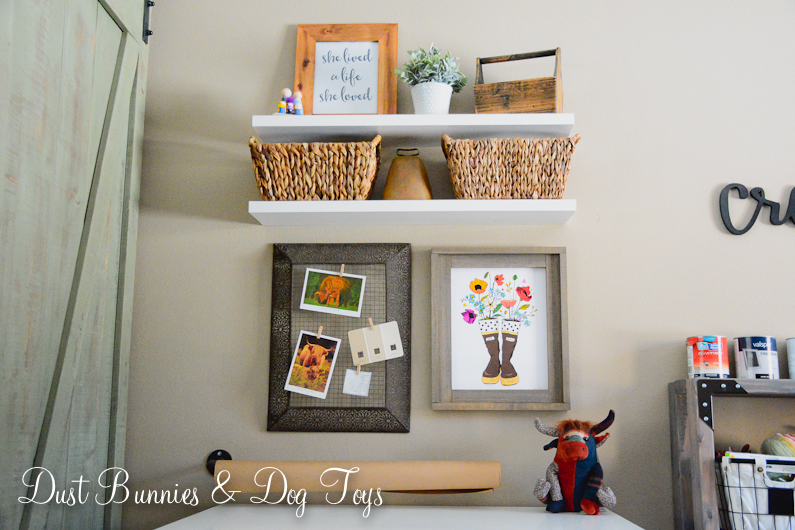
And here it is with the print attached.  I just taped it to the back using the backing board that came with the print so I didn’t damage the print itself.

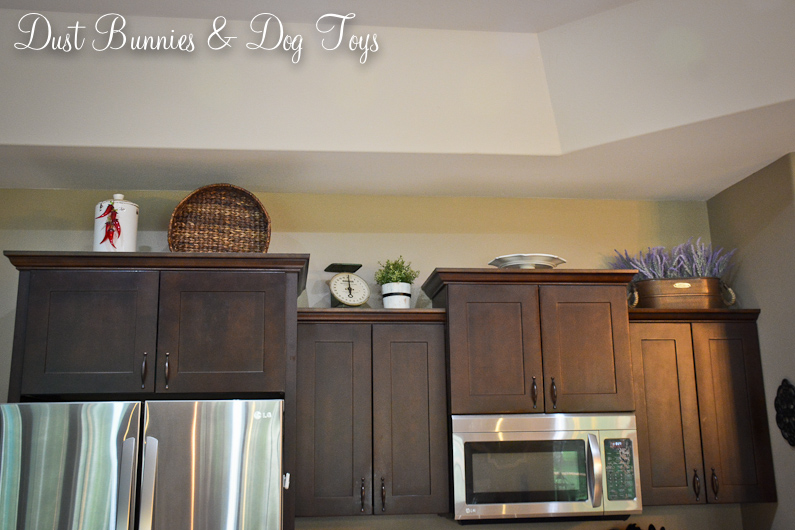
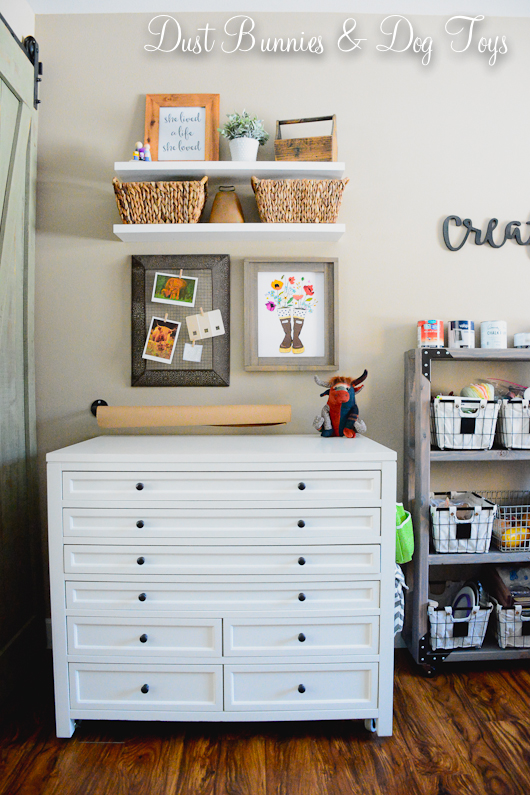
It’s the perfect piece to complete this area which I’ve been slowly revamping for quite a while now.  And there’s a sneak peek at the other project the Hubs did for me recently!  I’ll be sharing that very soon.

The second print is much more colorful and really pops with the rustic tones of the wood.  I hung this one in my cubicle at work and have gotten so many compliments on it.  It makes me smile every day, both because I love the art and knowing the love that went into the frame surrounding it. 🙂

So if you’re looking for a rustic frame I highly recommend this one.  It was simple and easy to do – just 1×2’s, L brackets and some stain.  I’d love to see what you come up with if you give it a try!

Advertisement

First Project of 2018

Hey everyone, the beginning of the year has been quite busy!  I had dental surgery on the 2nd that required a few days of recuperation and I was promoted at work to a new position that requires learning several new systems, but I still have to handle some things from my old position until it’s filled.  I took a little bit of time over the weekend to do a few small projects in between cleaning house and editing client photos.  Today I’m sharing the first of those with you – my new desk organizer caddy!

Here’s how this little cutie started out.  I spotted it at the thrift store well over a year ago and knew the simple design would work for some type of organizing in our house – especially when the price tag was only a couple of dollars!

I gave the whole piece a light sanding so the paint would adhere, and then used spray paint we had on hand.  Once it was dry I distressed the edges and sides to give it a bit of texture.  A quick coat of paint and it’s got tons of farmhouse style.  Even Mrs. Joanna Gaines would probably like this one. 🙂

Here is is in place and all loaded up.  I put note pads in the back slot and divided up my pens and markers into to of the front sections, while the third hold the other miscellaneous items I like to keep on hand.

Every time I look at it now, I think “That was so simple.  Why didn’t I do this sooner?”  Truth be told I had to live with it for a while to make sure it would work in this spot plus decide what color I wanted it to be and then life just got busy with other priorities.  Luckily I had other spray painting to do so it was the perfect time to get this one done.

The best part of it all is that this little upgrade didn’t cost me a cent!  Since I already had the caddy, spray paint and sand paper all on hand the only cost was my time.  That’s a great way to start off DIY in 2018.  Here’s to hoping all my projects this year go this easy and have as great of a result!

Going Farmhouse in the Kitchen

I’ve been switching up the decor in our kitchen for a more simple, farmhouse style and had this idea for a sign over the pantry.  Everywhere I looked I saw “EAT” and “KITCHEN” but I wanted one that said Dry Goods, because that’s what’s in the pantry!  I considered making one myself but life has just been too busy for that project and things won’t slow down anytime soon.  So when I spotted the style of sign I wanted for a great price at one of my fave local shops, Brown Chicken Brown Cow, who you may remember from the recent vintage market, I asked the owner if she could do a custom version.  She said yes and because she’s awesome she even kept it at the same price as the other signs she already sells!

It turned out awesome.  She made it to the dimensions for my specific spot and gave me a choice of colors so it was just what I wanted.  It’s the perfect addition to the cabinet top decor changes I’ve made so far.

On the right side the large white platter stayed where it was, as did our personalized cutting board, but the fruit basket was swapped out for this large breadboard and a vintage wicker wrapped jar.  I picked both of those up at an antique shop outside of Portland on our recent trip for a great price.  I’ll be sharing more of that shopping trip soon.

The other side kept several of the same pieces as before, just rearranged.  The wine rack I had in the corner was sold and I picked up this cute copper bucket that I’d been eyeing at Target for months for just $2 on the local buy/sell page.  That’s a 90% savings from the original price!

It sat empty for a while, but when I won an Amazon gift card at work I ordered my favorite purple pens and several bunches of faux lavender.  As soon as they arrived I knew they belonged in the copper tin.  I love the contrast of the colors and textures and am even happier that it’s something that can stay up year round.

I still may rearrange a few things as I find other items just right for this space, but for now I’m pretty happy with how it’s looking.  I’d love to hear your suggestions on moving things around or items to add, so leave me a comment if you have ideas!

Checking Out Magnolia Home Locally!

I recently learned that Joanna Gaines’ furniture line was available through a local furniture retailer who usually specializes in quality Amish furniture called Treeforms Furniture Gallery.  I stopped by their showroom to check out what they had during my lunch break the other day and had to share the great ways they styled the pieces.

Although they had several of the Magnolia Home accessories with the furniture I was disappointed to learn that they weren’t selling those pieces and only had them as display props.  But the sales lady did tell me that they could order anything available on the Magnolia Home online shop and it would possibly be less expensive because they got a dealer price break and shipping is already included.  The Hubs wasn’t quite as excited by that news as I was… I can’t imagine why! 😉

We’re not really in need of any new furniture so this was just a browsing trip anyway but it was fun to see the Fixer Upper style in person.  Including a few pieces from recent reveals, like this school desk and framed bed.

I really liked the combination of modern and rustic in this tall dresser, which looked like multiple small drawers but was really 4 large drawers.

The Magnolia line was just a portion of their showroom so I browsed a few of the other areas too.  I loved this rustic bookcase, which was no surprise since I’ve had pinned for sometime now.  I’m pretty sure I’ll be replacing the ladder shelf next to the craft cabinet with something like this in the near-ish future, albeit with a much less expensive and custom sized DIY version!

I also really liked this metal firewood rack.  It too was fairly pricey and I think it’s a bit tall for use at our fire pit, which is the only place we burn wood thanks to a gas fireplace indoors.  I’m thinking I might recreate something similar with PVC pipe painted to look like metal or copper and place it on cinder blocks so it’s raised off the ground.

They had some really adorable Easter accessories out.  I considered getting a few of the little bunnies for my spring decorations but there were no price tags which meant they were also just showroom accessories.

It’s a shame because I think they could really have some good additional income if they had a small inventory of the accessories!  Especially ones this cute!

One accessory that was for sale was this large metal tiered basket.  I’ve had similar pieces and always used them for organizing or decorating up high so seeing it as a centerpiece was definitely a new idea.  It might be something fun to try as the holidays approach later this year.

The driftwood boats also caught my eye.  I’ve got a whole board of driftwood ideas pinned for one day when I have extra time to make something out of my stash of driftwood collected when we go riding in the summer.

My favorite display item was this unique hanging terrarium chandelier. It was the perfect balance of rustic and modern.  Several of the hanging pieces here were for sale, but I’m usually not great with small pots as they require daily attention rather than the weekly watering my plants usually get.

It was a fun little diversion from a stressful day at work even though I didn’t come home with anything new.  Sometimes it’s just good to go someplace new and look for ideas. And now that I know they can order in Fixer Upper decor I’ll be browsing the Magnolia Online Shop for new ideas soon too! 🙂

Windmill As Wall Art

0Happy New Year everyone!  I hope your holiday weekend was exactly how you wanted it to be, wether that was exciting or relaxed.  We took the relaxed approach.  I stayed home and the Hubs went hunting so no big ball dropping parties here.  Today I wanted to share another piece of wall art that came back on our recent trip to Portland.

This metal reproduction windmill.  If you remember I purchased an authentic windmill from Alaska Picker about a year ago and planned to display it on this faux shiplap wall but it was SUPER heavy and the Hubs just wasn’t sure we’d be able to locate studs in the right spots to mount it securely.  So when I spotted this baby on DecorSteals.com for $90 a few weeks before our trip I snapped one up and had it sent to my Mother-In-Law’s house since they wouldn’t ship to Alaska.

1This one is smaller and much lighter than the authentic one we bought.  Plus it comes apart into three sections so should I ever want to change things up I can use them separately without much effort.  It looked so awesome with our holiday decor and my new farmhouse style sign fit perfectly inside the bottom curve.

I packed up all the Christmas decorations over the weekend and I’m still working on my ‘winter’ decor for January – March, so we’ll see how I decorate around this in the coming days.  I’m considering adding two hanging lanterns or sconces on either side since the wall is so large, but I’ve got something else from our Portland trip going up on the wall where the barn wood angel hung for Christmas, so I want to wait until I get that up before I make a final decision, in case it would make the space too cluttered.

2So you’re probably wondering what we’ll do with the large and expensive authentic windmill right?  Don’t worry it will still get it’s due – I found a local buyer for it who wants to display it on a wall in her home.   And since she’s buying it for what we paid, we’re breaking even on that attempt.  Hopefully, she’s able to figure out a way to secure it well and enjoys it as much as I do this one.

We’ve also been working on another long-time-coming project recently – barn doors for the office!  The Hubs built the doors over the Christmas weekend and sanded them down so now it’s up to me to finish them with stain or paint.  I’m still debating on what the final choice will be but they should be done and installed this weekend so I can share them with you soon. 🙂

Tobacco Baskets in the Laundry Room

basketclose

Today I’m sharing another quick project that came together after our trip to Portland in the fall.  I found these amazing reproduction tobacco baskets on a decor website I frequent and purchased two sets of a large size and a small size.  Unfortunately the distributor wouldn’t ship to Alaska, so I had them sent to the Hub’s Mom’s house in Portland knowing we’d be visiting soon.  I told the Hubs that these were part of the “must come back” pile and he made it happen, even with their fragile construction.  Have I mentioned recently how much I love that man? 🙂

basketswide

I’d been on the hunt for tobacco baskets for some time when I found these and knew exactly where I’d use them when I bought them – in the laundry room above the board & batten we installed earlier this year.  My vision of having one large basket in the middle of the wall flanked by the two smaller ones worked out perfectly.

basketsside

It’s just enough to finish out this wall in farmhouse style without being too heavy and it adds a bit more texture to the space.  Plus the fact that I was able to put them up all by myself with a couple of finishing nails made the whole project even simpler.

basketsview

Here’s how things look from the dining room.  I ended up selling the other large basket so my total cost for this project, including shipping to Portland was around $55.  Not bad for three good sized pieces of art.

We also brought back another large piece of art I had to ship to Portland for pick-up.  That piece ended up in the dining room and I’ll be sharing it here soon, so stay tuned for that!