From Lantern to Vase

The best thing about thrifting is that you often find pieces that can be reworked into something new.  Usually that involves a coat of paint or major altering of the original item, but every once in a while you stumble upon a super simple upcycle that requires barely any effort.  That’s exactly what happened with my new vase.  The mason jar style and the green tint to the glass are what caught my eye at the thrift store.  But it had a different purpose when I first saw it.

It was a lantern for a small votive candle!  I didn’t originally intend for it to be used as a vase but when the Hubs brought home flowers and I needed another large container for a second bouquet this new treasure was on the counter and the idea was sparked.  I simply pulled out the votive holder rack, filled it with water and plopped in the flowers.  That has to be the quickest upcycle ever – literally 30 seconds flat!

I kept the votive holder rack in case I ever want to use it that way again, but I see many more days as a vase with summer bouquets in it’s future! 🙂

Save

Advertisement

Checking Out Magnolia Home Locally!

I recently learned that Joanna Gaines’ furniture line was available through a local furniture retailer who usually specializes in quality Amish furniture called Treeforms Furniture Gallery.  I stopped by their showroom to check out what they had during my lunch break the other day and had to share the great ways they styled the pieces.

Although they had several of the Magnolia Home accessories with the furniture I was disappointed to learn that they weren’t selling those pieces and only had them as display props.  But the sales lady did tell me that they could order anything available on the Magnolia Home online shop and it would possibly be less expensive because they got a dealer price break and shipping is already included.  The Hubs wasn’t quite as excited by that news as I was… I can’t imagine why! 😉

We’re not really in need of any new furniture so this was just a browsing trip anyway but it was fun to see the Fixer Upper style in person.  Including a few pieces from recent reveals, like this school desk and framed bed.

I really liked the combination of modern and rustic in this tall dresser, which looked like multiple small drawers but was really 4 large drawers.

The Magnolia line was just a portion of their showroom so I browsed a few of the other areas too.  I loved this rustic bookcase, which was no surprise since I’ve had pinned for sometime now.  I’m pretty sure I’ll be replacing the ladder shelf next to the craft cabinet with something like this in the near-ish future, albeit with a much less expensive and custom sized DIY version!

I also really liked this metal firewood rack.  It too was fairly pricey and I think it’s a bit tall for use at our fire pit, which is the only place we burn wood thanks to a gas fireplace indoors.  I’m thinking I might recreate something similar with PVC pipe painted to look like metal or copper and place it on cinder blocks so it’s raised off the ground.

They had some really adorable Easter accessories out.  I considered getting a few of the little bunnies for my spring decorations but there were no price tags which meant they were also just showroom accessories.

It’s a shame because I think they could really have some good additional income if they had a small inventory of the accessories!  Especially ones this cute!

One accessory that was for sale was this large metal tiered basket.  I’ve had similar pieces and always used them for organizing or decorating up high so seeing it as a centerpiece was definitely a new idea.  It might be something fun to try as the holidays approach later this year.

The driftwood boats also caught my eye.  I’ve got a whole board of driftwood ideas pinned for one day when I have extra time to make something out of my stash of driftwood collected when we go riding in the summer.

My favorite display item was this unique hanging terrarium chandelier. It was the perfect balance of rustic and modern.  Several of the hanging pieces here were for sale, but I’m usually not great with small pots as they require daily attention rather than the weekly watering my plants usually get.

It was a fun little diversion from a stressful day at work even though I didn’t come home with anything new.  Sometimes it’s just good to go someplace new and look for ideas. And now that I know they can order in Fixer Upper decor I’ll be browsing the Magnolia Online Shop for new ideas soon too! 🙂

Flipping the Door

We recently made a very simple change in our master bedroom that had way more impact than we ever imagined.  We’ve wanted to flip the direction our bedroom door swings since we saw the model of our floor plan.  In fact, it was one of the two changes we requested of the builder, but by the time we noticed it hadn’t been done how we asked it was too late to change it before the final inspection because it would cover the light switches if we did.  So we lived with it for the past 3+ years.

It drove us nuts to have to come in and move the door to get to the closet every time we came home or pulled the hampers to do laundry.  It’s such a minor, trivial thing but it was an every day thing which made it seem even more annoying.  The Hubs decided he’d had enough and did some research online to figure out what he needed to do to swap the direction of the door.

He used a template he picked up at Lowes to chisel away the spots where the hinges would attach, starting with an outline of the spot and then creating slices he could work out little by little.

Soon he had three indented spots ready for hinges.  He also had to change up the hinge locations on the door itself so he took the door off and chiseled those areas too.  I was working on another project while he was doing this and occasionally held the door steady while he chiseled, so I don’t have any pictures of that step.  Once he had the new hinge locations prepped and swapped over the hardware we went from this….

…to this!  Look how much more open it makes the space feel!  Now the door swings back flush against the wall, leaving nothing blocking the entrance to the closet – just how we always wanted it.  We left the light switches right were they were because we rarely used them thanks to the remote for our overhead fan/light combo.  We also have switches for the overhead fixture by the bathroom door so we can always use that instead.  The Hubs relocated the holder for our light/fan remote to the open side of the door so we have easy access to that if we want to turn the light off as we leave or on as we enter.

Luna wasn’t too impressed with the change because behind the door was one of her favorite hiding spots, but she’ll just have to be upset because we love it.

We still need to paint over the old hinge locations to make them blend in, but it’s not a huge priority since you barely notice it.  We plan to leave the old indents on the off chance that SHOULD we ever sell this house the next buyer has the option to change it back – if they were crazy and wanted their life to be more difficult that is!

So there you have it.  One very simple change made the room feel twice as big – and pissed off the cat until she realized she can just hide in the closet instead. 🙂

Save

DIY Indoor Herb Planter

Continuing my willing of Spring to officially arrive in Alaska, I’m sharing the indoor herb garden we recently installed.  We love having fresh herbs to cook with and give the chickens during the summer and preserved some to continue using over the winter at the end of last season but nothing beats fresh, so I decided we should have an indoor garden just for that.  With that in mind we picked up these hanging containers and rods at IKEA on our last trip down south.

They are a perfect fit for this small wall in the dining room and as you can see, this spot gets good light from the window across the room.  The Hubs made sure to secure it to the studs since the plants will have a bit of weight.

For now I just have a few faux plants, also from the same stop at IKEA.  The local nurseries should begin offering herb starts within the next few weeks, but until then the fake stuff provides a bit of greenery.  Unfortunately I didn’t have enough to fill the large containers in the middle, but it still looks ok for now.

I’ll be creating some DIY plant stakes once I have our herbs selected.  I considered a few ready to purchase options I’ve seen in the stores but wanted them all to match and wasn’t seeing all the options I was considering which includes oregano, basil, parsley, rosemary and thyme.  I may try lavender in the larger containers just for the scent, but I’m not sure it would give the plant enough room to flower.

If anyone has used these containers with live plants I’d love to hear about how they worked for you.  I plan to water sparingly at first since there are no drainage holes (good thing since we’re indoors), but there are small trays at the bottom that would provide a place for water to collect below the dirt and the plant to reabsorb the moisture.  Hopefully that keeps the roots from getting soggy, but there may be a learning curve.  I’ll share the finished project when everything is planted and growing!

Welcome Spring

The calendar says that it’s officially spring but in Alaska spring is “break-up” season, which is why we still have about a foot of snow in the yard.  Granted, the snow is disappearing – just not quick enough for my preference.  So rather than lament spring’s tardiness outside I changed up the decor inside to feel a bit more in line with what the calendar says.  The Hubs brought me home flowers recently so that bouquet has been the centerpiece on our table and the large candle I’d had there moved to the windowsill in the family room where the dogs tunnel is below it so they don’t seem to notice it.

I kept things simple in the entryway with two new pedestal cloche stands from World Market, cute little beehive skeeps from JoAnn Fabrics and my Pottery Barn knockoff basket filled with the DIY neutral eggs I made last year.

I love how the little skeeps fit perfectly inside the glass domes.  I love the bright colors of spring but I like to keep my decor simple these days and this gives just enough color while remaining neutral with a farmhouse flair.

Next to the front door my big oil can got some pretty dogwood branches, which are the perfect height to hide the ball chucker we keep in the corner for when we take the dogs out front to play!

The media cabinet got a few little touches of spring as well.  All items I pulled out from storage and one of the little faux planters I recently created.

I don’t remember where I got this little chick or the basket but they fit together perfectly!  Plus pairing two little items together means it’s a little less likely to get snagged by one of the fur babies.  The other side of the cabinet has a free Easter printable I found online a few years ago and my green shamrocks.  Since I don’t decorate for each particular holiday anymore (St. Patricks, Easter, etc.) but rather the season I just use it as greenery now.

The mantel is still a work in progress, but my cutie little wool lambs take safe haven up here away from the fur babies.  I got the white candle sticks on the local buy/sell page for $20 and the brown one was a recent thrift store find.  I’m in the process of painting and distressing it to match the others and plan to add some fun moss or boxwood balls to the tops of each.  The cute birdhouses came from JoAnn’s and will eventually be used as photo props and in the backyard.  The wreath was also from JoAnn’s.  I just couldn’t pass up the pretty purple color.

The tray next to the table got a pitcher of tulips and a cute little bird to accompany the rustic frame I’ve had here for a while now.

Over in the dining room I kept the lanterns from the winter decorating but swapped out the filler for split pea to give them a spring feel and added smaller bee skeeps like the ones in the entry way.  In the middle I paired a cute bunny ornament and a basket of carrots from storage in the cloche I found at Home Goods on our last trip down south.

In the window is my favorite farmhouse lantern, filled with moss for a spring feel and my clearance ceramic bunny I found at the end of last season for just a few dollars. The other side of the windowsill was a safe haven for a few more small pieces, including some hydrangea stems in a green bowl I thrifted some time ago, the fun little moss bunny I love to pull out each year and one of my vintage votives.

Before I had a chance to get this post up I’d already swapped out the wreath above the mantel so I thought I’d share that change.  I got this boxwood wreath from Target and thought it would look good in this spot for most of the year.  It’s just the right amount of farmhouse style mixed with spring.  The purple wreath moved to the front porch where it coordinates well with the purple front door. 🙂

So that’s my attempt to usher in spring indoors while I wait for it’s arrival in my garden!  How did you decorate for spring?

Updating the Lighting

We recently updated several of the lights in the main living area of the house and I’m totally in love with them all.  The change all began with the dining room light.  I’d been wanting to change it out from the fixture we chose when building the house for some time.  The original fixture was a secondary option because the one I’d wanted was at a local antique store and was far too expensive.

Last year I spotted a very similar fixture to that antique one at one of my favorite local boutiques.  It wasn’t in the budget at that point but when my bonus check came in at work I decided to treat myself and go buy it.  Unfortunately, in the many months that had passed it had sold.  The shop owner told me they could order another one just like it when they did a supply order in the coming month so I prepaid and anxiously awaited news that it had arrived.

Unfortunately when the call came the shop owner informed me that their vendor no longer offered that light or anything similar enough to it.  So they refunded my money and I started looking online for other options.  The next day we made a trip to Lowes for a few projects and I decided to browse the lighting section, where I spotted this beauty.

I had seen this same fixture used in a house remodel on the Jenna Sue Design Blog and really liked how it looked in her space.  I showed it to the Hubs and he liked it too and it was less expensive than the boutique option I’d planned on!  It makes the room look much more open and the round shape contrasts the many square features in this room.  We will eventually swag the light over to be centered above the table, but for now it hangs from the original location.  Although it came with bulbs we decided t get LED Edison style bulbs instead which create a warm light, perfect for a dining room.

While I was browsing the lighting aisle I spotted another fixture I liked that was marked for clearance.  I’d seen similar fixtures on my favorite show Fixer Upper as kitchen island pendants, but I love our DIY insulator pendants so I never considered looking into them.   But at $43 it seemed too good of a deal to pass up and I thought it would be a good size for the entry way.

The fixture we had picked out for the entry way during construction was a nice large drum chandelier but it just wasn’t jiving with my style anymore and it hung lower than I liked.  With the LED bulbs we got for the new fixture it’s brighter than the old one and because it sits higher and is see through it creates an illusion of more space.

Plus it’s got good classic farmhouse style, which you know makes my heart go pitter-patter!  It’s going to look amazing with the update I have planned for the wall where the mirror is, but that’s still a bit on the horizon.

I also spotted another farmhouse style light while browsing at the store and knew it would be a great option for the laundry room.  We’d selected a simple flush mount bowl style light during construction because we wanted to spend our lighting allowance in spaces that saw more traffic, but it had become a bug collector and didn’t fit with the style I’ve curated in this space.

I really loved the seeded glass detail and because it’s a closed flush mount it won’t become a trap for bugs, unless they’re some sort of Houdini!  We used LED bulbs in this fixture as well, but got the antique Edison style so the light is more yellow than the entry way bulbs but it works fine for this space.

Doesn’t it look great with the other industrial metal accents in the room?  And the new yellow tone of light makes it more cozy opposed to the stark brightness of the old fixture.

It’s been so exciting to see all these recent little changes make such a big impact.  Even though we got to choose the finishes while building our house didn’t come ready set with all the details that fit our style.  That’s what you create over the years of living in the house and with each passing year it becomes more and more ‘our home’!

A Simple Change Makes a BIG Impact in the Dining Room

Two weekends ago the Hubs was in town shopping for some project supplies while I was home cleaning.  He texted me a picture of several large area rugs on sale for half off at one of the stores and asked if I liked any.  I certainly did and he said that was the only one like it that they had, so he swooped it up and headed to the cashier.  When he got it home I noted that it was more grey than the beige it had looked in his text but I actually liked that even more.

We had been in sore need of a new rug in the dining room after the jute rug we had in there had taken the brunt of Brinley’s teething phase.  We had moved the rug from behind the island over under the table as a temporary option but it was too small for the space and the pattern didn’t work there.  This option fit perfectly, had a lovely neutral yet traditional pattern and is so soft and cushy I could probably sleep on it quite comfortably.  Even the Hubs has commented how nice it feels underfoot!

The lighter color brings a whole new look to the space, and coordinates with the other grays and neutrals we already have in this space.  It was a great change for spring – making the whole area light and bright.

Although I probably wouldn’t have picked this pattern if I’d been shopping online, in person it’s just enough style without being over powering.  Plus it lets me have the lighter color I like to incorporate to combat our long winters but in a way that masks the dirt which collects in this high traffic spot – at least from what I’ve seen so far.

Now that we know how plush it is I’m on the hunt for a similar one to replace the aging rug that moved back to it’s original spot behind the island.  We call that space the “playroom” because it’s were the dogs romp and usually take their toys to play with in the sunlight from the slider doors.

It’s surprisingly low profile for how soft it is.  It literally feels like there’s a foam mattress hidden inside!  It also seems fairly tightly woven which should help with my allergies, as things won’t be able to build up between the fibers.  And the packaging says it was made in the USA which we can fully support.

I’m so in love with this new look and smile every time I see it.  There are also a couple of other updates in this space you might have noticed in the photos.  I’ll be sharing more detail about those changes soon, so stay tuned!

Save

The Finished Laundry Counter

I’m so giddy to be able to share this finished project with you all!  Remember way back to No-Spend January of 2015 when we installed this cabinet where the plastic sink used to be?  We’ve been living with a plywood top and no faucet for the sink since then which you’ve seen in a few posts like this.  It functioned for what we needed and there were higher priorities to tackle but it secretly drove me NUTS.

So why did this project take so long to finish?  We had a remnant piece of granite to match the kitchen and bathrooms but needed it cut to size and finished with the sink opening.  I’d attempted to barter the service with no luck and every quote we had gotten was insanely high – like in the range of you’d think they were selling us brand new marble counter tops rather than finishing material we provided.  So the hunt continued.  Until the Hubs found a vendor who was willing to cut the granite using a template we provided for just a couple hundred dollars!

He used a gator board political sign that had been left out on the side of the road long after the elections to trace the plywood top.  I was pretty proud of him for being genius enough to recycle material and help keep the roads clean!   Once he had the template traced he cut it down and marked where the sink would be.  The vendor said he did a great job and made it easy for them to layout the cuts.  They also complimented him on the A-Frame he built to transport the slab to them and the finished counter home.  Have I mentioned how I love having a spouse who can get things done?! 🙂

Miss Luna was not to pleased to have “her” space disturbed while we were installing the finished top, but she seems pretty ok with it now.  Especially since it gives her another inch or two above her doggie siblings.  Here, she does an excellent job of showing just how deep that sink really is!

The finished top makes all of my existing decor and laundry products look even better.  On one side is the vintage iron I picked up at the antique store and our DIY laundry soap container.  On the other is the last of our mason jar soap pumps – which I’ve been saving for this spot – and a simple little faux succulent planter from my recent spring project for a bit of greenery.

We did have to replace the faucet because we discovered that the one we’d saved from the original plastic sink didn’t have long enough posts to reach through the granite and the pull out nozzle required an extra line that we didn’t have space for.  So the Hubs picked up a bargain faucet for around $50 and got that installed quickly.  I took all of these pics last weekend with the old faucet standing in for the photo op, but the new one looks very similar.

Since we did the install ourselves, our total cost with the new faucet came in around $400, which was 100% worth it!  I still haven’t really used the sink much since I’m still getting used to having a working faucet in this spot, but I really love having the option and seeing this clean, finished space each day when we come home.

A Fur Rendezvous Birthday

The Hub’s birthday was this past Saturday and although we hadn’t planned to celebrate since we bought concert tickets for later in the year as our joint birthday/Christmas/anniversary gifts I had a last minute work obligation come up that required I help with an event at the annual Fur Rendezvous the same day so we made a mini celebration of it.  Locally known as Fur Rondy, this 2-week long festival centers around everything winter and Alaskan with dogsled races, snow sculptures and other unique activities.  The ceremonial start of the world famous Iditarod is also held during this time and we were able to catch several of the mushers starting the course as we arrived and made our way to lunch before my work event.

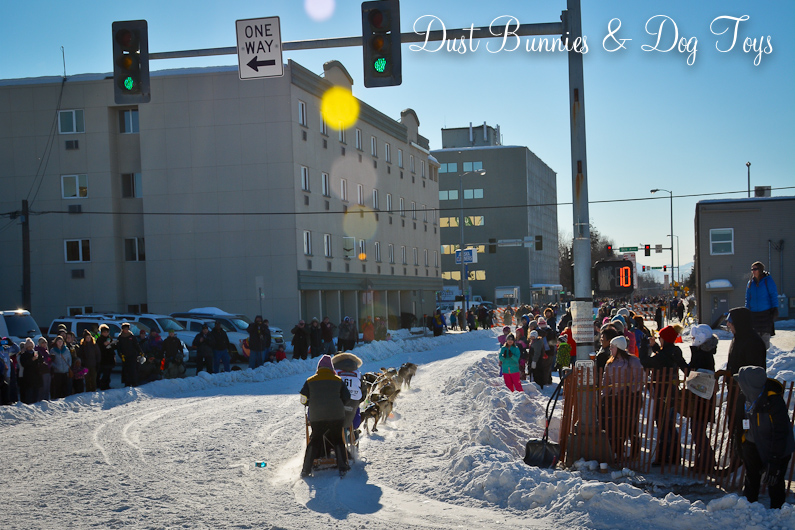
Although I’ve here for 4 years now, this is the first time I’ve been able to attend the ceremonial start so it was a fun experience for me to watch the teams go by and cheer them on.  The first musher we saw was #61, Michael Baker. Each musher has an Iditarider on their sled during this portion of the race.  These passengers bid in an auction to win these unique perspectives which come with traditions of their own.

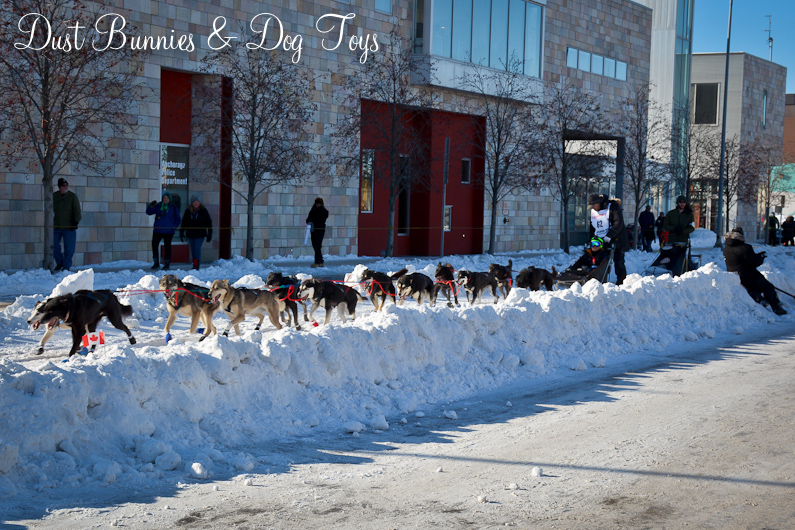
The ceremonial course is 11 miles on Anchorage streets and park trails – and most of it is lined with crowds.  It’s a very different scene than the rest of the race.  The second musher we saw was #62, Nathan Schroeder.  As you can see the trail on the city streets is well prepared and maintained during the event with trail workers along the entire route ready to remove debris and other hazards.

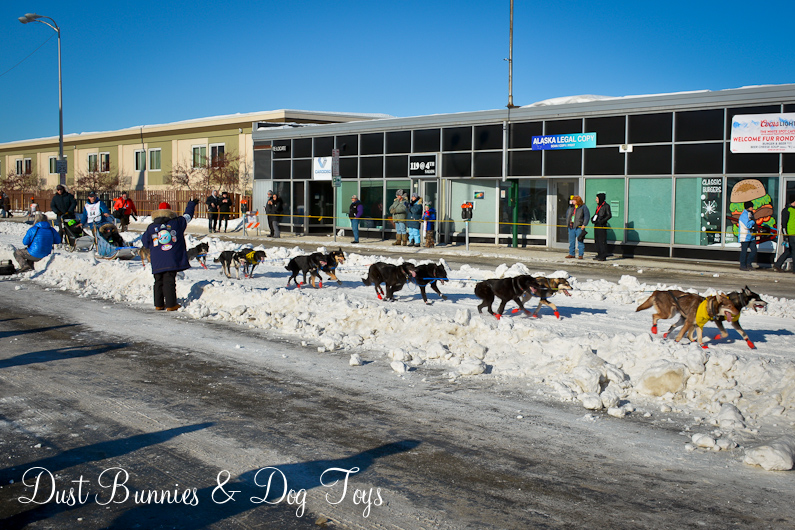
We walked down along the course and eventually had to cross over to the other side of the street.  Here’s how the trail looks to those going down it.

Jason Mackey, #64 was the next musher to come down the trail after we crossed over to this side.  He was a good example of how the musher also has to be athletic and use his body to control the sled.

2011 Champion John Baker, #65 came by next.  Although I had a good vantage point from the sidewalk I was sure jealous of the guy crouched down along the snow berm with his camera.  He was part of the official Iditarod crew which is why he was allowed to be so close to the action.  I’m going to have to research how I might join that crew!

The last musher we saw was Anna Berrington – one of a handful of female mushers in the male dominated field.

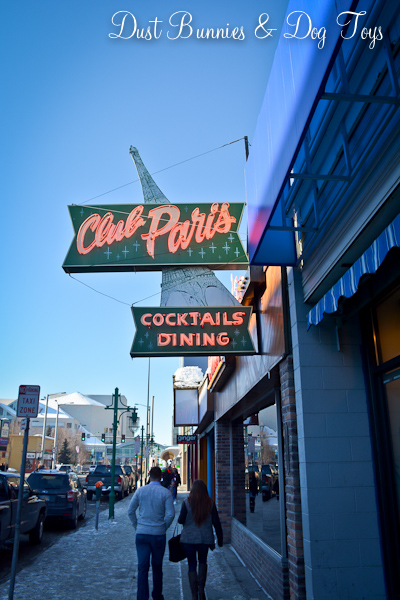
We couldn’t stick around to watch the remaining seven mushers because we had a lunch reservation at Club Paris around the corner.  This was another first for me, although the Hubs has been here many times during his Alaskan tours.  I chose the Alaskan Cordon Blue sandwich which was a Cordon Blue made with halibut instead of chicken.  It was prepared just right, keeping the halibut moist and flaky.  The Hubs had teriyaki Tri-Tips, which I sampled and deemed to be even better than my choice.  We ended the meal with creme brulee for desert.  I added strawberry puree to mine while the Hubs enjoyed his plain.

After lunch I headed over to my work event while the Hubs went to the fur auction.  I don’t have any photos from the fur auction, but you can probably imagine how the scene looked – auctioneers, bidders yelling and furs being shown off.  Although not the same kind of fur, I spotted this beautiful bear statue with amazing painted on northern light colored fur as I made my way to my event.

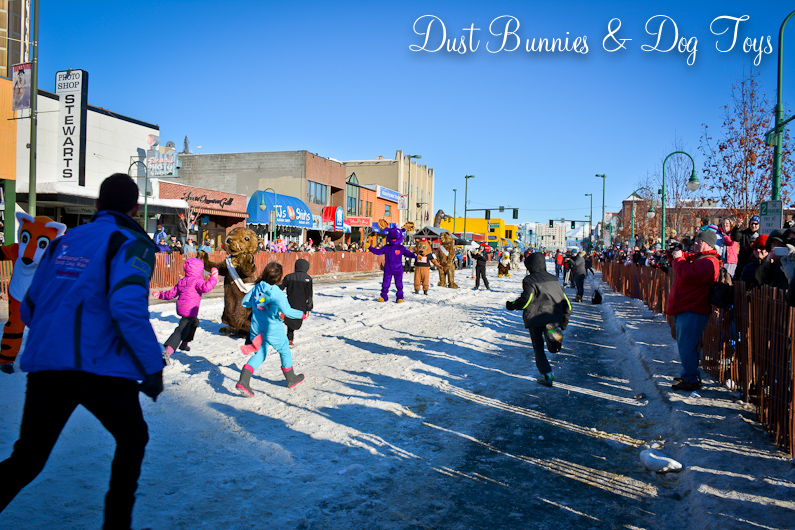
The event I was assisting with was called Running with the Critters.  It’s a new event this year and gives children a chance to experience something similar to the Running of the Reindeer.  Mascots from all over Alaska came out to play the ‘critters’ and while some ran with the crowd, most lined up down the street to cheer on the runners and give them high-fives as they ran past.  There were several really cute critters, including an otter and our own Peri Winkle the purple moose!

After the run Peri met part of the Fur Rondy Royalty just out side of the new Hard Rock Cafe.  He was a big hit with tourists and locals and had to pause numerous times to oblige the photo requests.

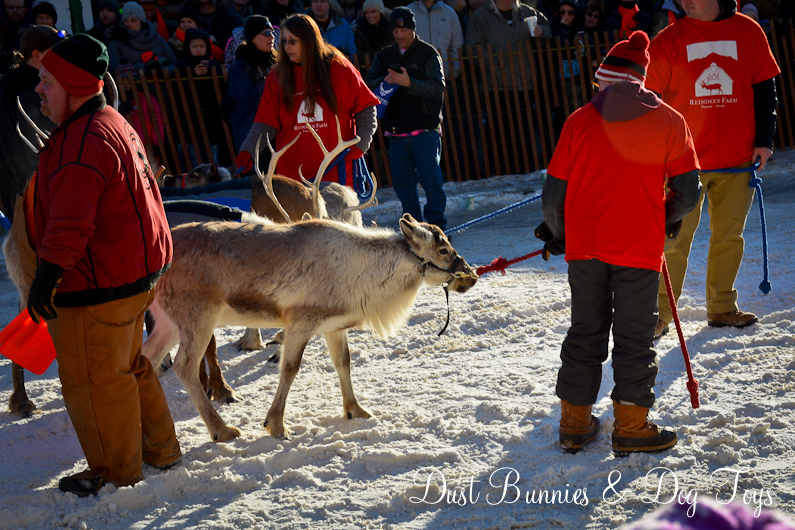
Once Peri was done with his event I stuck around to watch the Running of the Reindeer.  Similar to Spain’s running with the bulls – but with an Alaskan twist – the event raises money for Toys for Tots.  The reindeer were led from their holding pen at the end of the track up to the starting line.

Several stayed behind in the pen, both to encourage the other reindeer to come back to the herd and to wait their turn for the second heat.

Several of the reindeer sported sponsors coats.  I think a few of the reindeer got their sizes mixed up because a few were more snug than the others. 🙂

This reindeer had apparently already been pretty rowdy and was missing one of it’s antlers, which gave it a lopsided appearance.

And some just wanted to show off for the crowd even while waiting in the pen.  Isn’t he just beautiful?!

As you can see there was quite a large crowd, so I wasn’t able to get up close to the barricade when the race started but I did spot the runners as they made their way down the street.

The reindeer tend to run in small groups so the runners have to be on the lookout for them to make sure they stay out of the way of their antlers, which are sharp and pointed this time of year.

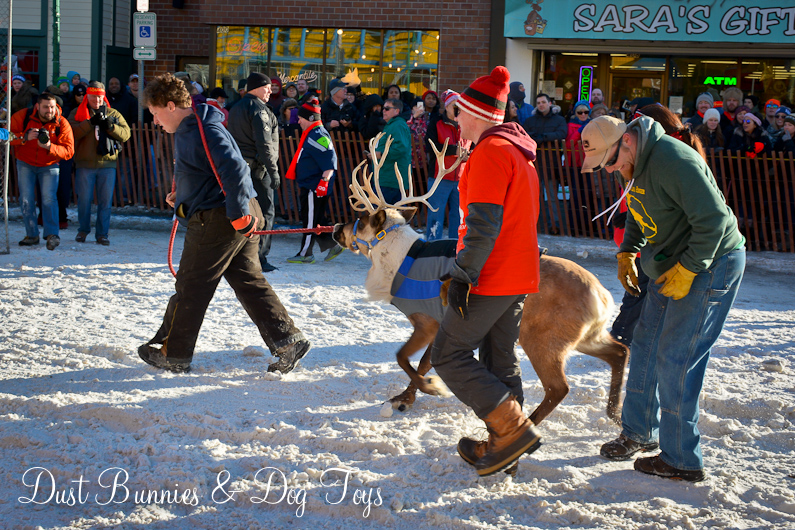
It was a bit of a scramble when they did get back to the pen as the handlers had to get their lead ropes back on and most of the reindeer were not much interested in that.

It’s become tradition to create funny costumes for the event and some get a bit outlandish.  I’m pretty sure the reindeer don’t much care about what the runners wear and are more interested in getting back to their herd mates.  This year someone ran as T-Rex, which was pretty hysterical to watch because apparently he’s not used to that much action and had to take a breather at the end of the course!

Another runner decided the finish line was a good spot for a snow angel.  Mario and the nearby clown didn’t seem much impressed.

About that time one of the reindeer went rogue and decided to make a break for freedom.  He seemed more interested in searching for something to nibble on, which is good for him because one of the runners turned back to catch a close up of the reindeer in a fur-speedo.  Thank goodness there were additional layers along with that choice of attire!

The rebel reindeer eluded capture for several minutes as the handlers tried to herd him back to the pen, so finally one decided to follow the old adage of grabbing him by the horns and wrestling him down until they could get him back on a lead.  The reindeer wasn’t hurt, just a bit disgruntled at no longer being free to roam the street.

It had been a long day and we still had a long drive home so we called it quits and headed for the truck.  On the way we saw the carnival area which was in full swing on this clear and chilly day.

It was a fun day with lots of fun things to see.  The Hubs enjoyed celebrating his birthday with a bit of Alaskan flair, so we might just have to consider doing something similar again next year!

Save

Save

No-Cost Large DIY Tray

5

Here’s another quick project I did as part of my inventory for the holiday bazaar.  This large tray started life as a cabinet drawer.  When we installed the laundry room cabinet we took out the drawer on one side because we needed clearance for the sink drain.  Knowing I could use it for something, I kept it and eventually took the tracks off.  When I did, I immediately thought to make it into a tray.

2

But I was busy and it got set aside for more priority projects.  When it was crunch time to create more inventory for the show I pulled it back out, dug through my stash of supplies and found two handles we had replaced on our desk cabinets.  They were originally gold, but a quick couple coats of ORB gave them more of the farmhouse style I was going for.

3

The hubs helped me attach them, since I’m not good at making things line up.  He also had the brilliant idea to use Q-Tips to paint the screw heads once they were in so they matched the handles’ new paint job!  Have I mentioned recently how much I love that man? 🙂

1

Although it didn’t sell at the bazaar, it’s found a home in our guest room.  It’s just the right size for the bed at 20″ by 20″ and can easily be moved to the hope chest when it’s bedtime.  I plan to stage it with some simple toiletries guests might appreciate when they visit.   I know I’ve seen similar set-ups on blogs I follow so I’ll be looking back to get an idea of what all I should include, but I’d love your suggestions as well.

4

Since I had the handles and spray paint on hand the entire project didn’t cost me a cent.  Functional and free.  It doesn’t get much better than that!

Linking up at: Knik of Time’s Talk of the Town, Tater Tots & Jello’s BFF and Savvy Southern Style’s Wow Us WednesdayStone Gable’s The Scoop and Thrifty Decor Chick’s Before & After Party!

Save

TDC Before and After