A Simple Change Makes a BIG Impact in the Dining Room

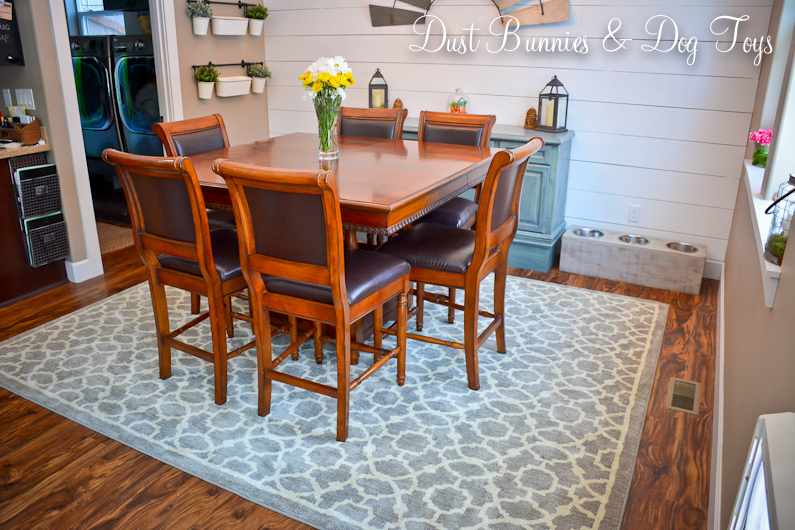
Two weekends ago the Hubs was in town shopping for some project supplies while I was home cleaning.  He texted me a picture of several large area rugs on sale for half off at one of the stores and asked if I liked any.  I certainly did and he said that was the only one like it that they had, so he swooped it up and headed to the cashier.  When he got it home I noted that it was more grey than the beige it had looked in his text but I actually liked that even more.

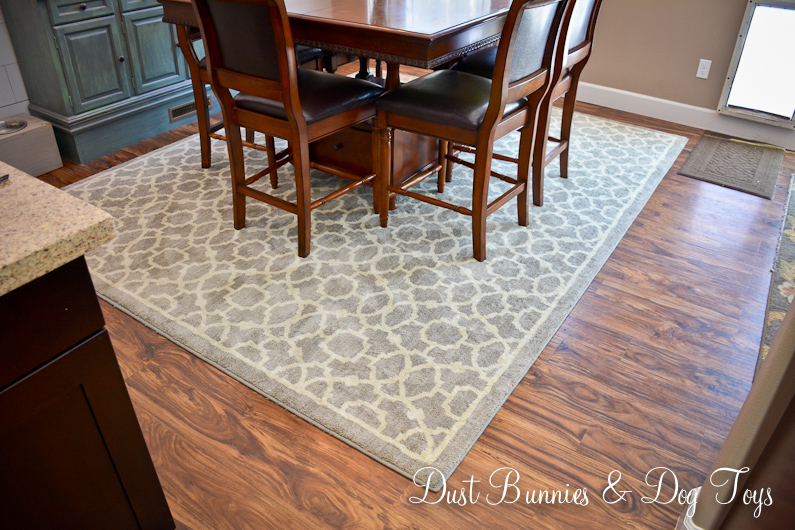
We had been in sore need of a new rug in the dining room after the jute rug we had in there had taken the brunt of Brinley’s teething phase.  We had moved the rug from behind the island over under the table as a temporary option but it was too small for the space and the pattern didn’t work there.  This option fit perfectly, had a lovely neutral yet traditional pattern and is so soft and cushy I could probably sleep on it quite comfortably.  Even the Hubs has commented how nice it feels underfoot!

The lighter color brings a whole new look to the space, and coordinates with the other grays and neutrals we already have in this space.  It was a great change for spring – making the whole area light and bright.

Although I probably wouldn’t have picked this pattern if I’d been shopping online, in person it’s just enough style without being over powering.  Plus it lets me have the lighter color I like to incorporate to combat our long winters but in a way that masks the dirt which collects in this high traffic spot – at least from what I’ve seen so far.

Now that we know how plush it is I’m on the hunt for a similar one to replace the aging rug that moved back to it’s original spot behind the island.  We call that space the “playroom” because it’s were the dogs romp and usually take their toys to play with in the sunlight from the slider doors.

It’s surprisingly low profile for how soft it is.  It literally feels like there’s a foam mattress hidden inside!  It also seems fairly tightly woven which should help with my allergies, as things won’t be able to build up between the fibers.  And the packaging says it was made in the USA which we can fully support.

I’m so in love with this new look and smile every time I see it.  There are also a couple of other updates in this space you might have noticed in the photos.  I’ll be sharing more detail about those changes soon, so stay tuned!

Save

Advertisement

A Garden Bench

1

Today I’m sharing the new garden bench we added between the brick pillars we recently added to the side yard.  I found a metal bench online that I liked but of course they wouldn’t ship to Alaska and the local store didn’t have any in stock, so I went into the store to see if they had anything similar hoping they’d have a decent option or two on sale for the end of the season.

2

They had this bench which is very similar to the one I saw on the website but it was $30 more!  Luckily I had printed the online option and taken it with me so I sweetly asked the sales guy if he could price match their own website since they didn’t carry the one I really wanted.  He must have wanted to clear out the last one they had because he quickly agreed and offered to carry the big box to the register for me!

3

On the way to the registers I realized that the outdoor pillows I’d been eyeing were on 50% off sale so I snagged a couple of those as well when I noticed that several of the options available tied in the navy, green and aqua I already had going on in the yard.  My favorite is the little bird pillow, which I got two of!  They look pretty great on the fire pit chairs.

4

And they coordinate perfectly with the two over-sized navy pillows I got at Sams club earlier this summer.  I plan to paint an aqua pineapple design on the drop cloth pillow I have on the sectional and will add navy grain sack stripes to the ones on the table chairs over on the deck so there’s a cohesive color scheme throughout the area.

5

Stop back by tomorrow to see how I finished off the brick columns with some more fun aqua accessories!

The Keys to Consignment Success

Floor

I’m not one for hosting yard sales – especially since we live in the boonies and no one would find it – and dealing with people on the buy/sell pages can be quite a headache, so when heard about an upcoming consignment sale for women’s and girls’ clothing I figured it was worth a try. I’d recently purged my closet and still had a stack of stuff left from the previous purge so I certainly had plenty to offer. In total I ended up with 115 items!

I registered as a consigner, paid the $10 consignment fee and started entering my items into the online system. Making sure I had the correct size and category for each item was a bit tedious, but it helped when I printed the tags generated by the system and started tagging items since I had several that were similar.

Tags

I rented a tagging gun from the sale’s organizers so I could attach all those tags with the plastic barbs just like the department stores. Although it’s a fairly simple tool I couldn’t quite figure out how to load the barbs. Luckily, a quick online search pulled up a YouTube video that got me rolling. After a few attempts I felt comfortable with the gun and things went pretty quickly.

This sale required consigners to provide their own hangers. I certainly wasn’t giving up my nice felt hangers and didn’t want to buy plastic hangers to use, so I was glad to hear other consigners suggest asking local retailers for their extra hangers. I stopped by the Sears where I meet my carpool to see if they could spare some. Apparently they – and many other retailers – just throw hangers away so the cashier was happy to help me load up two large bags from the bins under her register!

Hangers

Now that I had everything on hangers and tagged I organized everything by category in the guest closet (which was completed just in time!) and bagged batches of items so they would be easier to transport to the sale. I can’t take credit for this awesome idea, it was another suggestion from the sale’s organizers. But it sure worked well!

Bags

I opted to work a few shifts at the sale so instead of the standard 65%, I got to keep 80% of my sales total. Since the sale was located 45 minutes from my house I decided to work shifts when I already planned to be there such as organizing and putting out items when I dropped off my items, a shift just prior to the half-off presale and a third sorting the left over items when I came to pick up my own items. And because I was out on the floor for all of these shifts I also got to see what was available and set aside a few items I wanted to try.

I ended up buying five items for a whopping total of $14.50 and sold 31 for $148.80! Not bad for items I no longer use! And if I leave all of the items that didn’t sell tagged, I can put them in the fall sale without having to re-enter them. Guess that means part of my guest closet will be in use until then. 🙂

So now that I’ve been both a consigner and a shopper I thought I’d share a few tips on how to make the most of a consignment sale for both roles. Here are my tips for shopping a consignment sale:

  1. Get there early! Sometimes you have to wait in line, but you’ll be able to grab the best stuff at the best prices before they’re gone later in the day
  2. Make a list of items you’re looking to add to your wardrobe so you can keep an eye out for them, but don’t limit yourself to just that (unless you’re shopping on a budget) because you might find a great deal on something you didn’t even consider.
  3. Try on everything before buying. Because this is a consignment sale there are no returns if you change your mind once you get home.
  4. Be open to altering something you try on to make it just right, but be realistic about the options each piece will provide so you don’t end up with something you won’t use.

Here’s a few tips for consigners:

  1. Don’t try to sell items that are obviously out of style, unless your sale is right before Halloween or a community event like 80’s prom!
  2. Consider the season of the sale when selecting items.  Sweaters don’t sell as well at spring sales and shorts aren’t very popular in the fall.
  3. Double check all of your items to make sure there is no damage that might keep it from selling.  And if you find something either mend it or remove it from your sales list.
  4. Price your items fairly.  Here’s a handy chart to help and a few more tips on increasing your sales.
  5. Go for it!  If you’re going to go through the process of registering, prepping and tagging you might as well offer as many items as possible and increase your chances of earning more.

I hope these tips help you find consignment success, either as a shopper or a seller!  If you have additional tips, please share them with a comment below.