Flipping the Door

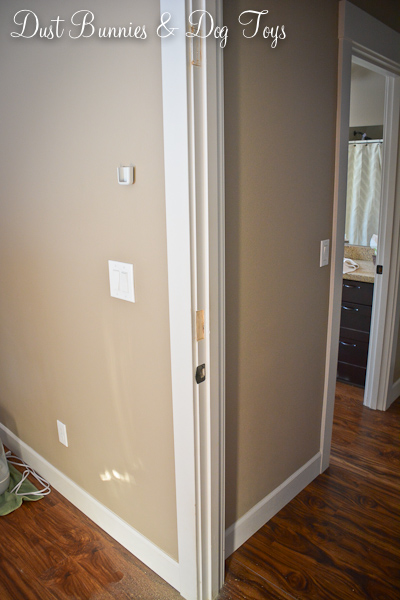
We recently made a very simple change in our master bedroom that had way more impact than we ever imagined.  We’ve wanted to flip the direction our bedroom door swings since we saw the model of our floor plan.  In fact, it was one of the two changes we requested of the builder, but by the time we noticed it hadn’t been done how we asked it was too late to change it before the final inspection because it would cover the light switches if we did.  So we lived with it for the past 3+ years.

It drove us nuts to have to come in and move the door to get to the closet every time we came home or pulled the hampers to do laundry.  It’s such a minor, trivial thing but it was an every day thing which made it seem even more annoying.  The Hubs decided he’d had enough and did some research online to figure out what he needed to do to swap the direction of the door.

He used a template he picked up at Lowes to chisel away the spots where the hinges would attach, starting with an outline of the spot and then creating slices he could work out little by little.

Soon he had three indented spots ready for hinges.  He also had to change up the hinge locations on the door itself so he took the door off and chiseled those areas too.  I was working on another project while he was doing this and occasionally held the door steady while he chiseled, so I don’t have any pictures of that step.  Once he had the new hinge locations prepped and swapped over the hardware we went from this….

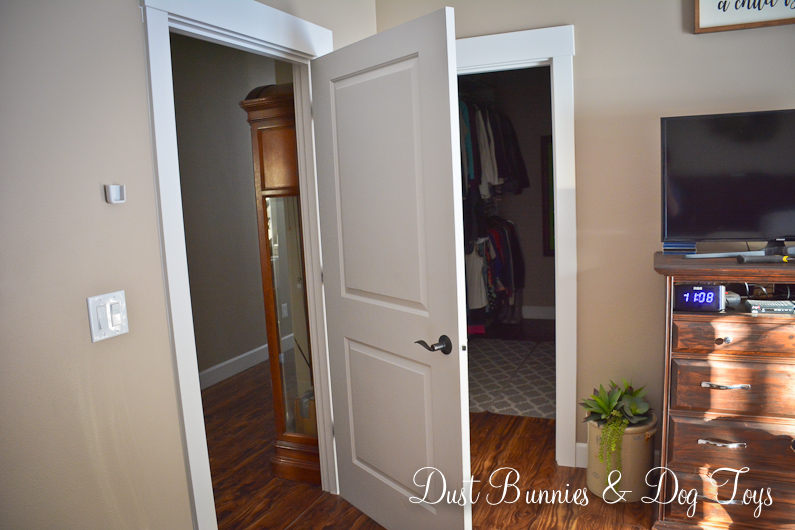
…to this!  Look how much more open it makes the space feel!  Now the door swings back flush against the wall, leaving nothing blocking the entrance to the closet – just how we always wanted it.  We left the light switches right were they were because we rarely used them thanks to the remote for our overhead fan/light combo.  We also have switches for the overhead fixture by the bathroom door so we can always use that instead.  The Hubs relocated the holder for our light/fan remote to the open side of the door so we have easy access to that if we want to turn the light off as we leave or on as we enter.

Luna wasn’t too impressed with the change because behind the door was one of her favorite hiding spots, but she’ll just have to be upset because we love it.

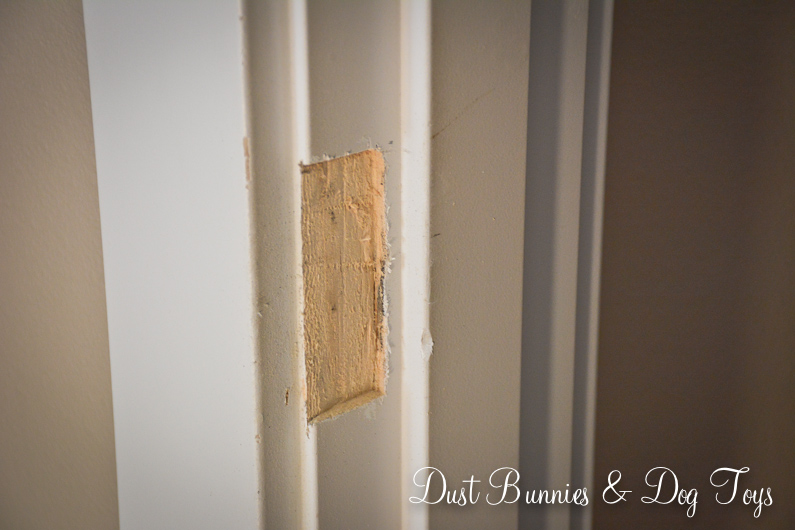
We still need to paint over the old hinge locations to make them blend in, but it’s not a huge priority since you barely notice it.  We plan to leave the old indents on the off chance that SHOULD we ever sell this house the next buyer has the option to change it back – if they were crazy and wanted their life to be more difficult that is!

So there you have it.  One very simple change made the room feel twice as big – and pissed off the cat until she realized she can just hide in the closet instead. 🙂

Save

Advertisement

Updating the Lighting

We recently updated several of the lights in the main living area of the house and I’m totally in love with them all.  The change all began with the dining room light.  I’d been wanting to change it out from the fixture we chose when building the house for some time.  The original fixture was a secondary option because the one I’d wanted was at a local antique store and was far too expensive.

Last year I spotted a very similar fixture to that antique one at one of my favorite local boutiques.  It wasn’t in the budget at that point but when my bonus check came in at work I decided to treat myself and go buy it.  Unfortunately, in the many months that had passed it had sold.  The shop owner told me they could order another one just like it when they did a supply order in the coming month so I prepaid and anxiously awaited news that it had arrived.

Unfortunately when the call came the shop owner informed me that their vendor no longer offered that light or anything similar enough to it.  So they refunded my money and I started looking online for other options.  The next day we made a trip to Lowes for a few projects and I decided to browse the lighting section, where I spotted this beauty.

I had seen this same fixture used in a house remodel on the Jenna Sue Design Blog and really liked how it looked in her space.  I showed it to the Hubs and he liked it too and it was less expensive than the boutique option I’d planned on!  It makes the room look much more open and the round shape contrasts the many square features in this room.  We will eventually swag the light over to be centered above the table, but for now it hangs from the original location.  Although it came with bulbs we decided t get LED Edison style bulbs instead which create a warm light, perfect for a dining room.

While I was browsing the lighting aisle I spotted another fixture I liked that was marked for clearance.  I’d seen similar fixtures on my favorite show Fixer Upper as kitchen island pendants, but I love our DIY insulator pendants so I never considered looking into them.   But at $43 it seemed too good of a deal to pass up and I thought it would be a good size for the entry way.

The fixture we had picked out for the entry way during construction was a nice large drum chandelier but it just wasn’t jiving with my style anymore and it hung lower than I liked.  With the LED bulbs we got for the new fixture it’s brighter than the old one and because it sits higher and is see through it creates an illusion of more space.

Plus it’s got good classic farmhouse style, which you know makes my heart go pitter-patter!  It’s going to look amazing with the update I have planned for the wall where the mirror is, but that’s still a bit on the horizon.

I also spotted another farmhouse style light while browsing at the store and knew it would be a great option for the laundry room.  We’d selected a simple flush mount bowl style light during construction because we wanted to spend our lighting allowance in spaces that saw more traffic, but it had become a bug collector and didn’t fit with the style I’ve curated in this space.

I really loved the seeded glass detail and because it’s a closed flush mount it won’t become a trap for bugs, unless they’re some sort of Houdini!  We used LED bulbs in this fixture as well, but got the antique Edison style so the light is more yellow than the entry way bulbs but it works fine for this space.

Doesn’t it look great with the other industrial metal accents in the room?  And the new yellow tone of light makes it more cozy opposed to the stark brightness of the old fixture.

It’s been so exciting to see all these recent little changes make such a big impact.  Even though we got to choose the finishes while building our house didn’t come ready set with all the details that fit our style.  That’s what you create over the years of living in the house and with each passing year it becomes more and more ‘our home’!

A Simple Change Makes a BIG Impact in the Dining Room

Two weekends ago the Hubs was in town shopping for some project supplies while I was home cleaning.  He texted me a picture of several large area rugs on sale for half off at one of the stores and asked if I liked any.  I certainly did and he said that was the only one like it that they had, so he swooped it up and headed to the cashier.  When he got it home I noted that it was more grey than the beige it had looked in his text but I actually liked that even more.

We had been in sore need of a new rug in the dining room after the jute rug we had in there had taken the brunt of Brinley’s teething phase.  We had moved the rug from behind the island over under the table as a temporary option but it was too small for the space and the pattern didn’t work there.  This option fit perfectly, had a lovely neutral yet traditional pattern and is so soft and cushy I could probably sleep on it quite comfortably.  Even the Hubs has commented how nice it feels underfoot!

The lighter color brings a whole new look to the space, and coordinates with the other grays and neutrals we already have in this space.  It was a great change for spring – making the whole area light and bright.

Although I probably wouldn’t have picked this pattern if I’d been shopping online, in person it’s just enough style without being over powering.  Plus it lets me have the lighter color I like to incorporate to combat our long winters but in a way that masks the dirt which collects in this high traffic spot – at least from what I’ve seen so far.

Now that we know how plush it is I’m on the hunt for a similar one to replace the aging rug that moved back to it’s original spot behind the island.  We call that space the “playroom” because it’s were the dogs romp and usually take their toys to play with in the sunlight from the slider doors.

It’s surprisingly low profile for how soft it is.  It literally feels like there’s a foam mattress hidden inside!  It also seems fairly tightly woven which should help with my allergies, as things won’t be able to build up between the fibers.  And the packaging says it was made in the USA which we can fully support.

I’m so in love with this new look and smile every time I see it.  There are also a couple of other updates in this space you might have noticed in the photos.  I’ll be sharing more detail about those changes soon, so stay tuned!

Save

A Quick Update to the Craft Shelves

3

As I mentioned when I shared our new barn doors in the office I’ve been making a few changes to the craft shelves above the craft cart.  Here’s how things looked the last time you saw this space – a random collection of containers and displays to store my finished inventory and on-going projects.

installedcraft

And here’s how it’s looking today.  Much simpler and more stylish!

4

A bit of purging and rearranging reduced what I needed to store here so I was able to condense it all down to two containers.  I found these cute baskets on sale at Michaels and with a coupon only paid about $10 for both.  One holds finished inventory and the other has bits and pieces of projects in the works.

1

Since I’ve stopped making hair accessories and am focusing more on personal DIY and home decor projects I didn’t need the displays I’d used for the smaller pieces anymore so the mannequin was sold and my beloved metal grate became a note board rather than a display.  The rusty oil can will eventually become a small lamp for this table.  I’ve got the lamp making kit, but am still on the hunt for the right lampshade to get that project rolling.

6

I shopped the house, pulling a milk glass vase, small plant and wooden caddy to arrange with the frame I already had here.  I also moved our little minion family over here from the other side of the room.  They are much more visible now, which makes me happy and reminds me that we need to have a new minion made for Brinley! 🙂

2

I eventually want to get a vintage scale like this one to replace the wooden caddy, but I’m waiting to find a good bargain.  until then the caddy brings a nice balance of tones and texture to the space, so I’m happy with it.

5

I still need to figure out something for the blank space next to the metal grate.  My current idea is to make a fabric canvas that can be used as a backdrop for photographing small projects, similar to one a favorite beauty blogger of mine created.  I’m thinking something a little lacy since this is one spot I could get away with it because it’s out of reach of the dogs.

I’m really loving the simple farmhouse vibe this space has now.  It’s a big change for just $10 since the only thing I bought for the update was the two baskets.  We’ve been making a couple of other simple changes around the main area of the house recently that have a similar style so things are really starting to feel cohesive.  I’ll be sharing those updates very soon, but in the meantime I’d love to hear you think of the changes so leave me a comment below.

Linking up at: Knik of Time’s Talk of the Town, Tater Tots & Jello’s BFF and Savvy Southern Style’s Wow Us WednesdayStone Gable’s The Scoop and Thrifty Decor Chick’s Before & After Party!

TDC Before and After

Save