The Cutest Pumpkins EVER!

3

Remember, last week when I said I had a little décor project to wrap up on the porch? Well, it’s finally done and I’m ready to share it with you! Wa-La! The cutest pumpkins EVER! At least to me anyway. 🙂

Painted

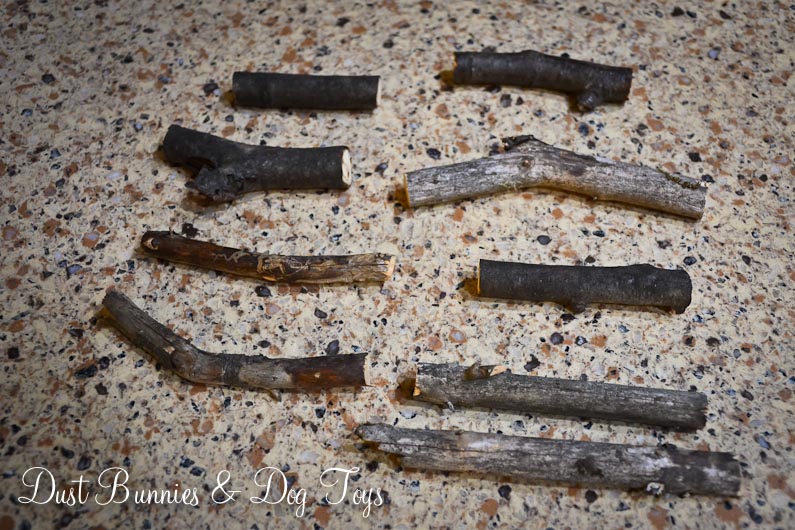
Besides being adorable, they were super easy to make. First, I spray painted some scrap pieces of 4×4 left over from our fence project. A couple coats of orange and they were looking like very square pumpkins. Now they just needed stems, so I went stick hunting in our woods, much to the dogs delight.

Sticks

I let my pile of sticks “dry out” on the porch for a few days, ok, weeks – which caused several of them to fall victim to puppy playtime. But I digress. Once I deemed them “dry” I chose a few with interesting texture and curves and marked off sections for the hubs to cut. Yes I could have done it myself, but have a bad history with sharp objects so he came to my rescue.

Stems

Once I had all my stems ready to go I tested them out on the different bases and decided the combinations I liked best. A little hot glue and presto, stems!

During

Cute as they were at this point I felt like they needed a little softening, so I dug out some orange raffia I found at a yard sale long, long ago and tied some around the base of each stem. BAM. Delightful, rustic, recycled wooden pumpkins! On. my. porch!

0

They are the perfect finishing touch to my other fall decor on the front porch!  Apparently Mother Nature didn’t agree because she added some little touches as well… LOL.

4

Advertisement

Lightbulb!!!!

Pot
Now that the weather has turned chilly I’m in the mood for crockpot cooking, but many of the recipes I find to try only require 6-8 hours  which is much less than we are away from the house thanks to daily commuting. I considered getting a new crockpot with a built in timer, but the one we have works great and we really like it. So I figured out a work around – a timer plug!  We have a couple of these for our holiday decorations so I dug one out and and tested it the last time we made something in the crockpot.
Plug
It took a few minutes to make sure I had everything set just right and I left for work afraid I’d come home to find it never clicked on, but it was a needless worry because it worked perfectly!  I felt pretty clever for figuring out a solution that would be beneficial all winter, but it wasn’t until I was telling a co-worker about it and she declared it genius that I realized just how smart it was.
Although her commute is significantly less than mine, she is away from home longer than the recipes she was using called for, so she would often request her husband run home during lunch to start the crockpot. Now she has a simple, no cost solution that won’t require coordinating a run home to start dinner mid-day. So I’m sharing the idea here in case it helps others as well.
As for what’s in that pot?  Our current favorite is a six ingredient turkey recipe that only requires five minutes of prep, just in time for Thanksgiving!
Even though I have a Pinterest board full of them, I’m still in the hunt for more crockpot recipes so if you have a favorite please share it below.

Feathered friends

Ptarmagain2
We’ve had some pretty feathered guests in our yard recently, including this beautiful spruce grouse who I originally thought was a ptarmigan.  I’ve seen him several times, but wasn’t able to get close enough for a picture thanks to my rambunctious children.  So this time I left them in the house and slowly made my way down the driveway where he was foraging on the seeds and cast off by the trees during fall.  He didn’t seem concerned that I was getting closer and when I sat on the bench by the garden he actually moved even closer.

Ptarmagain
Eventually he moved into the woods and flew up into a tree where I couldn’t see him anymore. But while looking for him, I spotted this guy pecking away at our birch trees.
Pecker
I think this is a downy woodpecker, the same species of bird I saw in the back yard of our rental in Anchorage last year but can’t be certain.  Whatever he is, he was pretty darn cute and very industrious.  He worked his way up to the top of one tree and then flitted to the next to repeat his peckish ways.
 Pecker2
Eventually he did visit my nearby suet feeder, which I was glad to see getting some use.  I think offering a few feeding stations encourages the birds to visit and eat those pesky insects who are almost the same size as they are!  Which is why I’ll be keeping the feeders stocked all winter, because if they know there is a reliable food source they will hang around and nest here, creating another generation of eaters to battle the insect population that is bound to return after winter.
 Pecker3

Thanksgiving Decor

I’ve given ya’ll a couple sneak peeks of my fall/Thanksgiving décor and I’m finally ready to share it all. I kept things simple and used items I already had to create fun yet classic vignettes.  You’ve already seen the entryway here, so today I’ll share the little holiday tree that sits next to the front door.  It’s the perfect spot to show off my cute little jingle bell Thanksgiving ornaments – a turkey, scarecrow and a pilgrim couple.

Tree
Also in the entry way is the new welcome pumpkin I picked up on sale at JoAnns.  It’s the perfect fit for the narrow space between the two coat closets across from the dresser and mirror.  I’m loving the rustic feel and the contrast it provides with the wall color.
Welcome
And here’s a full shot of the mantel with my pretty new painting made by moi!  I picked up that amazing yellow ceramic vase for just $8 on the buy/sell page.  I did my happy dance when I did because I’d been eyeing similar versions at different stores for months for WAY more.  I filled in the rest with items I already had – antlers, pumpkins a couple gold votives, a little crow figure and some tall decorative grass in a tan vase.  I finished it off with a fall colored ribbon garland I made, similar to the one in the entryway but with softer ‘harvest’ colors.  Notice that one pumpkin on the floor?  It’s the only one that the dogs aren’t interested in because it’s metal! 🙂
  Mantel

There are few other fall touches in the family room including a bouquet of orange mums in a small cream crock I thrifted earlier this year on the side table and a pretty pumpkin plate in the windowsill next to the fireplace. Somehow I neglected to take photos of those for this post, but I’m sure you can envision them.  In the dining room, I paired a tall cloche holding a pumpkin and other natural elements with some gold votives on the buffet.

Buffett
The windowsills in the dining room also got some attention. A metal owl thrifted last year gives a bit of contrast to my pretty purple plant and a small metal gourd on one side. On the other side I grouped a fall arrangement with a doily covered green pumpkin and my favorite little scarecrow.
Plant

VingetteI had grand plans to make a pretty centerpiece for the dining room table and a “Thankful” tree, but time is a scarce resource these days so I decided to table those ideas for next year in favor of other more important projects right now.  I still have a simple craft project to wrap up out on the front porch and then I can share that with you, hopefully in time for Thanksgiving!I’d love to see how you decorated for Thanksgiving, so share a link to your site or leave a comment below and tell me what you did to show your gratitude this year.

Channeling My Inner Van Goh

3

Although I’m the crafty type, painting is a skill that eludes me. I seriously suck at it. So when I saw a painting class offered on Groupon I figured why not? The hubs wasn’t too interested in joining me so I purchased a single coupon and figured it would be a fun way to meet a few new creative people.

When I checked the studio’s schedule to decide which class to attend I noticed that they offered one called “Starry Night Over Alaska” which used Van Goh’s Starry, Starry Night as inspiration. That has always been my favorite painting, so I was pretty excited to give it a try. Maybe it’s the scene, maybe it’s the movement, or maybe it’s just all the little details put together. Whatever ‘it’ is, I LOVE it!

When I arrived at the studio I was greeted by walls of the other designs they teach.  There were several I wouldn’t mind attempting and possibly hanging in my home.  Here’s just a small group of the options.

1

Luckily, everyone started out with a stenciled canvas like this.   That immediately made me a little more confident that my final product would turn out looking at least somewhat like the masterpiece I adore.

0

They gave us palettes of paint and showed us which to mix for the different sections of the painting.  First we started with the sky.  The first layer looked pretty rough but they assured us that it would get better.


2

Next we filled in our comet, stars and moon.  I wasn’t super happy with the lack of blending I was seeing in the comet tail, so I went back in and worked on it a bit more before we had to move on to the other half of the painting, where the ground and mountains were.

4

I didn’t get any shots of the lower half in progress, because we were running a bit behind and had to rush a bit to stay on schedule.  Although that certainly flustered my inner perfectionist I had to finally call it done and let it dry so I could hit the road for my hour drive home.

Displayed

And here’s my finished creation.  Rather than the little village seen in Van Goh’s version, we depicted Sleeping Lady and glaciers.  I had a bit of trouble with the flat brush that was supposed to create the depth and tones on the mountains so they aren’t as crisp as I’d like, but I decided to go with the instructor’s five foot rule – that most paintings look pretty darn good from 5′, but when you’re up close painting them you notice little things you want to play with.

The instructor offered that we’re welcome to come back during her open studio time any week if there are things we want to ‘adjust’ after we live with it for a while.  I’m considering it, but probably won’t just because although it’s not the original master piece, part of it’s beauty is it’s imperfection.  Than and the fact that if I have time to go back, I’m painting another creation! 🙂

PS – Enjoy that little sneak peek of my fall decor.  I’ll share more of that next week so stay tuned!

Our Big Massive Shed Update

Finished

The hubs has been working very hard the last few days to get this project finished and just has a few details left to wrap up.   There were a few hiccups in the process, but it looks amazing, especially since he did it all by himself.

1

2

3

4

Luckily, now that the roof is complete and the siding is up, except one spot in the back wall, he can start taking things out of the garage and putting them in the shed. Which means I’ll soon be able to park in the garage again – something I’m very excited about with winter snow just around the corner.  And now that it’s done we can start cleaning up the job site.  All the debris and tools laying around has made me twichy the last few weeks, so I’ll be glad to get everything organized and tidied up before winter sets in.

5

Finished Inside

There is one spot on the front above the door where he pieced together two scrap pieces rather than buy a whole extra sheet of siding, so he’s going to caulk that seam to make it less noticeable.  Then he plans to add some trim over the siding joints and around the corners to finish things off.

Finished 2

Another big project checked off the ever expanding to-do list.  Now he gets a little breather, before we tackle another. 🙂

All gave some, Some gave all

I had the privilege to photograph a soldier’s homecoming last night and it was the perfect way to start Veterans Day.  Yes, I drove an hour and a half each way in the middle of the night to be there when he came home, but that’s nothing compared to the sacrifices he, his family and thousands of others who have served have paid.

We have a long history of service in our family, including my grandfather who served in WWII, my brother-in-law who put in 20 years with the Navy, his two sons who carry the torch in ROTC – one of whom will soon be attending Navy flight school, my retired Coastie hubby and his Pop who served as a Navy fighter pilot and performed several of the flight scenes for Top Gun!  And we have friends in just about every other branch of the military, as well.

It takes a different kind of person to serve.  I knew I wasn’t suited for military service, but I support those who do, regardless of the politics.  And I thank them, sincerely.  To me, they are the backbone of our country, not those who call the shots in DC.

America has many problems, and one of our biggest is forgetting our veterans.  They endure hardships and trauma in the name of our freedom and return changed in ways they can’t even explain.  Many are able to find their own way to cope with the help of friends and family, but unfortunately thousands don’t and end up suffering even more once they are home.  There are many programs out there to help, although they are often overwhelmed with demand and not enough resources.   So I encourage you to think about small things you could do to serve those who have served and are still serving for you.  They don’t expect a hand out, but they will truly appreciate the small things such as:

  • Visit a local veterans nursing home and talk with the residents.  You will be amazed at the stories they have to tell.
  • Invite a local military family to join your holiday celebrations.  Often times they are stationed far away from family and miss having a large group to gather with.
  • Cook a meal for those staying at a Fisher House.  They are often consumed with the details of their loved one’s treatment that they forget to take care of themselves.
  • Offer to babysit so an active duty member can an enjoy a little alone time with his or her spouse – or so that spouse of a deployed member can have a break from the constant demand of parenting solo.
  • Tackle a few home maintenance tasks for a disabled veteran who is unable to perform them.  But let him or her help if they want – it will make them feel useful and capable despite their injury.
  • Have a yard sale and donate the proceeds to programs like Wounded Warrior, Fisher House, Honor and Remember.  Even if it’s a small amount, it helps.
  • Help organize, fund raise or donate airline miles for local veterans to take an honor flight.  If you live in the areas of the memorials they visit offer to cook a meal for the group or host them if you have room.
  • Raise or help train a service dog for a veteran.  The programs that do this will support you in doing so.
  • Foster a single service member’s pet while they are deployed.  It will give them the peace of mind they need to focus on the tasks at hand.

These are just a few ideas.  You could also contact local organizations like the USO, VFW and VA to ask what specific needs might exist in your community. But perhaps the easiest thing to do is to thank active and retired military members and their families for their service when you see them in the community.  They may only briefly acknowledge your comment because they see their service as normal every day life, but I promise that taking the time to acknowledge them resonates on a deeper level and they do appreciate it.

Quick DIY Thanksgiving Decor

Plate

Now that Halloween is over, I’m in full Thanksgiving mode and that means the decorating has begun.  This pretty plate was a left over from a recent work event and it just screamed to be made into a sign.  It fit perfectly on one side of my entry table and I thought a simple “Give Thanks” was the perfect way to welcome guests during this season.

Before

I loved the texture it already had  and new simple white letters would play well off that.  I took some quick measurements and played with a few fonts on my Silhouette and came up with this!

After

I do wish it filled the space a bit more, but I still love it.  And it only took about 5 minutes to create!  All with materials I found for free or had on hand.  That’s my kind of decorating.  Here’s a quick sneak peek at the other side of the entry way table.

Owl

I found that little owl lantern at the thrift store for a few dollars earlier this year, and the wooden tote started out solid black as a clearance find at JoAnns.  I sanded it down on a whim one day and loved the texture the left over paint gave it.  And because it’s so simple it ends up being used in many of my vignettes throughout the year.  And you might remember my little lace votives from this project.

FallEntryLooks like someone approves of my Thanksgiving entry way decor!  I’m still working on a few things for the other areas I’m decorating, but I’ll share those soon. 🙂

Constructing A Massive Storage Shed

Even though we have a three car garage in our new home there still isn’t enough room to park our two daily driver trucks, my classic truck and our side-by-side and still fit all the things that tend to end up stored in the garage.  To solve this problem the hubs decided to build a shed.  But this isn’t just any lil ‘ol shed.  It’s a mega shed.  Seriously.  It’s 11′ wide by 20’ deep!  But it has to be pretty big to house the lawn mower, yard tools, our side-by-side and various other odds & ends.

I don’t have much of the step-by-step info since he’s been doing the construction solo while I’m busy crafting, cleaning and editing photos but hopefully these pictures give you a good idea of the basic framing and set up.  He started with freebie I-beams that were headed for the dumpster at a job site to lay out the base of the shed. Because the location of the shed was a bit uneven, he used cinder blocks we had on hand under the subframe on one side to make everything level.

1

The I-beams were topped with a layer of plywood and OSB so the floor of the shed has a solid surface and additional strength.  Next he framed up the walls, figuring out the angles needed to create the pitched roof line.  The side walls were made in two panels.

2

Once those were ready I helped raise the walls and held them in place while he nailed them in.  That’s when you start to get a sense of just how big this thing will be.

3

The side closet to the house will be taller than the far side, which should help reduce snow build up during the winter and eliminate any water build up during the rest of the year.

4

He’s now moved on to framing the roof and adding the clear panels which will let in natural light.  Both sides of the roof have a bit of overhang, which should help keep water away from the base of the shed.

ShedRoof
That’s the progress thus far.  He’s hoping to get it finished and filled before winter hits, but we’ve already had one snow (as seen in the first pictures) so who knows how long that will be.  I’ll post another update once we have some more progress to show, so stay tuned!


He’s added supports between the rafters for additional strength.  After the first few rows he had the ingenious idea to use left over pieces of the I-beams to save the more costly wood for other areas.

ShedRoof2