Juneau: Part I (The Red Dog Saloon)

When I sat down to write about our trip to Juneau I realized that we’d actually done so much it would make for a very long post if I shared it all at once, so I’ll be doing several installments, documenting each activity we did over the next few days.

RedDog

One of the first things we did was visit the world famous Red Dog Saloon. Established during the territorial gold rush days, the saloon has been a part of Juneau for decades. Although it’s been housed in several different locations around downtown over the years, it still has that saloon feel with swinging doors and sawdust floors.RedDogBalcony

Just about every visitor to the saloon has left a mark, literally. Names and dates are carved and written on every surface in the place. No surface is safe, even the emergency lights.

RedDogRail

RedDogWall

RedDogLight

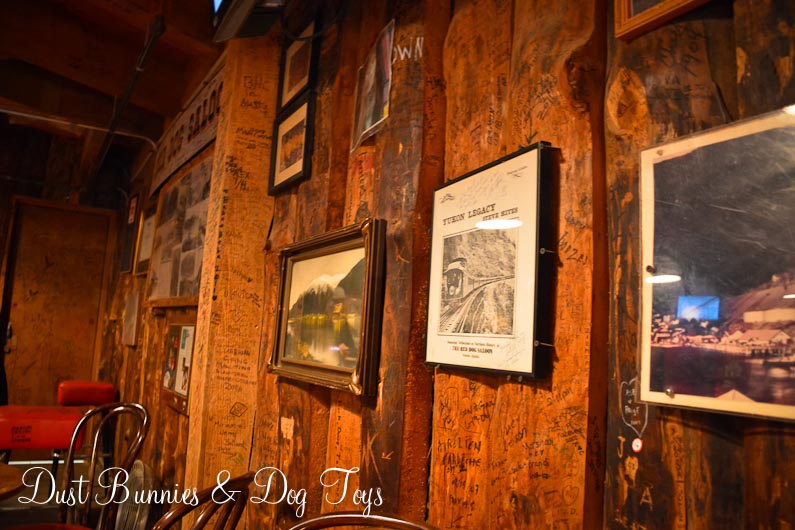
Local artifacts such as Wyatt Earp’s gun and souvenirs from visitors also cover the walls and ceiling, including life preservers from each of the Coast Guard ships that have docked there – including my hubby’s old boat, the Mustang.  My personal favorite was the bear chasing ‘someone’ up the pole in the middle of the room.

RedDogMoose

RedDogPole

Since we’d already had dinner when we visited we shared a cup of chowder and ordered a couple of drinks. Although the duck fart sounded interesting I opted for the glacier margarita, which was pretty good.

RedDogTable

We enjoyed listening to the singer, who often paused mid-lyric to tell a story or chide someone. And I couldn’t help but chuckle at his tip jar – the blind puppie fund, which later changed to estrogen!

RedDogSinger

The entire place had a truly laid back, Alaskan style, but the best way to sum up the Red Dog Saloon is this sign.  In fact it’s so perfect they offer it on t-shirts and other merchandise in their gift shop.

RedDogSign

So if you find yourself in Juneau with a few hours to kill this is a good place to do so.  Kick back, read the writing on the walls, marvel at the odd collection of items and definitely enjoy a cup of chowder. 🙂

Advertisement

Slinky + Embroidery Hoop = Peanut Squirrel Feeder!

Done

When we first put the bird feeder out we had a kamikaze squirrel who took up residence on the branch it hung from and kept up a constant chatter to proclaim his turf.  Of course he only wanted the sunflower seeds and would knock everything else out of the way to get to them, thus most of my bird seed mix ended up on the ground wasted.

I quite enjoyed watching his aerobatic endeavors and didn’t want to shoo him off, so I decided to make a feeder just for him.  I’d seen metal hoop peanut feeders for WAY too much so I scouted Pinterest until I found a DIY version using a slinky, which I just happened to have thanks to the $1 zone at Target.  I picked up a small plastic embroidery hoop at Michaels for  few buck with a 40% off coupon and paired the two together with a key ring to keep the two ends connected. It was that simple.

FeederReadyCloseup

Although she didn’t offer any assistance or guidance, Luna supervised my work and gave it a good inspection before it was filled.

FeederInspect

Since I used a small slinky and hoop, I only needed about a half bag of peanuts to fill it completely.

FeederPeanutsNow that the fence was  mostly done I added my plant hooks and hung the feeders from the raised posts.  This gives Luna the perfect vantage point to supervise who visits each feeder.

LunaWait

And safely watch what her siblings are doing without being in their midst!  It is pretty funny watching her get to this lookout though – since she can only jump high enough to get her claws in the top board.  After that she gets an ab workout hauling herself up.

Luna

I’m sure these hooks were intended to be used with the flat side as the top, but it felt more secure to have the hook curl over rather than under.  And I’m pretty sure that the birds and other critters partaking in the buffet won’t give two hoots which way they sit.BirdBathI haven’t seen squirrely squirrel back since I put the feeder out and no one else seems to appreciate my handiwork just yet, but I’ll leave it out because soon their food sources will grow scarce and they’ll  be on the hunt for yummy things to stash away for those cold winter days. 🙂


I’MMMM BBAAAACCCKKK!!! :)

Hi, remember me?  Yeah, I’m the crazy gal that writes this little ‘ol blog.  I’ve been uber busy with regular life recently and haven’t had a chance to share anything in weeks.  During that time, I made a business trip to Juneau that included a little personal time with the hubs who tagged along to play chauffeur.  I’ll share some of our exploring soon, but for now here’s a quick update on our hydroseed.

1

Things are looking nice and green, providing the perfect contrast for the falling leaves, which I personally love and have no intention of raking unless I’m going to jump in the pile.  Although some spots are definitely thicker than others we are pretty pleased with how things look.

3

5

The area just off the garage is obviously the most lush.  We didn’t do anything different here than any of the other areas, so maybe it’s just better tilled soil here since those tubes mark the location of our septic tank which required excavation and fill during constuction.

2The side of the house is probably the sparsest section, but it’s also the area with the worst drainage.  Hopefully the patches that have taken root will reseed and fill in the bare spots as things come back in next spring.

4

These shots were taken just before we took down the dog run and gave the fur babies free reign of the yard.  They absolutely love having such a large area to romp and did just that ALL DAY for the first two days.  That made for very tired puppies and a very quiet evening. 🙂

The hubs still needs to get the gates made and installed, but things are secure enough to keep the kiddos in and other things out for now.   The gates can wait until he finishes his priority project – building a fairly large storage shed before winter hits so we can clear out the garage and reclaim our indoor parking before we have to bust out the ice scrapers pre-commute.  We’ve already had a few mornings with frosty windows so it won’t be long.  Eventually that shed will convert into a greenhouse when we build a big “shop” elsewhere on the property.  I’ll share some of the construction and organization once it’s done, so stay tuned!


Our New Barstools

BarstoolsBack

While building our house I planned to use the extra chairs from our bar height table at the kitchen island bar so they’d be within easy reach if we needed to add a few seats.  Unfortunately, we soon realized that they weren’t high enough to be used at the bar unless we wanted every adult to feel like they were sitting at the kiddie table!  So the hunt began for a set of barstools.  I found an option at Target that I liked and purchased one to bring home and test out.  It turned out to be the perfect fit and was pretty darn comfy, but with a price tag of $117 each (Alaska price)  I wasn’t about to buy all the stools at once.  About a month later the chairs went on sale and I found that the store would price match the website, so I picked up another for around $90.  That gave us two spots to sit at the bar, which was enough for us, but it drove me CRAZY having just two stools in this massive space for MONTHS.

A few weeks ago the stars aligned.  I found a Cartwheel coupon for 25% off bar stools which could be combined with a store coupon of $10 off a home purchase of $75 or more.   Added to the website price match and my 5% off for using my red card I came home with another three stools for under $75 each!  And they even loaded them in the truck for me!  I think I sang the happy song the entire day!  Those of you who follow me on Facebook probably saw my ode to Target that day.

The hubs assembled two and proclaimed that four was the perfect number of stools.  I thought he was saying that just so he wouldn’t have to assemble the final stool, but when I looked I had to agree.  You read that right.  My husband was right.  Five stools would be too crowded.  So not only was he right, he saved us almost $75!  I knew there was a reason I married him. 🙂

Barstools

But the most important reason these chairs are perfect is that they sit just high enough that when Luna sits in one she can see over the counter.  I haven’t been able to get a picture of that in action, but trust me that it happens and it’s hysterical. Just imagine a little kitty face peering over the top of the counter in this shot…

BarstoolsFront

Hydroseed Update

Grass

It’s been roughly 4 weeks since we had the back yard hydroseeded and things are starting to look a little green out there – although still somewhat sparse.  It’s a slow process, especially since we had several days without rain and didn’t have time to keep the seed damp like the company said to. However, what is growing seems pretty hardy on close inspection.

GrassCloseup

But it’s still not ready for our heathens, er, furballs to be introduced. Hopefully, the current stalks will reseed and fill in the barren areas before winter hits, but if not it should at least give us a good start for next season.  And it’s still more cost effective than sod given the square footage we’re covering, even if it isn’t as instant.

Freshening Up the Fireplace

FireplaceBefore

Somehow I’ve lived in our house for the past 9 months and never really noticed that the stone on our fireplace still had installation dust on it – that is until it hit me like a 10lb brick to the face one day as I looked at the fire while watching TV with the hubs.

FireplaceStoneBefore

But once I noticed the white dust on several of the stones it became my obsession to eliminate it. The next day I filled a bucket with hot water mixed with vinegar and started scrubbing. I decided to focus on the lower right-hand side of the stone wall since that would be the least noticeable area if there was any discoloration from the vinegar and it would give me a good section to judge the effectiveness of my chosen cleaning method

I let the area dry and was pleased with the improvement, so I added “Clean fireplace” to my to-do list for the upcoming long holiday weekend. It wasn’t a complicated process, but it was time consuming because each time I scrubbed a stone I had to wipe down the wall next to it where the dirty water would splatter.

FireplaceStoneAfter

So last Saturday I gathered my supplies and proceeded to scrub, rinse and wipe my way across the fireplace, from top to bottom.  Although I started with fresh clean water and vinegar this is what I ended up with once the entire area was done. I was pretty amazed.

FireplaceBucket

I’m sure there’s a bit of regular dust mixed in that concoction since the stones have texture which provides particles a place to accumulate. I’m thinking this might need to be a new part of my annual deep clean, but that beautiful wall of stone is sooo worth it. Check out the difference in the before and after.

FireplaceBefore
Before
FireplaceAfter
After

All that pretty clean stone will be the perfect backdrop to my fall décor! Watch for a post about that soon.

Front Porch Rockin’

I’ve always loved the look of white rocking chairs on a front porch and I vowed when we started building our house that I’d have one on mine before long. I spotted several at the home improvement stores when the patio furniture displays went up, but wasn’t ready to pay $100+ for a rocker, so I kept my eyes open for a bargain elsewhere.

A few weeks later I found this wooden rocker on the local buy/sell page for $30. That seemed like a pretty sweet price, even though I’d have to sand it down and paint it white. So I brought it home and it sat on my porch all summer, just waiting for it’s makeover.

Rocker

I blinked and summer was over and I still hadn’t started the rocker’s transformation. But sometimes procrastination pays off. Just as I was starting to make my supply list for the project I spotted some outdoor rockers for sale on the buy/sell page. Granted the price being asked wasn’t a deal, but as I calculated the cost of the supplies to do the update I realized I wouldn’t be saving much by doing it myself – especially when I factored in the value of my time being diverted from other projects.  I decided to see if the store might have them on clearance yet and sure enough they did. The ready to assemble, already painted chairs were now $88 and with our military discount I got one for just under $80.

I sold the original chair for $50 within a day of posting it, so my total investment is just under $60! Still cheaper than the retail price and about what I would have spent to finish updating the first chair without hours of prep, sanding and painting.  The hubs did a fantastic job assembling the new one and now it’s looking lovely on the porch next to my lovely milk can side table. It’s a pretty impressive combo when you realize I got both for less than $125 and they will adapt to each season’s décor!

RockerNew

I’ve already enjoyed a few sits to enjoy the view of the mountain down the driveway – which is a MUCH better way to spend my time if I do say so!

Milk Can Side Table

MIlkcanFInished

This little project has been in the making for some time now. I picked up the milk can on the local buy/sell page. At $50 it was pretty pricey but they are hard to come by and this was the real deal, solid metal in good condition. I needed something sturdy that would stand up to the elements on the front porch.

MilkCanBefore

I wasn’t loving the original red color so I dug through our paint cabinet and found two grey spray paints I could use. The first was a dull grey primer and the other a brilliant metallic finish. I randomly layered them so they would mix well and play off each other. Here was the end result.

MilkCanPaint

MilkCanPainted

I hunted high and low for an unfinished wood table top to complete this project to no avail. I even looked when I was down south on our trip. Amazingly, I finally found one at Lowes for about $13.I found a can of stain in the paint cabinet and gave each side a coat. Then the hubs and I took turns applying coats of poly – also from our paint cabinet – to both sides until we were happy with the color and finish.

MilkCanTop

I planned to screw the top on through the lid of the milk can, but the hubs suggested liquid nails which we had on hand. A couple dollups and a good hard press and it was done.

MIlkcanFInished2

It looks just how I envisioned it would, the perfect unique and rustic side table for less than $65. Just wait till you see what it will accompany on my porch!

Shared at Knick of Time’s Vintage Inspiration Party #203!

Rustic Laundry Room Sign

LaundrySign7

I tackled several projects over the long holiday weekend and this is one of my favorites. When we thought we were being transferred to Florida a few years ago I purchased a couple Uppercase Living vinyl phrases for the house we contracted to rent. But plans changed and we didn’t transfer and the fancy phrases got tucked away for future use. Now that we’re in our own home I’ve been deciding how to use them and knew that the laundry room phrase I had would make a perfect sign for the top of the cabinets in that space.

I found a scrap piece of wood left over from when the hubs took apart the old dog beds. It was destined to be used for this sign because it was the perfect size without any further prep.

LaundrySign1

I painted the perimeter of the board gray since I wanted to rough up the edges and have some color come through.   Then I gave the whole thing a couple coats of white.

LaundrySign2

LaundrySign3

LaundrySign4

Next I randomly sanded the edges until I was happy with the look of the texture. I was pretty pleased with how the grey peeked through.

LaundrySign5

Then came the hard part of prepping the vinyl and making sure I applied it centered and straight! It took a few attempts, but I finally got it right.

LaundrySign6

The hubs helped me add a little more sanding around the lettering and gave the words themselves a light sanding for texture.

I climbed up on the washer and dryer to reach the cabinet top, where I used some shims and a small easel to make it stand just the way I wanted. It ties in with the other fun signs in this room and it fits the space perfectly. Another project done and I couldn’t be happier with the result!

LaundrySign8

Next up for this room is a fold down drying rack and a cabinet for the laundry sink, but those are both projects for the coming months when Alaska’s winter weather traps us indoors.

The Fruits of Our Labor

BerryBucket

After my recent visit to Hatcher Pass I couldn’t wait to go back and pick berries, so I invited a friend to join us recently, loaded up the dogs and hit the trail. I had a local’s tip for a spot that was supposed to offer “copious amounts of berries,” but it turned out to be a bust, so we traveled further up the road and checked a few more spots before we finally found a great little patch just below a parking pull-off.

Unlike the high brush blueberries we’d had in Kodiak, these were low brush, which meant they were harder to spot and pick. We all ended up with purple splotches on our knees and rears from unknowingly sitting on a patch while working a group we’d spotted nearby. They were also smaller than their high brush cousins, except the couple of patches we found shaded by other vegetation.

BerryStoli

BerryRun

We chatted as we picked and the dogs ran amuck exploring – sometimes right through the patch we were working on, nearly toppling the harvest bucket! They occasionally got to sample the harvest and we took them to the nearby creek for a drink several times. Several times they barked warnings at the paragliders who rode the breeze overhead, in case they got any ideas about trying to land in our berry patch! 🙂

BerryBother

BerryBotherBucker

There were also periods of focused picking, where the only sound was the waterfall a few yards away and an occasional chirp of a bird. That’s usually when I’d look around to see where the kiddos had gone since it was too quiet and not see anyone until I called and then heads would pop up out of vegetation.

BerryPickin

BerryKiss

It got chilly as the day wore on and the clouds started to move in so we decided it was time to call it quits before it started to rain. Before we left I took a few minutes to capture a few portraits of the fur babies, who were plum tuckered and ready for a nap. Two of the three were asleep by the time we got we got halfway home.

BerryTired

BerryT

We came away with berry stained hands and harvests big enough to make some yummy treats. The hubs used ours – after a lengthy stem removal process – for some lemon blueberry bread, which is the perfect complement to my new indulgence, berry frozen yogurt.

BerryHands

BerryBread