A Little Change in the Guest Room

Today I wanted to share a little change I did in the guest room.  The shams we had on the back pillows in this room were on their last legs and desperately needed to be replaced. I wasn’t loving the bedding after we upgraded the headboard and wanted something more modern.

Luckily a friend was making an IKEA run on a trip down south and agreed to pick up a couple items for me, including a duvet set.  Although I didn’t want the duvet itself, the shams were exactly what I’d been looking for to coordinate with the throw pillow we got on our trip to Scotland.

The subtle grey ticking stripes pick up the blues in the new throw pillow and bring just enough pattern to the bedding without being overwhelming.  I also like the combination of the stripes on the throw pillow and the shams.

While I was changing out the shams I decided to swap the throw blanket for a fur one I already had.  It makes the space cozy while we’re still in the grasp of winter.  I also moved the vintage crock from the corner by the closet to the other side to balance out the space a bit more, which allowed me to center the bed on the wall.  I added one of the cute little faux trees I picked up after Christmas to fill the corner and add a bit of greenery.

I still need to refinish the dresser, faux shiplap the wall and find art for above the bed.   I tested out the tobacco baskets I planned to relocate here and wasn’t loving them so I’m now thinking about getting one of the big vintage window shapes from Joanna Gaines’ Magnolia line.  But that’s not in the budget right now.  After our recent overnight earthquake I know it has to be something light weight in case it did get shaken off in future quakes so our guests stay safe!  I’d love to hear ideas you might have.

Advertisement

A Quick & Easy Spray Paint Makeover for Desk Accessories

Since I’m transitioning into a new role at work, someone had to take over my old position.  Luckily we had someone within the department who was interested and ready for a change, plus she already knows how we operate and the history of many projects.  She’s had to share a desk at every job she’s ever had so having her own desk in this new position is a big deal for her.  I decided to really make it special with a few fun accessories she can use to set up her own space.  I picked up a cute mouse pad and some note pads at Target for a few dollars and then found this inspirational free printable online to continue the pink theme.  I asked a friend to pick up a simple IKEA frame on her trip down south for the holidays and printed the artwork to fit.

While these couple of pieces were nice, I wished I could buy her a whole new set of accessories to really make her desk snazzy, but that just wasn’t in my monthly budget after the holidays.  Then inspiration struck – I remembered I had a can of gold spray paint at home and because I made my own DIY paper clip jar for my new desk I didn’t need the metal mesh clip cup I’d used at my old desk.  So I decided to give spray painting it a try since it worked so well on my desk caddy organizer at home.

It worked pretty well and coordinated with the mouse pad’s gold dots.  That’s when I knew I was on to something.  I took the business card holder and tape dispenser home over the weekend to give them the same makeover.

The card holder was pretty simple, but the tape dispenser needed a good cleaning along the little groove and a bit of taping off so the tooth part where you tear the tape didn’t get painted.  Now both look like the fancy desk accessories you buy new at the stores, rather than the boring bankers black they used to be.

Finally I painted an IKEA metal bucket I had on hand for a pen cup to complete the set.  I had run out of spray paint at that point and had to buy another can, which wasn’t an exact match to the first but it all still works together.

When I presented her with the spread she was very surprised and loved the whole set.  She officially starts the new position next month and is excited to get her space set up with her new bling.  It was a simple way to give her an extra little bit of motivation for the challenges she will encounter as she learns her new duties and it didn’t ‘break the bank’! 😉

New Job, New Desk and New DIY Decor

In my post last week I mentioned that 2018 started with a big change for me at work.  I’ve been promoted to a new position within the same department and as part of that transition I got to move to a bigger desk.  I had decorated a bit at my old desk, but the space was awkward and limited so I didn’t do much beyond organizing my office supplies.  The new desk has much more room and is a bit more private so I had a lot more to work with.

Here’s how the space looked just before I moved over.  It was a total blank slate.  And here’s how it looks now!

It’s still a cubicle, but it’s cozy.  And since I spend a big chunk of time here every week I’m glad that it makes me comfortable and reflects my style.  Things started with a plan to organize my office supplies.  I’d picked up some pieces from the Joanna Gaines spring line at Target, but they ended up not working out for what I wanted.  So I went the old DIY route.  I had this little metal caddy for a while.  I picked it up from the Target dollar zone probably 2 summers ago for use out on the deck, but it never left the cabinet since it came home so it needed a new purpose.  It was just the right size and layout to store my note pads, pens and markers.  But I wasn’t crazy about the color in this space when I tested it out with my other supplies.

So I did what any good DIYer does, I broke out the spray paint for another desk caddy revamp.  My first thought was white, and I had a can of chalk paint in the garage.  I taped off the handle to protect it and got to spraying.  It took several coats to cover the teal color and once it did, I wasn’t loving it.

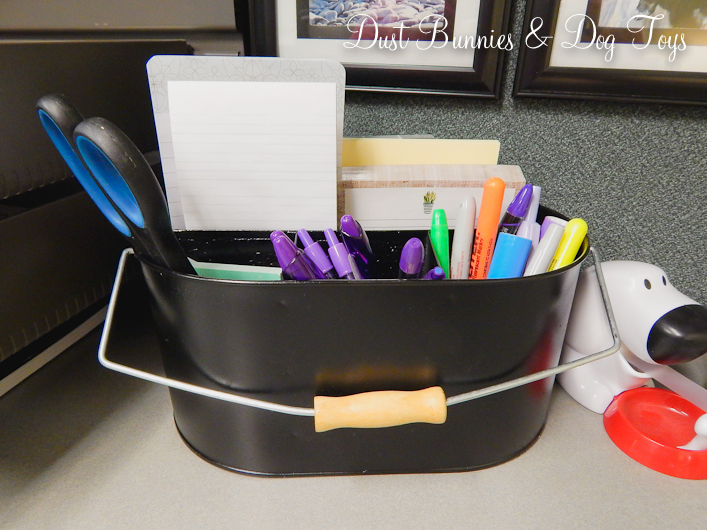
So I dug in the paint cabinet again and found black.  It’s my new go-to farmhouse style color and I figured it would work well with the frames I already had at my previous desk.  There were a few spots that crackled or bubbled since the first coats were a chalk paint but in good farmhouse style it adds to the character.  Here it is finished and all loaded up.

I did keep the fun shaped paper clips from Hearth and Hand because having goat shaped paperclips is just awesome.  I had originally planned to have them in the small dish you saw above, but it was too small and they spilled out easily.  So I decided to DIY another solution.  I pulled an old small canning jar out of the cabinet – oddly the same cabinet the caddy had been stored in – and since I’d used up all the black on the caddy I painted the ring top with ORB so it coordinates.  Now it’s the perfect way to store all my cutie paper clips.

There was a little cubby area in the back corner of the desk which lent it self to being the perfect spot for all my supplies.  Here’s how I originally set it up.

I decided to move the paper clip jar over by my business cards so it was more visually balanced and turn my little Scotch doggie tape dispenser toward the caddy.  This just felt better so I kept it this way.

I had this fun cast iron card holder from my craft show booths and since it doesn’t get use most of the year I decided to bring it in to the office so I can see it every day.  I think it was originally meant to hold bars of soap but it’s the perfect size for business cards.

I snagged a letter board on EBay for $20 with shipping and put that off to the side near the phone as you saw above.  I plan to share inspirational messages each week to help motivate our team.  I flanked the board with an IKEA plant I already had and the seasonal winter bird decor I’d gotten for each of the desks in the office back at Christmas.

I placed the lamp from my old desk in the other corner behind the monitors.  I already had the verse print from our trip to Hawaii when we visited a friend’s shop there, but I found a nice frame for it and placed the books I’m reading for professional development next to it.

If you’re wondering what’s on the other side of that big white area behind the monitors, it’s this pretty mural of a local mountain range.  It’s a nice piece of art to enjoy every time I walk toward my desk.

Above the back corner was a little shelf, where I display my awards and a faux succulent from my previous desk.  I hung my version of van Gogh’s Starry Night (my fave painting) that I did at a paint night event a while back on the back wall for a bit of color.  I also traded out the heavy wood inbox tray for the black wire one I’d brought in for my old desk, since it coordinated better with my other black accents and reduced the visual clutter a bit.

So here’s my home away from home during the week.  It’s cozy and welcoming, but still professional.  My coworkers have enjoyed seeing the space come together and now look forward to the weekly inspiration on my little message board!

I also DIYed some items for the gal filling my old position, which I’ll share soon! 🙂

First Project of 2018

Hey everyone, the beginning of the year has been quite busy!  I had dental surgery on the 2nd that required a few days of recuperation and I was promoted at work to a new position that requires learning several new systems, but I still have to handle some things from my old position until it’s filled.  I took a little bit of time over the weekend to do a few small projects in between cleaning house and editing client photos.  Today I’m sharing the first of those with you – my new desk organizer caddy!

Here’s how this little cutie started out.  I spotted it at the thrift store well over a year ago and knew the simple design would work for some type of organizing in our house – especially when the price tag was only a couple of dollars!

I gave the whole piece a light sanding so the paint would adhere, and then used spray paint we had on hand.  Once it was dry I distressed the edges and sides to give it a bit of texture.  A quick coat of paint and it’s got tons of farmhouse style.  Even Mrs. Joanna Gaines would probably like this one. 🙂

Here is is in place and all loaded up.  I put note pads in the back slot and divided up my pens and markers into to of the front sections, while the third hold the other miscellaneous items I like to keep on hand.

Every time I look at it now, I think “That was so simple.  Why didn’t I do this sooner?”  Truth be told I had to live with it for a while to make sure it would work in this spot plus decide what color I wanted it to be and then life just got busy with other priorities.  Luckily I had other spray painting to do so it was the perfect time to get this one done.

The best part of it all is that this little upgrade didn’t cost me a cent!  Since I already had the caddy, spray paint and sand paper all on hand the only cost was my time.  That’s a great way to start off DIY in 2018.  Here’s to hoping all my projects this year go this easy and have as great of a result!

Farewell 2017

Happy New Year!  As we welcome 2018 with new goals and ideas it’s easy to think of how much we didn’t accomplish last year.  Yet when I look back at what I’ve shared here on the blog I’m always amazed at just how much we did do each year.  Here’s a quick look back at the highlights of 2017:

  • We started off the year with one of my favorite projects to-date, barn doors for the office!
  • The next big project was finishing the laundry room sink update by installing the granite counter top remnant.
  • We celebrated the Hub’s birthday at the famous Iditarod ceremonial start during Fur Rondy.
  • The Hubs and I had a great visit to Portland over Memorial Day weekend where we did lots of shopping and celebrated our anniversary at the Tim McGraw and Faith Hill concert and got some great finds at a wonderful little antique shop.
  • The first season using the green house was a great learning experience for next summer and the added porch, sitting area and nearby shed bed make it my new favorite spot in the yard.  Plus the DIY compost bins should hold some garden gold come spring!
  • We enjoyed a unique 4th of July celebration in Glacier View while my sister and brother-in-law were visiting from Virginia.
  • There was also the quick trip down to Kenai to visit the Hub’s family during their annual fishing trip from Arizona.
  • We made a quick day trip with friends to Hope & Whittier in search of new photography locations and salmon berries.  While we didn’t come home with much it was a fun day spent with friends.
  • I enjoyed browsing local artists’ creations at the Bubbling Brook Vintage Market where I started my Rae Dunn collection.
  • I saw some amazing gardens on the Willow Garden Tour and can’t wait to go again this year!
  • I got to explore Homer while there to photograph a sweet couple’s wedding.
  • The Hubs resurfaced the deck off the living room with Trex and built a new one off the master bedroom to match.  There’s still some finishing touches to do to the new deck this year, but it’s been a great addition to the yard.
  • I attended two great photography workshops to improve my skills behind the camera and in running my business.
  • We hit the State Fair to see Josh Turner perform and to pet the goats.
  • I picked up some fun new items at this year’s Picker Day that will be fun projects for the yard come spring.
  • The Hubs and I had an amazing time in Iceland and Scotland this fall on our way to my nephew’s wedding!  I’ll be sharing those adventures soon as I’m still working through the thousands of pictures we took on the trip.
  • We kicked off the holiday season with the Colony Christmas celebration and an amazing fireworks show.
  • We enjoyed a little getaway in Girdwood while photographing an elopement at the end of the year and had a nice quiet Christmas at home with the fur babies.

This year is off to a busy start as well.  Tomorrow I have a minor dental procedure to keep myself healthy and when I return to work after recuperating for a few days, I’ll be starting a new position in my current department!  There will be a lot of new things to learn and coaching of the person who will take over my current position, but I’m excited for the change.  I’ve also got some big plans for the house and yard this year which I’ve already started planning out on the calendar.  Looks like next year’s annual recap will be just as interesting!  🙂