Pretty Tiki Torches for the Back Yard

Now that we have so many great areas to enjoy in the back yard we spend more time out there.  Unfortunately the famed Alaskan mosquitoes like to join us!  To remedy that problem we decided to add tiki torches to expand the reach of the citronella candles we already use.

I spotted these Better Homes and Gardens torches at Walmart recently and decided to give them a try.  They come with hardware so they can be used three different ways.  The first option is as a table top torch using the pedestal attachment.  The second option is to position them on a deck railing with the clamp provided.  And the third is as a pole torch using the post extensions.

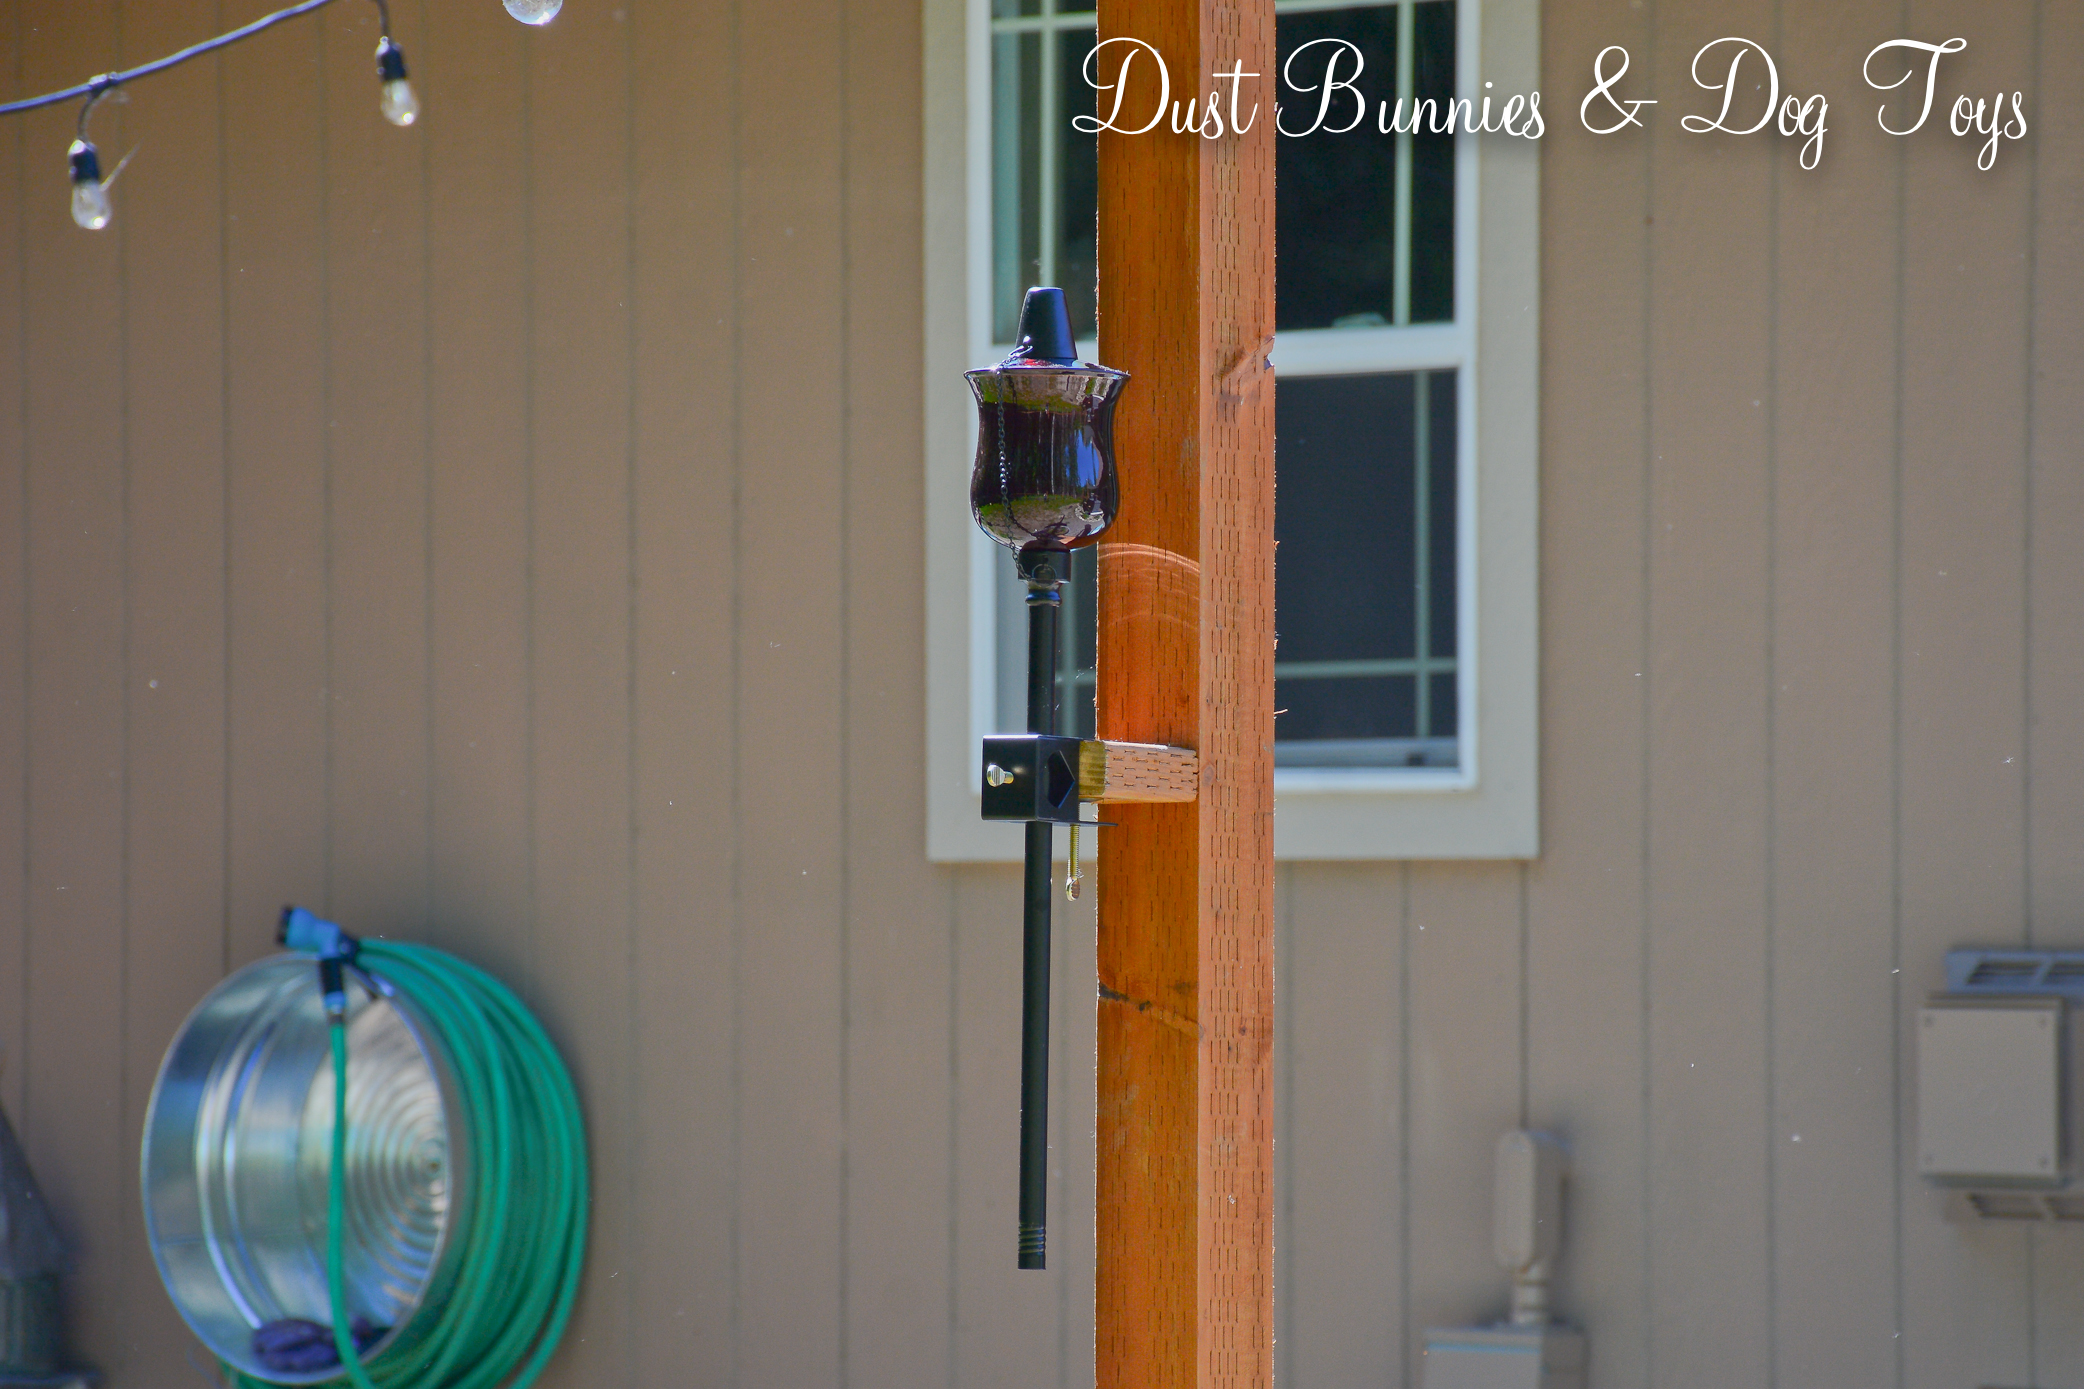
Because I always seem to use things slightly differently than how they are intended, I wanted to put them to the posts we already had in the yard.  I planned to ask the Hubs to create a galvanized pipe fitting that we could attach to the posts for the deck shade and fire pit lights, which could be affixed to the base of the torch.  Luckily, he had an easier idea.

He suggested using the provided railing clamp on a small block of wood he could attach to the posts.  It was such a great idea and it saved us the cost of creating the pipe fittings.  We did debate about cutting the metal pole on the torches so they didn’t extend beyond the clamp.  The Hubs wanted to keep the extra length and I was thinking it would look better with it cut.  We decided to leave it for now and if I still don’t like it in a few weeks we can cut them down.

We tested them out the other night, now that the days are getting a little shorter.  They sure seemed to keep the bugs at bay and they gave off a nice glow in addition to our cafe lights. (Just ignore those cobwebs, ok?  The spiders seem to appreciate them as well.)

The big reservoir inside the canister means they don’t need to be filled often, so we can just light them and sit back.   Now we just need to make more time to sit out back and enjoy them before the snow flies in about 2 months!

Advertisement

A Serving Cart for the Deck

As I was changing up things on the deck this year I decided to add a serving station.  Last year this spot was occupied by the chippy bench we brought back from Portland, but that moved to the new deck this season leaving room for this cute cart I upcycled.

I picked it up on the local buy/sell page for $50 back in the spring.  Since it was still too cold outside to work on the yard at that time, I focused my attention on upcycling items for the deck, including this and the milk can planter I shared recently.  It was in good shape but I knew the red color wouldn’t work with the other elements we had planned for the deck.  I gave it a good cleaning and several coats of spray paint.  I went with black because it ties into my modern farmhouse look and it was the one thing I could count on to cover the red.  Here’s the before and after in my makeshift paint booth in the garage.

It’s always amazing what a coat – or several in this case – of spray paint can do!  It’s the perfect height to fit under the windows and is still narrow enough to not impede the walkway to the chicken coop.

I styled the top with a couple items I had on hand including the outdoor glasses I picked up on our trip this spring and the pottery barn glass pitcher we got as a wedding present.  I borrowed the faux plant from the laundry room.  Lastly, I added the table top tiki torch for a bit of bug protection.

The lower shelf stayed pretty simple with the metal bird house I found during our spring trip and a little succulent planter I made from an old candle container.

The handle is a perfect spot to drape a dish towel, so I used this IKEA one I had in my stash for projects.  And just like that we’re ready for a party on the deck!  I plan to put it to use when we have friends over this evening.

I do wish it filled the space here a bit more so next season I may use it elsewhere and build a narrow console table to go here.  But for now I’ll enjoy my little upcycle design. 🙂

Adding Chippy Charm to the Deck

Is anyone else still coming to terms with the fact that it’s already mid-August?  While blog land and Pinterest fill with everything fall, I’m clinging to the last bits of summer.  It’s been a rainy one here and while that’s great for my plants I’d prefer more sunshine during summertime.  Luckily, I’ve had plenty of projects to distract me, including this spot on our deck where I created an extra seating and planting area with an old bench that I picked up at the Junk Bonaza show last fall.

It was a steal at just $30 and I knew it would look great on the deck – plus it can double as a photo prop for large families!  It’s the perfect amount of chippy paint and classic lines for my style.  I placed it under the dining room windows and flanked it with our whiskey barrel fountain and a wooden barrel we picked up on our last trip to Portland.  Then I added in plants and a bird house to finish off the look.

This arrangement brings so much color and life to this side of the deck.  Most of the plants I used are in pots with minimal or no drainage so being under the eave of the house is a smart choice, plus they all have a rustic vibe to them so they pair well with the worn bench.

I’ll be enjoying this pretty set up as much as possible for the rest of the summer, even if that’s only until the end of the month.  I can’t wait to figure out similar areas on the new deck off our Master bedroom next summer.  That deck is almost done, so I should be sharing it with you soon!


Revamping the Deck

One of the biggest projects we tackled during May and June was updating our deck with a new Trex top.  The pressure treated boards the builder had used to top our deck were already starting to look very worn and since we are building a second new deck on the other end of the house this summer we wanted them both to match.  The Hubs researched quite a few materials and decided on Trex both for the ability to be shipped to Alaska in the quantities we needed and it’s reviews.

He started at the outside of the deck, removing the old boards and replacing them with the new Trex, section by section.  It was slow going getting the 20′ boards up and making sure all the nails and screws were out so the Trex had a flat surface to attach to.

The dogs were quite intrigued by this process and kept coming outside to check on the progress.  That is until we got to the last section next to the house, which made using the doggy door a bit more difficult than usual.

Tequila wasn’t sure what to do when she realized there wasn’t a solid surface outside the door other than the single board we had to pry out from the trim.  She kept looking out the door and considering the options.

Eventually she decided to give it a try and gingerly worked her way out onto the ledge before jumping between the deck joists and scurrying under the deck frame to get to the yard.

The Trex boards have the special little fasteners that also act as spacers to keep the deck uniform and allow for a gap for water to drain out.  They slide into a little groove on the side of the boards and are then screwed into place on the joists.

Here’s a look at the spacer/fastener from the side so you can see the little track they slide into.

We ran into a bit of a snafu when he got closer to the house and realized the frame of the deck wasn’t square, so the boards weren’t lining up on either side of the deck.  Rather than re-do the whole deck we opted to work with the frame as is lining up one side and trimming the boards that hung over too much on the other end to match the others.  It worked out pretty good and I doubt anyone will ever even notice the difference unless they are really looking for it.  Here’s the finished deck before I added all the potted plants and other yard decor.  It looks so great and is a perfect extension of the colors of our floors inside.

The darker color provides a nice backdrop for the new deck rugs I got this season!  I’ve got a matching one for the new deck which is under construction right now.  I plan to paint the sides of the frame white for contrast once the other deck is done so I can do them at the same time.

I have a plan to reuse some of the old deck boards for another project and the Hubs may use some for a bit of the framing on the new deck so they won’t be going to waste. I’ll share those projects once they are completed. The vision we had for the yard when we moved in 4 years ago is starting to become more and more a reality and I couldn’t be more excited to get it all done and enjoy it!

DIY Tiki Torches

3

As we continue to spruce up the yard and prepare to enjoy it all summer, keeping the bugs at bay was a top priority.   If you’ve ever visited Alaska you know that our mosquitos are massive and excessively numerous.  We did some DIY tiki torches last year using wine bottles based on this Pinterest idea, but since we wanted them near the deck and didn’t have a spot to hang them from we created some simple stands with a closet rod and tuna cans like this tutorial.

The wine bottles fit perfectly in the tuna can and were certainly pretty, but I was constantly worried that the dogs would break the glass and as the temps cooled in the fall the fluid started to freeze overnight.  We took them down when we closed up the deck for the season, but left a few of the stands out over the winter.  The stands didn’t fair well with the weather and were looking pretty beat up by the time spring rolled around so I knew we needed a better option.

1

That’s when I spotted this idea on Pinterest.  I showed it to the Hubs and he liked it so we picked up the supplies we needed on our next trip to the hardware store and used the handy cutter from our recent Insulator Garden Art project to cut the pipe as needed.  Everything went together very quickly and soon we were ready to add the wicks and fuel.

2

The Hubs did swap out the clamps we’d used to secure them to the deck since the copper pipe was a much smaller diameter than the closet rods had been.  But we were able to reuse the wood blocks he’d attached to the deck to keep them flush with the deck boards.

Clamps

We both like that the slimmer profile of these torches help keep the view open and there’s no glass to worry about.  We have found that the design doesn’t hold much fuel so they do run out every few days, but we keep the tiki fuel on hand in the BBQ table so it’s easy to refill.

5

We placed several around the perimeter of the deck to create a “no-fly” zone for bugs, which seems to work fairly well.  Hint – there’s a sneak peek at two of the projects I’ll be working on finishing up this weekend in the photo below! 🙂

6

What do you think of our new and improved tiki torch design?  They will certainly get plenty of use this weekend!

Getting the Deck Ready for Summer

1

The temperatures are getting warmer and the sun is out longer which means it’s time to get the deck ready for summer!  I switched things up in the yard this year and put the sectional seating elsewhere so we could have a dining table on the deck.  Having one here makes more sense because the grill is nearby and the space is just off the sliding door to the main area of the house where the kitchen is.

I picked up this great table and chairs set on the local buy/sell page for just $100.  I love that the metal design is sturdy and won’t hold water so it should be ready to enjoy all the time.  I originally planned to add cushions to the chairs, but they are surprisingly very comfortable so I just used the throw pillows I already had instead.

The hubs dug out the umbrella and we placed it with the table for extra stability.  It took a tumble off the deck at the end of the season last year which broke the arm the hubs had repaired after we bought it at Goodwill.  This time he used metal tubing and painted it to match so it blends in quite well.

2

You really have to look closely to spot which arm is the one that’s been repaired, so I’d say he did an excellent job!  As an extra precaution we keep the umbrella down when we’re not using it, just in case the winds pick up when we’re not around.

3

Before we got everything set up we also pressure washed the deck (ignore the fact that it’s still sitting off to the side there.) so we had a clean slate to start with.  We’ll be painting the deck at some point this summer since it’s starting to show wear and needs a refresher, but a good wash works for now.  I’ll be adding plants to the various planters you see in the far corner this weekend and tilling the area around the deck to add landscaping there.  Check back next week to see it all come together! 🙂

Our New Deck Seating!

Patio3Our back deck is finally starting to look how I envisioned it before we began construction and I couldn’t be happier!  I had originally planned for the hubs to build a sectional for this space, but when I found a super duper sale at Pier 1 on their Echo Beach collection I decided to save him a project.  And because the final price with my coupon brought the total to less than what the materials would cost to build it I saved a few pennies too!

Patio2The purchase also earned me $70 in rewards points, which I used to buy the umbrella stand you see off to the right (thrifted umbrella coming soon once the hubs fixes a damaged arm) and a few décor pieces.

All the pillows I’d been hoarding collecting now have a home and coordinate fairly well with the rug, which I picked up on the local buy/sell page for $10 at the end of last summer. Because the tones of blue and green on each are a bit different, I am likely going to make some no-sew covers similar to these – perhaps with black stripes, a number and “Relax” or “Home” for some variety. The tan and black would be more cohesive and tie in to the umbrella which is also a dark tan.

The spool is a temporary coffee table until I decide what I want there.  I’m considering either a round table made with a galvanized tub and a wooden top for storage of candles and other little items when not in use or an industrial pallet cart style table.  It might depend on which supplies I can find locally first.

Patio1We’d like to add another two-cushion piece along the wall, but I’m holding out in the hopes that they will have an even bigger sale on outdoor furniture just before fall. Eventually this set will move to the deck we plan to install off the Master Bedroom (hopefully next year) and we’ll put a big farmhouse dining table under a pergola here. I’m fairly confident that we’ll do the same arrangement when that happens, but having the ability to move the pieces into different configurations gives us flexibility to see what works best. Until then, I’ll be enjoying them here every chance I get!

Lantern Love

Can someone please tell me where the heck the week went? We spent a good deal of it dealing with a broken dishwasher, a security breach at our insurance company and damage to one of our couch cushions – all of which required calling various customer service centers, most of whom were not very helpful. I was actually so frustrated with the process I started writing a post about the experience, but felt that it was turning into a rant. Since I’d rather focus on more productive things I decided to share a fun little update I did on our back deck instead.

Spring in Alaska is very different than the rest of the country. There aren’t any flowers blooming here yet, but our occasional days of warmer temps and sunshine have me shifting attention to our outdoor spaces. Last year we installed two hooks on either side of the window on the back of the house for hanging planters. This year, I plan to create sectional seating under that area and worried that hanging baskets would be a ‘head hazard’ for anyone sitting or getting up. Since I didn’t want to take the hooks down, or deal with the holes that would create, I decided to hang lanterns on them instead.

I spotted these at Target during a recent visit and picked up two to try out for just $13 each. I really liked the style and size, but worried that the open top might collect water which could become a mosquito breeding ground if I didn’t take it down when not in use.

Lantern3

The width did fit my new Luminara candles but I wasn’t crazy about how the height worked out. You couldn’t see the flame, which is kinda the point.

Lantern4

Luckily I had a plan B. I also found these at Pier 1 and because I had a reward coupon and a gift card left over from Christmas (thanks sis!) I got them for FREE! I’ve always liked this style and have looked at similar designs many times before. Granted the top isn’t fully covered, but it should reduce the amount of water that might collect if I do leave them up.

Lantern1

Since these are taller than the first option they fit the Luminara candles much better. They also seemed a little sturdier than the first option too.

Lantern2

And who doesn’t love FREE?! I plan to clean the deck and start getting things set up this weekend, so watch for a post about that soon, followed by one on my plans for the yard this season. Until then I hope you get outside and enjoy some spring sunshine! 🙂

A Pretty Spot to Sit

Several weeks ago we picked up two unfinished wood Adirondack chairs at the big box store. They were pretty as is, but needed something to make them stand up to the Alaskan elements since I don’t plan to bring them inside every winter.

ChairBefore

I had some teal outdoor paint leftover from a project I never got to when we lived in Kodiak, and thought they’d look awesome painted and paired with one of my many garden stools. Turns out I was right.

Chair

I added a couple of bright outdoor pillows from my ever growing stash and some potted oregano just for fun. The wooden stool came home with the hubs from work and makes a handy little table – or footrest!

Chairs

The ultimate plan is to use them next to the fire pit, but until that’s installed they are making the barren deck more hospitable – even in the rain. Oh and that metal thing in the back corner, that’s the cat’s access to the doggie door from the yard.  I can’t wait to no longer need that once the dog run is taken down!

Next year, I plan for this space to be home for a DIY outdoor sectional that will store all the outdoor cushions and pillows during the off-season. And that pretty white cut-out stool will live between some lounge chairs on the master deck that will be installed next to the hot tub.  It’s an evolution, but I’m sure trying to make each stage as pretty as possible.

Big Plans for the Back Yard

Although the house is still under construction and we won’t move in until late fall, we’ve already been thinking about what we want the back yard to look like.  The builder will install a 20′ x 12′ deck off the family room – where the three ‘pink’ footers are in the picture below.  We specifically requested an additional slider door be included in our Master Bedroom rather than just a window so we can have back yard access on that side too.  The builder will provide basic ‘steps’ at that door for now, but next season we plan to build a deck to match the one on the other side.

Back

We had originally planned to continue the deck out the entire length of the house, but we decided it would be easier and more cost effective to have the two decks with a ground-level patio in between so that the hot tub could sit lower than the deck which eliminates the need to ‘climb’ into it.  Plus I won’t fret about the deck being stable enough to support a full hot tub!

I also like the idea of breaking the space up into different areas for different purposes.  I’m envisioning something like this on our ‘private’ Master Bedroom deck for lounging and a dining set on the deck off the family room.  On the patio below I would like to make something like this where guests could sit and relax near a fire pit which will be made from this free washing machine tub we snagged on Craigslist last week!

Pit

The plan is to use pavers like this or stamped concrete like this on the patio, then use landscaping stones to create a spot that the drum will slide into.  Eventually we’d like to have one or both decks screened in or at least covered by a pergola with some sort of rain protection to extend the usability in our short summer season.  But that of course is a year or five down the road.

Beyond the decks and patio we plan to have grass for the dogs.  Depending on when we get into the house, we might buy some of the ‘end of season clearance seed’ to put out and see what we get, but most likely we will have the yard hydroseeded next spring.  I was stunned to find out that they charge just $395 if the area to be seeded is less than 3,000 sq. ft.  Um, yeah!  Sounds good to me!  Definitely better than the Craigslist ad I saw for free sod if you come cut up and haul off some guy’s yard!  I might be thrifty, but I know my time is valuable and I’d spend a whole lot more digging up, hauling and replanting his old “who knows what’s in it” grass than paying the out call to have fresh, weed free grass growing within 2 weeks!  Knowing us we’ll measure out everything before we schedule and make sure we’re just under that figure. We should be able to do an L-shape around the back and side of the house well within that figure.  🙂

I don’t have much landscaping beyond the deck-patio-deck and lawn planned for the back yard, but I will probably put a small flower bed along the bedroom side of the house for perennials like bulbs and hostas.  Our garden will be to the right of the deck off the family room in the alcove created between the side o the house and 3rd bay of the garage, which you can see on the right edge of the photo above.  Watch for a post about that plan next week!