A Simple Revamp with Paint & a Knob

1TopToday I’m sharing a quick revamp I did on a side table with a bit of midcentury mod style.  Here’s how it looked when I spotted it on the buy/sell page.

Before

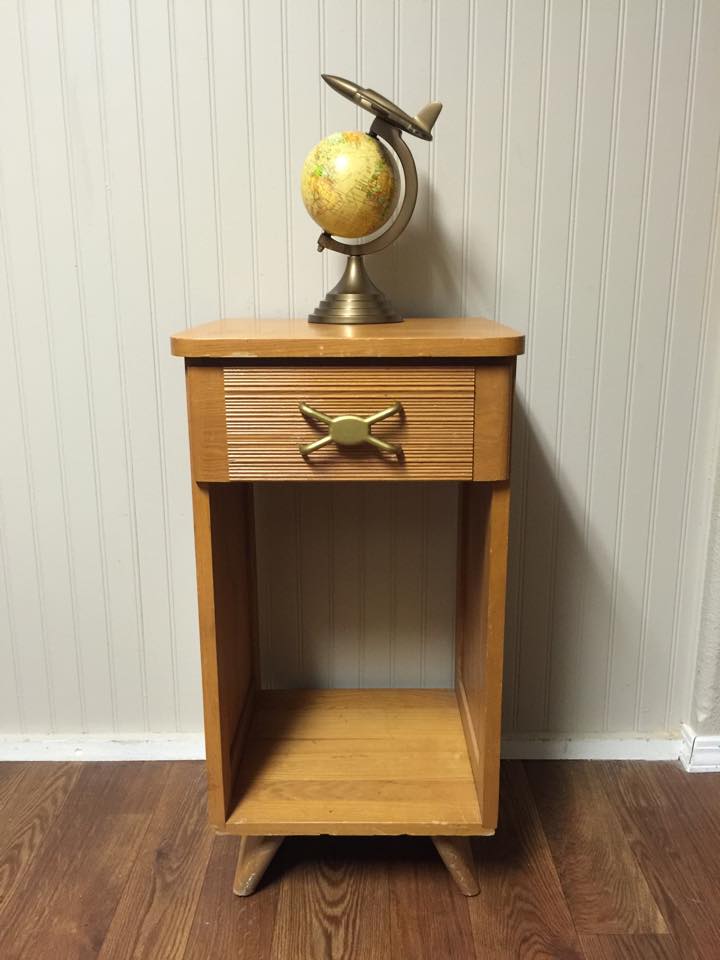
It was a good price for a solid wood piece and I knew I could give it a facelift with a quick coat of paint.  I had grey paint on hand from a previous project so I used that. I was pretty happy with how modern the new color made the piece look, even part way through painting!

during

Once everything was dry I switched out the futuristic drawer pull for a simpler knob.  I originally wanted to do a farmhouse style pull like we have on the drawers in the office, but since that would require drilling new holes I decided to stick with the single attachment option.  I also added a basket for more storage space.  It’s the perfect size for magazines or a throw blanket which makes the piece very functional in a multitude of spaces.

Finished

I originally planned to use this piece as part of a desk in the foster room but changed my mind as the room came together, so for now it’s acting as a nightstand in the guest room.

Z

I paid $30 for the table and around $20 for the basket, so the total cost came in just under $50.  Not bad for a quick little project.  I’m currently on the hunt for a small dresser for the guest room so when I find one this piece may find a new home elsewhere in the house.  I could see it working well as a side table in the family room as well.  But if not it should be an easy piece to sell.

I’d love to hear what you think of the transformation!  Leave me a comment below about how you’d use it in your home if you had the chance.

Advertisement

Inching Toward the Finish Line

As anticipated the November 1 closing date has come and gone without the house being ready.  We’ve signed an amendment to extend the deadline, but it’s still going to be tight to get everything done.  The hubs and I went to sand the sub floor in preparation for installing the flooring on Saturday, but found painting and cabinet installation in full swing when we arrived, so we weren’t able to get anything done.  We did unload the half order of flooring the vendor had in stock so it could acclimate on site for the recommended two days.  The remainder should arrive tomorrow or Tuesday, so we’ll have to let that acclimate on site as well before installing it.

Flooring

We had a meeting with the foreman and the realtors today to go over the timeline for the new closing date of December 1.  We will work on the flooring every evening this week, and the master bathroom tile should be installed in the next few days so we can finish flooring around that at the end.  Then the following week all of the finish work will be done – trim, doors, electrical outlets, paint touch up, etc.  The should put us at 95% complete for the appraisal the week before Thanksgiving.

The power line has finally been installed, so there is electric to the house now.  They ended up having to take a few more trees out at the end of the driveway to run the line, but getting power to the house is worth it.

2

1

You can see the small green box to the side of the house.  That’s our electrical pedestal.  That side of the house is getting pretty crowded with pips and utility features, so I’ll have to figure out some landscaping beyond my rain garden (which will have a retaining wall made from those tires) to hide them next season.

Inside, things are finally starting to look like the finished vision we’ve had all along.  The cabinets look great with the paint color and the tile coordinates perfectly as well.  Hopefully I’ll have pictures of that later this week, once it’s installed.

Kitchen

Kitchen2

Bath2

Bath

The counter tops are on-site and ready to be installed once the final tweaks are done on the cabinets.

Counters

I tested out the flooring next to the cabinets just to get a feel for it, and I’m pretty happy – even with the dusty paw prints!  I plan to attempt documenting the install over the course of the week and share that, so stay tuned!

Floor

The Home Stretch

1

We made our weekly visit to the house yesterday to find it ready for paint, cabinets, flooring and finishing touches. It’s finally starting to look like the house we’ve been envisioning all this time!

2

3

hallway

The texture is done with a minimal flat finish.

texture

And all of the corners are rounded for a smooth clean look.

Corner

Our builder wants to finish by November 5, but he hasn’t ordered the flooring yet – which takes 10 days to arrive from Seattle and then needs to sit on site for 2 days – so that’s not likely.  We’ve struck a deal with the builder that we will install the flooring ourselves to reduce cost, so that should happen the weekend before Veterans Day.

While we wait to hear from our builder about the flooring we’re anticipating that we won’t close and move until the end of November or early December.  Hopefully, some things can be scheduled simultaneously like the energy rating followed by the VA appraisal to speed things up, but we all know this isn’t a perfect world so we aren’t anticipating it will go that smoothly.

Here’s what’s still left to be done:

  • Paint
  • Cabinets
  • Flooring
  • Electrical outlets & switches
  • Light fixtures
  • Plumbing fixtures
  • Stone work on the front porch and fireplace
  • Interior doors, trim and window ledges
  • Appliances
  • HVAC vents
  • Locks

It’s so close and yet so far away, which makes me crazy.  I’m a planner and not knowing when things will happen makes me crazy.  It doesn’t help that we have to coordinate dates with our current landlord, our lender, my job and the hubby’s new schooling schedule around these unknown dates.  It all has me wishing I could push fast forward and just zip right to moving day.  If things work out, I plan to take a week off for the move so I can unpack and get settled, but we’ll see how things line up with my work schedule. At least it looks like we’ll be done and living in our new home before 2014 arrives!

Gold Dipped Toes

I’d been itching to update my wardrobe for fall when I spotted this post by one of my favorite bloggers and realized I had the exact same pair of shoes!  I don’t wear them that often and figured this might make them more versatile.  So, a quick trip to Michaels with a store return gift card in hand and I was ready to make it happen.

I’m not going to do a tutorial, since it was as simple as getting my supplies together, taping off the section I wanted painted, and well – painting.  The hardest part was making sure I made the gold section the same on both shoes! Here’s a few shots of the before, during and after.

Before
Before
Step 1
Step 1
Step 2
Step 2
Finished!
Finished!

They turned out pretty darn cute, if I do say so myself!  And unless you inspect them closely, you’d never know that they were painted.  Now I’m thinking I should also paint the wedge part gold or do a similar pair of flats with polka dots!  It might also be a way to fix the scratch on the top of my favorite pair of kitten heels…What do you think?  Good idea gone bad or worth a try?

Pottery Barn Knock Off Wall Medallions


PBMedallionsI can’t explain why, but I’m completely drawn to anything with an exotic print or pattern.  Perhaps it’s because of my plain Jenna, American apple pie background – you know, the whole you want what’s different and mysterious thing?  Whatever the reason, it’s part of why I L.O.V.E. Pier One and Pottery Barn‘s eclectic accessories.  So it was no surprise that I audibly gasped when I saw these in a Pottery Barn catalog a few seasons ago.  And then quickly went into sticker shock when I saw the set of three ran $130!  Um.. I don’t think so.  No even if I had a gift card.  I just have a mental block about over-priced items.

So I did what I always do.  I pinned them for inspiration and kept an eye out for something similar at a more reasonable price.  Then one day I found some wooden trivets at a yard sale in Kodiak.  They looked pretty old and dried out, but the carving pattern was pretty similar.  Plus the lady had three – small, medium and large!  I tried not to act too interested when I asked how much she wanted.  She glanced over and mumbled, “How about $5?”  I don’t think a $5 bill ever flew out of my pocket so fast!

MUnfortunately I wasn’t blogging back then and don’t have a before picture to share, but here’s a sneak peek at what they look like now.  Of course when my hubby saw them he raised an eyebrow and asked just what I intended to do with them.  I showed him my inspiration picture and explained I wanted him to paint them white for me.  I don’t do well with painting since I’m usually in a rush and try to do thick coats instead of thin ones and usually create a pretty wide berth of over spray so we decided long ago that when it comes to painting he saves himself a headache and just does it for me.  Yes, I’m spoiled, but he is too, so it’s an even trade! 🙂

It took a few coats because the wood was so porous and dry, but they turned out beautifully.  Unfortunately we were living in military housing at the time which meant ALL of our walls were WHITE.  Have I ever mentioned how much I HATE white walls?  If not, just accept that I do.  They make me feel like I’m in a cold hospital or crappy hotel room.  That left me stumped on what to do with these newly painted pretties.  So they sat in my project pile.  Waiting for something to happen.  And then it did.  We moved!

90% of the walls in our rental are painted and I decided to do a Modern Exotic theme in our bedroom since we opted to do a road trip honeymoon rather than jet off to some foreign locale.  The pattern fit right in with the other elements in the room and the white looks great against the colored wall.  I hung them above the TV on a small wall that needed a little something to make it look finished and I’m very happy with the final look.  Especially when my version comes in at just under $10!

Trio