A Visit to Alpine Park


Last fall I was on the hunt for a unique location for a styled photo shoot when I discovered the Alpine Historical Park in nearby Sutton.  Since I’d never been there before I decided to arrive extra early to check out all the displays before my model came for the shoot.  Not only where the exhibits interesting to someone who loves rusty ‘old’ things but they definitely told a story of the area’s progress over the past century.

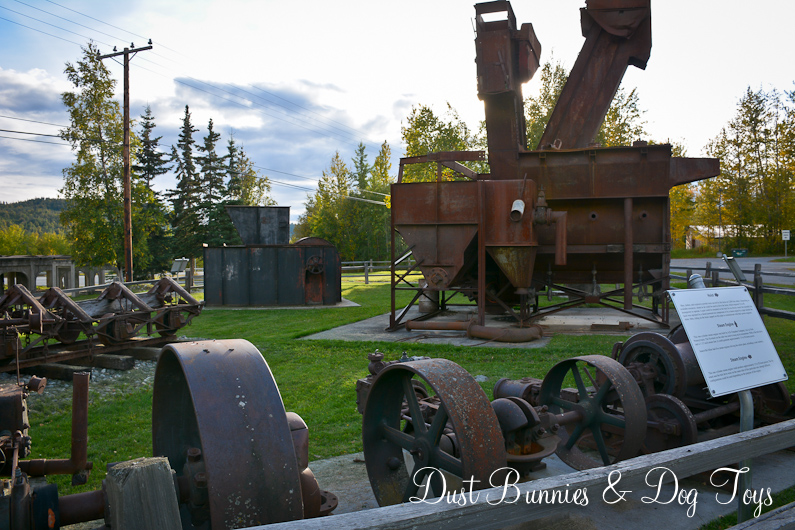
The prominent exhibit are these concrete forms, which are the remains of the foundation for a coal wash plant originally built for the US Navy during the 20’s for nearby projects.  In it’s heyday, the plant processed 25 tons of coal an hour! In front of the wash plant was this coal car train and track from a nearby mine.

Along with a variety of antique construction machinery, which had been used for local improvements and left behind when they were no longer worth hauling away.


This old boiler furnace caught my attention with its massive size.  It must have been a full-time job to keep it running!  The double doors at the back were so big they looked like the nose of a steam locomotive.

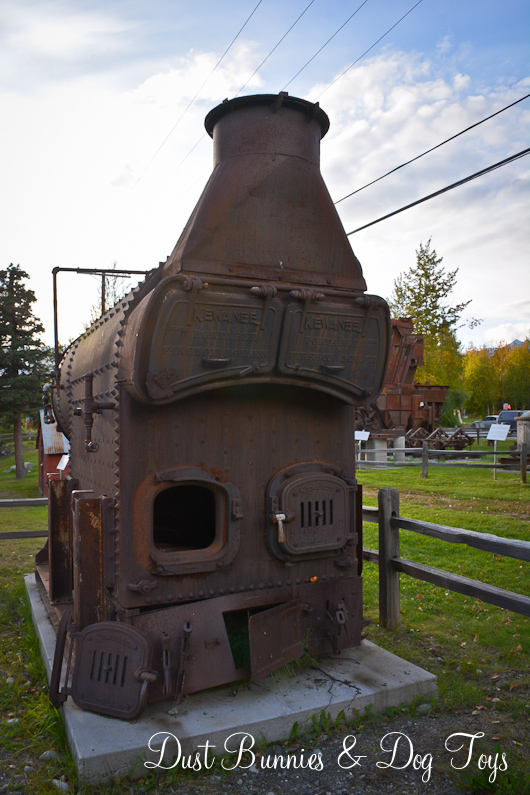
There was also a smaller boiler on display that was just as rusty and interesting.

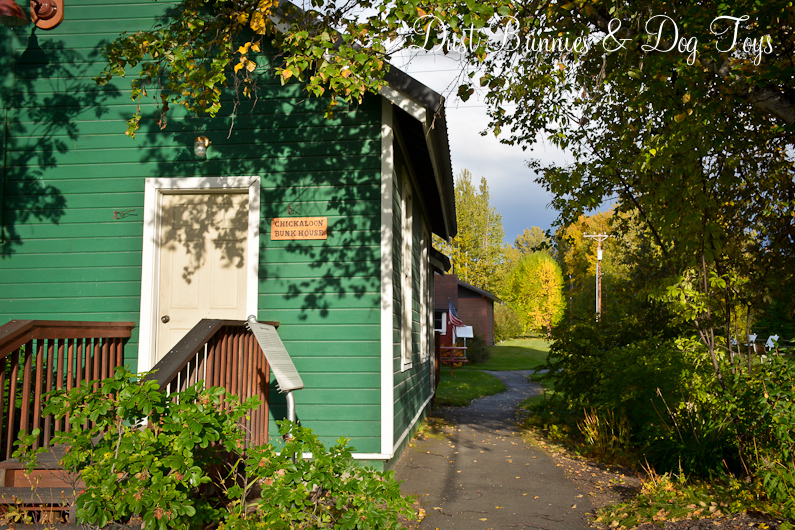
There were several historical buildings nearby that had been relocated to this site for preservation including a mine bunk house, a post office, a church and homes of significance in the region.

Built in 1948, this small building was Sutton’s first post office. Grace Boulter, who became the postmaster in 1951, started part-time and earned 56 cents a day. Grace remembers this old building saying “The place was so small around Christmas time; I would have to take a couple bags of parcel post and lock them in my car at night, because there was not enough room to leave it in the post office.” In those days, mail was delivered by train; it was thrown from a railroad car as the train passed the office on its way to Jonesville Mine.

Inside the post office there was an old Coleman heater, oil tank and postal boxes used by Boulter and her customers.

The Mary Geist House was built in the 1960’s as a guest house but was moved to the park in 1990 to house the Old Timer’s Hall of Fame-honoring the residents of Sutton who were involved with the coal mining industry and development of Sutton. It houses plaques of the inductees and a collection of fossils and petrified wood found in the mining area.

Built in 1917, the Lucas House, served as a residence for coal miners at the Chickaloon Coal Mine. Sometime after the abandonment of the mines, it was moved to Palmer where it became the Lucas home in 1943. Donated by the Lucas family in 1989, the first floor has since been renovated to accommodate Alpine Historical Society (AHS) records in addition to serving as a meeting room for the board.The Hitchcock Cabin houses Athabascan Dene’ cultural displays and serves as a meeting place for cultural workshops.  This wall tent house is similar to those used by the military and early explorers who settled the area.  In fact most of Anchorage started as a collection of such tents.  
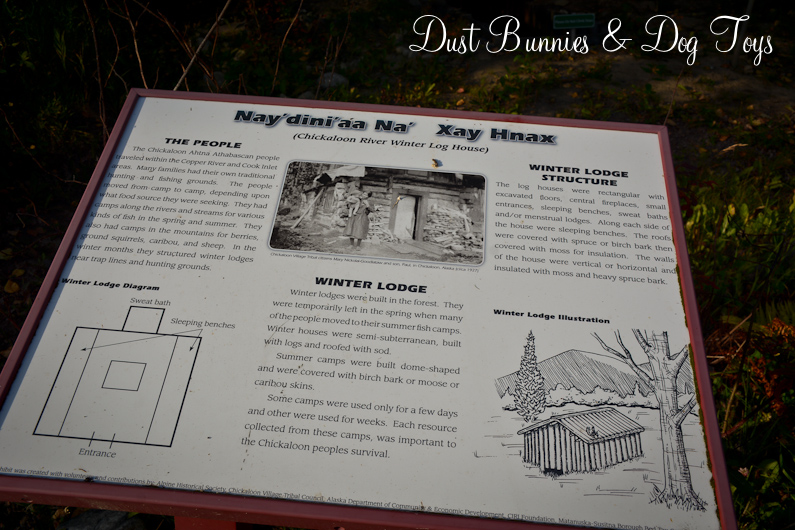
This Athabascan Winter Lodge was built in 2005, thanks to a collaboration between AHS and the Chickaloon Native Village. It illustrates a traditional native house design, commonly used prior to Russian and Euro-American contact.  It holds examples of local medicinal plants and animal hides, that were used by local natives.  There are also items donated lLate Native Dene Elder, Kathryn “Katie” Wade along with bunks and a mock central fire pit that would have been used as a sweat lodge.  A recorded Athabascan Dene’ story, singing and drumming can be heard within the walls. This display of petrified wood brought back memories of my family’s trip to the petrified forest when I was a child.  I had never thought about petrified wood being in Alaska but considering the state’s geological history it made perfect sense that there would be some. Apparently the petrified forests found in Alaska are some of the largest and best preserved! This is the spirit house of Ahtna Indian John Goodlataw, who was born in 1870 and died in 1935.  These structures are a combination of traditional Native beliefs and Russian Orthodox religion.  Native tradition says that a person must be buried with their head upriver and a blanket placed over the grave to keep them warm.

The visitor center for the park was in a log building had information about activities in the area and a small historic display of earlier life in Sutton. The other portion of the house serves as a private residence for the park’s caretaker.  There is a welcome sign next to the visitor center with information about the park.

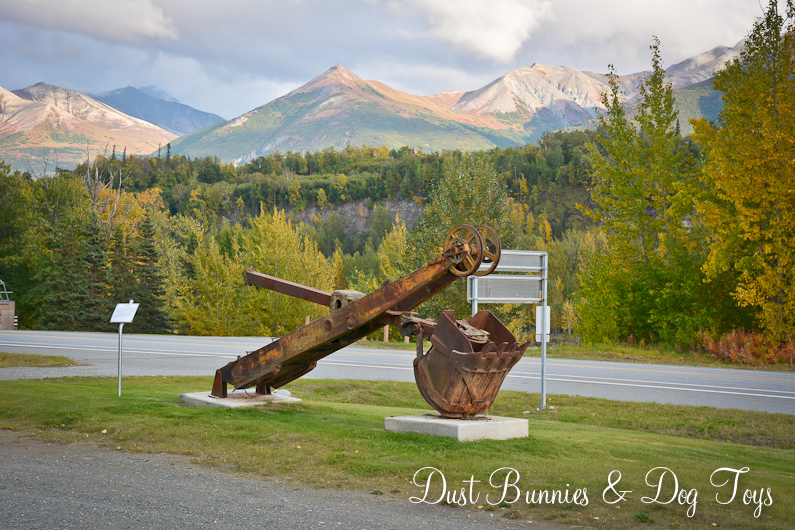
In front of the visitor center is a large shovel arm used in the construction of the Glenn Highway which seems dwarfed by the Chugach mountains that border the town to the south.  Although upon closer inspection I realized just how massive it actually was.

One of my favorite buildings was the Powder House. Built in 1921 this structure housed explosives for coal mining and the Glenn Highway construction.This unique planter made great use of pieces from the old conveyor belts from the machinery.After I’d explored all the exhibits I headed back to the wash plant to prepare for my shoot.  It was the perfect spooky look for the Halloween style we had planned.The shoot went perfectly and the super talented model really made my artistic vision come to life.  She also did her own makeup in the sugar skull theme!  Here’s a few of my favorite images from the shoot.Sutton2Sutton3Sutton4Sutton5If you happen to travel through Sutton and have a little free time I highly recommend stopping off at the Alpine Historical Park to take a walk back through the history of the region.

A Flower Farm Tour

It’s been a super busy couple of weeks with a full schedule of photography shoots for clients and projects, so I haven’t been doing much DIY.  But I did make time to enjoy a tour of a local flower farm this past weekend, since I skipped the Willow garden tours this year.  I’ve followed All Dahlia’d Up, which is run by Misty Vanderweele, for a while now, so I was excited when I heard she was offering tours of her farm this summer.

I purchased my tour ticket as a birthday present to myself and I’m sure glad I did.  When we arrived at the farm we were greeted in the driveway so we could sign in and got our name tags.  Once the tour began we were escorted to the backyard where this pretty table set-up greeted us.

It was the perfect garden party spread!  The table was right in Misty’s backyard and was situated next to her original dahlia garden, which now also has a row of sweet pea.  I noticed she had a purple door on her house, just like mine – and I’m totally loving those purple chairs too!  Perhaps the ones I have by the greenhouse need a new coat of paint! 😉

The group was led to the back area of the yard, past another larger garden to where the property opens to her father-in-law’s crop fields and an amazing view of Pioneer Peak.  She uses this area to host small wedding ceremonies during the summer.

She gave us a bit of history about how she started the farm after her son’s passing due to Muscular dystrophy and how he was the inspiration for the farm.  He had brought her home a feeble dahlia plant one year for Mother’s Day courtesy of a class project.  She wasn’t sure it would even survive, but it did and it produced lovely purple blooms, which is her favorite color.  The farm idea took off when she gave a local bride a bouquet of flowers one summer and soon had multiple requests for more.  She did a bit of research and realized that flower farming was indeed a ‘thing’ and decided to run with it.  six years later she has a well-known thriving Alaska Grown business that shares her joy with others near and far.

After the quick presentation we walked across the road to her newest flower patch, located in one of her father-in-law’s fields.  It was a little hike, but it was well worth it.  Here she explained the various types of flowers she grows for bouquets and arrangements.  She chooses flowers that bloom continuously all summer so she can cut from them multiple times.

She turned us loose in the flower patch for a few minutes to take in all the varieties she’s growing.  Some of the most recognizable were bachelor buttons, sweet pea, dianthus, poppies and snap dragons.

She also had a few veggies growing in the back corner of the garden including pumpkins and these pretty flowering kale.

These huge poppy pods were a big hit with several of us on the tour.  They looked like something right out of a Dr. Seuss story, but produced one of the prettiest poppies I’ve seen in a long time.

This pink sunflower was also a favorite of the tour guests.  I’d never seen one this color but really liked the variation.

My favorite area of the garden was the sweet pea row.  I’m considering doing something like this around our bee hive area next summer.  It would provide a nice screen to disguise the hive and provide a bit of wind block, plus I could cut flowers from it for arrangements.  And I’m pretty sure the bees would like it too.  I’m not sure I’d do this variety of colors but it was fun to see all the varieties together.

The view of Pioneer Peak was fantastic from this spot too.  It’d certainly give me an extra reason to be in the garden all day!

We trekked back across the road to the gardens in her yard where she clipped several blooming dahlias for us to use in arrangements.  There were all types of varieties and colors, including some unique spikey ones!

On the side of the larger garden she’s created a sweet pea tunnel, which we got to walk through and squeezed in to do a group picture.  She had a local photographer on the tour taking photos, so I’ll share a link to those when she posts them.

Next we went to the prep tent where we created individual arrangements using the dahlia’s she had cut as the centerpiece.  We had a variety of snap dragons, sweet peas, white dill and stock to add to our bouquets.

I decided to use a variety of purple and pink tones to create a monochromatic backdrop for my pink and white dahlia.  And I chose a seat that had more purple blooms to add to the arrangement.

Once everyone placed their arrangements on the table it really came to life.  Everyone had fun getting pictures of their arrangements and their neighbors!

We wrapped up the tour with a yummy dinner of Alaska grown produce, and local salmon.  I didn’t get any pictures of the food because I was quite hungry and too busy chatting with the ladies seated around me at the table – but I’ll tell you that it was all very delicious!

I’m so glad that I decided to take the tour.  I got to learn a bit more about this local business and the woman who leads it.  Plus I got to take home a beautiful arrangement of local blooms with a full belly, plus a yummy truffle that I saved to enjoy the next day.  If you get a chance to enjoy the tour I highly recommend it!

Pretty Tiki Torches for the Back Yard

Now that we have so many great areas to enjoy in the back yard we spend more time out there.  Unfortunately the famed Alaskan mosquitoes like to join us!  To remedy that problem we decided to add tiki torches to expand the reach of the citronella candles we already use.

I spotted these Better Homes and Gardens torches at Walmart recently and decided to give them a try.  They come with hardware so they can be used three different ways.  The first option is as a table top torch using the pedestal attachment.  The second option is to position them on a deck railing with the clamp provided.  And the third is as a pole torch using the post extensions.

Because I always seem to use things slightly differently than how they are intended, I wanted to put them to the posts we already had in the yard.  I planned to ask the Hubs to create a galvanized pipe fitting that we could attach to the posts for the deck shade and fire pit lights, which could be affixed to the base of the torch.  Luckily, he had an easier idea.

He suggested using the provided railing clamp on a small block of wood he could attach to the posts.  It was such a great idea and it saved us the cost of creating the pipe fittings.  We did debate about cutting the metal pole on the torches so they didn’t extend beyond the clamp.  The Hubs wanted to keep the extra length and I was thinking it would look better with it cut.  We decided to leave it for now and if I still don’t like it in a few weeks we can cut them down.

We tested them out the other night, now that the days are getting a little shorter.  They sure seemed to keep the bugs at bay and they gave off a nice glow in addition to our cafe lights. (Just ignore those cobwebs, ok?  The spiders seem to appreciate them as well.)

The big reservoir inside the canister means they don’t need to be filled often, so we can just light them and sit back.   Now we just need to make more time to sit out back and enjoy them before the snow flies in about 2 months!

Lighting Up the Yard

Last summer we picked up several strands of cafe lights on our trip to Portland with the plans to put them up in the back yard around the fire pit, but we got busy with other projects and didn’t get them up.  Luckily, we’re playing catch up this summer and crossing off all the projects from last year that didn’t get finished.  Which means we had most of the materials already on hand to get this one done.

It started with creating the posts the lights would hang from.  We used two small metal stock tanks we got from Wilco on our big trip last summer as the base.  We added two bags of sand from the sand bags we use in the bed of the truck for weight during the winter to create a base at the bottom of the tank and provide a bit of drainage.

From there we used concrete footer blocks that had a metal attachment for a pole.  We picked those up on the buy/sell page last summer as well.  We decided to use pressure treated 4×4’s to coordinate with the fence around the yard.  Since the ground slopes away from the house for drainage we knew the tanks wouldn’t sit perfectly level, so we leveled the posts with a handy tool the Hubs had and used long deck screws to secure them in place.

Then the Hubs added a couple of supports around the posts using scrap wood.  These help prevent any sway during the wind or pull from the tension on the light strands.  He kept them a little low in the tank so I’d still have room to plant around the posts.

I spent weeks filling both tanks with plastic bottles and jugs to reduce the amount of dirt needed to fill them.  Luckily I know a coffee shop that was willing to save their large milk jugs each day to speed up the process a bit!  Once I had them topped off with dirt I planted cosmos and dill, which should fill in and grow tall next to the pole for the rest of the summer.  Next year I may try cat mint to see if it survives the winter in the metal tank since both cats enjoy this new vantage point and can often be found sitting in the tanks next to the flowers.

The Hubs strung the lights using small hooks at the top of the posts and securing the ends of the cords to the house with a bracket and zip tie.  The nearest electrical outlet is over on the new deck so he got a tan colored extension cord and used small flexible loops to hang it along the eve of the house so it could run the distance to the deck and then down to the outlet.

Since our days are so long during the summer we haven’t gotten much use out of them just yet, but now that summer solstice has past the days are slowly getting shorter.  I plan to enjoy them through the fall until winter threatens the first snow.

The next step is to add a low profile border of some sort between the gravel and the grass.  Then we’ll add more pea gravel to fill in the area.  We also used a strand of these same lights in the gazebo we put over the hot tub on the new deck.  I’m still getting that all set up and will share that project when I have finished pictures for you!

The Palmer Garden & Art Faire

This past weekend I got to enjoy the Palmer Museum Garden & Art Faire.  This is the third year I’ve gone to the faire (check out the first visit here) and always enjoy it.  The forecast didn’t look great, but the day turned out beautiful and just perfect for this type of event.  There were vendors, live music and instructional classes throughout the day.

I had planned to attend a couple of the classes offered but my schedule didn’t work out.  While browsing the vendors I noticed that Lakeside Forge was instructing a couple of workers.  I’m not sure if they had signed up or if this was part of his display, but they sure looked like they were learning a lot!

The Hubs met me at the Faire on his way to run some errands and we got some lunch from the food vendors.  Because there was another event going on in town there wasn’t as much selection as years past, but we enjoyed the BBQ pork & noodles we got from Momma Rav’s.  While we waited in line, I was eyeing the cool truck next door which was built on an old International truck!  We also sampled a couple of the Rhubarb Rumble entries at the vendor booths while we browsed.  Although we didn’t make it out to all the locations around town with recipes for sampling, our favorite was the rhubarb strawberry salsa with cinnamon chips.

After the Hubs went off to run his errands I checked out a few more of the activities at the fair.  There was a group of painters capturing this lovely scene full of peonies.  Some took the abstract route, while others created a portrait.  As a photographer, it was fun to see the differences these creatives had in their visions of the same set up.

Next, I took in some of the history of downtown Palmer.  The city was started as a farming colony as part of Roosevelt’s New Deal program during the 30’s.  Inside the museum they were playing a documentary that showcased what life was like as the colony was built through interviews of those who were there.  I’m so grateful for those brave families who left everything they knew behind to start over in Alaska.  They were the foot hold for the wonderful community we love today.

The museum also had displays of life in Alaska during those times.  One display featured the history of the Matanuska Maid, a local icon and mascot of sorts for the local dairy & creamery.  They also had displays of the native cultures in the region and the mining history of the surrounding ranges.

They also had displays about the daily life of the pioneers including the giant cabbages they could grow due to the long hours of sunlight and the typical household items they used, including dresses made from flour sacks.  Nothing went to waste due to the limited resources and minimal funds available.

There were also displays about the difficulties the pioneers faced in creating the farms out of the Alaskan wilderness.  Not all of Roosevelt’s plans worked in Alaska and many had to be altered to fit the unique circumstances encountered here.

I spotted these pretty glass emblems in the window of the gift shop area and immediately fell in love with them.  I had something similar with the Norfolk Mermaid on it from when I lived on the East Coast.  There were several designs to pick from, but I think I like the iconic water tower the best.  I decided to think on it some and come back to get one in a few weeks.

This enamelware pot was right near the entrance and drew my eye instantly.  I loved the simple charm of the rusty bucket and the faux lavender was the perfect touch to finish it off.  If it had been for sale it would be in my home right now!

I also toured the exhibition garden next to the museum.  I’ve been to this garden many times and always love seeing how things grow here so I can compare how they will do in our yard which is just a few miles away.

The new truck statue between the museum and the garden looked great with the new plantings starting to fill in.  I’m excited to see how they decorate it for Colony Christmas this winter!

There were also several antique tractors on display outside the museum.  I’ve seen a few of these before in local parades, but it was fun to get up close and see some of their details.  The vintage lawn mower was tucked in between a couple of the big tractors and caught my eye with it’s unique design.

I also learned about a new project some local veterans are spearheading.  They are fundraising to purchase the fuselage of an old cargo plane and turn it into a traveling Alaska and military art gallery, performance venue, and museum.  Learn more about this unique project at their website: www.rollingboxcar.com.

While I didn’t find any garden art that called my name this time around, I did come home with this lovely peony bouquet to brighten our dining room. We also bought two of the mason jar strawberry lemonades I had the first year to enjoy at home.

It was the perfect mid-summer event to celebrate the community, local growers and the season.  I look forward to seeing what they plan for next year’s event!

Revamping Thrift Store Finds into Garden Art

Today I’m sharing a simple upcycle project that took over a year to get just right.  It started when I spotted this decorative finial at the thrift store the winter before last.  It was only a couple bucks and super heavy.  I’d seen similar shaped pieces sell for much more like this one and thought I could create a knock off version with this piece.  Here’s the quick before picture I remembered to snap just before the makeover began.

I used some grey spray paint I had on hand to give it a new look.  It was definitely an improvement, but I thought it still needed more texture.  I put it out on the deck to see if any ideas came to mind, but then got busy with other projects and never did more to it last summer.

This spring, as I prepped items for the yard I decided to give it another makeover while I was white washing some terracotta pots.  I gave it a quick dry brush with the same white paint and instantly fell in love with the look it created.

Now it looks like it’s made of concrete, just like the inspiration example!  It adds just the right amount of style to this corner of the deck where it compliments the potted plants.

And because it’s so heavy it can stand up to the dogs, so it’s placement here is also strategic.  It keeps them from jumping off the deck onto my plants in the flower bed below.  Pretty and functional all for a few dollars and a little paint. That’s my kind of makeover!

A Serving Cart for the Deck

As I was changing up things on the deck this year I decided to add a serving station.  Last year this spot was occupied by the chippy bench we brought back from Portland, but that moved to the new deck this season leaving room for this cute cart I upcycled.

I picked it up on the local buy/sell page for $50 back in the spring.  Since it was still too cold outside to work on the yard at that time, I focused my attention on upcycling items for the deck, including this and the milk can planter I shared recently.  It was in good shape but I knew the red color wouldn’t work with the other elements we had planned for the deck.  I gave it a good cleaning and several coats of spray paint.  I went with black because it ties into my modern farmhouse look and it was the one thing I could count on to cover the red.  Here’s the before and after in my makeshift paint booth in the garage.

It’s always amazing what a coat – or several in this case – of spray paint can do!  It’s the perfect height to fit under the windows and is still narrow enough to not impede the walkway to the chicken coop.

I styled the top with a couple items I had on hand including the outdoor glasses I picked up on our trip this spring and the pottery barn glass pitcher we got as a wedding present.  I borrowed the faux plant from the laundry room.  Lastly, I added the table top tiki torch for a bit of bug protection.

The lower shelf stayed pretty simple with the metal bird house I found during our spring trip and a little succulent planter I made from an old candle container.

The handle is a perfect spot to drape a dish towel, so I used this IKEA one I had in my stash for projects.  And just like that we’re ready for a party on the deck!  I plan to put it to use when we have friends over this evening.

I do wish it filled the space here a bit more so next season I may use it elsewhere and build a narrow console table to go here.  But for now I’ll enjoy my little upcycle design. 🙂

Our New Deck Shade

Hey there!  I hope your holiday week was fantastic and you got a little time off to enjoy it.  I took a couple days off from work to get caught up on some projects around the house.  The weather was clear and hot the entire week, so it finally really felt like summer.  One of the projects we knocked out was adding a shade cloth to the deck.  The Hubs actually put this up while I was out on a photo shoot so I don’t have many detail shots but it’s a pretty simple setup so you should catch on without them.

We had purchased two sun shades while on vacation down south last summer and had planned to put one over each deck.  Unfortunately when we pulled them out to set them up this summer we realized neither size we’d gotten would work for what we wanted.  So we sold those and purchased a 10 x 10 cover on Amazon.

We added these cement pole foundations in the rock beds against the deck and secured pressure treated 4×4’s into the prongs.  I plan to eventually cover the cement block with more rock so you don’t notice it but that is a project for another day.

The tops of the posts were finished with copper caps like we used on the fence around the yard and a bracket was attached to tie off the corner of shade.

We did similar brackets on the house which connect to the corners on that side  (excuse the cobwebs – I swear I clean them but those industrious little buggers seem to have them back up in no time!).  Next year we’ll swap out the rope for turnbuckle hardware for a cleaner look, but this gives us an idea of size needed for that change.

It ties right in with the other grey and black elements we’ve got going on in the yard.  And the sleek design looks good from every angle of the yard.  The amount of shade it provides changes throughout the day as the sun moves across the sky and we’ve noticed it does give some protection during a light rain.

It really makes the space feel intimate and inviting.  And because we made sure it didn’t hang over the grill it’s safe to stay up for the whole season.  We do plan to take it down for winter, so it doesn’t get too heavy with snow and lasts a little longer.

Not only are we enjoying it, the fur babies appreciate the extra shade too – especially on hot days like we had last week!

Freebie Doggie Toybox

Today’s post is another DIY container, but this time instead of holding flowers it’s purpose is to corral the numerous dog toys that are always around our yard.  It started with this free crate I picked up at a work event.  The vendor said they had a huge stash of them and wanted to eliminate some so I could keep it.

I first thought about putting cedar boards around it but I couldn’t find a quick and easy way to keep them attached so I moved on to a free covering option I already had in my fabric stash – burlap.  I dug out a large scrap piece left over from previous projects and cut did a quick dry ‘test’ fit.  Then I trimmed it down and grabbed some twine to secure it to the crate.  I pulled apart some of the fibers and threaded the twine through so I could tie it.

The cats decided now was a good time to ‘help’ even though this project wasn’t for them.  Apparently burlap is a good spot for a kitty nap…

I conferred with the Hubs about the best way to wrap the box and secure the liner inside.  He made a few suggestions and then just told me to hand it over so he could work on it while he watched a movie and I edited client images.  Knowing his vast knowledge of knot tying and securing loads from almost 20 years in the Coast Guard I happily accepted the offer.  About an hour later he presented me with this.

He wove the twine through the top edge of the fabric and the holes on the crate pulling it taunt as he went so everything stayed smooth on the outside.  This will keep the fabric from pulling up every time the dogs pull out a toy.

Meanwhile, Stella was still hard at work on that nap…

I took a break from editing photos and placed the box in the backyard.  I was able to fit the toys we had in two smaller baskets into this one container so I went with the spot next to the firewood storage where it’s more out of sight and helps cover the electrical conduit.

It sits under the eave of the house so it’s mostly protected from rain, but because we didn’t cover the bottom any water that does get in it will be able to drain out easily.

Seeing it in place, I’m glad I went with the burlap instead of the cedar.  It blends in more, even when it’s filled with the dog’s brightly colored toys.  I showed the dogs where their new toys and they didn’t waste any time rooting through the pile to find their favorites and head off into the yard with them.  Now if only I could train them to pick up the toys and put them back in the box!

It’s a pretty nice upgrade for spending nada and it keeps the yard a little cleaner. 🙂

My New DIY Planter

Continuing my theme of DIY planters this week, here’s another that the Hubs made for me.  It started with this cute wooden caddy I picked up on the buy/sell page.  I had planned to use it as a planter, but the support bar down the middle just wasn’t going to work for that.

 I mentioned my disappointment to the Hubs and we chatted about how I wished it had been configured.  He must have been listening and wanting a project, because a few days later he surprised me with this.

This sucker is solid wood and super HEAVY.  We gave it two coats of the teal outdoor paint we’ve used on other projects like the bin planters and firepit chairs.

Once it was in place I realized how deep it was and knew I didn’t want to fill the whole thing with dirt.  So I had the Hubs drill a couple drainage holes in the bottom and we gathered scrap wood to create a little platform half way up the inside.

Now I needed something to hold the dirt and actually plant in.  I decided to try the foil baking pans from the grocery store, since they were cheap and readily available.  I added two to my grocery order and picked them up the next day.

The pans fit the width of the box perfectly.  I decided to use two, end to end to fill the space as much as possible.  Next came planting.

I had some violas that needed a home so this seemed like a perfect spot for them.  Plus the Hubs really likes these little blooms, so it was fitting that I fill the planter he built me with flowers he likes. 🙂

They still need to grow into the space a bit but they look pretty cute for now and add a bit of color to this corner of the deck.  I like how they spill over the side a bit too.

Next year I’m thinking I’ll use ferns in the caddy since the area will be more shaded when the gazebo cover goes up soon.  Perhaps I’ll snag a couple faux ferns like the ones I used out front in the vintage cart so there’s 0 maintenance!