Lantern Love

Can someone please tell me where the heck the week went? We spent a good deal of it dealing with a broken dishwasher, a security breach at our insurance company and damage to one of our couch cushions – all of which required calling various customer service centers, most of whom were not very helpful. I was actually so frustrated with the process I started writing a post about the experience, but felt that it was turning into a rant. Since I’d rather focus on more productive things I decided to share a fun little update I did on our back deck instead.

Spring in Alaska is very different than the rest of the country. There aren’t any flowers blooming here yet, but our occasional days of warmer temps and sunshine have me shifting attention to our outdoor spaces. Last year we installed two hooks on either side of the window on the back of the house for hanging planters. This year, I plan to create sectional seating under that area and worried that hanging baskets would be a ‘head hazard’ for anyone sitting or getting up. Since I didn’t want to take the hooks down, or deal with the holes that would create, I decided to hang lanterns on them instead.

I spotted these at Target during a recent visit and picked up two to try out for just $13 each. I really liked the style and size, but worried that the open top might collect water which could become a mosquito breeding ground if I didn’t take it down when not in use.

Lantern3

The width did fit my new Luminara candles but I wasn’t crazy about how the height worked out. You couldn’t see the flame, which is kinda the point.

Lantern4

Luckily I had a plan B. I also found these at Pier 1 and because I had a reward coupon and a gift card left over from Christmas (thanks sis!) I got them for FREE! I’ve always liked this style and have looked at similar designs many times before. Granted the top isn’t fully covered, but it should reduce the amount of water that might collect if I do leave them up.

Lantern1

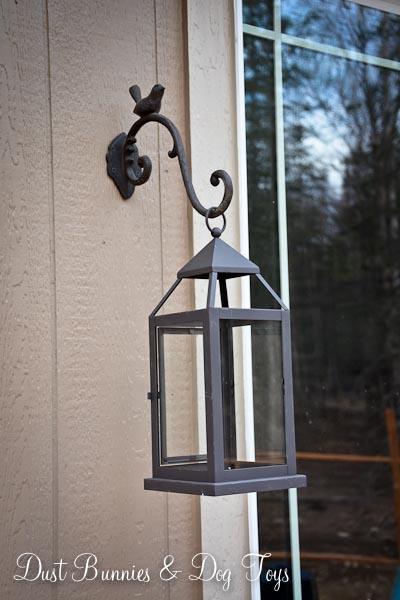
Since these are taller than the first option they fit the Luminara candles much better. They also seemed a little sturdier than the first option too.

Lantern2

And who doesn’t love FREE?! I plan to clean the deck and start getting things set up this weekend, so watch for a post about that soon, followed by one on my plans for the yard this season. Until then I hope you get outside and enjoy some spring sunshine! 🙂

Advertisement

A Master Closet Case

As promised, here’s my plans for our Master closet.  We decided to forgo having the builder install any shelving in the closets because we didn’t want to have to ‘work around’ the builder basic shelving or worse rip it out to make it functional for us.  So without further a’do here’s the grand plan for our closet!

ClosetFloorplanWe will each get one side of the closet – of course mine is the bigger side – and my full length jewelry cabinet mirror will hang on the back wall.  There is a funny little indent into the closet at the back because of our toilet being in a separate room in our Master Bath which is next door to the closet. At first that made me worry that it would be difficult to design around, but in the end it worked out pretty well for what we needed.

My side will have double bar space, laundry baskets like this, a couple shelves and a tall hanging space.  Here’s the drawing of the layout.  I still need to measure everything out, but since it’s a simple design I figure we can move things to fit the materials and space.

Jenna's SideMatt’s side will be much simpler with just two rods for hanging and a top shelf along the entire space.  We don’t really use the shelving in our rental’s closet so we figure we don’t need much in our house.

MattsSideThe funny little pop out wall will hold my high heel shoes with something like this and my boots will sit in a pretty copper boot tray at the bottom of the wall.  I plan to add some sort of hanging space for my larger costume jewelry that doesn’t fit well in the mirror cabinet above the shoes.

Picture 5Then the back wall will hold the mirror cabinet, which we plan to mount in the wall.  Based on our preliminary measurements of the framing it should fit between the studs with just a slight shaving of the boards.

BackWallThe crawlspace access is almost smack dab in the middle of the floor of our closet so we plan to put down an area rug to cover it.  I figure you usually come into the closet from the bathroom to get dressed and thus want something soft and warm underfoot while choosing an outfit anyway.

Since it’s a fairly simple layout we should be able to get it set up the first day we’re in the house, especially if we measure and purchase the materials before hand, so they’re ready to be installed.  The simple design also means we won’t be spending oodles on some fancy closet kit either!  I think that might just be the best part of the whole project!

So that’s the master plan.  What do you think?