
At the end of last summer, the Hubs was suddenly motivated to build a green house and although I had lots of ideas on what I wanted, I didn’t have a plan fully thought out for the project. But I definitely wasn’t going to take advantage of this unexpected desire to build when it was in my favor and so the green house building began.
I did know where I wanted the green house – behind the raspberry bushes where it would get the most exposure and I could see it from the house and driveway. Unfortunately this spot is slightly sloped so it’s not an ideal building site, but the Hubs worked that out by building a platform for the floor of the green house with a support for one side to cover the difference.

He used a large pressure treated board for this support since it would sit on the ground. The floor itself was made with pressure treated 4×4 joists topped with 3 sheets of plywood. The lack of a permanent foundation allows us to move the green house should we determine there’s a better spot for it in the future, but provides adequate support for the current location.

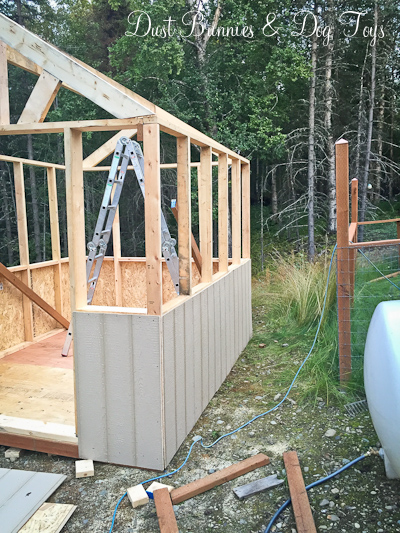
I wasn’t sure on the size so based on the spot the Hubs suggested 8′ x 12′ and that seemed reasonable to me, so I went with it. He framed up the walls for either side and I helped hold them in place while he nailed on supports.

Working from the plan in his head based on pictures I’d shown him of designs I liked, he framed out the front and back walls and started adding trusses to create the roof. He also created a support frame for siding that would go half way up the sides of the all 4 walls.
 It really started to look like something when the siding went up on the lower walls. He had to get creative with the front corner due to the slope of the ground, but he made it work.

The siding will provide a great spot for me to attach the gutters I used for strawberries last year. This season they will hold lettuce, spinach and chard or kale for salads and the strawberries will move inside the green house to give them a longer growing season. You’ll notice the large water tank we added next to the shed last year is nearby for easy watering. The front yard hose reaches the tank fairly easily so filling isn’t too difficult and the natural slope of the yard provides a gravity feed for watering the raspberries and filling watering cans for the green house.
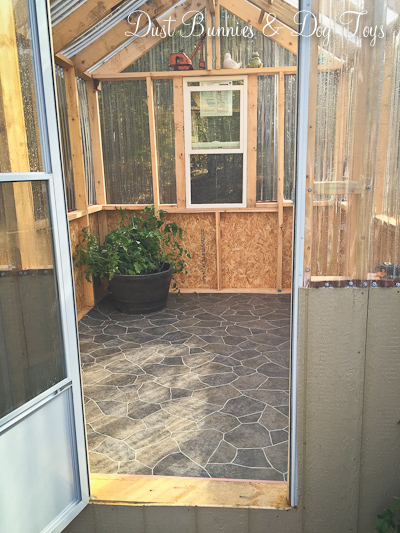
Next came the clear plastic siding and a window in the back that can vent heat if needed. He used the contoured wood slats designed for these clear panels to support the pieces and provide spots to secure them to the frame. I added some paver blocks we had on hand in front of the the doorway. I may add a few more once I get things set up, but for now it creates a nice little stoop for the structure.

One of his last steps was installing a storm door, which also has a window and screen that can be used to vent excess heat if needed. He lucked out finding this door on a “returned” clearance rack for much less than it originally sold for. A brand new door for a fraction of the price – he’s learning my bargainista ways quite well!

He finished off the open space on either side of the door and we purchased a piece of low cost linoleum to cover the plywood floor. I chose the grey stone pattern for two reasons: A) I liked the look of it for a green house floor and B) the dark colors should absorb heat during the day and release it back out to the plants during our very short nights during the summer. Somehow I neglected to take a finished picture of the exterior but here’s some views of the finished interior.
Finishing the project just in time for the season to end last year it provided a spot for me to move plants that were starting to struggle with the temps and spots for my garden art I was starting to collect from the yard. Several pieces found storage spots along the top of the wall, where they fit perfectly.
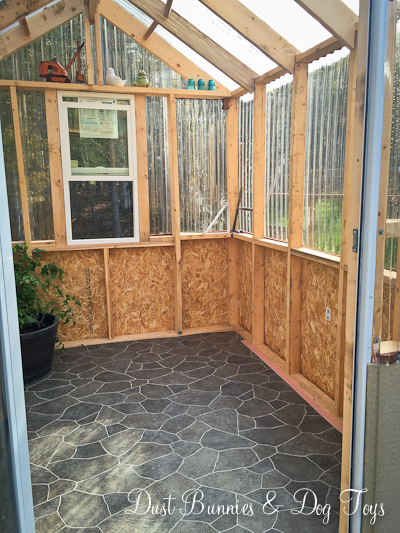
Even at the end of the season it was still getting pretty warm inside the green house so it should work well to extend our growing season which is sadly very short due to being next to the mountains.

And here’s how it looked during the final weeks of summer before fall arrived. Having these containers in the space temporarily really helped me develop a plan for how we’ll set up everything come spring. With our first snow of the season in late October we opted to leave everything in here and store the patio furniture in here for the winter as well, so it’s a hot mess these days, but come the first sign of spring I’ll be pulling everything out to get my plan in motion. I’ll be sharing that here on the blog very soon so check back and feel free to make suggestions when I do! 🙂
Shared on:

So jealous! I would love to have a green house!
I’ve been waiting for it for a long time. 🙂