My Gifted Garden

No, I don’t have a magical super smart garden. I’m just lucky enough to be gifted an entire flower bed of plants, which I’m now calling “my gifted garden.”  Since we purchased a new construction house, we have a LOT of blank space to fill in our yard. I was chatting about this with a co-worker one day a few weeks ago and she asked if I was looking for any perennials to fill my yard. Free plants that will come back bigger and better each year?! You bet I was game! She told me to let her know when I was ready and we’d set a time for me to come to her house and help her “prune” her garden.

I was finally ready to take her up on the offer last week, so we picked an evening after work for me to come by and I showed up with a couple buckets, a shovel and gloves. I was so excited I actually beat her there, but I knew I was at the right house when I drove up and saw this amazing assortment of flowers.

1

Just to make sure I rang the doorbell and her husband answered. He was mighty confused when I said I was there for plants! She arrived a few minutes later, changed into yard garb and we set to work with shovels and a stash of plastic bags she brought out to hold the roots.   We chatted about what types of plants grew well and which liked particular exposures as we worked our way up one side of the bed and down the other. She’d ask if I wanted this or that, and I repeated that I’d take whatever she was willing to part with and give it a home to grow.

2

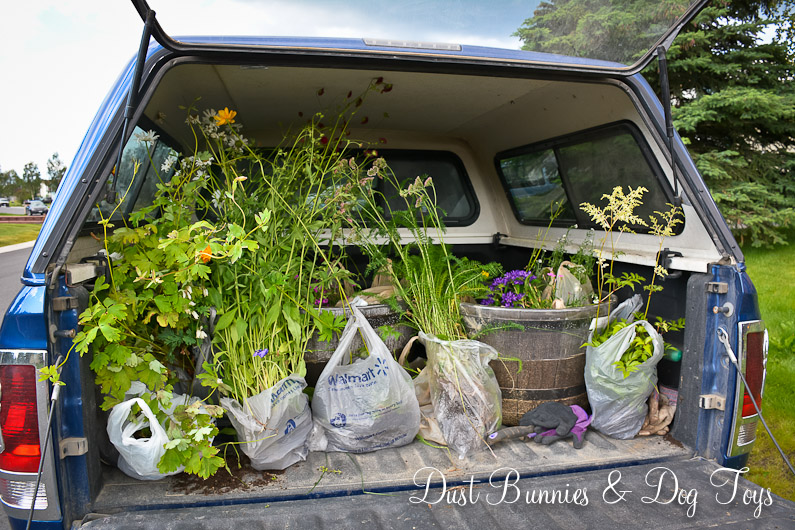
By the time we were done the back of my truck was a wall of plants. Both tubs I’d brought were full of bags and I had other bags tucked in between the tubs and on a small tray I had thrown in the truck just in case! And you couldn’t even tell we’d touched her garden!

1

Ok, so this IS the same picture as above, but it literally did look exactly the same from the road. It was only if you came in for a closer inspection that you’d see the areas we dug into.

3

Once I got everything home, I placed the bags around the flower bed so I could decide final placement for all of them and make sure that I spread things out. I watered everything in the bags since it was getting late and headed for bed. I wasn’t able to get them in the ground for a few more days but I kept watering the roots in the bags and most of the plants seem like they did ok.

Finished

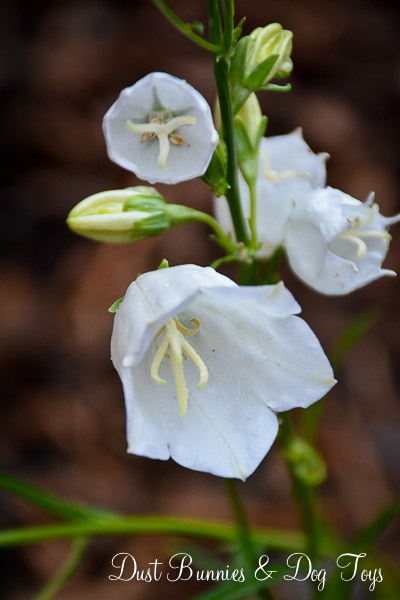
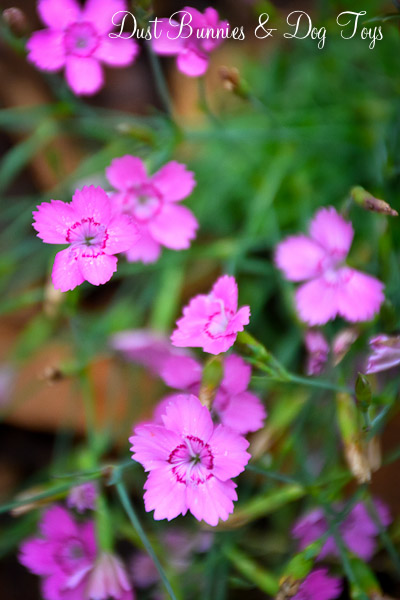
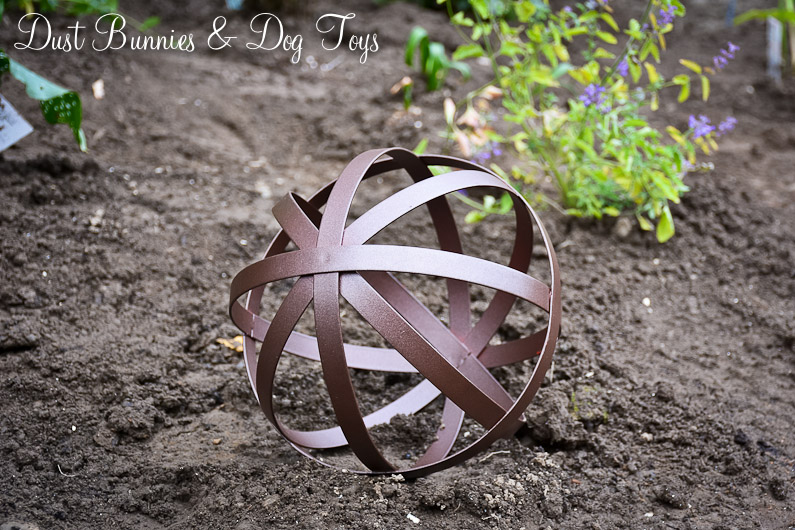
A little fertilizer and some mulch and its done! It will look even better when the hydroseed is done next week and we finally have a lawn too.  I still need to add a line of pea gravel at the back along the house, just like we did out front and add some garden art, but I’m plenty pleased with my gifted garden. I’m anxious to see how it all comes back in next year. I’m hoping most will go to seed, spread a bit and come back even bigger next season. And hopefully, in a few years my gardens will be as established as my co-workers is now and I can ‘gift’ plants to others to continue the chain. 🙂  Here’s a few close ups of the flowers that survived transplant.

Purple

Yarrow

Campanula

Phlox

Daisy

Finding the Right Fit

Sometimes it takes a few tries to find something just right. That was certainly true when it came to finding the perfect case for my iPad. I loved the purple case I showed you just after I started this blog, but one night I was tucking it away next to the headboard of our bed and some of the keys came off the keyboard! I tried desperately to reattach them, but they just stuck to my fingers the next time I tried typing.

I spotted a similar style for sale on the local buy-sell page for just $10 and quickly bought it as a replacement. It was still new in the box, but it was basic black. And the more I used it the more I realized it just didn’t work well for me. The fold out for the keyboard was difficult to use, I couldn’t switch up the direction the iPad sat due to the flaps that covered ‘non-button’ areas and the grooves to hold the screen at an angle didn’t grip so unless I was sitting totally still it would often slide down.

Then a coworker showed me the keyboard cover she’s just bought and let me test out the different features. Not only was it purple, it had magnetic contact points that were secure but still easy to remove. I was sold.

iPad3

She said she found it on Amazon for half the price she’d seen it elsewhere so that’s exactly where I went. At checkout I was asked if I wanted to use reward points on my credit card to pay for the purchase. Um, yes! And I got free 2nd day air for trying Amazon Prime. I think that’s fate saying I was supposed to have this.

iPad4

iPad2

iPad

Since the keyboard just covers the screen I wanted to find a way to protect the back of the iPad. Then I remembered that my company had iPad sleeves as a promo item! And because our marketing department is super awesome (hint, hint, wink, wink) it didn’t have a big gaudy logo on it. Instead we have a fun catch phrase and artwork.

iPad5

I was able to sell the old case for what I’d paid, so my only financial investment is the minimal price I paid for the original purple case. How’s that for savvy shopping?! 🙂

DIY Bargain Laundry Detergent. It Really Works.

Before we moved into the new house and started using our new washing machine I read a lot of information about what types of detergent were the best to use in HE washers. In doing so, I learned just how many chemicals were in the typical name brand laundry detergents and how liquid fabric softeners coat your machines with a film.

That’s when I started researching natural detergents and discovered this DIY detergent recipe. It seemed pretty simple, just a few common ingredients and was supposed to last MUCH longer than the usual bottle of detergent from the store. I figured it couldn’t hurt to try it out, so I made a half batch and started using it. That was back in December. Apparently their claims about how long it would last were right because I just used the last spoonful of that half batch the other day!

Soap2
My first half batch before stirring to mix in the last ingredient.

And I don’t notice any difference in my laundry. Our laundry comes out just as clean and still feels as soft as it did before. But I do notice that my clothes seem to hold up a bit better. I’m not sure if that’s the improved washer or the detergent, but I’ll take it.

Because things were going so well, I decided to make another half batch with the ingredients left over from the first half batch. I haven’t priced out the ingredients in detail, but I probably spent around $50 for everything needed for the first batch. So that averages out to a cost of just $6.25/month for laundry soap. That’s definitely cheaper than the store brands, even in bulk! And because I had half of a box of most of the ingredients left over from the first order, I only spent around another $10 to make the second order. If that batch lasts as long as the first did that will average $1.25/month!

Next time I’ll make a full order since I think the container I’m using is big enough to store it. Doing so should bring the average cost to around $3.75/month. That’s certainly within my bargain budget.

SoapSince the recipe is super simple and well described on the original website I won’t rehash it here. I did choose the option to microwave the bar soap rather than spend time grating it. This does result in bigger clumps so it doesn’t mix quite as much as their original picture, but it still works fine.  The hubs helped crumble it up just before dinner and joked that the pieces resembled biscuits so much that he almost tried to take a bite of one!

I couldn’t find Zote soap here in Alaska, but I did find the alternative yellow naptha soap, which goes better with my color scheme in the laundry room.  It’s not quite as pretty as their pink and purple concoction but it’s just laundry soap. 🙂

Our Cutlass Heirloom

My husband inherited his father’s Navy cutlass and wanted to display it somehow. I knew there were sword stands that would work and researched a couple online. I originally planned to have a custom one made by the same artist who made his coin holder, but the price was a bit excessive for something that wouldn’t get much notice. At one point the hubs considered making a stand, but that would have required several new tools – which was probably his real motivation – and time that could be spent on other more important projects.

When I found a basic wooden stand on a discount website I ordered it right away. Unfortunately, I soon got an email that they wouldn’t ship to Alaska and had to cancel the order. I searched on and off for the next few days and finally found one for about $15. A few dollars more for shipping and it was on it’s way.

Sword

It’s definitely not fancy, but it does the job. And because we display the flag from his dad’s service in front of the sword you really don’t see it anyway. Together they make a simple display to honor his dad.  And I find it fitting that the custom art I had created from a drawing of the hubs in service hangs above them both.

Sword2

Want some history on the traditions of the Navy Cutlass? This website details the origins of the Navy sword and it’s demise with the advance of modern warfare.

Knock-Off Designer Garden Art

While touring my Mother-in-law’s neighborhood on our recent trip I spotted a beautiful craftsman style home that I adore. In addition to beautiful timber columns on the porch they had a large rustic metal sphere in their landscape that I fell in love with even though I it was likely a designer piece that was light years outside my budget.

I thought about that metal sphere on the drive home and decided to look for a way to DIY my own. I’d seen several similar projects for light fixtures so I knew it was doable. I just had to find a material that could stand up to the elements.

I pinned a couple of ideas, but put the project on hold since I had several others already in the works. Then I happened to spot these beauties on a Target clearance rack! They weren’t the color I wanted, but I knew a coat of spray paint could fix that. I got all three for about $21. I all but danced out of the store!

Spheres

They lived as is in the flower bed for a while since I was busy with those other projects I mentioned, but when I started spray painting my cache pot from yesterday’s post I decided to knock these out as well.

Spheres

I love the copper color on the small one, but because it was a metal flake paint it was a little difficult to work with and required several small coats to get all the angles. The ORB color on the other two is a dead ringer for the original designer inspiration and only took two coats. The third sphere has found a home in the new rain garden, which isn’t finished just yet.  A few more steps and I’ll be ready to share that project too! 🙂

Sphere

Cache Update

Remember the pretty little cache pot I created a while back? Well it had a little defect. You see the lid fit so snugly that when you went to remove it you had to hold the pot itself to pry it open. And when it did open the motion created caused the contents already inside to move. Sometime so much that they escaped – onto the person opening it. That’s why my pretty copper canister became cabinet top décor and a replacement was found.

Shortly after we moved to the mainland I purchased this ice bucket at JoAnns on clearance for something like $5. And then I never used it.

Cache

Since my inspiration to DIY a cache pot in the first place came from an ice bucket I decided to give it a try and set it out on the counter for a test run. It was easy to open – just lift the lid. It was easy to clean – just pull out the insert dump and put in the dishwasher. And it was the perfect size. Unfortunately, it wasn’t the perfect color. But that’s nothing a coat of spray paint can’t fix.

Cache

A few coats of spray later and wha-la, I have a new cache pot! Plus because I already had the bucket and the spray paint it didn’t cost me a dime! I’m still not crazy about the stars, so I might rig something to cover those, but for a totally free project I’m not gonna complain.

Something New Underfoot

KitchenRugs2When we decided to do vinyl floors throughout our house due to my allergies and desire for easier cleaning I knew I’d be on the hunt for several area rugs once we moved in. It’s been more difficult than I imagined finding just the right rug in the right size at a price I can swallow, which is why none of our bedrooms have rugs as of yet.

However, I did find some smaller accent rugs for great prices at CostCo while in Portland. When we first moved in I used two brown memory foam rugs we had in our master bathroom at the rental in the kitchen. They worked ok, but they required constant cleaning and didn’t play well with the vacuum. Plus they tended to wander across the floor with the assistance of running paws. I’d considered getting some of the fancy gel mats you see at the specialty kitchen stores, but just couldn’t justify $200 on such a small item. So when I spotted these knock-offs for just $14 I quickly plopped two in my cart.

KitchenRugs

Although they aren’t quite as nice as the specialty store variety, they feel good underfoot, stay put where placed and don’t surrender to the vacuum. I occasionally use a Lysol wipe to get any lingering dirt, but overall they have been a perfect fit for this spot.

ClosetRugMy next bargain find were these runners at $10 each. I planned to use one in the master closet and one in the laundry room, but they were a little too narrow for both spaces, so I paired them up to cover the access panel in the closet floor. Eventually, I want a single rug in here that either matches or coordinates with what I select for the Master Bedroom, but at just $20, this will work for now.

The hubs pointed out some indoor/outdoor mats similar to what his mom has in her garage since I’d mentioned how I liked them. I thought they were a little pricey at $20, but I knew it would be a good option for the back door where the dogs come in and out. I was glad to see that it covered the large opening, plus a little extra, so it catches dirt from both paws and feet, as you can see.  It’s certainly reduced the amount of dirt making it inside!

OutsideRug

I almost bought a second for the laundry room, but I was pretty sure it would be too wide and not long enough. I decided I’d try the one in the laundry room first and if it did fit then it could stay there and I’d check our local CostCo for another for the back door. But my assumption was right and it just didn’t fit the space properly, so the hunt for a long, yet sturdy runner for the laundry room continues.

Over the Bed Art

MasterArt2

I wanted our Master bedroom to be very simple and calming, so I purposely kept things in this space to a minimum but it was lacking character.  I knew I wanted to add some sort of textured art, but hadn’t found anything just right.  Then I spotted a wood carving on clearance at Pier 1 while on our trip down south and knew I wanted it for this space.  Unfortunately, they only had one.  Luckily, the store across town still had a few, albeit not on clearance and they were able to do a phone purchase so I could pick it up later that day.

I originally planned to hang them over the night stands, but when I tested that idea the space above the bed felt too empty.  Although they are fairly large, they weren’t big enough to take up the whole width of the bed, so I opted to center them with some extra space in between.  I decided to hang them half way between the top of the head board and the ceiling since it is such a large space.  Once they were hung I almost wished I’d bought a third, but I think that might have felt a bit too fussy.

MasterArt

I also hung this watercolor print by an Alaskan artist on the small wall by the bathroom door across from the bed.  We purchased it during a trip and got a super sweet deal, frame and all!  It’s a favorite of mine and the hubs, so it’s fitting that we wake up to it every day.  Plus the colors work well in this space.

MasterArt3

I’m not ruling out the possibility that I’ll add other art in this space, but for now I’m enjoying the simple yet unique look.  Now if only I could find the perfect rug and get the bench done for the foot of the bed! 😉

Free & Easy!

Soap

I recently found some pretty green bottles and instantly knew that I wanted to use them in the kitchen for the hand and dish soap.  I lucked out and the top from the store dish soap bottle fit the glass bottle perfectly.  It even screwed on tight without a hassle.

The hand pump was a little more difficult.  I tried a pump like the one we used on the mason jar soap bottles, but it wasn’t the right size to fit the opening.  I had a small hand soap bottle in our bathroom that had a larger pump so I decided to try that.  That one did fit, unfortunately the stem wasn’t long enough to reach the soap at the bottom of the bottle.

Then I remembered that we had a package of flexible straws somewhere and wondered if that might fit the pump.  I dug through the cabinets and found them, then tested out the length next to the bottle.  It seemed like it would work, so I pulled the old stem out of the pump and pushed the straw in.  The connection was a little loose due to the flexible part of the straw, but it stayed snugly attached as I fussed with it.

Since it seemed pretty secure, I put everything together and gave the pump a couple pushes.  It took a few before the soap started flowing, but when it did it worked just fine.  It’s been about a week now and it’s still working great, so I guess my little DIY rig is good enough.  And it’s a whole lot prettier than the plastic store bottles!

I’m not crazy about the different colors of the two tops, but they work and I’m probably the only one who notices it.  Plus the bottles fit the little tray I’d been using to hold their plastic predecessors as if it was made just for them, leaving just enough room for the sponge.  But the best part about the whole project is that it was 100% free!  Now if only I could get all my projects to be this affordable and easy. 🙂

A Little Update Up Top

Although I love the decor I chose for the small section of our kitchen cabinet tops, I wasn’t super crazy about how things were looking on the long portion.  I’d tried a few options and had a plan to update a large tin I purchased, but something still wasn’t just right.  It just seemed a little to sparse compared to the other side, so I knew I wanted to add something.  Maybe a few somethings.

Luckily, while I was in Portland I found several somethings on my pilgrimage to Home Goods and a visit to a large Goodwill.  The new haul included a basket tray, a tall distressed white ceramic container, a fake plant and a green glass jar.  All together, I probably spent around $30 for all four, which brings the current total spent to around $40.  Still within my bargainista budget.

I added a cream ceramic pitcher I already had and the former cache pot – watch for an update on that project soon.  I played around with the items, trying things in different spots and finally settled on this line up.

CabTops

Apparently Luna approves!  In fact, I’m surprised she didn’t knock over the basket so she could lay in IT!  I’m still getting used to the new look, but I’m pretty happy with how it pulls in the colors and textures from around the kitchen and family room.  The fact that the pitcher is a different color than the other ceramic pieces kinda makes me twitchy, but it works for now. 🙂