A Master Bench

BenchDone2

This is my final No-Spend January Project recap and it’s one of my favorites! Yes I know it’s now March, but life happened and I’m just getting to sit down and write this up.  I’d had this project in mind for a while and had gathered all of the supplies we’d need over several months. It was just a matter of actually spending the time to put it all together.

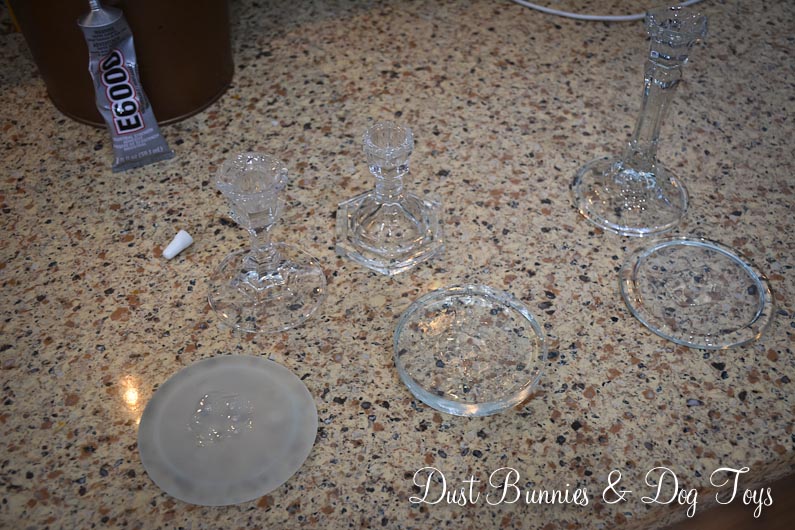
We started with the legs, which we picked up unfinished at the hardware store for around $7 each. I decided to stain them with an oak color we had on hand and then did a light coat of rose gold paint to give it a little sparkle and depth. The hubs created this genius holder so I could do the whole leg at once and leave it to dry! It’s just a piece of scrap lumber with holes to hold the threads on the tops of the legs. (Notice my last no-spend project there in the background?  You’ll see the pedestals mid-painting in the background in one of the upcoming pictures too!)

BenchLegsPaint

Next we attached the legs to a simple box structure the hubs built based on the dimensions we’d taken to fit the foot of our bed. He used scrap 2×4’s for the frame and a piece of plywood for the top.

BenchStart

I’d found a huge section of foam for just $3 at a rummage sale, which was a much better bargain than the pre-cut pieces that sell for $25 or more and weren’t the right size. We cut a piece of the foam to fit and used spray adhesive to attach it to the top of the box frame.  And as you can see behind the bench, there’s still plenty of foam left over for future projects!

BenchFoam

Since I planned to upholster around the sides of the box, I wanted it to have a bit of cushion too.   A layer of batting accomplished that and made the edges of the foam less square. We realized the next few steps would work better without the legs so we removed them and stapled the batting down on the underside of the frame, pulling it tight as we went. It took us a few tries to figure out exactly how we wanted to wrap the ends, but we finally figured out the method that involved the least amount of bunching.

BenchBatting

Next came the outer fabric, which had been a shower curtain I picked up at good will for around $4. I chose this material because it seemed to have a bit more tear resistance, which was important with three dogs and a cat! We stapled down either side of the fabric avoiding the staples from the under layer of batting.

BenchWrap

Just like the batting, we tried several methods of folding the ends before deciding on one that kept the lines of the fabric straight. We had to cut a bit of excess fabric from the folds to keep things smooth, but the end result turned out pretty good.

BenchWrapped

Finally we reattached the legs by cutting holes where the threads attached to the frame and screwing them back on. (Notice that antique table we’re using as a work bench?  I snagged that just before Christmas for $20 and plan to refinish it as a nightstand for our guest room!)

BenchLegs

Now we have a custom bench along the foot of our bed, which is the perfect place to hold all those extra pillows each night! Which also keeps the fur babies from using it as a launching pad onto the bed!  🙂

BenchDone

DIY Glass Hurricanes & Pedestals

This was seriously one of the easiest DIYs I’ve ever done. All it took was some glass candle sticks, glass candle trays, a couple simple vases and some industrial strength glue. I found several tutorials on Pinterest for both the hurricanes and pedestals, so it’s certainly not a new idea.

The hardest part was deciding which glass candle sticks to pair with each topper. I mixed and matched the different pieces, doing a “dry fit” to finalize my selections. I decided to use the taller candle sticks for the hurricanes since the added height made them feel a bit more like the expensive versions I’ve seen in the designer catalogs.

CandlesTest

The three shorter candlesticks were paired with the glass trays to create pedestals of varying heights. I think one of the trays was actually a paper weight, but I like that one has a thicker platform since some items might look better with that.

StandsTest

Once I was happy with the dry fit, I lined up all my pieces and broke out the super strength glue, which other bloggers recommended. This stuff is pretty strong, so I wore gloves while working with it as a precaution.

Glue

The directions say to apply the glue to both pieces, wait 2 minutes and then join them, so that’s what I did. And it worked like a charm. The glue does need 24 hours to cure, but once it did it created a super strong bond. I painted the pedestals white, so I could use them for multiple occasions.

Pedestals

My only disappointment with this project is that I don’t have a large pillar candle that fits in the curved vase hurricane so I have to use a smaller votive candle. But for a fraction of the designer price I can work around that.

Valentines2015TV2

Since I already had the spray paint and had picked up all the glass pieces for about $25 at thrift stores before January, all I needed was the glue which runs about $5 at the hardware store – although after a military discount and a gift card it was free. So there you have it, another 0-cost project wrap up for No Spend January!

The Sickness

Hi, there. After a lengthy battle with “the sickness” – a nasty, allergy-induced, head cold – I’ve finally returned to feeling human. The hubs was amazing through it all. He drove two hours to pick me up at work and bring me home early because I car pooled the day I got sick and then took great care of me until he came down with a bug himself. We’re both still fighting some congestion, but at least we’re back in action. And now begins the game of playing catch up since I spent my long holiday weekend, including Valentines, hacking up a lung instead of making progress on my to-do list.

One of the items on that list was sharing my Valentines décor with you. I know it’s now passed, but I wanted to share what I did anyway. I had this grand plan to make a sweet X & O like this, but things didn’t pan out quite how I hoped. I bought plain white X and O letters at Michaels with the rest of my no-spend January return gift card.

XO

I originally planned to paint gold stripes on one and gold dots on the other, so I taped off the stripes and poured a bit of craft paint.

XOPrep

Apparently the finish on the letters wasn’t well suited for painting because the paint didn’t adhere well and bled, even with the tape.

OLines

I decided to try making the dots with the end of a large brush.  That didn’t work out so well either.

ODots

Since I had limited time and didn’t feel like sanding anything, I ended up just wiping off the paint and leaving them plain, atop the curio cabinet.

Valentines2015Curio

The media cabinet got some love from a few of my recent bargain finds, including a super simple DIY glass hurricane candle votive, which I’ll share a tutorial for in my next post.

Valentines2015TV

Valentines2015TV3

Valentines2015TV2

I was pretty happy with the mantel arrangement, which included another DIY glass hurricane votive, milk glass and a DIY lipstick heart framed art thanks to several of my gal pals donating their old unwanted lipsticks. They all thought I was nuts when I asked if they had some to donate, but thought the end result was pretty cool.

Valentines2015Mantel

The side table held some faux tulips in a white crock (another fairly recent bargain find), paired with a long-ago thrifted gold heart votive candle. And my chair became home to my “Love you More” pillow.

Valentines2015SideTable

I added a “Love” cover to a pillow I already had and it looked perfect on the bench near the entryway. Beyond that you can see the heart rose wreath on the wall in the entry.

Valentines2015Pillow

The dresser in the entry gave me fits. I just couldn’t seem to make it work. I started with this set-up on one corner and really liked it, but that left the other side barren.

Valentines2015EntryTry

So I reworked things and ended up with this arrangement. Certainly not amazing, but it filled the space and didn’t cost anything, so I decided to go with it.

Valentines2015Entry

Valentines2015Entry2

Valentines2015Entry3

Clear and red glass heart ornaments, along with some pink ribbon brought my holiday tree to life. I used to have a topper for this holiday but it bit the dust last year so I just went without this time.

Valentines2015EntryTree

I kept the dining room simple, with two large felt hearts on the buffet lamp shades and a little bear holding the wooden heart the hubs mom brought back from Jerusalem under a cloche.

ValBuffet

ValBuffetBear

A flameless candle and some rose petals finished off my recent bargain hurricane for the perfect simple centerpiece.

ValTable2

ValTable

There you have it – my 2015 Valentines décor. Just in time for me to switch it all out to for green St. Patty’s stuff! LOL. I’ll try to get that glass hurricane tutorial posted tomorrow, so stay tuned for that!

Recent Bargains

Bargains

Just before No-Spend January started (hence the Christmas centerpiece) I snagged a couple really good bargains on a trip to the thrift store. I only paid $45 for all of this! Several of them got a makeover during the last month – I’ll be sharing those very soon – and several became part of my Valentine’s décor – which will also be shared soon.

Although my favorite find was the milk glass vase for $0.99, I was pretty excited about the tall hurricane vase since I had bought one on the local buy/sell page for $5 about this time last year and ended up selling it to someone at a spring bazaar even though it was only part of my display because she liked it so much and offered me double what I paid for it! I snagged this one for $12 and although I originally planned to paint the base I’ve decided to leave it as is for now. The wooden pedestal bowl is still mid-transformation, but I think it’s going to be fantastic when it’s done – just in time for some spring decorating.

Chair

But the best recent bargain is this leather arm chair. Wanna know what I paid for it? NADA! Zilch! Absolutely nothing! Every once in a while trolling Craigslist’s free section pays off! 😉 One of the arms is a bit wobbly and needs some reinforcement, but the hubs is pretty sure he can take care of that at some point. That point will probably be right before we have company coming one day when it’s a priority. Oh well, at least for now it looks pretty darn fancy!

Now that No-Spend January is over, I decided to check out a local clothing consignment store last Sunday and brought home a lovely Banana Republic jacket for just $7! I also found a pretty pink scarf at the thrift store in their ‘new/retail donated’ section for just $9. I’d been on the hunt for one for some time now so finding one at such a great price was even sweeter.  Isn’t finding a great bargain wonderful?  Tell me about your recent favorite in a comment!

Merry & Bright

Bright

It’s Christmas eve and I wanted to share one last Christmasy craft project! My mother-in-law gave me several glass blocks when we visited her last fall. They had been given to her and she had no idea what to use them for, so she hoped I would figure out something fun to do with them. I had seen several ideas on Pinterest using glass blocks, so I revisited them and chose to make a simple lighted message block, using materials I already had. I didn’t take step-by-step photos since the process was so easy.

I had the hubs drill a hole on one side of the block and then shoved a strand of Christmas lights inside. I could have paid better attention as I stuffed and probably would have gotten the lights more evenly dispersed inside the block, but I think it turned out just fine anyway.

I found a Merry & Bright design in the Silhouette online shop for 50 cents and used white vinyl to create my applique. Once the vinyl was applied and smoothed I just plugged it in. Wha-la! Festive Christmas décor for under $1!

I also made one with a different Merry & Bright design and white lights, which sold at my holiday bazaar booth. Luckily, the one left was my favorite of the two and it now greets guests on our front porch.

I hope your Christmas is Merry and Bright and filled with fun!

Quick DIY Thanksgiving Decor

Plate

Now that Halloween is over, I’m in full Thanksgiving mode and that means the decorating has begun.  This pretty plate was a left over from a recent work event and it just screamed to be made into a sign.  It fit perfectly on one side of my entry table and I thought a simple “Give Thanks” was the perfect way to welcome guests during this season.

Before

I loved the texture it already had  and new simple white letters would play well off that.  I took some quick measurements and played with a few fonts on my Silhouette and came up with this!

After

I do wish it filled the space a bit more, but I still love it.  And it only took about 5 minutes to create!  All with materials I found for free or had on hand.  That’s my kind of decorating.  Here’s a quick sneak peek at the other side of the entry way table.

Owl

I found that little owl lantern at the thrift store for a few dollars earlier this year, and the wooden tote started out solid black as a clearance find at JoAnns.  I sanded it down on a whim one day and loved the texture the left over paint gave it.  And because it’s so simple it ends up being used in many of my vignettes throughout the year.  And you might remember my little lace votives from this project.

FallEntryLooks like someone approves of my Thanksgiving entry way decor!  I’m still working on a few things for the other areas I’m decorating, but I’ll share those soon. 🙂

My New “Old” Fruit Bowl

Bowl1

Some time ago, my fruit ‘bowl’ became the hubs’ catch all spot for when he comes home and empties out his pockets. In the meantime I’ve just been using a bowl from our regular dish set, which worked just fine but I knew that wasn’t a permanent solution. So I’d been on the hunt for a simple and inexpensive replacement.

Bowl2

This little milk glass beauty fit the bill perfectly. I picked it up for just $4.50 at a local antique store I just discovered! I kept eying it as I wandered through the aisles and finally decided it spoke to me. There were actually two of the same bowl, but one was marked $10 and the other $6, so I took the cheaper bowl knowing I’d get an extra 25% off thanks to the open house sale they had going on!

Eventually, when the side counter is no longer a tool bench for indoor projects, I may rearrange the hubs’ drop zone and use something different so I can reclaim the original bowl. If and when that happens, I’ll use this one for centerpieces and other decorating. But until then, I think it does a mighty fine job as the counter top fruit bowl!

An Artful Disguise

As promised, here’s my other bargain art piece from my recent Target shopping spree.  I’ve been looking for a subway art piece for the wall between the entryway and the office for a while now, and actually purchased a canvas from Michaels to create my own.  Luckily, before I got to that little project I spotted this on sale at Target for around $20.  The color was a great contrast to the wall and I love the phrase, but what I really love is how it’s doing double duty!

Canvas

How you ask?  Well it’s hiding the not so lovely thermostat!  How clever is that?!  Of course I can’t take credit for this brilliant idea since I got it from Pinterest, but I’m still super happy with how it turned out.

CanvasOpen

All it took was a couple of hinges and it was bye, bye boring thermostat!  The hubs did notch out the frame of the canvas just a bit so we could center it on the wall, but that was due to my preference on location.

CanvasHinge

This same idea could be used to disguise other wall mounted items like alarm systems or old intercom systems.  Have you decorated around your thermostat or disguised something in your home?  Tell me how with a comment below!

The Hubs’ New Desk Chair & A Few Other Bargains

Check out the hubs’ new desk chair! Isn’t it pretty?! I’m loving it, not only because it can also double as a photography prop (whoop, whoop), but because I got a great deal on it.  Originally marked at $218 at Target, I asked customer service to price match their website where I found it for $152.  And to make it an even sweeter deal I used a $5 off coupon, plus $10 in ShopKick rewards and got another 5% off thanks to my Red Card. Let’s just say I was doing my happy dance!

Chair

I also found a couple of other bargains on that shopping trip.  The first was this pouf, which the hubs has been enjoying using as a foot rest when he sits on the couch.  It’s indoor/outdoor material so it can be used on our deck next summer, but in the meantime it can also serve as extra seating when we have guests over.

Pouf

I snagged a couple of bargain art pieces as well.  One became a little project I’ll share with you next week, but here’s the other.  I found this pretty little piece on clearance for just $7!  It was the perfect size for the blank wall next to the mirror in our guest bathroom and it fits the colors I’ve used in that space exactly.

Art

Just another example of why I adore Target and shop there often!  I think the only way it could get better is if they would pay me to shop!  A girl can dream right?! 🙂

Ready for a Siesta

A while back I shared a little about the dog bed that the hubs had built and I’d ‘fluffed’ along with our plans to build a few more for other spots around the house. That plan changed a bit when we found a couple of pretty nice dog beds with removable covers during our recent trip to Portland. Removable covers are a huge benefit for me, since I’m actually allergic to both our dogs and cat, but refuse to give up family members for a few sniffles and a headache or two. That means that I need to wash their bedding – and all the other household linens – every week.

2

I spotted this large bed at Home Goods for $30 and knew it would work well in the spot where the bed we’d made was in the family room. At first I thought about just using it inside the frame, but it bothered me that the frame covered part of the return vent behind the bed, so I decided to try out the bed on its own without the frame. Not only did I like how it looked and fit below the vent, but the dogs took to it right away. Win #1.

3

I also found this round bed at Home Goods for $25 and knew it would work perfectly in the corner of our bedroom. It wasn’t quite as cushy as the other Home Goods find, but I figure we can add to the padding later on if needed. It’s the perfect size for this spot, allowing the hubs room to still move around the bed on his side, but large enough that two dogs can snuggle together on it. Plus it replaced a non-removable cover donut bed that harbored dust and hair. Win #2.

1

Just before we left Portland, we found this bed at CostCo for something like $30. I envisioned it taking the place of the non- removable cover donut bed that was behind the chair in the family room. The replacement fit just right and has become a favorite spot for all the dogs since it provides a good vantage point of what’s going on in the main area of the house. Win #3.

We tried moving the bed frame we built into our bedroom, but it didn’t fit well in either spot we had left, so I decided I’d check the CostCos here and see if I could find some more of the round bed we’d placed in the family room.

5

The first CostCo didn’t have any of the round beds, but they did have this memory foam bed for about $40 that I was sure would fit the corner of the bedroom by the bathroom. It did, and adding the body pillow from the previous built bed on the back against the wall made it look like a little sofa. This seems to be Stoli’s favorite spot since he can snuggle into the back while still stretching out. Win #4.

4

The other CostCo in town did have the round beds, albeit for a bit more than we paid in Portland – but we’re used to that here in Alaska. We picked out a different pattern that fit better with our bedroom colors and placed it in the corner on my side of the bed. It fits just right and like it’s cousin in the family room it’s enjoyed by all three dogs at different times. Win #5.

If you’re keep count, that’s about $170 in dog beds. It sounds pricey, but considering we would have spent more than that for materials plus our super valuable time if we’d built beds for each spot it actually ends up costing less. I was also able to sell the pads we bought for the bed frames and the old donut beds so that brought the total down to around $100 for all five. The fancy pillows I had made will be used elsewhere and that nice wood frame has since become part of the top that will be used for our office desk built in, so it didn’t go to waste either.

The pups are happy, momma’s happy and dad’s happy he doesn’t have to build another few projects. Sounds like a win-win-win to me!