Junkin’

6

Today I’m sharing my amazing trip to the Funky Junk Sisters’ Great Junk Hunt in Puyallup, WA.  I’ve followed the Sisters online for a while now and I adore their stuff, so I was super excited to find out we would be in the area during the show.  I bought two tickets for the early buying event the night before the actual show so we’d have first dibs on the best stuff and I can say it was totally worth the price.  I arrived early to pick up my tickets at will call and was directed into the building where the show was being held to see row upon row of this.  1I swear I heard heavenly music as I entered!  Let’s just say I walked very slowly while trying to find the person who had the tickets.  I did restrain myself to just looking from afar rather than actually shopping and bothering vendors as they were putting the finishing touches on their booths.  Although I was drooling over all the possibilities, I wanted to be respectful of the vendors who didn’t expect shoppers for another hour.  But I won’t lie – getting to look at everything without fighting crowds was absolutely wonderful.4

2
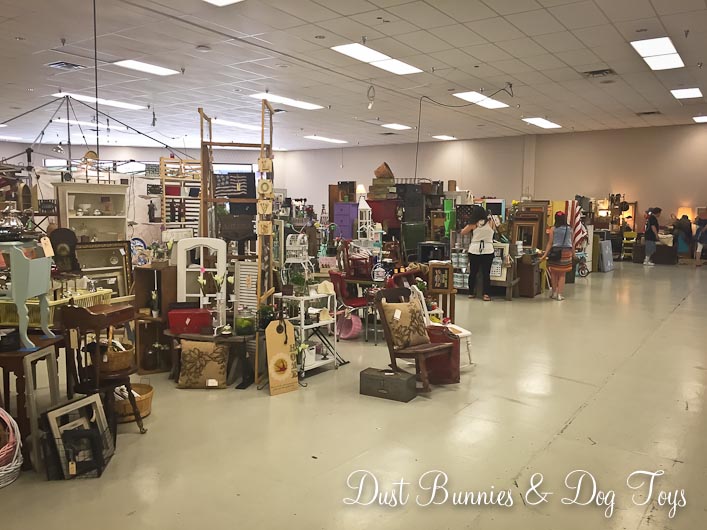
The hubs joined me after parking the car and we wandered row to row pointing out things to each other.  Eventually we did have to head outside and get in line for the doors to officially open, but thanks to our unexpected preview we had a game plan of which booths to hit first.  And we had the perfect way to carry them thanks to the little red wagon we borrowed from my mother-in-law!

WagonBefore

Once the doors opened, both the hubs and I bee-lined to different booths and scored the items we’d both liked then met at a third booth where the hubs had spotted a cool metal jug.  With our top three finds purchased and in the wagon we started going booth to booth to look in detail.  I was pleased to realize that although it was crowded, everyone was so respectful of each other.  No one rushed the doors or tried to elbow out others.  And I constantly heard, “Excuse me, I want to step past you to look at something.”  But it really sank in when the sound of something falling and breaking caused the entire crowd to react in unison with a distressed “oooohhhh!”  I also enjoyed spotting a few pieces I already had up for sale, like this yellow jug I spotted hiding under a chair.  It’s twin lives in my kitchen cabinet top décor!

Urn

I won’t lie, I did have a few favorite booths.  B’Aase Repurposed was one of them.  They pulled me in with those insanely adorable planters out front and every time I went by I seemed to find something new to check out.  I’m kinda wishing I’d bought that first light fixture hanging in the back on the left because it would have been a great addition to the laundry room’s new vintage vibe!

3

I wanted this little metal one on the tracks for my garden sooooo bad, but it was super heavy which means it would take an act of Congress to get it back home to Alaska so I had to pass.  I later saw it being carried off to someone’s car, so I’m not the only one who loved it.

FlowerCart

Across the way from this booth was Built From Scrap, who created this fantastic cart table that was previewed on the event’s Facebook page.  Even the hubs commented how cool it was!  Although I didn’t get a picture of their booth (but you can see it on their page here) I did buy an amazing rusty pulley from them for and chatted with the owners Joe and Tonya.  Apparently I made an impression when I mentioned that I was going to use it as garden art in Alaska because Joe later sought me out in the crowd to ask if I’d be interested in a pulley wheel on a stand that he had out in his truck.  He even offered to bring it in for us to check out!  At just $10 I couldn’t pass it up so it got added to the wagon too.

The row up from them was Whimsical Details, who had the most ADORABLE booth.  I love every single thing about it!  Her style is so on par with mine that it felt like several ideas I’ve had suddenly sprang to life as I browsed her displays.  Don’t be surprised if you see some DIY projects in the near future that have been inspired by her!

7

I scored some fantastic metal numbers for the gallery wall at Our Country Homestead’s booth.  Although they had a large selection of letters to pick from I didn’t see any numbers, so I asked if they had any.  It just so happened that they had a small batch tucked away that they let me look through!  After testing several groupings I ended up with a 9, 0 and 7 to symbolize Alaska’s area code for just $36!

8

Remember the little piggy pot I shared in my last post?  I got it from the Cat’s Crate booth, which had lots of other great stuff.  I loved their basic, rustic furniture paired with great antiques.  I didn’t even notice the moose horseshoe rack in the back until I was editing the pictures back home!

9

The Weathered Home had a great set up and Serendipity Design – Flea Chic’s booth included a real retro trailer!   I also enjoyed browsing a joint booth run by B Designs Home Décor and EMJ Design who had a simple classic style with a nice punch of color.

5

All that amazing stuff had me on a serious junky rust high and smiling like a fool!  By the time we’d hit all of the downstairs booths the wagon was pretty full, so the hubs had to make a trip out to the car to unload it while I headed upstairs.  Luckily for him, I didn’t need it upstairs since I only bought a few small items at those booths.

WagonAfter
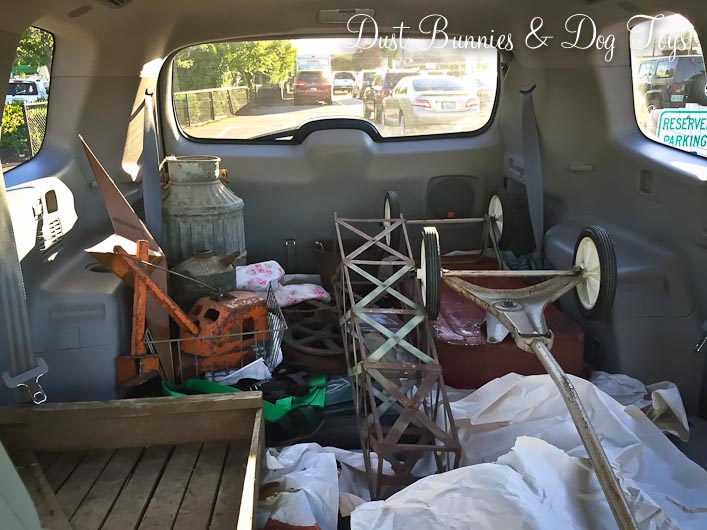
After almost 2 hours of shopping here, the final haul all loaded up in the car.  Notice that tall trellis in the middle?  That was a surprise.  I saw it and loved it but thought it would be too difficult to get back to Alaska so I passed over it, but the hubs secretly went back and bought it while I was at another booth!  Yeah, he won some serious brownie points on that one!  I spent a good portion of the ride home just looking back at everything grinning like the Grinch.

HaulThe entire experience was wonderful and I’ll do it again every chance I get!  Now that I’ve got one big show under my belt I thought I’d share my top 10 tips for junk hunting:

  1. Carry cash – Although many vendors will accept credit cards these days, cash is still king.
  2. Bring a cart or wagon – This was the best advice I heard before attending the show.  Make sure it has a long handle and is easy to maneuver if possible.
  3. Be ready to measure – Have a tape measure if you’re looking for pieces to fit a specific spot
  4. Talk to the vendors – Even if they don’t have exactly what you’re looking for, they might have it back at their shop or know another vendor who does.
  5. Get there early for the best selection – Don’t be the pesky early bird who hassles vendors while they are still setting up, but the best pieces usually sell first, so be there to buy them first.
  6. Have a plan – When shows are large and have multiple vendors navigate the booths in a particular pattern so you don’t miss any.
  7. Grab a map – Not only is a good resource after the show to contact vendors you want to follow, but it’s an easy way to note where you purchase large items that need to be picked up when you leave or booths that you want to revisit for particular items or sales.
  8. Wear comfortable shoes – This is a no-brainer.  Wandering booth to booth should be fun, not painful.
  9. Be willing to negotiate – Most vendors are open to offers, especially if you’re buying multiple items or a larger piece.
  10. If you love it, buy it – The majority of items at these shows are unique and one-of-a-kind so if you can’t live without it buy it before someone else does.

I hope that helps during your next junkin’ trip.  If you have other tips to share, please leave a comment below.  I’ll do a post on how I’m using these finds around the house soon, so stay tuned!

Linked to The Scoop @ Cedar Hill Farmhouse, The Everyday Home, Confessions of a Plate Addict, and White Lace CottageAlso linked to Knick of Time’s Vintage Inspiration Party #199.

The Gravel Patio

GravelClose

Once the fire pit went in the next step was installing a gravel patio around it.  The hubs added small side-walls on our big flatbed trailer to pick up a load of pea gravel, which only cost around $80 since we didn’t need delivery.  It took him most of the day to dump and spread it, but it was totally worth the effort.

GravelCombined with the new garden, our Adirondack chairs and one of my pretty little garden stools it’s starting to look like the backyard I’ve been envisioning all along!

Our DIY Fire Pit

FirePitFinished2

One of the projects I really wanted to tackle this summer was a fire pit. Luckily, the hubs was totally on board.  We started with the freebie washing machine tub I scored last year, which we set on two cinder blocks to keep the heat off the ground.

FirePit

We stacked landscape stones around the tub, off setting the seams.  But after the second row we ran into a little problem, the ridge at the back of each stone required the next row to be a smidg bigger.  After a quick Pinterest search we learned that others using the same stones removed the ridge when building their fire pit, so we chose to do the same.
FirePit2Layers

The hubs attacked them with his fancy power tools, but it wasn’t working as well as we hoped.  I suggested going old-school and use a hammer.FirePitGrind

This time old-school worked better, so we stuck with it row by tedious and muscle building row.  Eventually we upgraded to a larger hammer which was a bit more efficient, although still time consuming.FirePitHammerFirePitHalf

Apparently all the noise we were making didn’t bother the dogs who napped on the deck nearby.  It truly is a rough life they live…
FirePitNapA puppy nap and several more rows of stones and we were almost done.  That’s when we ran out of stones.  Go figure.

FirePit90The hubs picked up some more stones the next day so we could finish off the top row, where we left the little ridge in case it’s helpful for a future table top I want to build to cover the pit when it’s not in use.

FirePitFinishedTopIt’s taller than most fire pits but it feels more impressive and should be safer for when we have little ones around.  The top row sits just above the top edge of the metal tub so the fire stays contained and the smoke rises a bit, keeping it out of our eyes when sitting around it.  We’re pretty pleased with how it turned out.

FirePitFinishedWe only got to test it out once before Alaska’s burn ban took effect.  Hopefully, the conditions will improve soon and we can enjoy it again before the summer is over because next time I’m planning to create some backyard s’mores!

FirepitFire

A Little Update Out Front

FrontFullView

Now that summer is here it was time to get the front porch and flower beds in order.  I started with the porch, which just needed a little cleanup and a few accessories.  A citronella candle and a cute little cast iron frog I’ve had for years were a great fit for the milkcan table by the rocker.

FrontPorchTable

As one of very few shady spots in the yard, the porch was the perfect place for some inpatients.  I used an old ceramic crock that fit in the small spot next to the front door.

FrontPorchImpatients

Since the crock didn’t have any drainage I placed a small disposable pot inside before adding soil.

FrontImpatientPotFill

I did something similar in the large whiskey barrel planters just off the porch.  The hubs drilled a couple drainage holes in both, but I wanted to reduce how much soil it would take to to fill them so I filled the bottoms with plastic containers from our recycle bin.

FrontWhiskeyBarrelFill

FrontWhiskeyBarrelFill2
You’d never know all of that is in there looking at them all planted.

FrontWhiskeyBarrelFinished And they do a great job of attracting butterflies!

FrontButterflyI filled two metal buckets on the steps with dusty miller and lobelia for a little contrast.

FrontBucketI did the same combination for planters in front of the garage, which were used on the porch last season.

FrontSmallPotFinishedI searched for several weeks to find a third green planter to match the ones we already had but could only find a larger version which I placed between the two garage doors.

FrontBigPotFinished

Since it was so large I placed an empty bucket in the bottom to conserve soil once again.

FrontBigPotFill

I also added some pieces of sponge in the top layer of soil to help the plants retain moisture between waterings.

FrontBigPotSpongesI just tucked them down in the soil as I planted.

FrontBigPotSponges2

The perennials in the front beds were the slowest to return this year and I’m convinced that the landscape fabric we used was the reason, so I tore it all out.  While doing so, I found a couple of plants  that did get trapped under the fabric as they started to grow so hopefully now that they’ve been freed they will come in properly.

FrontFlowerbedSmallAnd to finish it all off I added a few patriotic pieces like this garden flag and fun door hanging.

FrontFlagPot
FrontDoorBanner

There’s still a bit I’d like to do out here, but for now it’s ready for summer!

Quick DIY Wall Art

SignFinishHang

Today I want to share a quick DIY sign I recently created.  I’ve had this Uppercase Living vinyl for some time now, as in more than 3 years because it was purchased for the house we planned to rent in FL when we thought we were being transferred there.  Anyway, I loved the phrase so I kept it with the intention of using it at some point.  Unfortunately, I’d ordered it in “oat” which was just a shade lighter than our current wall color so I knew it wouldn’t show well if I applied it directly to the wall.  I’d considered using a scrap board as a background like I did for the Laundry Room sign, but just hadn’t gotten around to it.  Then I spotted this pallet board at Michaels and inspiration struck, especially since I had a coupon for 40% off!

SignStartThe construction was pretty basic, several boards secured on the back with cross pieces and a twine hanger at the top.  There were several color options – unfinished, white washed and this stained color, which I was immediately drawn to and knew would contrast nicely with the color of the vinyl.  With my coupon it cost me around $10.

SignStartBack

I was pretty sure it was just the right size for the vinyl, so when I got it home I tested it out and it fit perfectly!

SignTestI followed the instructions that came with the vinyl and applied it to the board.  I could have called it done then, but I wanted to give it a bit more character so I decided to rough it up a bit with the sander.

SignApplied

Although I did a very light pass on the entire piece there were a few spots that got a little too roughed up due to how they sat on the joints of the wood.

SignGoof

I was slightly distraught about it, but decided to try to find a solution rather than give up on the project.

SignGoofClose

I started small with the leaf that that was damaged to build my confidence.  I used an exacto blade to trim small pieces of damaged vinyl away, reshaping the leaf as needed to work around the missing pieces.  I think it worked pretty well.

SignGoofLeaf

SignGoofLeafFix

I did the same on the lettering with decent results.  It’s not perfect, but it’s better than the rough edges I started with.

SignGoofFix

I took a step back to get some perspective and realized that neither spot was very noticeable from a distance.  Luckily, our guests don’t typically inspect my décor up close, so it passes muster.  I love that the sanding gives it a rustic feel, which also plays into being a little imperfect.

SignFinish

And here it is in our bedroom above the TV.  At that height no one will notice my little ‘patched’ areas and it also disguises my other little goof on this project.  I’m not saying what that goof was because I want to see if anyone else notices it or if I’m just being too much of a perfectionist!  If you think you know what it is, leave a comment below! 🙂

SignFinishHang2

TDC Before and After

Copper Topped Posts

When we installed the fence last year we debated cutting the extra length on the posts down, but ultimately decided to leave them so I had a spot to hang bird feeders and other cutesy garden stuff.  It worked out pretty well, but I was never really keen on how the posts looked even with the decorative hooks.  It just felt unfinished.

LunaWait

Although I wasn’t 100% happy with the look it wasn’t a high priority, so I ignored it – until recently when I spotted these copper fence post caps.  I’d considered them last season, but when I researched them online they were much too pricey.  For some reason our local store had them for $4.95/each, so I snagged a few to test out.  I was pretty pleased with the result.

PostCap

And installation was so simple.  You just set the cap on top of the post.  They recommend you use adhesive to permanently attach it, but I’m holding off on that until I decide if I want to leave them up all year or take them down for the winter so they don’t oxidize and patina as quickly.  (Notice the peanut feeder is half empty?  I moved it over a few posts to help the squirrels find it and now that they have, they are emptying it almost daily!)

The local store also had coordinating solar post cap lights, which I thought would look nice on either side of the back gate.  Although they were quite a bit more expensive than the basic caps, I think they were worth it and the hubs agreed.

PostLightsGate

PostLight

They are definitely more decorative than functional as far as light output, but here in the land of midnight sun, that’s not really an issue during the seasons we’d be out using the gate anyway.  The hubs picked up enough caps and lights to finish the rest of the posts during a second trip to a different store, where the caps were on sale for $3.95/each!  Pretty and on sale.  Can’t beat that!

Our New Garden!

I spent most of the recent long weekend gardening, starting with planting a patch of raspberry bushes given to me by a co-worker who is rearranging her yard.  They look a little scraggly after being transplanted, but I’m hoping they bounce back quickly and possibly even bear fruit this season. The one in the front there has several branches so I left them secured with the paper bag we used for transport to give it a chance to establish new roots before supporting the weight of hanging branches.  I’ll keep you posted on their progress throughout the summer.

1Raspberries

While I was planting raspberries, the hubs was building my long anticipated garden box!  I decided on a design with removable tubs so when we have a greenhouse I can start planting earlier inside and then move the tubs out when spring arrives.  It will also let me extend the growing season into the fall by moving tubs indoors as the weather cools.  The hubs designed this fancy subframe to support the weight of the tubs and then added the base on the bottom so that it would be waist high as I requested.  There was a bit of miscommunication on the final design plan because we had discussed several options and the inspiration I showed him was only a foot tall, but he was still able to make my vision a reality. 🙂

Planter1Frame

Once the frame was done we moved it into the back yard and finished it off with metal side panels and cedar trim.  It went together pretty quickly, thanks to the hubs’ detailed plan.  I helped by holding pieces in place until he got each section secured and showing my approval with a very wide grin as I watched it all come together.

Planter2Panel

Here’s how it looked once the sides and trim were installed.  I would have done a happy dance if I hadn’t been so tired, but the hubs knew I was super happy with the results.

PlanterBuilt

Next came the removable tubs, which rest on the cedar lip and are supported by the subframe below.  I love the look of the metal next to the wood.  It totally works for my modern farmhouse style.  Clean and simple, yet rustic at the same time.

PlanterBuiltTubs

PlanterBuiltTubsSide

Now it was time for planting!  I wanted to use a water reservoir system to encourage the plants to root deep and seek out water, so I added smaller tubs with holes on the sides to the bottom of each tub, and then had the hubs drill a hole for a PVC watering pipe.  Now when I water it will leech out into the surrounding soil and water the plants from within.  The idea is that this will require less frequent watering, which is perfect for my busy schedule.  And if it doesn’t work, it’s not permanent so I can just take it out next year.

PlanterBuiltTubsTop

PlanterBuiltTubsTopPipe

We filled around the tubs with soil and I got to planting.  This year we’re having herbs, lettuce, possibly spinach, cucumbers, peppers and tomatoes.  I already had the tomato and herbs on hand, but was waiting to purchase the others until the garden was ready for them.  I’ll pick those up over the weekend.  The pepper will go next to the tomato plant and the center tub will hold the lettuce and cucumbers.

PlanterPlanted

I selected a variety of herbs including cilantro, chives, parsley, oregano, dill and mint.  The cilantro will come in handy for summer salsa recipes and I’m excited to start using dill in ranch and other mixes.  We use dried parsley and oregano fairly often so it should be fun to experiment using it fresh. We don’t often use mint or chive, but this will give us the opportunity to experiment with them and I believe both deter pests, so that’s an added benefit.

PlanterPlantedHerbs

To finish things off, I dug out the fancy metal garden signs I’d bought over the winter to mark what’s what.  They tie in the metal siding of the box and look totally cool!  I wish I had one for herbs, but it’s ok.  I do have signs for peas, carrots, onions, potatoes and pumpkin, so those are the other likely possibilities I’d try first.

PlanterPlantedMarkerTomatoes

PlanterPlantedMarkerPeppers

PlanterPlantedMarkerLettuce

PlanterPlantedMarkerCukesAnd since the garden is located just off the deck and right outside the back door it’s more convenient to snip a few things for cooking, which was the plan all along!  This spot gets full sun from morning until early afternoon, so it should also be pretty productive.

PlanterPlantedFrontI’ll try to do an update later in the season when things have grown in and are producing!  Until then, feel free to share any gardening tips you think might help that day come sooner! 🙂

The Beginnings of a Gallery Wall

Hi everyone!  I hope you enjoyed the weekend and did something special to honor those who have paid the ultimate price for the freedoms we enjoy.  We tackled several projects over the long weekend and have plenty of complaining muscles to prove it!  We were so busy that I didn’t even have time to edit the photos yet, but I plan to get to that tonight so I can start sharing them tomorrow.  In the meantime, here’s a little project I did last week.  Remember back in January when we hung our massive new TV on the wall and I mentioned I planned to do a gallery wall around it?  Well I finally did.

GalleryWall

Although I originally had a layout all figured out it didn’t fit quite the way I anticipated, so I rolled with it and just hung things in a similar pattern.  I could have done the Pinterest trick of cutting out templates for each piece to test it all before I committed, but I wasn’t feeling patient enough for all that.  And it seems to have turned out ok without the extra effort.  I’m enjoying the Pottery Barn look it gives the Family Room and the fact that most of the pieces hold a special memory for the hubs and I is even better.

GalleryWall3

On the right is a pencil sketch of me with my horse done by a friend and a wooden arrow pointing to a photo of the hub’s mom and dad in Italy on their last trip together.  I love that that the arrow points to their photo as if it’s pointing it out.  Can you believe I found it on a daily deal website, stained and ready to hang, for just $12?  Talk about a great bargain!  And the wood tones fit perfectly with the rest of the pieces in the gallery.

GalleryWallArrow

Here’s a full shot of the pencil sketch.  It’s nice to have it out on display again after it’s been packed away for so long.

GalleryWallSketch

Next to the sketch is a metal star I picked up a while back, but can’t remember where and Sangria’s paw print plaque.  I added a small saw-tooth hanger on the back with heavy duty industrial glue and let it cure overnight to make sure it had a good seal.

GalleryWallStar

The left side includes a framed postcard from our trip to Tucson for a friend’s wedding, where we saw the world’s largest rose bush alongside a photo of my kitty before Luna, Kitty Meow.  Below that is a watercolor portrait of the hub’s previous dog, Kenai as a puppy.  I had it commissioned as a gift shortly after we were married by the same artist friend who did the sketch of me and my horse .  Next to that is a Bruce Nelson print, which was the first artwork the hubs and I bought together after getting married.  And a lovely rusty metal D rounds out this section.

GalleryWall4

Here’s a close-up of the watercolor portrait, which was done from a photo the hubs loved.

GalleryWallKenai

And here’s a good look at that metal D.  I was totally giddy when I found this gem at a local antique trunk show for just $20!  The rusty patina adds so much character and ties into the other browns in the other pieces.

GalleryWallD

It’s still a work in progress, as I plan to continue adding to the collection by making a wood slice chalkboard sign with some of my favorite song lyrics and an industrial looking 907.  Eventually, it will probably take up the whole wall, but for now, having room to grow is just fine.   🙂

GalleryWall2


A Minion Pedestal

1

Remember a while back we had our family minionized?  Well now that the desk is complete it was time they found a permanent home where they could be on display.  I also wanted them to have a little platform to sit on, so when I saw a small unfinished wood plaque in the dollar bin at Michaels that was just the right size, I snagged it.  I did the same finish on the pedestal as I did on the dog bowl stands, starting with a coat of stain, then some grey paint and a light sanding for a bit of distressing.  It’s the perfect mix of rustic and modern.

2

They live on my side of the desk, between my “inbox” and my supply caddy.  From across the room you don’t notice them much, but up close they just make you smile. And now that they are out in the main living area rather than our bedroom, guests can see them and enjoy them as well, which makes me even happier. 🙂

Finished

3

DIY Raised Dog Bowls

BowlLead

The second project we wrapped up last week were two raised dog bowl stands.  We’ve been wanting to do these for a while but kept putting it off.  Although we had heavy ceramic bowls for each dog, they would be pushed around on the floor each day and our youngest liked to play in the water bowl creating a wet mess, even with a mat under the bowl.  I’d seen raised bowl stands made from vintage crates and loved the look but A) didn’t have a vintage crate and B) if I did I wouldn’t have two that matched, or want to destroy an antique for a dog bowl stand.  So we DIY’d an alternative.

The hubs built simple hollow wood boxes and then cut the holes out for the bowls, using small holes inside the diameter of where each bowl would sit as a staring point.

Marked

Inside

PlainReady

Then it was up to me to finish the look.  Since I knew these pieces wouldn’t stay pristine being used by the dogs, I decided to intentionally create a distressed look.  I started with a coat of stain, followed by a coat of light grey paint, which I sanded randomly to make them look vintage.

Stained

Painted

PaintedClose

Here’s the finished look!  It’s so much nicer than the hodge podge mess we had before!  (Apparently I hated it so much I never took a single picture of it, because I can’t find any before pictures to share!)  We have one stand on either side of the buffet in our dining room, so we all eat together. One holds two water bowls and a single food bowl for Tequila since she’s the alpha and likes to be separated from the others when eating.  The other has two food bowls and a single water dish for Stoli and Bacardi who often share while eating.

2

1

I wasn’t sure how well the kiddos would take to the new set up and planned to ‘introduce’ them to the bowls with treats, but it wasn’t necessary.  In fact they started using them as soon as they went down, which made me even happier with the project!  Eating at this level is easier for them and is supposed to help improve their digestion.

BEat

TEat

I think Luna is actually a little jealous of their new bowls!  But since her bowls are in the laundry room window ledge, where she has plenty of privacy I think she’ll be just fine.

LunaBowl

This post linked to Tatertots and Jello’s Link Party Palooza!

and
TDC Before and After