The Growing Season

Front2
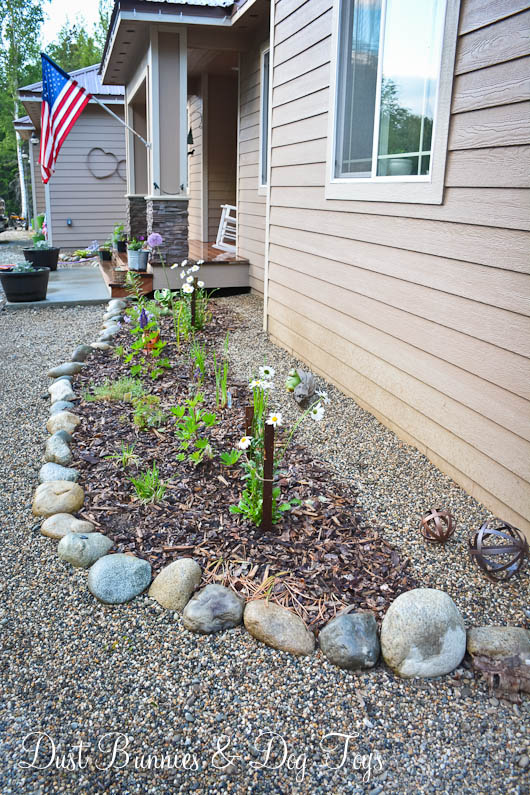
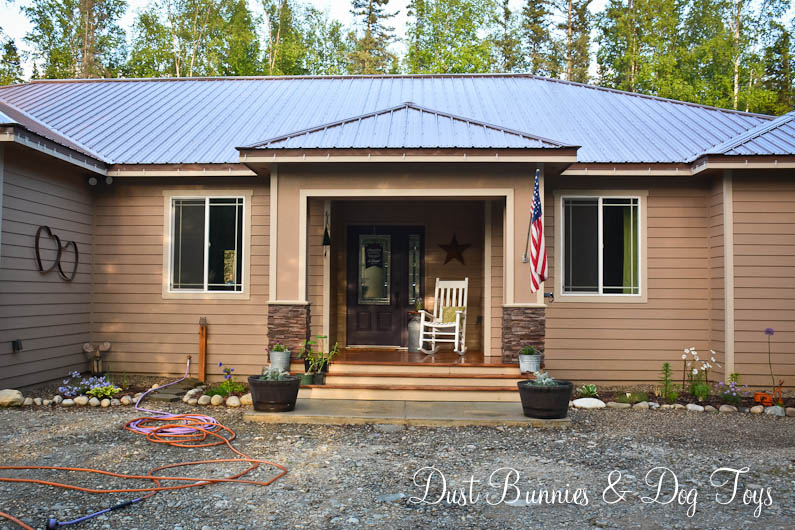
Today I thought I’d share how the front flower bed and rain gardens are looking this season.  The perennials from previous plantings have slowly been coming in and I’ve added a few new items as well to get the front beds going for the season, although like most other things around here, it’s a work in progress. (On that note, pretend you don’t see that crazy hose situation going on in the foreground there.  Our expandable hose bit the dust last season and unfortunately we haven’t figured out a good system for storing the long hoses we replaced it with just yet so they stay coiled in this pile for daily use for now.)

The first thing that showed up was this amazing allium, which sprouted and then produced a long stalk with a odd shaped bud at the top.  At first I thought an alien had taken up residence in my flower bed, but thanks to the local garden group I was able to identify it and enjoy watching it blossom.

FrontAllium2

FrontAllium

We moved the rain barrel out of the small corner next to the garage so it can be used in the backyard with a gutter so the space needed a bit of rearranging.  I filled the void from the rain barrel with white iris from my mother-in-law’s garden that I brought back when we picked up Brinley and added some phlox between that and the hosta that has come back much better than it did last year.  The phlox is doing quite well and has doubled in size since I planted it, so I’m pretty sure it’s happy there.  I’m also loving the metal hearts I added on the wall, which will look even better when the plants grow up and fill some of the empty space below them.

None of the previous plantings on the other side of the walkway came back so I took the opportunity to try something new – an anemone and a sea pink armeria.  The armeria reminds me of a Dr. Seuss plant, but hasn’t rebloomed since I deadheaded spent blooms, so I might need to find a better spot for it.

FrontCorner

The anemone is doing very well, although upon closer inspection last night I noticed aphids so I’ll have to address that.  It’s been a horrible season for pests so I’m checking out every DIY remedy available online.

FrontAnenome

I moved our little wooden moose statute into the corner to hide a cable that comes out of the garage wall until the plants grow in and do that on their own.  In the opposite corner next to the porch, I paired this metal sphere and piece of driftwood for a fun little garden vignette.

FrontGardenArt

There are more spheres on the far end of the bed on the other side of the porch.  This space got several new plants including daisies, lupine, yarrow and day lilies transplanted from my mother-in-law’s garden.

FrontEnd

The daisies got a little wild as they started to grow in so I used some of rusty cement stakes to create a little support system for them.  I’m hoping they go to seed at the end of the season and self-sow an even bigger crop next year.

FrontDaisy

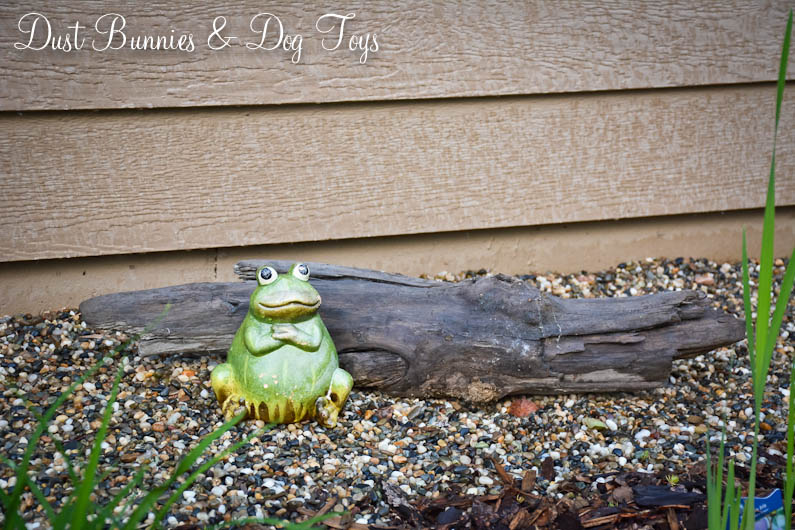
Mr. Frog found a nice little resting spot next to a big piece of driftwood in the back of the bed.  He’s sorely in need of a paint job but I think I’ll let him be this season and address that next year since I love his colors in this spot.

FrontFrog

I filled the whiskey barrels on the stoop with dusty miller and purple alyssum, which has been slowly growing in.  Beyond that there is white alyssum in wire and burlap pots on each side on the first step, with purple daisies in rustic metal pails on the top step.  Those extra pots you spot hanging out on the porch are awaiting new homes in the gifted garden along the side of the house.  Before that can happen I need to weed that bed and make a bit of room for them.

Front

The rain garden is coming along quite well, and without much effort on my part, which is my kind of garden.  I moved the tall obelisk we got at the Great Junk Hunt last year to this space for some height at the back of the garden and really like it here.  I plan to transplant a lilac in the gifted garden to that same spot at the end of the season so it has more room to spread out, which will hide a large section of the tire wall. 🙂

RG

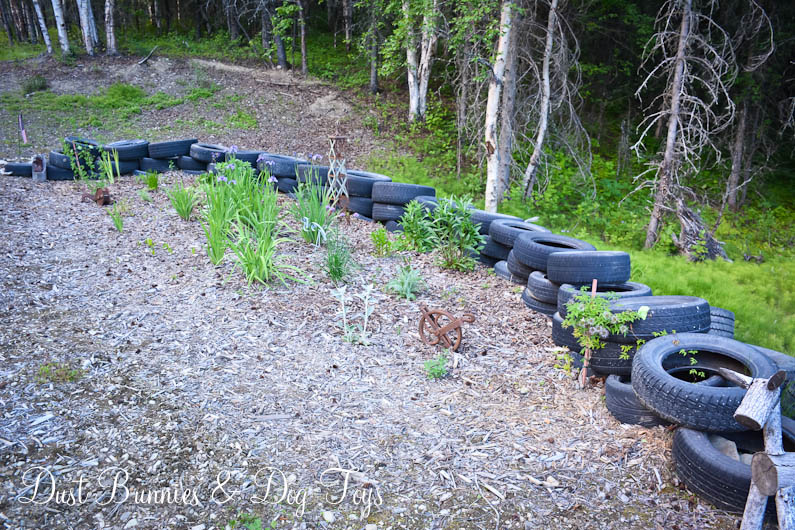
The clematis on either side of the garden weren’t growing in to cover the tire wall as I’d hoped so I decided to give them a bit of guidance with temporary tape.  One side is looking fairly lush and seems to have adapted well, but the other side is still a bit sparse.  I may add a third and forth clematis along the back wall next year if I don’t see much growth by then.

RGClematis

RGClematis2

The chives I planted out here at the end of last season when cleaning out the garden box are doing well and have actually bloomed.

RGChives

The mint from our herb planter last year is also coming in quickly.

RGMint

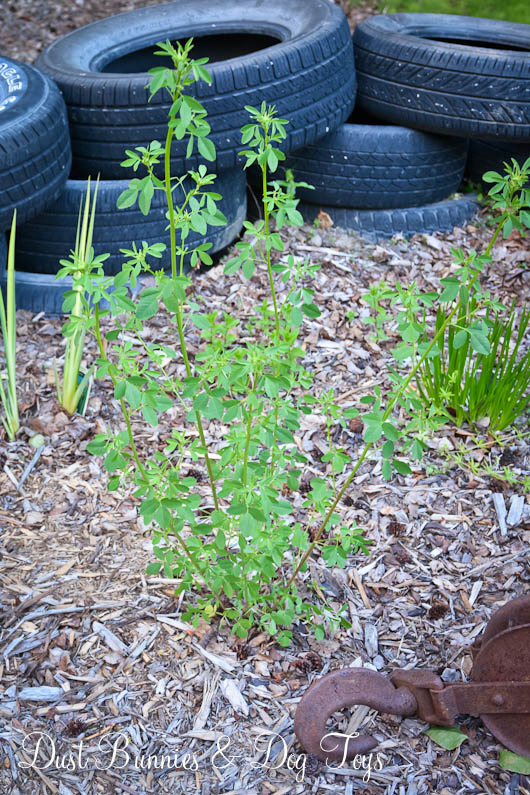
This mystery plant in the front of the garden is growing quite rapidly, but I haven’t been able to confirm what it is just yet.

RGMystery

I was surprised to discover the vinca vine I planted when we first did the rain garden had come back in after it showed little signs of life last summer.  Next to it the spikewell is quite lush although it hasn’t shown any buds yet.

RGVinca

The water iris are slowly growing, but I’m thinking they may not bloom again this year.

RGWaterIris

But the large clumps of iris that came from our friend’s yard in Seward have finally started blooming!  In fact almost every plant has several blooms opening on it!

RGIris

The other two lilacs that were at the back of the garden have been relocated to either side of the garden so they have room to establish and spread out without crowding each other.  I still need to clean up the areas around them but at least they have their own space now.

RGLilac2

RGLilac

The lambs ear from my mother-in-law’s garden survived the winter after transplant and has grown taller, so I’m hopeful it will continue to grow and create more shoots.

RGLambsEar

Here’s the view from the driveway of the whole scene.  The pile of rocks in the foreground are headed for our new rock garden and there are small batches of ground cover along the front that will eventually grow in to cover the slope.

RGPano

Between the house and the rain garden lies the raspberry patch, which is coming along nicely.  I pruned back the dead branches to encourage the new branches to produce which worked well since we have lush growth on the stalks and numerous white buds on each plant so we’re on track for a bountiful harvest.

We also added a haskap bush in front of the raspberries.  Haskaps are similar to blue berries, but are better suited for our climate.  Hopefully we’ll harvest those to accompany the raspberries in our summer time desserts.

Raspberries

The hubs also rigged up the big water tank you see in the background to gravity feed the soaker hose in the raspberry patch, which has been super convenient on the occasional hot sunny day.  I’ve decided to let the fireweed that’s encroaching on the raspberry patch be for now since both are fairly dominant and should fight each other out.  Plus it blocks out the ferns and other undergrowth that would like to spread out from the woods just beyond and if something going to spread I’d rather have fireweed than a thorny Nuka Rose!

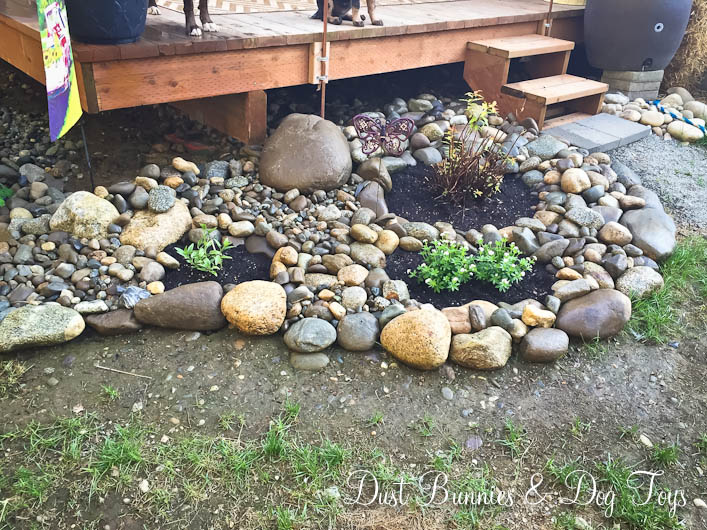
Hopefully I’ll get the gifted garden in shape soon and can share that as well, along with the finished rock garden around the back deck. Stay tuned for those updates and a few other little projects in between. 🙂

Our New Rock Garden

4

We’ve been working on one of my big projects for the summer over the past several weeks and although it’s still a ways away from being completely done, it’s finally at a point where I can share the progress.  Check out the new landscaping around our back deck!  It’s been an intensive project, especially since we’re sourcing all of the rock from else where around our property, but that keeps cost low.  Here’s how the space looked just after the Hubs tilled it right before Memorial Day weekend.

1

Talk about a blank slate!  But I had a vision and have evolved the plan as we’ve put it together.  The biggest break in this project came when I spotted some boxes on the side of the road with some green sprouts sticking out of them.  We were on a schedule to get somewhere so I didn’t dare ask the Hubs to stop to investigate and when we came home later that day we used an alternate route so I was sure they had likely been claimed.  Luckily, the next day we drove by again and they were still there so this time I made the Hubs pull over and quickly stashed this amazing haul in the truck!

2

Big beautiful columbine plants!  And there were lots of them too!  I could have filled this whole bed with them, but I didn’t want this area to be all about one thing, so a few of the larger ones went in this bed and the rest found homes in the gifted garden and the rain garden.  Here’s how things were looking mid-way through after I’d planted the columbines and a few other plants, including a spirea I weathered over in the pot from the end of last season and a couple new plants from a local charity plant sale.

3

And here’s how things are looking these days.  I’ve still got a lot to fill in along the edge of the deck and plan to put more rock a bit under the deck to complete the look, but I’m super happy with how it’s looking so far.

5

Here’s a view of the far side where the Hubs added steps so we no longer have to walk all the way around the deck to go feed the chickens!

6

I’ll be sure to share the finished project when it’s all done, but until then enjoy this before and after!  From a mess of weeds to a defined space.  What a difference!

1

4

Any guesses what I’ll be working on this weekend? 😉

Save

DIY Metal Planter & a Peek at the Garden

OnionsPotFinished

Today I thought I’d share a quick peek of our veggie garden and a quick DIY planter I installed.  We had a red and white onion sprout in the pantry so I figured I’d give them a shot in the garden this year.  With all the spots in the garden boxes full I decided to add a secondary planter at the end of the box.

I originally envisioned using an antique wash tub and stand, but just wasn’t willing to pay $100+ for a planter.  So I used my DIY skills to create something similar starting with this metal stool we’ve had for several years.  You originally saw it on our balcony at the rental house.  It’s since been painted over and the hubs was using it to position the fan for his big green egg, but now that he has his table he doesn’t use it any more, so it was available to be repurposed.

OnionsStand

I added this large metal tub on top of the stand to create a planting space.  The Hubs drilled a couple of holes in the bottom of the tub for drainage since this sits just under the edge of the roof.

OnionsStandPrep

I used empty pots to add additional drainage space and reduce the amount of garden soil needed to fill the tub.  Luckily, I had quite a few to choose from!

OnionsStandPrepFill-2

And here it is filled and planted.  I’m not sure if this little experiment will yield a harvest but it’s interesting to give it a try.

Onions

It looks pretty cute next to the main garden box, which I decorated with two lemon cypress trees on either side.  I’ve been wanting some of these and finally spotted them at the nursery so I snagged two.  They are supposed to be natural mosquito repellants so that’s a nice added bonus, especially since the windows are right there.

Full

In the box we’re growing peppers, lettuce and cherry tomatoes.  We’ve already harvested some of the lettuce for salads several times and the tomatoes have tiny buds on them.  The peppers are the same as the ones in the burlap planters I shared previously, which sit next to the large whiskey barrels on either side of the slider to our Master Bedroom that hold 4 more tomato plants, although those are a “patio tomato” variety I haven’t tried before.

Peppers

Lettuce

Tomatoes

Between the garden box, onion planter, wheel bed and the strawberry gutters we should have a good crop of fresh produce to use for salads, meals and desserts this summer! 🙂

Purdy-ing Up the Chicken Yard

F-Full

Part of my plans for the yard this year included adding flowers around the new chicken yard.  I placed cinderblocks around both sides of the yard so I’d have a built in row of planting spots and picked up a couple flats of lobelia at the nursery just for this area.

1

Tequila stood chicken watch while I planted.  Things were looking so pretty that even the hubs commented on the new flowers and I was feeling pretty happy with the project.  That is until those fluffy cluckers attacked said flowers and had picked them down to the base before I finished planting the other side!  I quickly placed boards against the fence so the chickens couldn’t see or reach the plants anymore in a desperate attempt to save those that had been hacked.

2

But this was NOT the look I was going for.  The hodge podge of boards constantly got knocked over and landed on the plants themselves which was just as damaging as the chickens pecking them.  So what’s a chicken momma to do?

3

Well a crafty chicken momma makes protective curtains!  I dug out some thick sail cloth material I had in my fabric stash and cut it to size to fit between each of the posts.  A couple of simple slits along the top gave me a spot to use a zip tie to attach it to the panel and keep things taunt.

F-Full

It’s not the fanciest option, but it looks and works better than the piled high boards.  And it didn’t cost me a cent!

F-Tie

The curtains are just low enough that the chickens can still see out when standing on the ground and just high enough that Brinley can’t see in unless she stands on the blocks.  She can still see through the door so that’s become her new viewing spot, which keeps her out of the plants as well.

F-back2front

I did have to replace a few of the plants, but now things are looking pretty good.  I didn’t make a curtain for the small panel at the back, since those two blocks will hold grass that I’ll let grow just for the hens.  They are temporarily blocked with two small boards, but once they establish I’ll take them down periodically so they can enjoy fresh greens.

F-f2b

I also got the walkway along the chicken yard cleared of the rock piles that had been there (hint, those are being used for another project that I’ll share soon).  We’d like to put down pavers or some other permanent pathway from the deck to the gate, but that’s probably a project that will happen next season.  For now having a clear established walkway functions just fine.

I’m sure the chickens don’t appreciate my crafty genius solution, but that’s ok.  I plan to take the curtains down at the end of the season and let the cluckers have at the remains of the plants since they are annuals anyway.  Then I’ll wash the fabric and store it away for next year.

I’d love to hear what you think of my little project to pretty up this utilitarian space in our yard, so leave a comment below!

Save

The Wheel Bed

0

I finally put that amazing rusty metal wheel the Hubs dragged home for me forever ago to use!  It’s now the centerpiece of our new garden bed where the two metal bed frames I found junking recently also found homes.

Cukes

The wheel will serve as a support structure for two cucumber plants and the bedframes will be perfect for the peas to grow up and attach to as they climb.

Peas

Above all this rusty goodness is a Kokopeli figure, who used to be cloaked in an obnoxious multi-color western pattern.  Nothing a coat of spray paint can’t fix!  Now he compliments the rest of the metal tones in the bed.  And hopefully he works his fertility magic to make these plants grow large and strong to produce a good crop!

Koko

I created the bed using some stone edger blocks and backfilling over the grass with dirt left over from the chicken yard install, topped with garden soil.  I added a few marigolds and lobelia along the front of the bed and finished it off with two metal pieces sculptures I found when I salvaged the bed frames.

Finished

Now I just have to water and wait until everything becomes an amazing lush harvest!  Luckily, this is a low spot in the yard so it should get extra watering from runoff.  Hopefully that will mean we don’t have to wait quite as long. 🙂

DIY Tiki Torches

3

As we continue to spruce up the yard and prepare to enjoy it all summer, keeping the bugs at bay was a top priority.   If you’ve ever visited Alaska you know that our mosquitos are massive and excessively numerous.  We did some DIY tiki torches last year using wine bottles based on this Pinterest idea, but since we wanted them near the deck and didn’t have a spot to hang them from we created some simple stands with a closet rod and tuna cans like this tutorial.

The wine bottles fit perfectly in the tuna can and were certainly pretty, but I was constantly worried that the dogs would break the glass and as the temps cooled in the fall the fluid started to freeze overnight.  We took them down when we closed up the deck for the season, but left a few of the stands out over the winter.  The stands didn’t fair well with the weather and were looking pretty beat up by the time spring rolled around so I knew we needed a better option.

1

That’s when I spotted this idea on Pinterest.  I showed it to the Hubs and he liked it so we picked up the supplies we needed on our next trip to the hardware store and used the handy cutter from our recent Insulator Garden Art project to cut the pipe as needed.  Everything went together very quickly and soon we were ready to add the wicks and fuel.

2

The Hubs did swap out the clamps we’d used to secure them to the deck since the copper pipe was a much smaller diameter than the closet rods had been.  But we were able to reuse the wood blocks he’d attached to the deck to keep them flush with the deck boards.

Clamps

We both like that the slimmer profile of these torches help keep the view open and there’s no glass to worry about.  We have found that the design doesn’t hold much fuel so they do run out every few days, but we keep the tiki fuel on hand in the BBQ table so it’s easy to refill.

5

We placed several around the perimeter of the deck to create a “no-fly” zone for bugs, which seems to work fairly well.  Hint – there’s a sneak peek at two of the projects I’ll be working on finishing up this weekend in the photo below! 🙂

6

What do you think of our new and improved tiki torch design?  They will certainly get plenty of use this weekend!

Two Metal Hearts

0I finally found a spot for the metal hearts I picked up at the Alaska Chick’s Vintage Market a few months back!  I toyed with several spots both indoor and outdoor but decided they would work best as a compliment to the flowers in the front beds.

1

3

The rusty metal color plays well off our neutral siding.  And it only took a couple of nails for each to get them to stay just how I wanted.

4

Although the flower bed itself is still in progress, the hearts look great above the blooms and since they sit under the eave of the house they should remain fairly protected from weather.

P

Now anytime someone comes to our front porch they’ll see these rusty hearts.  Plus we can enjoy them every time we’re out on the porch to watch the dogs play.

2

I haven’t decided if I’ll leave them up year round or take them down for winter.  We’ll see how they fair over the summer and make a choice when fall arrives.  Until then I plan to enjoy them regularly! 🙂

Getting the Deck Ready for Summer

1

The temperatures are getting warmer and the sun is out longer which means it’s time to get the deck ready for summer!  I switched things up in the yard this year and put the sectional seating elsewhere so we could have a dining table on the deck.  Having one here makes more sense because the grill is nearby and the space is just off the sliding door to the main area of the house where the kitchen is.

I picked up this great table and chairs set on the local buy/sell page for just $100.  I love that the metal design is sturdy and won’t hold water so it should be ready to enjoy all the time.  I originally planned to add cushions to the chairs, but they are surprisingly very comfortable so I just used the throw pillows I already had instead.

The hubs dug out the umbrella and we placed it with the table for extra stability.  It took a tumble off the deck at the end of the season last year which broke the arm the hubs had repaired after we bought it at Goodwill.  This time he used metal tubing and painted it to match so it blends in quite well.

2

You really have to look closely to spot which arm is the one that’s been repaired, so I’d say he did an excellent job!  As an extra precaution we keep the umbrella down when we’re not using it, just in case the winds pick up when we’re not around.

3

Before we got everything set up we also pressure washed the deck (ignore the fact that it’s still sitting off to the side there.) so we had a clean slate to start with.  We’ll be painting the deck at some point this summer since it’s starting to show wear and needs a refresher, but a good wash works for now.  I’ll be adding plants to the various planters you see in the far corner this weekend and tilling the area around the deck to add landscaping there.  Check back next week to see it all come together! 🙂

A Little Pickin’

0

The other day I spotted an ad on the buy/sell page for several old rusty items and decided to spend a few minutes checking out what was available.  One of the items was a set of metal lockers for $10.  Although I don’t really have a spot planned for them I claimed them and made arrangements to pick them up that evening.

2

They turned out to be quite large and heavy.  While moving them we also discovered that there were small drawers inside each!  As the hubs figured out a plan to get them in the truck the property owners told me to look around and see if there was anything else I might want because they were clearing the lot to build and wanted it gone.  Not one to pass up the opportunity for a real life picking moment, I started exploring the piles of stuff tucked between trees and forgotten for years even thought I was still dressed from work at the office.

3

I found these two bed spring frames in an old truck bed and knew they would make awesome trellises for my garden!

5

Then I spotted this large metal tank that had been cut down and immediately fell in love with it.  I’m not sure if it will become garden art or if I’ll make it into a seat for next to the fire pit!

6

I also found some cool bits and pieces of things to fill in the open areas of my gardens including large springs, metal grates for small trellises and a metal twin size headboard that is begging for a second life.  I also spied this amazing jerry can in a pile and snatched it up.  I hunted for a match for it but I couldn’t pass it up.

1

The owner took me up to a conex box he had more stuff stored in and I spotted these larger springs and metal crates.  He made me a deal for on the whole group and I quickly stashed those in the truck too.  At this point the truck was full and it was getting late, so we made arrangements to come back the next day to get the rest of our finds and I quit looking.  Tired, covered in rust and dead leaves we headed home to unload our treasures with smiles.

A

Take a guess at what my amazing haul cost… I paid just $50 for the whole batch!  That’s a whole ‘lotta rusty goodness for a bargain price!  I’m not 100% sure where I’ll use each piece just yet, but now that I have them I’ll find creative uses for them and I’ll be sure to share how I utilize each here on the blog once I do.  🙂

Cluck Club Update

6

There are some new faces in our chicken coop!  We brought home four new hens after seeing an ad on Craigslist from someone who was moving and couldn’t take them.  The ad mentioned that they were already laying eggs so I contacted the poster to find out if they were social.  He responded via text with a photo of his young son holding one of the chickens.  He knew his children would be upset that the chickens were going to a new home but after I described our coop and setup he was sure that they would be happy with us, so we arranged for the hubs and I to stop by after work and pick them up before the weekend.

8

The new ladies have settled in quite well.  We kept them separated from the other chickens the first day and tried to introduce the two groups the next, but it was very clear that the two would not do well together so we found a new home for the previous flock with another local chicken family where they could be free range and happy.

5

We did keep Miss Biscuit who was at the bottom of the pecking order in the last flock as evidenced by her missing feathers and ruffled appearance.  It seems she holds the same position with her new coop mates but after a few squawks and flaps she knows her place and gives them space so everyone seems to be getting along well.  The dogs are loving their new siblings and often go stand at the fence just to watch them.

4

These new ladies are very social and friendly.  They come right up to us and stop and wait to be picked up when we come near them.  They were also in right in the middle of things as we did a little tweaking on the yard this weekend, checking out the ladder, hoping in and out of the hen house as we were working in it and inspecting every little detail.

7

I leveled out the piles of dirt left from the trenches the hubs dug when he installed the chicken yard, so now everything is mostly level and ready for the grass to grow back.  I pulled as much of the rock and gravel as I could out of the dirt while leveling so those piles will be added to the landscaping going in around the back deck.  I also added cinderblocks around the entire perimeter of the yard which will be planted with lobelia soon to attract potential prey for our flock, and just make things a little prettier.

1

The hubs added a few boards over the hen house doors to hold the netting up so it doesn’t catch on the tops of the doors when they open.  It’s not the prettiest setup but it works for now.

2

My favorite new chicken is Charlotte, an Easter Egger who has these fun fluffy feathers around her face and lays greenish blue eggs!  The hubs’ favorite is the black and white chicken, Fluffy.  We may change their names once we get to know their personalities more, which we’re doing quickly thanks to their willingness to be held and petted.

3

The change has brought a new color variety to our egg cartons too!  Biscuit continues to lay her speckled brown eggs, while the two black chickens, Split and Splat, lay dark brown eggs.  Fluffy lays a light brown egg which is actually a white egg with small brown spots when inspected closely, and of course Charlotte’s green egg.  Sure makes our old plain white eggs seem kinda boring!

EGGS

Next up for the coop is some touch up painting, tilling the yard and creating a fun sign for the fence while the hubs builds a new storage area for their food and treats.  Watch for future posts as those projects are completed!