Foster Room Art Wall

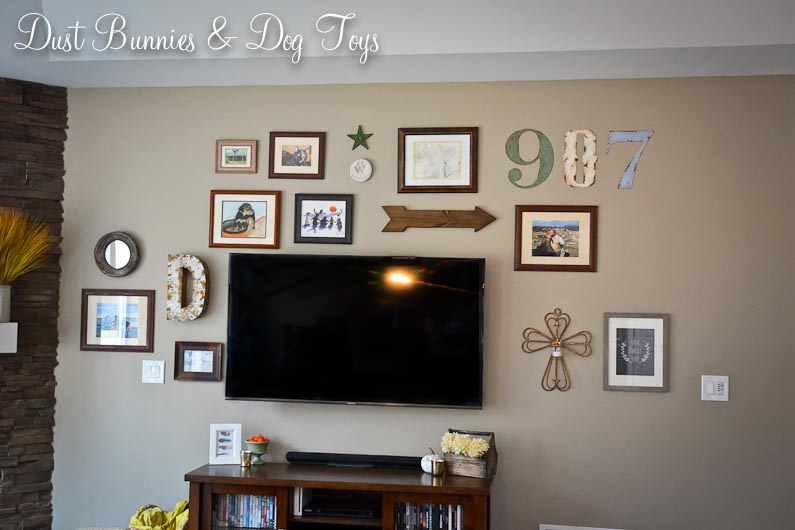
I’m still sorting through Hawaii photos and collecting my thoughts so I can share all the things we did with tips for those who are planning trips which I’ll share in several posts next week.  Until then, I thought I’d give you an update on some of the projects we completed in the Foster Room before our trip.  One I really like are these simple art display boards.

BoardsFront

I needed something to fill the large empty wall, but also wanted it to be changeable with the seasons and each child’s interests without costing a lot so when I saw this idea on one of my favorite blogs I knew it was the perfect answer.  It was such a simple project that I did it all while watching TV and didn’t take any photos of the steps, but here’s the quick run down:

  1. Stain or paint pre-cut boards with favorite color.
  2. Screw in eye bolts at each end of the board.
  3. Loop gauged wire through the eye bolt and twist back on itself a few times.
  4. Pull wire taunt across the board to the other eye bolt and cut to appropriate length.
  5. Loop other end of wire through second eye bolt and twist it back on itself a few times.
  6. Adjust wire and eye bolts as needed to make wire tight. (I used pliers to tilt the eye bolts outward a bit for some extra tension.)
  7. Add small metal clips to the wire for hanging art.

Boards2

It’s the perfect simple solution and it can double as a spot to display little artworks to be oohh’ed and ahhhh’ed over.  For now I put up some simple dog and cat art I found online as placeholders.  I think the total cost came in under $30 and I have a third left over board stained and ready to be used for another project.

Boards

Tomorrow I’ll show you what we set up below these boards for more display and storage space so check back for that!

A Quick Revamp

Aloha!  It’s been quiet around the blog the last few weeks because the hubs and I had a little get away to Hawaii!  It was an amazing trip and I’ll be sharing information on all that we did while there in the next few days once I get a chance to sort through the masses of photos I took.  Until then here’s a quick little upcycle project I did a while back and never shared (hence the lack of snow in the before photo!).

I bought this wooden wall art at a furniture store when we first moved to the mainland about three years ago.  I was drawn to the details of the carved wood and always liked it but it blended in with the wall color at the new house too much for my liking so it languished in the “not sure where to put this pile”.Before

A quick coat of chalk spray paint from Michaels and a little distressing took it from pretty basic to awesome rustic!

After

Now it looks like something you’d see on HGTV’s Fixer Upper!  Although I really love the new look, I don’t have a spot for it in the house any more so I’ve got it set aside for the next bazaar and will post it on the local décor buy/sell page in the meantime.  Hopefully someone else will have the perfect home for it and snag it up.

Looks Good, Smells Good

2

I’m not sure where the past week has disappeared to but I certainly don’t want it back.  I’ve been handling some mini “crises” at work, preparing for a trip, dog sitting a VERY active puppy and just trying to keep the to-do list flowing so I haven’t had time to work on projects or edit photos of ones I’ve done recently.  Hopefully this weekend will provide some much needed catch-up time.  Until then here’s a quick look at some new wax warmers I got and am really loving.

Long ago the hubs and I made an agreement that I should not have burning candles because I tend to forget them, which is obviously not very safe.  So instead I have flameless candles for decorating and wax warmers for scents.  I used to have the table top style warmers but have recently moved to the smaller outlet style option because they are easier to clean and don’t take up horizontal space.  I like to have a themed warmer in the entry way and loved the simple winter look of the one seen above.  It went up before Christmas and will probably stay put until spring officially arrives in Alaska.
3
This one is in the master bathroom and provides a wonderful glow.  It’s the perfect nightlight with just the right amount of light to let you see what you’re doing but not be a shock to tired eyes.  The beautiful pattern and metal tone of the finish are an added bonus.  Even the hubs commented on how nice it was!  Since we were so happy with this style in our bathroom I decided to get one for the hall bath as well.

1

I originally planned to buy the same one again, but noticed this pattern from another brand on the same shelf and thought it would have a similar glow. It does and the simpler design fits well with the décor in the hall bath better. Now our guests will have plenty of light to see what they’re doing if they need to make a trip to the bathroom in the middle of the night. It also illuminates the little basket of essentials I put out below it which is also helpful.

1A

The first two warmers are from the Better Homes and Garden line at Walmart, but the one in the hall bathroom is from brand called ScentSationals also from Walmart.  All three came with toppers for the wax area which give them a cleaner look than the open air ones I’ve had in the past.  I choose not to use the topper on the winter version just because the wax bowl isn’t very large so I didn’t want the topper sitting in wax if I put two cubes in, but it works just fine without it.  The warmers I had in these locations have since moved to other areas of the house or been sold so it was an efficient change as well.

Sometimes it’s the little things that make a space feel homey and I think these do just that.  Do you use wax warmers?  If so, I’d love to hear about your experience with them and what your favorite scents are since I’m always testing out new ones each season! 🙂

DIY Moose Mount

7
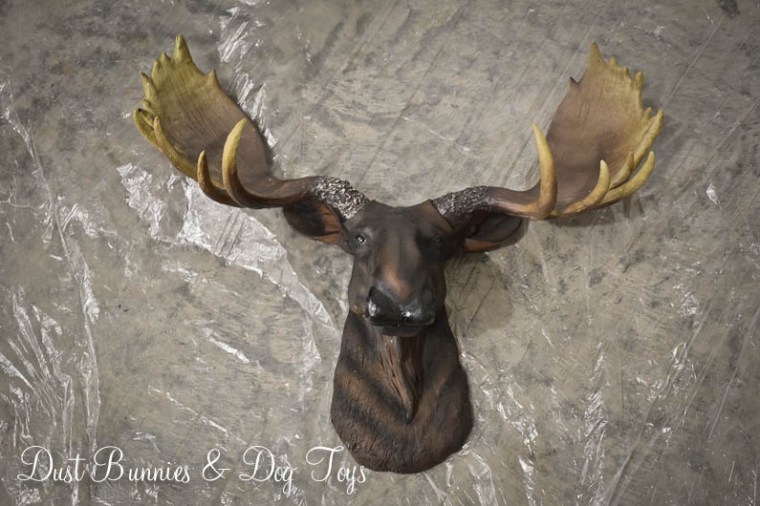
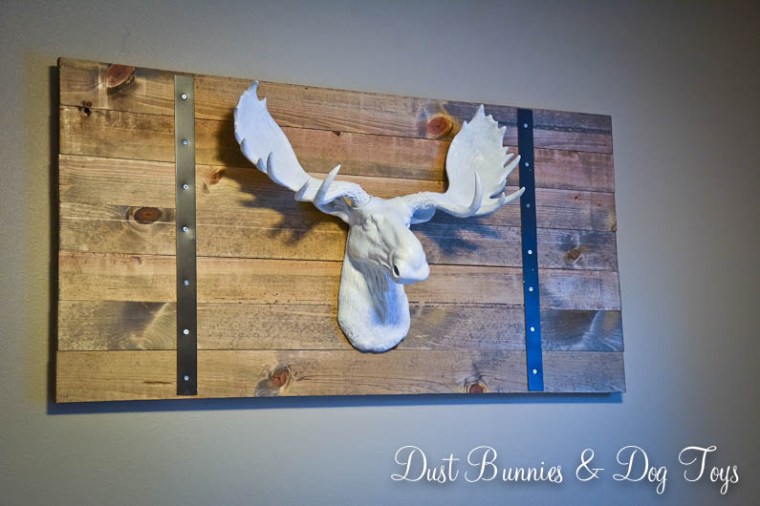
Today I’m sharing a recent DIY project the hubs helped me create as part of the games for my employer’s company holiday party.  The company is celebrating it’s 25th anniversary this year so we had a theme of ‘silver winter.’  We wanted to try having some games that people could do before dinner was served and I came up with the idea of a moose head ring toss.  I found this resin moose head on Amazon, which the company purchased for around $20 after we used some gift certificates from a vendor we work with.

1

Much to the hubs dismay, I spray painted him white.  Sometimes he just can’t see my vision. 😉  Once we had the moose head ready we purchased the wood, screws and metal strips to make the mounting board.  We laid everything out in the garage for a dry run before putting it together.

2

The first step was staining the wood, which was precut whiteboard.  I had planned to use pallet wood but ran out of time to disassemble the pallets I had.  Luckily these were the right size and at around $5/board they didn’t break the bank.

3

Here’s the moose head, sans antlers, on the stained boards.  I love the contrast and rustic feel!

4

The next step was adding the metal brackets on either side to hold the boards together.  The hubs convinced me it was cheaper to buy a long solid piece of metal, so he cut it to size and drilled the holes for the screws.

5

The hubs and Stoli look so thrilled to show off the finished project don’t they?!   At the party we set the board on a table on top of a white fur throw with the back propped up against the wall so players could attempt the ring toss.

6

And now that the party is over and the company has no use for it any longer it’s become a focal point in our guest room!

8

As I was prepping the images for this post I realized that when we hung the board at the house it’s actually upside down, which makes the moose sit a little higher than it did in the “finished” picture.  I might eventually correct that but since it’s not that noticeable that’s pretty low on the priority level.

9

I think I’ll dress him up a bit next holiday season with a scarf or fur wrap, like I’ve seen many other bloggers do since I plan to decorate more throughout the house with small touches.  I’d love to hear what you think of our latest project and how it looks in our rustic Alaskan guest bedroom!

7

Making a Little Faux Tree New Again

Happy Christmas Eve! I have one last Christmas project to share and it’s the revamp of this sad little faux tree.  It used to be my holiday tree in the entry way, but I decided to give up that tradition this year in favor of spending time on more important things like spending time with my hubby and kiddos.

This little skinny tree had definitely seen better days.  It had moved from Virginia to Alaska and then from Kodiak to Anchorage and finally Wasilla, so it was looking pretty tired.  Since it came apart in two pieces I decided to make each portion a smaller mini tree for use around the holidays.

TreeOriginal

The bottom section was glued very securely in the base – trust me I tried to remove it and I’m pretty sure it would survive an explosion intact.  So rather than fight it I just wrapped the container in burlap, tucked the ends over the top of the urn and tied it with some pretty twine from the boots I’d bought at a consignment sale.  One down, one to go.

BurlapFinished

Now I needed a base for the top portion of the tree, which had a metal stump that had once attached into the base of the tree.  I remembered I had this wooden box in my stash and thought it would work perfectly.  This had been the container for a gift basket my office had received last year and originally came as unfinished wood with the sender’s logo carved on one side and this pretty snowflake on the other.

BoxStained

Although the snowflake was cute I didn’t want to see the company’s logo so I needed a way to cover it up.  I considered adding metal pieces with decorative tacks, paint stick shiplap and other methods, but then had a light bulb moment when I realized that the burlap webbing I had a small section of was just tall enough to cover both the logo and snowflake!

BoxWrapped

I filled the box with some Styrofoam from some packaging I was about to discard, shoved the metal stump into that and wrapped the webbing around the box, securing it with a bit of hot glue where the two ends met.  It was looking pretty good, but I wanted to cover up the white sytrofoam so I pulled some crinkle paper stuffing out of my filler stash and tucked it around the base.  I literally had just enough!

BoxWrapped&Filled

And here it is all done!  I think they turned out pretty darn cute for being a totally $0 project!  I paired each with a reindeer and placed them in the guest room and foster room for the season.  I didn’t even decorate them so they can stay put through the winter. 🙂

BoxFinished

And because I just can’t not share one more, here’s a cute little lamp post I revamped.  I bought it at a thrift store for $4 back in the summer and set it aside to redo for my holiday bazaar booth.  I forgot to take before pictures, but envision it as unfinished wood, with some 1980’s Christmas appliques at the top and a beat up garland around the post.  I removed the garland, sanded down the appliques and painted the whole thing in ORB.  Then I distressed the edges of the lantern and added a simple bow with greenery to the lantern base with a screw.  And here’s the finished result.

Post

Although it didn’t sell at this year’s bazaar I’ll store it away as inventory for next year since it never hurts to get a head start and I plan to market pieces earlier next year on my Etsy shop and crafting Facebook page.

I’ll be taking it easy tomorrow, Skyping with family back home while enjoying the day with my fur babies and the hubs, so I wish you a very Merry Christmas and will share more projects next week!

Christmas Decor Tour

With everything going on this year I didn’t get to decorate for Christmas until last week, so I kept things simple and classic with items that can transition into January without feeling too Christmasy. If you’ve been around the blog for a while you know I decorate with reindeer and name my favorites.  Max and Milo ended up in the same spots they had last year while big man Woody is still out in the yard guarding the rain garden. Holly and Rudy travel with me in my truck and little Fink is on my desk at work again this year.  Here’s where the others are hanging out this season.

In the entryway I used a new lighted garland with Red & Flint.  Woodland Santa watches over them as they play in the lights and Rusty my metal reindeer welcomes from the corner.

Entry

I’m loving the new garland, especially at night when it looks lovely.

EntryNight

Across from the entry dresser is Moe, one of my favorite reindeers with his knotted needs and big ‘ol feet.

EntryMoe

Around the corner Gus holds down the bench with a noel pillow and fur throw.  He has a great vantage point of the tree from this spot.

EntryBench

In the family room little Noel met her twin (thanks to a thrift store find back in the fall at just $4) and they teamed up to build a little snowman between the new pretty sparkly trees I bought at a favorite local boutique shop called Vintage Joy during their 40% off holiday sale.  They look great next to our new rustic mantel with birch candles.

Family

Handsome Sebastian stays warm next to the candle on the side table with a little frosty garnish to munch on.

SideTable

Between the family and dining room our Willow Tree Nativity set is displayed atop the curio cabinet with this amazing barnwood star I picked up at a local craft bazaar for just $28 and two little simple trees that were at the same bazaar for just $3 each.  I realized after I edited the photo that the star was a little crooked and fixed it but didn’t want to retake the photo so just ignore that ok?  Next year I’d like to add to the wise men and angel to the set and may finally get around to making a creche like this one for it, but for now I like how the simple piece of wood elevates Mary & Joseph and ties in with the star.

Nativity

I struggled with the dining room buffet for a few days but finally settled on this lantern and rustic box filled with greenery and twinkling lights.  Simple yet festive and a perfect compliment to the centerpiece on the table, which I already shared.

Dining

I had planned to clip Christmas cards on the windmill, but we haven’t gotten it installed yet, so I used the same concept on my metal wall art next to the back door.  I think it worked pretty well.

CardDisplay

So that’s my decorating for this year.  Leave me a comment and let me know what you think!

DIY Birch Candles

1

Thanks to Pinterest inspiration, the hubs recently made several of these amazing birch candles for decor at my recent company holiday party.  We used a couple of trees from our property that had died but hadn’t come down yet.  He cut them at various lengths and used a special drill bit to carve the hole at the top for the candles.  He did burn through several drill bits to get the whole lot done but other than that he said they were relatively simple to make.

2

We grouped them in trios at the party inside of white wicker wreathes as centerpieces on the tables which drew compliments from employees and the venue staff who said they were nicer than anything they ever offer!  Now that the party is over I’m using some of them on our dining room table with a faux evergreen wreath I picked up for a few bucks at the Dollar Zone.

3

It looked pretty good, but a little plain so I added some pine cones and feathers to give it a finished look.  It works with my classic rustic Christmas decor and will transition into the new year afterwards without lifting a finger, which is exactly what I need these days.

4

We’re less than a week from Christmas and I’m finally getting the house decorated, but it’s better late than never.  I’ll share more of my holiday decor next week, including how I used more of these beauties on the mantel, so stay tuned! 🙂

Skip the Skirt, Get a Box!

6

This year we tried something new with out Christmas tree.  Instead of using a tree skirt to hide the base, we have a box.  I saw someone selling these on the local buy/sell page and considered having the hubs make one but since they were selling for $40, which is about what the materials would cost we agreed that it was a better idea to just buy and leave the extra time for more important activities.

7The box came unfinished, with the trim being 2×4 and the planks being cedar, probably fence pickets.  Although that was pretty it felt a little to raw for me, so I gave it a quick rustic coat of white to play off the flocking on our tree. There is also a small hole drilled in the back for the power cord to go through, which works perfectly.

The hubs likes the look and Luna likes having a new hiding spot inside.  I like that I’m no longer constantly fluffing the fur throws we used to use as a skirt!  Although it’s one more thing to store, I’m glad we made the switch and can see us using it for years to come.

Industrial Cart Makeover Plan

Cart

Today I’m sharing another project plan for our future Foster room.  We scored this fabulous industrial cart in a government auction for $45.  I originally planned to use it as a coffee table on the deck, but one of the wheels was missing some of the rubber tread, so it didn’t roll smoothly, which could be a pain when I want to move it around to change up seating.

CartWheel

Plus its SUPER HEAVY so I wasn’t keen on adding more weight to the deck since we already have the Green Egg table out there and a large seating area.  It was way too cool to not use it in some way, so I had to find another purpose for it.  Luckily inspiration struck quickly.  Although I’d picked up a bunk bed frame and a wooden twin bed for the Foster Room neither ended up working out like I’d hoped so I was looking for an alternative.  It dawned on me that the cart seemed to be about the same size as a twin bed, so I put the mattress on top to see how it fit.

CartMattress

I was quite a bit giddy when I realized it was a perfect match! Since I wanted the bed to be a trundle I knew we’d have to take the wheels off and create some other form of support, so seeing that the sockets at both ends of the bed were still accessible gave me another idea.

CartMattress2

We could create a frame for each end with metal pipe that would fit through the sockets! I did some searching on Pinterest and found something similar to my vision, talked it over with the hubs and confirmed it was possible.

CartHole

Armed with a plan, the hubs made a multi-project shopping trip to the big blue box and now has the materials we need to get this project underway. Hopefully that will happen over the weekend and maybe even be completed by next weekend, so stay tuned to see the progress!

More Gallery Wall Additions

GalleryWallFull

If you’ve been around the blog for a little while you know I’m slowly curating our gallery wall around the TV in the Family Room.  Today I’m sharing a few recent additions I added over the weekend.  The first is a rustic mirror I got from Michaels for free thanks to a great BOGO sale when I purchased the frame for my whale breach collage.  It originally came with a rope hanger attached to the sides, which I liked but not in this grouping.  So I removed it and will re-use it on another project I hope to wrap up this weekend.

MirrorClose

The whitewash creates a weathered patina that immediately drew me to the piece.   I placed the mirror on the side near the fireplace where it can reflect natural light from the windows. I think it also helps balance some of the bigger items in the whole collection and I love that the round shape breaks up all the square corners.

Mirror

I also added this lovely rusty cross votive holder I scored on the local buy/sell page for $15. I had planned to use it on the deck, but didn’t want to constantly be emptying the votive holder when it rains, so I decided to find it a spot inside and am in love with it here. Next to it I added a freebie frame I got on the same Michaels BOGO order. I filled it with a free chalkboard printable I found online. I might change the chalkboard print seasonally, but I like that this one can transition from season to season if I opt not to.  Plus I love the simplicity and thought behind the quote. 🙂

GalleryWallCross

I plan to DIY a long narrow Alaskan themed sign to fill the space just above the cross and chalkboard print and a shorter narrow piece to fill the space between the fireplace switch and the stone, but it might be a while before those happen.  I also have a piece of family history on the hub’s side that I want to add under the metal 7, but need to figure out how to make sure it’s secure because it’s pretty darn heavy.  Stay tuned to see how this space continues to evolve!

GalleryWallFull

Shared on Knick of Time’s Vintage Inspiration Party #209!