Hanging the Hose

For some unknown reason our builder decided to install our front hose spigot in the middle of the space between our garage and front porch, under a window. I’m guessing the plumber chose that spot because it was an easy location to run the pipe to. Unfortunately, it didn’t quite jive with my landscaping plans, which had a flowerbed going in from the porch to the garage and back to the window.

Life would have been much simpler if he’d just put it next to the front porch where I’d envisioned it, but if you know me you know simple rarely happens in my life. So rather than traipse through my flower bed every time I want to turn on the water, and then have a hose trapped amongst plants, I altered my plan and put in a divided flowerbed with a walkway to the spigot.

Hose3

But that made the hose the center of attention, so it has to look good. Problem was that I didn’t want to attach anything to the house unless absolutely necessary since we had brand new siding. About the time we were installing the flowerbeds I found this fabulous idea on one of my favorite blogs and knew it would work for our hose.   I like the idea of the metal post holder, but I didn’t think it would work well without support around it like she had, so I opted to do it the old fashioned way with the post in the ground.  The hubs cut down a 4×4 and we dug a hole with the post-hole digger next to the spigot.  We just backfilled the hole around the pole and then screwed on a pretty metal bracket so there was a spot to coil and hang the hose.

Hose2

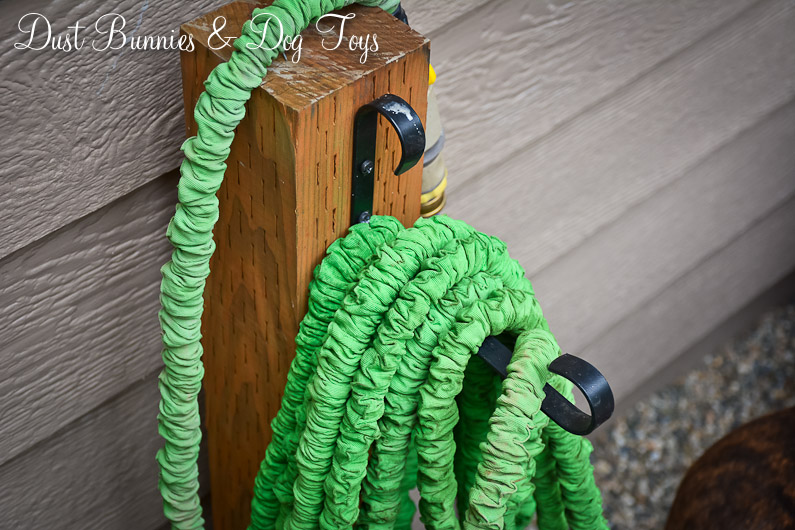
Since I have a fancy watering wand I just lean that against the pole, which allows it to drain if I don’t get everything out before coiling the hose. This is the first time I’ve used an expandable hose, but I love it because it’s light weight and easy to move. Plus it hangs on the bracket very easily without a lot of weight.

Hose

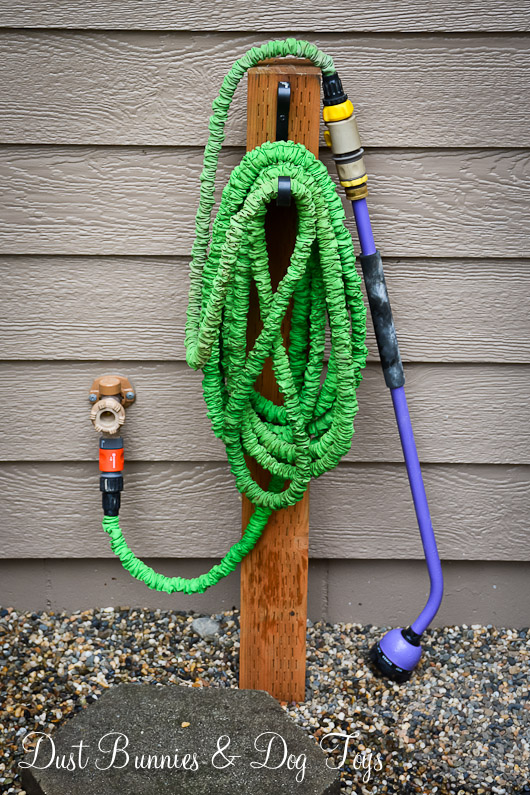
So that’s it: a pole in a hole, a bracket, some screws and a hose.


Free & Easy!

Soap

I recently found some pretty green bottles and instantly knew that I wanted to use them in the kitchen for the hand and dish soap.  I lucked out and the top from the store dish soap bottle fit the glass bottle perfectly.  It even screwed on tight without a hassle.

The hand pump was a little more difficult.  I tried a pump like the one we used on the mason jar soap bottles, but it wasn’t the right size to fit the opening.  I had a small hand soap bottle in our bathroom that had a larger pump so I decided to try that.  That one did fit, unfortunately the stem wasn’t long enough to reach the soap at the bottom of the bottle.

Then I remembered that we had a package of flexible straws somewhere and wondered if that might fit the pump.  I dug through the cabinets and found them, then tested out the length next to the bottle.  It seemed like it would work, so I pulled the old stem out of the pump and pushed the straw in.  The connection was a little loose due to the flexible part of the straw, but it stayed snugly attached as I fussed with it.

Since it seemed pretty secure, I put everything together and gave the pump a couple pushes.  It took a few before the soap started flowing, but when it did it worked just fine.  It’s been about a week now and it’s still working great, so I guess my little DIY rig is good enough.  And it’s a whole lot prettier than the plastic store bottles!

I’m not crazy about the different colors of the two tops, but they work and I’m probably the only one who notices it.  Plus the bottles fit the little tray I’d been using to hold their plastic predecessors as if it was made just for them, leaving just enough room for the sponge.  But the best part about the whole project is that it was 100% free!  Now if only I could get all my projects to be this affordable and easy. 🙂

A Little Update Up Top

Although I love the decor I chose for the small section of our kitchen cabinet tops, I wasn’t super crazy about how things were looking on the long portion.  I’d tried a few options and had a plan to update a large tin I purchased, but something still wasn’t just right.  It just seemed a little to sparse compared to the other side, so I knew I wanted to add something.  Maybe a few somethings.

Luckily, while I was in Portland I found several somethings on my pilgrimage to Home Goods and a visit to a large Goodwill.  The new haul included a basket tray, a tall distressed white ceramic container, a fake plant and a green glass jar.  All together, I probably spent around $30 for all four, which brings the current total spent to around $40.  Still within my bargainista budget.

I added a cream ceramic pitcher I already had and the former cache pot – watch for an update on that project soon.  I played around with the items, trying things in different spots and finally settled on this line up.

CabTops

Apparently Luna approves!  In fact, I’m surprised she didn’t knock over the basket so she could lay in IT!  I’m still getting used to the new look, but I’m pretty happy with how it pulls in the colors and textures from around the kitchen and family room.  The fact that the pitcher is a different color than the other ceramic pieces kinda makes me twitchy, but it works for now. 🙂

My Macy’s Personal Shopper

Did you know that Macy’s offers a free personal shopper service? I heard about the program last year and scheduled a session when I was in Portland last fall. The process was super simple, I just sent an email to the address on the website and within 48 hours I was in contact with a personal shopper associate who asked questions about my style and expectations.

When I arrived my shopper had a selection of items already pulled for me based on those conversations. I was a little worried that she might just push their new or designer products, so I was very pleased to see several clearance items among my choices.

As I tried things on she offered feedback on how each item looked and styling suggestions. She also brought alternate sizes for several items and because she knew exactly where everything a located in the store she was often back with the new size before I’d changed into the next outfit!

She was also able to look up items in the computer to find out if they came in alternate colors and if they weren’t the store if they could be ordered. Those that I chose to order were shipped directly to my home for free!

I was a little surprised when she politely declined the tip I offered saying they aren’t allowed to accept tips and confirmed they don’t work on commission. I guess Macy’s just believes in good old-fashioned customer service!

I enjoyed the experience so much that I decided to do it again this trip. This time around I worked with Lori, who started the appointment off with a home run on a pair of leopard print flats, which I had told here I had been wanting for some time. And they were on sale!

That was the only item she pulled ahead of time. Instead she chose to have me walk the floor with her and choose items together. I really liked this option because I did miss the fun of browsing the racks and grabbing things that caught my eye last time. She let me wander the different departments, but kept me on track making sure we also got items I’d told her I was in need of ahead of time.  And she rang everything up in multiple orders so I got the most savings possible with the coupons I had! That impressed me even more.

I ended up finding just about everything I was looking for, including a few last minute requests I asked for upon arriving!   Here’s a few of the items I picked this time:

So if you’re looking to update your wardrobe or just need something particular, I highly recommend the Macy’s By Appointment service.  It’s like shopping with a girlfriend, but without the drama. 🙂

My Garden Stool Addiction

My name is Jenna and I’m a garden stool addict. Our trip to Portland produced three new garden stools, which now brings me to a total of five. It all started with an online purchase of the first when I needed a table for the chair and ottoman in our family room. Then I picked up a metal stool last summer at the nursery and used that as a side table for the chairs on the balcony of the rental house.

I purchased the third in Portland last fall, but couldn’t bring it home on the plane so we left it there with the ’55 knowing we would be back to get it in the coming months. I plan to use it with the chairs going next to the fire pit.

Stool3

In the meantime, I’d started using the blue metal stool in our master bathroom shower as a spot to prop my foot when shaving my legs. It fulfilled a need, but the blue wasn’t working with the rest of the room’s decor, so I was planning to paint it gold like the accent in our mosaic tile. I purchased spray paint several weeks ago, but hadn’t gotten around to completing that project before leaving on our trip.

So when I spotted a white Moroccan garden stool that I loved at Home Goods during my pilgrimage there I convinced myself that it would coordinate with the white trim in the room and would make an excellent replacement. It was a bit pricey at $80, but I reasoned that if I decided it didn’t work in the shower I could use it elsewhere and go back to my previous stool.

Stool

A few days later we hit Marshalls to use a gift card and I found this. The color was a perfect fit for the bathroom and the pattern would work with the decor as well. And at $39.99 it would only cost me $15 after my gift card! I believe there was a heavenly hymn playing on the overhead speakers. I snapped that baby up and claimed her as mine.

Stool

Then I spotted a wooden stool nearby and debated which would work better in the shower. So I did what I always do, I grabbed both and found the hubs to let him help me decide.

That wonderful man didn’t bat an eye when I walked up to him with not one, but two more stools and asked which he liked better. Oh how I adore that man! A short discussion later the decision was made and the wooden stool left behind as we proceeded to the checkout.

So now I have a diverse collection of stools. But in my defense, they are all useful and #5 is perfect for the shower! So I guess this is one addiction I’ll maintain. 🙂

Shower

Down the road…

Mirror

I can now cross driving the AlCan off my bucket list , since we just completed a trip from Alaska to Portland and back! It was a long haul – about 5,500 miles – but it went pretty smoothly and we saw lots of beautiful scenery. There was a plethora of wildlife along the route as well, including black bears, grizzlies, caribou, bison, elk, porcupines, beaver, mountain goats, deer, fox, ermine, swans, geese, hawks, rabbits and moose.

Grizzly

BlackBear

Bison

Caribou

Goat

We didn’t stop at every attraction along the way, but we did hit a few of the fun ones:
The Hell’s Gate Airtram on the Fraser River was closed when we came through, but we did get to see the trams move across the canyon as they did safety checks on the equipment.
HellsGate

We picnicked at the 108 Mile House Heritage site before I wandered the 13 historical buildings from the old 108 Mile Ranch and 105 Mile Roadhouse. The Clydesdale barn was my favorite. I seriously considered digging up some of those amazing white and purple iris, but figured that would be frowned upon by the caretakers.

108

108-2

108-3

108-4

The world’s longest wooden tress pedestrian bridge and a huge gold pan in Quesnel.
Bridge

Pan

We missed the numerous chainsaw carvings in Chetwynd on the way down due to traveling at night, but enjoyed seeing them as we passed through during daylight hours on the way back.

Milepost 0 of the Alaska Highway in Dawson Creek, which dates back to the 1940’s.
MIle0

Crossing the Canadian Rockies and hugging the blue-green Muncho Lake were two of the most scenic areas of the whole trip.
Muncho

We wandered the Signpost Forest in Watson Lake, B.C., where we added our own sign to the over 75,000 already there!
SignsEntrance

Signs4

Signs3

Signs2

Signs1

Sign

We watched the world largest weathervane, a Douglas-DC 3 move with the breeze in Whitehorse.
PlaneVane

Our Lady of the Way Catholic Church was created in 1954 out of a quanset hut previously used by the US Army during construction of the Alaska Highway. Today it’s the most photographed church in the Yukon.
Church

The main reason for the trip was to pick up my 1955 F-100, which we trailered from Virginia to Portland last fall. We also loaded up several family heirloom items of my husband’s while at his mom’s house including a grandfather clock, plane models and a set of china with glassware.

55

Of course I took the opportunity to shop at retailers we don’t have in Alaska while there, with a pilgrimage to Home Goods, World Market and Marshalls. Posts on the treasures I found at each, along with a few others will be coming soon. Additionally, I enjoyed a session with personal shopper at Macy’s, which I will share in another post.

Because we live in Alaska, our visits with family are few, so making the most of them is important. Before leaving, I made sure to squeeze in some family portraits with the hubs and his mom.

MomNMatt

Mom

MomNMe

We were certainly the most unique rig on the road, resembling the Clampits on the trip back with the tarpped grandfather clock sticking up in the back and the cab of the 55 packed to the roof.
Rig

But even with that, we still had many admirers along the way. Someone would ask about the F-100 every time we stopped, even when it was for road construction and we chuckled watching folks stop what they were doing to watch us go by. One guy stared so hard he fell off the bike he was riding!

All said and done, it was a wonderful experience full of fun memories.