4th of July in Glacier View

Is this week been a blur to anyone else?  We’ve been busy getting back into the normal routine after my sister and brother-in-law headed home and catching up on things that fell to the wayside while they were here.  We’re also making progress on the new deck out back and the cedar soaking tub that will go on it!  I’ll be sharing all of that once we get closer to the finish line.

In the meantime I’ve got a couple of things we did while my sister was here to share.  Today that’s our visit to Glacier View for their annual 4th of July celebration which includes launching cars off a cliff!  It’s definitely a unique way to mark the occasion, but when you live in the land of midnight sun fireworks don’t quite have the same effect so this is a good way to get some oooohhh’s and aaahhh’s from a crowd instead.  All of the vehicles used are donated and typically on their last legs so this is their last hoorah before they head to the scrap pile.  I guess it’s a unique form of combining recycling and entertainment!

The event takes place on private property owned by a guiding company which does have a view of the glacier, although from the spot along the river we claimed for the show it’s only a small view.  I’m sure it’s much more impressive from the top of the cliff where the cars launched from.  But it was pretty along the river, so my sister and I explored a bit while we waited for the show to start.

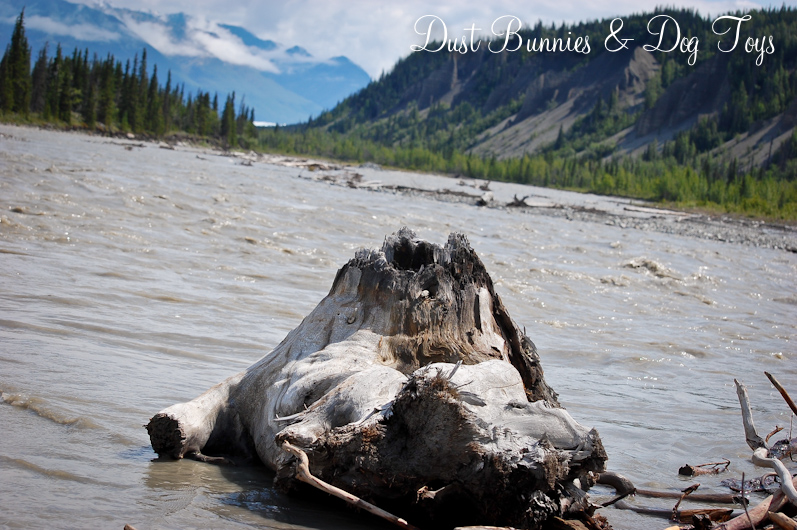
There were lots of big pieces of driftwood along the banks, showing just how powerful the river can be.  In fact this same river has claimed several houses down river after swelling from spring rains and snow thaw.

We found a few interesting items tangled up in the driftwood like this paddle, likely lost from one of the many rafting tours that go down this stretch of the river.

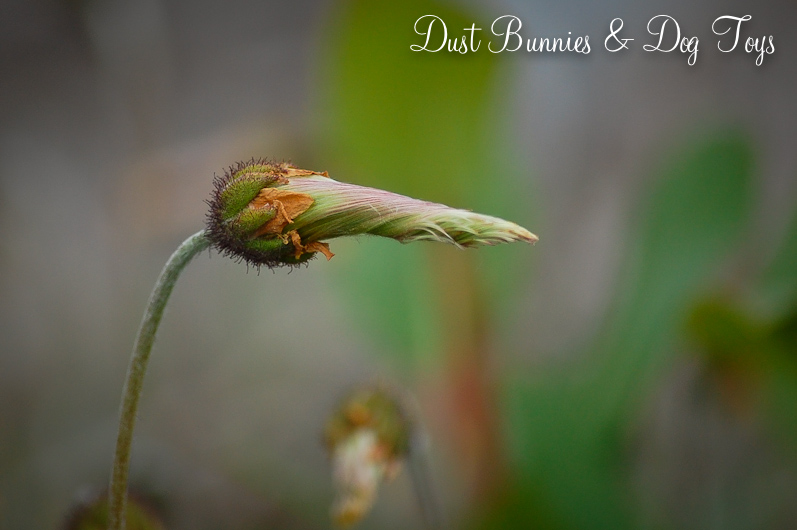
My sister was in awe of the scenery and took numerous photos so I took of few of her in action. 🙂  We also spotted these strange flowers growing near the river.  I’ve never seen anything like them before.  They look like something right out of a Dr. Seuss story!

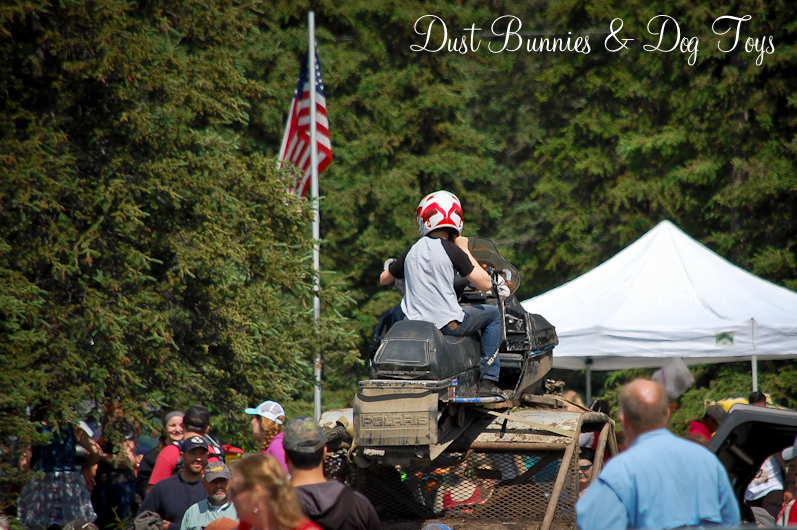
When the show was about to start the organizers started to move the vehicles that would be launched off the cliff toward to top.  This snow machine was a last minute entry and the first they’d ever had.  Since there was no snow to be had at this time of year, they strapped it to the top of a side-by-side for it’s journey to the cliff side.

As they got the cars ready up top we watched a few more folks take a trip down the zip line that spans over the area where the crowd had gathered.  My sister and I considered trying it out but we ran out of time after the show as we had to pick up some 4-wheelers we were borrowing from friends for another adventure.  I’ll share about that tomorrow!

Finally we were ready for the main event and it didn’t disappoint. First up was a little Subaru painted like Lighting McQueen.  It got pretty good air off the cliff and landed on target near a pond at the bottom.

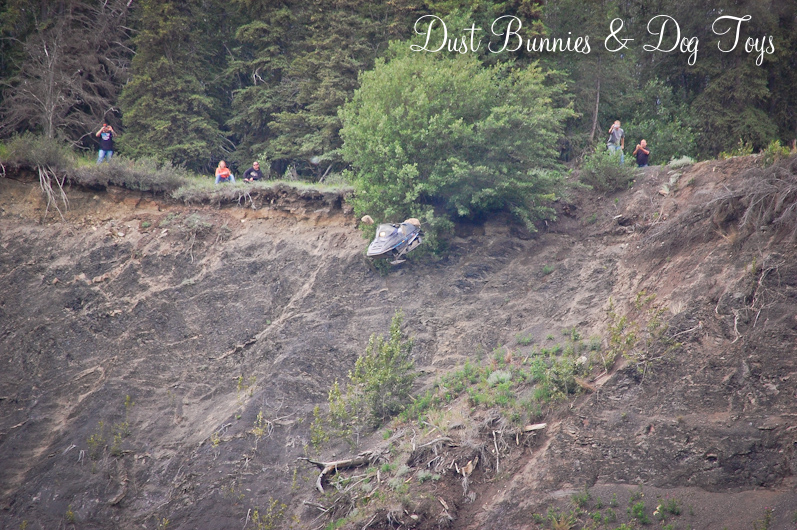
Next up was the snow machine, which gave a stunning launch with a dust trail as it left the cliff.  It flipped after impact giving a unique perspective.  It was a great first entry in the ‘lightweight’ division as they called it!

The third vehicle was another coup which had apparently been named Felica according to the roof’s paint job…

That was followed by a star spangled van, which turned out to be a dud.  It konked out before it had enough steam to make it off the ramp and rolled back into the trees.  They got it running again later and did launch it but forgot to warn the crowd so we could watch and I missed seeing it land.

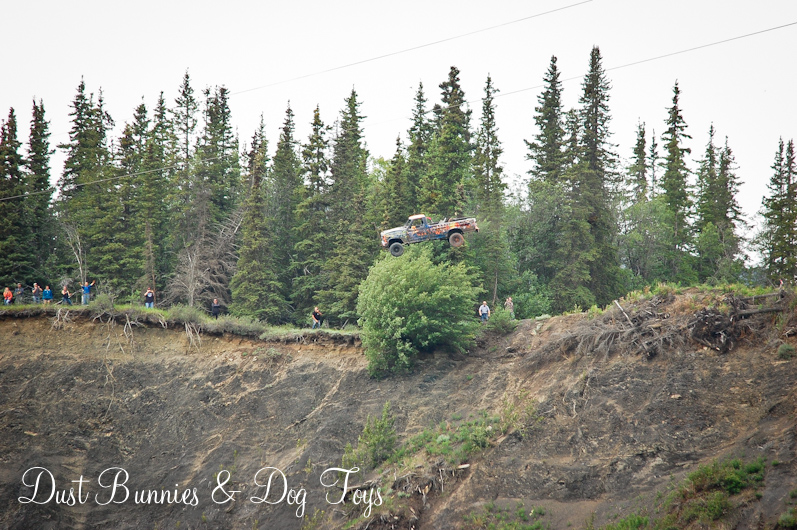
There was also a full-size truck in the line-up that gave a pretty good performance with high air and a decent soar before it nose-dived and flipped on landing.

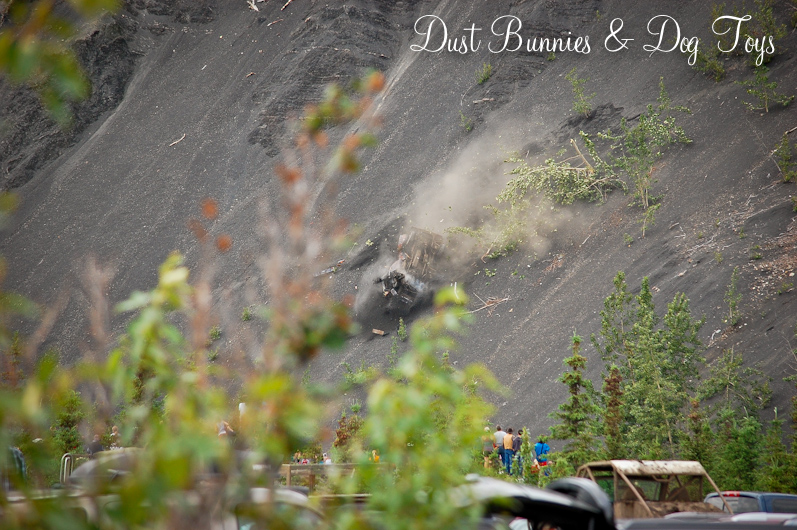
My favorite of the day was the old police patrol car.  It looked like a scene right out of Dukes of Hazard and I kept hearing “Just some good ‘ole boys…” play in my head as I watched it descend.  It gave a magnificent belly-flop at the end just as if it was Boss Hog himself driving!

I applaud the organizers and the community for a great down-home event.  We were told that it’s grown every year since it began and this year was the biggest they’ve ever had.  In fact they had sold out of food tickets when we arrived at lunch time so we hit the food truck and managed to get the last few slices of pizza they had!  We had a great time watching the show and plan to return next year now that we know what to expect and what to bring.  If you’d like to see more photos and videos of the action visit the event’s Facebook page here.

Garden Art Refresh with Spray Paint

My sister and I hit the Palmer Garden & Art Faire while she was here visiting and got in a bit of browsing (and shopping) before the rain let loose.  I’ll share some of those finds soon but today I wanted to show you some quick updates I did to other pieces of garden art.

The first is Mr. Froggy.  I’ve had him for ages and adore him to pieces but he was looking pretty worn from his many seasons in the garden.  While I loved his coloring I knew I wouldn’t be able to recreate something similar with my painting skills and honestly didn’t have a lot of extra time to give him a makeover.  So I picked up some textured spray paint to give him a simple neutral stone look.

It took a couple coats and he’s still not perfect, but he’s looking much better.  He looks rather handsome in my flower bed this year next to a big piece of driftwood as the flowers slowly encroach around him.

The second piece is this artichoke shaped finial I snagged at the thrift store over the winter for a couple bucks.  It’s SUPER heavy so at least it will hold up to the dogs on the deck, but the color was pretty blah.  I dug through our paint cabinet and found some simple grey, which gave it a nice updated look.

I’m still not super crazy about it so it may still see another paint job for a different look – perhaps a little ORB to make it look cast iron, but for now it looks pretty nice next to the pots on the deck.  I’d love to hear what you think about both make-overs!

DIY Compost Bins

Part of our green house project was creating a compost system to supply nutrient rich fertilizer for our crops.  After a bit of Pinterest browsing, I came across an idea that used plastic barrels raised on a stand so they could be filled, rotated and emptied easily.  I showed the picture to the Hubs and he whipped me up these.

I placed them right behind the green house where they get full sun exposure and there’s extra room for the stand supports. Although they currently sit on a slight incline I plan to remedy that when I add gravel around the green house so that they sit level.

The design is fairly simple.  He cut a panel door in the side of the barrels and created holes for the metal rod to go through the center of each barrel.  In a stroke of genius he added a weight to the opposite side of the barrel from the door so that the hardware wouldn’t cause the barrel to always rest with the door upside down.  He also added several large bolts that protrude into the barrel from the outside to help with the mixing process when it’s spun.

I’m still figuring out the right ratios of brown and green material and haven’t been great about keeping it damp to aid in the break down, but it also hasn’t been very warm here this summer so I’m not sure that if I had I would see much difference.  Luckily there’s never a shortage of material to add to the bins so we’ll continue the trial and error method with a bit of research until I get it just right.

If you compost I’d love to hear your tips and tricks both for cultivating the pile and using the resulting material in your garden!  Leave me a comment with what works or what doesn’t for you – it might just be something that helps me decrease this learning curve. 🙂

Updates to the Chicken Coop

Today I’m sharing a few quick updates I did in the chicken yard recently.  Last summer the cluckers kept creating holes along the wood of their run to take their dirt baths.  I’d seen the idea of creating a dirt bath spot with a tire and figured we’d give it a shot.  I pulled a small tire from the top of the rain garden wall since I plan to revamp that next season anyway and added it underneath their hen house.  I filled it with sand so it’s easy for them to flick up on their wings.  I haven’t seen anyone using it yet, but it’s obviously gotten traffic based on the foot prints and feathers so I guess it’s a hit.

I kind of wish I’d painted the outside of the tire so it looks a little nicer, but perhaps I’ll pull it out when I get to painting the rest of the coop later this season, then refill it.  I’ve still got more sand to spread inside the coop run so I can use the sand already in it to get that started.

The second project was finishing a small paver area in front of the coop door.  This area gets super muddy during the spring due to the run off from the roof and the dirt splashes up onto the door and other wood.  I figured pavers would reduce some of that and luckily I had a stack of pavers left over from another project just sitting around.

The pavers didn’t fit the space exactly, so I just filled the gap with rocks from around the chicken yard that needed to be gathered anyway.  It seems to be working well to provide a bit of drainage when it rains and it’s easy to sweep off or scrape when mud gets tracked across the pavers and gathers.

I’ve also tilled the run a couple of times this season trying to improve the drainage but we’ve discovered that the dirt under the coop is mixed with large chunks of wood and rocks from when the builder cleared the lot to build.  Eventually we may have to dig the whole area out a couple of feet down and replace it all with a mix of fresh top soil and sand, but that’s a project for another summer.

I’ve considered adding growing frames in their yard where I could plant grass under chicken wire for them, but since we shovel the run in the winter I’m thinking they would be more of a hassle than they are worth during the growing season.  I have a large metal pallet that I may add to the yard against the wall with small potted plants they could enjoy pecking instead.  I imagine I could rotate the pots higher when they need a break from constant pecking to regrow.  I may get that project going this season if I find pots and hooks to hold them on sale, but if not we’ll try it next season with seeds I save from this year’s crops.

Hopefully the weather and schedules will be more cooperative this fall so I can pressure wash the whole coop and get a fresh coat of paint on it in a single day.  Then it will be ready for another winter of snow and ice.  Luckily the cluckers aren’t too concerned with how their space looks so long as there’s plenty of things to peck at. 😉

New Dresser for the Guest Room

Although I’d recently picked up an antique sewing table for a nightstand in the guest room it just wasn’t working there for me, so I continued the hunt for a small dresser.  I spotted this sweet little piece on the local buy/sell page and jumped on it quickly.  It came with a large mirror that sat on top.  It was pretty but not the look I was curating in this space, so I sold the mirror and kept the dresser.

It’s got lots of pretty little details, from the key hole trim to unique handles on the drawers and it’s solid wood so it’s super sturdy.

It’s the perfect size for the spot and the height works well as a nightstand while providing a bit of space for guests to unpack and stash things away if they need.

I plan to eventually refinish it similar to the other nightstand which was originally a sewing table, but it’s not a high priority right now since that’s something that can be done indoors during the cold winter months when we don’t have outdoor projects.

Although I like the current layout of the room because it gives guests room to come in and access the closet, I’m considering swapping the dresser with the smaller nightstand on the other side so the larger dresser is in the corner.  I might give it a try after our guests leave and live with it for a bit to see how I feel about it.

I also have a plan for something new above the bed but have to change up another area of the house to pull the materials and I’m not quite ready to do that yet, so it will remain blank for now.  Our guests don’t seem to mind as they are more interested in the Alaskan scenery and wildlife than what their room looks like anyway! 🙂

Revamping the Deck

One of the biggest projects we tackled during May and June was updating our deck with a new Trex top.  The pressure treated boards the builder had used to top our deck were already starting to look very worn and since we are building a second new deck on the other end of the house this summer we wanted them both to match.  The Hubs researched quite a few materials and decided on Trex both for the ability to be shipped to Alaska in the quantities we needed and it’s reviews.

He started at the outside of the deck, removing the old boards and replacing them with the new Trex, section by section.  It was slow going getting the 20′ boards up and making sure all the nails and screws were out so the Trex had a flat surface to attach to.

The dogs were quite intrigued by this process and kept coming outside to check on the progress.  That is until we got to the last section next to the house, which made using the doggy door a bit more difficult than usual.

Tequila wasn’t sure what to do when she realized there wasn’t a solid surface outside the door other than the single board we had to pry out from the trim.  She kept looking out the door and considering the options.

Eventually she decided to give it a try and gingerly worked her way out onto the ledge before jumping between the deck joists and scurrying under the deck frame to get to the yard.

The Trex boards have the special little fasteners that also act as spacers to keep the deck uniform and allow for a gap for water to drain out.  They slide into a little groove on the side of the boards and are then screwed into place on the joists.

Here’s a look at the spacer/fastener from the side so you can see the little track they slide into.

We ran into a bit of a snafu when he got closer to the house and realized the frame of the deck wasn’t square, so the boards weren’t lining up on either side of the deck.  Rather than re-do the whole deck we opted to work with the frame as is lining up one side and trimming the boards that hung over too much on the other end to match the others.  It worked out pretty good and I doubt anyone will ever even notice the difference unless they are really looking for it.  Here’s the finished deck before I added all the potted plants and other yard decor.  It looks so great and is a perfect extension of the colors of our floors inside.

The darker color provides a nice backdrop for the new deck rugs I got this season!  I’ve got a matching one for the new deck which is under construction right now.  I plan to paint the sides of the frame white for contrast once the other deck is done so I can do them at the same time.

I have a plan to reuse some of the old deck boards for another project and the Hubs may use some for a bit of the framing on the new deck so they won’t be going to waste. I’ll share those projects once they are completed. The vision we had for the yard when we moved in 4 years ago is starting to become more and more a reality and I couldn’t be more excited to get it all done and enjoy it!

Growing Strawberries Vertically with Strawberry Straws

Yesterday I shared the progress our crops have made in the green house during it’s debut season.  You may have spotted a unique strawberry planter in the background of several of those shots.  Today, I’m giving you a closer look at how those went together and are performing.

We started with a simple 4″ black pipe that the Hubs added a cap fitting to one end and drilled holes in on one side.  He then fastened them in the two corners of the green house where we don’t have the hydroponic shelves using simple clamp bands.

Here’s how they looked after they were put together and installed in the green house.  He kept the bands loose enough that I could still pull the tube back out to plant it, which sure made planting them much easier!

I love that they don’t take up any floor space in the green house.  Their placement on the wall in the corners make great use of an awkward space that wouldn’t work for other crops.  And it keeps the berries from sitting on soil where they could spoil as they ripen.

Once they were planted I realized I needed a way to water each hole of the planter without washing away the dirt each time.  I’d seen several versions of these planters on Pinterest where they placed a second smaller pipe with drain holes along it’s entire length inside the large tube so water would seep out along the path of gravity.  I’ve tried this system before with other set-ups and not had great luck so I decided not to go that route.  Instead the Hubs helped me create what I dubbed ‘strawberry straws’ – simple PVC pieces tucked into each hole near the roots of the plant.

They were super noticeable at first when the plants were small, but as they’ve grown the white ‘straws’ start to blend in with the flowers on the plants themselves.  And as you can see they are working great!

We’ve now got two of these vertical planters in the corners filled with strawberries and are starting to see blooms which give way to the developing fruit.  Hopefully we’ll have an edible crop to enjoy very soon!

And if they produce a decent harvest this year I may have the Hubs figure out how we can fit two tubes into each corner next season!  I’ll let you know when we get the opportunity to enjoy the fruits of our labor. 🙂

Save

Save

Save

A Green House Update

I’ll be sharing updates on the projects that have been going on while we were offline for the next several weeks.  So let’s jump right in with an update in the green house!  Temps were staying above freezing by mid-May so I went ahead and planted everything I could but kept it all in the green house as a safeguard against overnight frost.

During that time I tested out a DIY hack for heating the green house I got from a local gardening club – a crock pot of water!  It not only provided a bit of heat inside the structure it helped increase the humidity for the plants once I got things started.  It worked really well so I plan to do the same thing again next year, although we also picked up a small heater for next season at a garage sale recently.  I also ran a humidifier in the green house for several weeks to help the plants get off to a strong start.  That’s another little DIY I plan to do again next season.

Here’s how things looked at the end of May.  My much planned layout was working well – getting the food crops started and providing a bit of room for my flower pots to wait out the slow to arrive summer weather, including hanging baskets I put together myself with geraniums and lobelia.  I snagged the baskets at Lowes for just $5 each and they came with the coconut liner, so even with the cost of the plants and dirt they were a far better deal than the crazy expensive ones the stores and nurseries put together – most of which have color or flower combos I’m not keen on anyway.

The freebie metal bed frames I scored last season fit perfectly behind the tubs to serve as a trellis for the peas and green beans.  Since I could only get a couple of the plants along the back side of the tub I put a couple along the front as well and the Hubs cut me a couple extra pieces of heavy gauge fencing from some scrap we had sitting around to create a mini trellis for the other side.

I didn’t  realize just how much I had packed into this space until I started moving the flowers out to the deck and yard and suddenly had a lot more room – that is until the food crops really got going!  The Hubs installed a water barrel in the corner for easy watering and started putting together a hydroponic system for the tomatoes but got sidelined with our trip, so we’re just now finishing that project up.  I’ll share the details of that set-up soon.

Although not everything made it through the transplant and adjustment period, a good majority did and things are growing well now.  Here’s how things are looking now!

Not bad for our first season with the green house and learning the ropes.  We’ve already enjoyed peas and lettuce from our efforts several times and look forward to plenty more before the summer is over.  Tomorrow I’ll share a closeup look at the vertical space-saving strawberry planters we’re using and the DIY solution we came up with to water them, so be sure to check back.

Save

Getting Back on Track & Putting Old Glory Back Together

It’s been quiet here on the blog for several weeks because life decided to jump the rails and train wreck my schedule.  A HUGE project at work went sideways the first week of May, requiring me to help out in another department plus do my regular tasks to coordinate several events, including our largest customer event of the year. The Hubs and I have been working on several projects around the house and then we were out of town to visit family over the Memorial Day weekend, which required a bit of prep and catch up afterwards.

In the mix of all that I had a full line-up of photography clients and then attended a photography workshop the first week of June, which gave me a whole new set of goals to work on as well. We also lost a close family friend and a family member to cancer over the Memorial Day weekend, which shifted our perspective to enjoying the days we are given rather than the to-do list.

July is set to be full of opportunities for just that, with my sister and brother-in-law visiting for the 4th, us visiting with the Hub’s cousins in Kenai mid-month, the Palmer Garden Art Faire and a vintage market on the calendar. We are also planning a trip to Iceland and possibly Scotland to tie in with our trip to D.C. for my nephew’s wedding this fall!

1As we celebrate Independence Day, I thought it was a perfect time to share this quick little project I did with a rustic flag decor piece.  I’ve had this metal flag wind chime for years and the original metal fasteners had worn out causing the stripes to fall off the main support rod.

3Since the pieces themselves were still in good shape, I knew I could put it back together fairly easily.  I originally planned to use twine for a rustic look, but the holes were too small, so I pulled out some thin gauge metal cording from my crafting cart and replaced all of the joints.  It only took a few minutes to re-do all the connecting points and the hardest part was not poking myself with the end of the wire.

2And here she is, all updated and ready for several more years on display.  I don’t currently  have a spot for her so she may end up in the sale pile, but I’m sure someone else would appreciate her rusty glory as much as I do.

I hope you all had a safe and happy holiday.  We spent the day watching our fellow Alaskans launch cars of a cliff in Glacier View with my sister and brother-in-law in tow on the first day of their Alaskan vacation.  It was a great way to celebrate our independence and create unique memories that will last a lifetime. 🙂

Save

Save

A Revamped Freebie Planter

Anyone else amazed that it’s already May?  We’re just flying through this year, but at least it’s almost time to start planting and getting our yard ready for the summer season.  Here in Alaska the temps are still pretty chilly overnight so I don’t dare plant anything outside just yet, but that doesn’t mean I have to sit around and wait.  I’ve been cleaning up the flower beds, looking for signs  of life from my perennials and getting my plan for where things will go together.  That plan includes a few new pieces like this freebie planter I got from someone I bought another item from.  They were moving out of state and were purging items so she said just take all the pots and planters on the porch too!  I was all too happy to help!

The other pots in the freebie group didn’t really suit my style so I grouped them with other pots I no longer needed and traded them on the buy/sell page as part of a deal for another item I’ll share on the blog soon.  But I had a plan for this little gem.  While the bright orange was cheerful it needed a new coat of paint and I knew it would have a classic farmhouse style if I painted it ORB.  So the first sunny day I had time I drug her out in to the driveway and sprayed away.  Here’s how she looked after!

Luckily I’d been hoarding saving a large planter liner for quite some time and it was a perfect fit!  Since I already had the spray paint and liner the only cost I had for this project was the plants I’ll be putting in it!

Now she’s all ready for summer in the front flower bed.  I’ve got two Bacopa set aside just for her.  She also hides the cord that comes out of the garage wall in this corner – which will all but disappear once the plants start to grow and trail over her edges.   One planter down, and a few more to go before the weather cooperates and it’s time to plant! 🙂

Shared on Savvy Southern Style’s Wow Us Wednesdays and Knick of Time’s Talk of the Town.

Save