Merry Christmas, Happy Birthday and Happy Anniversary – All in one!

EggTable

I decided to splurge a bit and get the hubs something special for Christmas so I had a handyman build a table to fit his big green egg BBQ based on the design he’d drawn up several months ago. Although he planned to build it this summer when we start working on the yard again I knew he’d never get to it with all the other projects we I have planned. Hopefully it also serves as an inspiration for all those projects!

It ended up being a bit more expensive than I originally expected, but it will get lots of use and since I told him it’s a Christmas/Birthday/Anniversary gift he isn’t expecting anything else until next Christmas! LOL

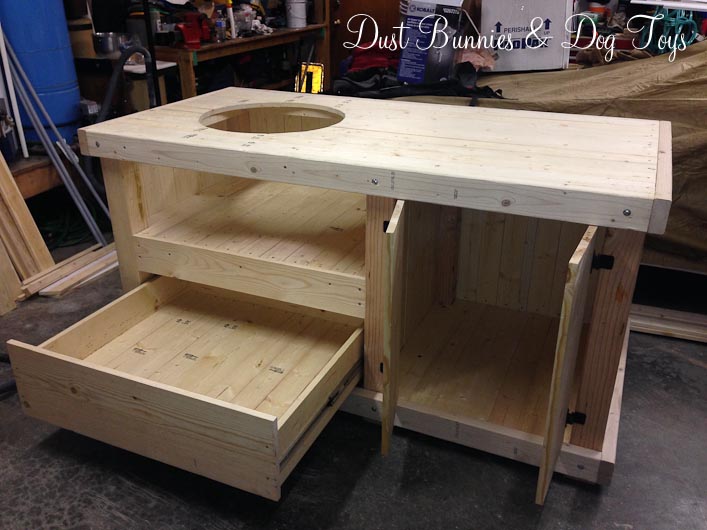
I asked the handyman to leave the wood unfinished so the hubs can decide if he wants to paint or stain it, which lets him still have a hand in “making” it. He’ll also add some large casters to the legs, just like he did for my craft cabinet, so the almost 200 lb. egg can be moved around the deck easily. In addition to using a patio paver from our current stash as a thermal base for the egg to sit on, he can put one on the top as a trivet for any hot plates. And maybe down the road he’ll add some fold down extensions on the sides for extra workspace.

But the best part is that there’s now plenty of out of sight storage for all the accessories that have accumulated since we got the egg, including room for the not-so-lovely deep fryer burner and propane bottle! I’m secretly doing a happy dance over that fact. 🙂

I’ll share more photos of it once everything is finished, organized and in place, but it might be a while due to our longer than average winters in Alaska.

The Cutest Pumpkins EVER!

3

Remember, last week when I said I had a little décor project to wrap up on the porch? Well, it’s finally done and I’m ready to share it with you! Wa-La! The cutest pumpkins EVER! At least to me anyway. 🙂

Painted

Besides being adorable, they were super easy to make. First, I spray painted some scrap pieces of 4×4 left over from our fence project. A couple coats of orange and they were looking like very square pumpkins. Now they just needed stems, so I went stick hunting in our woods, much to the dogs delight.

Sticks

I let my pile of sticks “dry out” on the porch for a few days, ok, weeks – which caused several of them to fall victim to puppy playtime. But I digress. Once I deemed them “dry” I chose a few with interesting texture and curves and marked off sections for the hubs to cut. Yes I could have done it myself, but have a bad history with sharp objects so he came to my rescue.

Stems

Once I had all my stems ready to go I tested them out on the different bases and decided the combinations I liked best. A little hot glue and presto, stems!

During

Cute as they were at this point I felt like they needed a little softening, so I dug out some orange raffia I found at a yard sale long, long ago and tied some around the base of each stem. BAM. Delightful, rustic, recycled wooden pumpkins! On. my. porch!

0

They are the perfect finishing touch to my other fall decor on the front porch!  Apparently Mother Nature didn’t agree because she added some little touches as well… LOL.

4

Feathered friends

Ptarmagain2
We’ve had some pretty feathered guests in our yard recently, including this beautiful spruce grouse who I originally thought was a ptarmigan.  I’ve seen him several times, but wasn’t able to get close enough for a picture thanks to my rambunctious children.  So this time I left them in the house and slowly made my way down the driveway where he was foraging on the seeds and cast off by the trees during fall.  He didn’t seem concerned that I was getting closer and when I sat on the bench by the garden he actually moved even closer.

Ptarmagain
Eventually he moved into the woods and flew up into a tree where I couldn’t see him anymore. But while looking for him, I spotted this guy pecking away at our birch trees.
Pecker
I think this is a downy woodpecker, the same species of bird I saw in the back yard of our rental in Anchorage last year but can’t be certain.  Whatever he is, he was pretty darn cute and very industrious.  He worked his way up to the top of one tree and then flitted to the next to repeat his peckish ways.
 Pecker2
Eventually he did visit my nearby suet feeder, which I was glad to see getting some use.  I think offering a few feeding stations encourages the birds to visit and eat those pesky insects who are almost the same size as they are!  Which is why I’ll be keeping the feeders stocked all winter, because if they know there is a reliable food source they will hang around and nest here, creating another generation of eaters to battle the insect population that is bound to return after winter.
 Pecker3

Our Big Massive Shed Update

Finished

The hubs has been working very hard the last few days to get this project finished and just has a few details left to wrap up.   There were a few hiccups in the process, but it looks amazing, especially since he did it all by himself.

1

2

3

4

Luckily, now that the roof is complete and the siding is up, except one spot in the back wall, he can start taking things out of the garage and putting them in the shed. Which means I’ll soon be able to park in the garage again – something I’m very excited about with winter snow just around the corner.  And now that it’s done we can start cleaning up the job site.  All the debris and tools laying around has made me twichy the last few weeks, so I’ll be glad to get everything organized and tidied up before winter sets in.

5

Finished Inside

There is one spot on the front above the door where he pieced together two scrap pieces rather than buy a whole extra sheet of siding, so he’s going to caulk that seam to make it less noticeable.  Then he plans to add some trim over the siding joints and around the corners to finish things off.

Finished 2

Another big project checked off the ever expanding to-do list.  Now he gets a little breather, before we tackle another. 🙂

Constructing A Massive Storage Shed

Even though we have a three car garage in our new home there still isn’t enough room to park our two daily driver trucks, my classic truck and our side-by-side and still fit all the things that tend to end up stored in the garage.  To solve this problem the hubs decided to build a shed.  But this isn’t just any lil ‘ol shed.  It’s a mega shed.  Seriously.  It’s 11′ wide by 20’ deep!  But it has to be pretty big to house the lawn mower, yard tools, our side-by-side and various other odds & ends.

I don’t have much of the step-by-step info since he’s been doing the construction solo while I’m busy crafting, cleaning and editing photos but hopefully these pictures give you a good idea of the basic framing and set up.  He started with freebie I-beams that were headed for the dumpster at a job site to lay out the base of the shed. Because the location of the shed was a bit uneven, he used cinder blocks we had on hand under the subframe on one side to make everything level.

1

The I-beams were topped with a layer of plywood and OSB so the floor of the shed has a solid surface and additional strength.  Next he framed up the walls, figuring out the angles needed to create the pitched roof line.  The side walls were made in two panels.

2

Once those were ready I helped raise the walls and held them in place while he nailed them in.  That’s when you start to get a sense of just how big this thing will be.

3

The side closet to the house will be taller than the far side, which should help reduce snow build up during the winter and eliminate any water build up during the rest of the year.

4

He’s now moved on to framing the roof and adding the clear panels which will let in natural light.  Both sides of the roof have a bit of overhang, which should help keep water away from the base of the shed.

ShedRoof
That’s the progress thus far.  He’s hoping to get it finished and filled before winter hits, but we’ve already had one snow (as seen in the first pictures) so who knows how long that will be.  I’ll post another update once we have some more progress to show, so stay tuned!


He’s added supports between the rafters for additional strength.  After the first few rows he had the ingenious idea to use left over pieces of the I-beams to save the more costly wood for other areas.

ShedRoof2


Slinky + Embroidery Hoop = Peanut Squirrel Feeder!

Done

When we first put the bird feeder out we had a kamikaze squirrel who took up residence on the branch it hung from and kept up a constant chatter to proclaim his turf.  Of course he only wanted the sunflower seeds and would knock everything else out of the way to get to them, thus most of my bird seed mix ended up on the ground wasted.

I quite enjoyed watching his aerobatic endeavors and didn’t want to shoo him off, so I decided to make a feeder just for him.  I’d seen metal hoop peanut feeders for WAY too much so I scouted Pinterest until I found a DIY version using a slinky, which I just happened to have thanks to the $1 zone at Target.  I picked up a small plastic embroidery hoop at Michaels for  few buck with a 40% off coupon and paired the two together with a key ring to keep the two ends connected. It was that simple.

FeederReadyCloseup

Although she didn’t offer any assistance or guidance, Luna supervised my work and gave it a good inspection before it was filled.

FeederInspect

Since I used a small slinky and hoop, I only needed about a half bag of peanuts to fill it completely.

FeederPeanutsNow that the fence was  mostly done I added my plant hooks and hung the feeders from the raised posts.  This gives Luna the perfect vantage point to supervise who visits each feeder.

LunaWait

And safely watch what her siblings are doing without being in their midst!  It is pretty funny watching her get to this lookout though – since she can only jump high enough to get her claws in the top board.  After that she gets an ab workout hauling herself up.

Luna

I’m sure these hooks were intended to be used with the flat side as the top, but it felt more secure to have the hook curl over rather than under.  And I’m pretty sure that the birds and other critters partaking in the buffet won’t give two hoots which way they sit.BirdBathI haven’t seen squirrely squirrel back since I put the feeder out and no one else seems to appreciate my handiwork just yet, but I’ll leave it out because soon their food sources will grow scarce and they’ll  be on the hunt for yummy things to stash away for those cold winter days. 🙂


I’MMMM BBAAAACCCKKK!!! :)

Hi, remember me?  Yeah, I’m the crazy gal that writes this little ‘ol blog.  I’ve been uber busy with regular life recently and haven’t had a chance to share anything in weeks.  During that time, I made a business trip to Juneau that included a little personal time with the hubs who tagged along to play chauffeur.  I’ll share some of our exploring soon, but for now here’s a quick update on our hydroseed.

1

Things are looking nice and green, providing the perfect contrast for the falling leaves, which I personally love and have no intention of raking unless I’m going to jump in the pile.  Although some spots are definitely thicker than others we are pretty pleased with how things look.

3

5

The area just off the garage is obviously the most lush.  We didn’t do anything different here than any of the other areas, so maybe it’s just better tilled soil here since those tubes mark the location of our septic tank which required excavation and fill during constuction.

2The side of the house is probably the sparsest section, but it’s also the area with the worst drainage.  Hopefully the patches that have taken root will reseed and fill in the bare spots as things come back in next spring.

4

These shots were taken just before we took down the dog run and gave the fur babies free reign of the yard.  They absolutely love having such a large area to romp and did just that ALL DAY for the first two days.  That made for very tired puppies and a very quiet evening. 🙂

The hubs still needs to get the gates made and installed, but things are secure enough to keep the kiddos in and other things out for now.   The gates can wait until he finishes his priority project – building a fairly large storage shed before winter hits so we can clear out the garage and reclaim our indoor parking before we have to bust out the ice scrapers pre-commute.  We’ve already had a few mornings with frosty windows so it won’t be long.  Eventually that shed will convert into a greenhouse when we build a big “shop” elsewhere on the property.  I’ll share some of the construction and organization once it’s done, so stay tuned!