Floor Scratch Removal

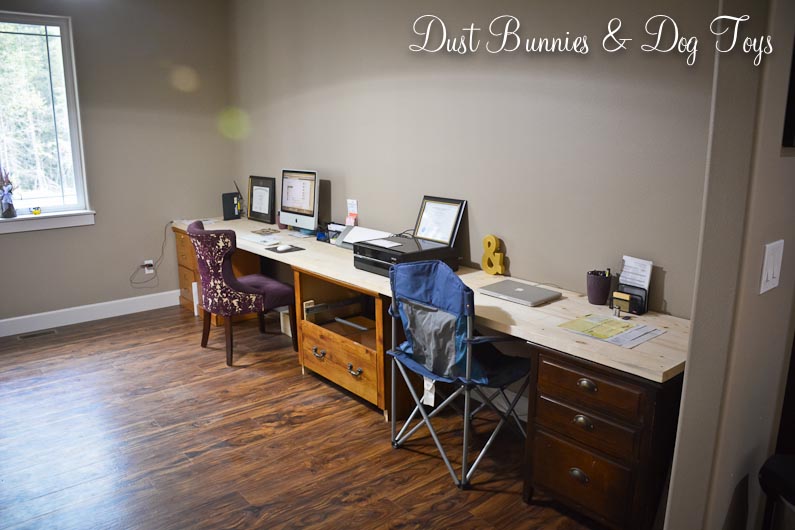
So remember that folding camp chair the hubs was using on his side of the new desk? Well it’s metal feet under the hub’s manly frame wasn’t very friendly with the floor…

FloorScratches2

FloorScratches

Luckily, I have a secret weapon, a wood stain pen.  Although I purchased this to disguise any little dings on our kitchen cabinets, it works just as well on the floors and furniture.

FloorPen

I actually first used it on the bathroom floor after the hubs installed some molding at the bottom of the cabinet and his drill left a sizable divet in one of the planks.   I just colored it in with the pen and let it “soak” in.  Now that spot just looks like a small knot in the wood.  Of course you can find it if you really look for it, but because it blends in no one ever will. 🙂

In the office, I cleaned the floor so there wouldn’t be any dirt or dust in the scratches and then lightly ran a fingernail over each scratch to take off any small rough pieces of the vinyl left behind.  Next I just colored on the floor.  Literally, I just squiggled across each area and then drew a line over any scratches that extended outside the main group.  I let that sit for a few minutes then wiped off the excess with a rag.  Here’s the end result.

FloorDuring

If you look really closely, you still might spot a few of the scratches, but if you were to walk past this area you’d never notice anything that would make you stop and look.  That was the exact reason we chose this flooring material.  It’s tough, so it’s scratch resistant and even when we do manage to scratch it, I can correct the problem quickly and easily!

Coat Check

2

Now that cooler temps have arrived the hubs and I are both wearing a coat each day. And those coats usually end up on the backs of our dining table chairs or barstools each evening because it’s a convenient location to leave them as we arrived home from work. It’s not a big issue, it just looked messy, which bugged me so I decided to figure out a solution.

Our laundry room is just off the garage so we pass through it every time we enter and leave the house. Although I’d love for this room to pull double-duty as a mudroom too, there isn’t enough room for both functions. But keeping our coats in check would be a nice compromise!

The idea initially came to me when I spotted a simple board with hooks on it for sale on one of the buy/sell pages for $10. Although I contacted the seller several times, she wasn’t responsive and then the ad just disappeared. I decided to look for something similar at local retailers and found one at Lowes for $28. A little more than I wanted to spend, since I could have had one for $10, but still not horrible.

I wanted to make sure it would be able to hold a bit of weight since we would be hanging coats on it, so the hubs broke out the stud finder and located the studs on the wall wall between the door to the garage and the door to the dining room.   A couple of screws and it was up.

1

It works perfectly, just enough room to hang a couple coats and my purse.  One day I might re-do this whole wall in board and batten with hooks farther apart, but for now this serves the purpose.

3

Our Massive DIY Desk – Part I

From the moment we signed the contract to build our home I envisioned a massive wall-to-wall desk in my office/studio, with enough room for both the hubs and I to have workspace.  But that wasn’t a high priority project, so the DIY desk we fashioned from a freebie door and two filing cabinets while in the rental was serving the same purpose at the new house.  It was certainly functional, but definitely not anything amazing.

DeskBefore

After moving into the house we’d purchased a few other filing cabinets to serve as the bases for the rest of the desk, but they sat collecting dust in the garage for months.  Then, a few weeks ago the hubs decided it was time to make room in the garage get this project rolling and purchased wood for the desktop.  He brought in the other two filing cabinets and then lined up the wood planks to form the top.

DeskSwap

At some point we took the top drawer out of one cabinet and Luna decided that was the perfect hiding spot, at least until she realized it was right at doggy viewing height!  Tequila was very concerned that her kitty was trapped in the cabinet. 🙂

DeskPrep

The hubs had prepped the boards with small biscuits to create joints between the planks.  He also predrilled counter-sunk screws down the length of the boards.  The combination of the biscuit joints and the screws make the entire top a sturdy and solid piece.

DeskBiscuit

DeskScrew

Here’s the new set up!  As you can see the desktop doesn’t go all the way to the wall on the near end, but that leaves room to install the sliding barn doors in the future which will allow me to close off the studio for clients when needed.

DeskCurrent

We still need to add molding around the bottom of the two new cabinets, add a pull-out shelf to the middle cabinet for the printer to sit on, paint all the cabinets white, stain the top and then install shelves above the desk for storage, but for now it’s just nice to have a little extra room for us both to work.  I’ve since found a new chair to replace the camp chair on the hub’s side, thanks to a great deal at Target.  Watch for a post on that soon!

I’MMMM BBAAAACCCKKK!!! :)

Hi, remember me?  Yeah, I’m the crazy gal that writes this little ‘ol blog.  I’ve been uber busy with regular life recently and haven’t had a chance to share anything in weeks.  During that time, I made a business trip to Juneau that included a little personal time with the hubs who tagged along to play chauffeur.  I’ll share some of our exploring soon, but for now here’s a quick update on our hydroseed.

1

Things are looking nice and green, providing the perfect contrast for the falling leaves, which I personally love and have no intention of raking unless I’m going to jump in the pile.  Although some spots are definitely thicker than others we are pretty pleased with how things look.

3

5

The area just off the garage is obviously the most lush.  We didn’t do anything different here than any of the other areas, so maybe it’s just better tilled soil here since those tubes mark the location of our septic tank which required excavation and fill during constuction.

2The side of the house is probably the sparsest section, but it’s also the area with the worst drainage.  Hopefully the patches that have taken root will reseed and fill in the bare spots as things come back in next spring.

4

These shots were taken just before we took down the dog run and gave the fur babies free reign of the yard.  They absolutely love having such a large area to romp and did just that ALL DAY for the first two days.  That made for very tired puppies and a very quiet evening. 🙂

The hubs still needs to get the gates made and installed, but things are secure enough to keep the kiddos in and other things out for now.   The gates can wait until he finishes his priority project – building a fairly large storage shed before winter hits so we can clear out the garage and reclaim our indoor parking before we have to bust out the ice scrapers pre-commute.  We’ve already had a few mornings with frosty windows so it won’t be long.  Eventually that shed will convert into a greenhouse when we build a big “shop” elsewhere on the property.  I’ll share some of the construction and organization once it’s done, so stay tuned!


Our New Barstools

BarstoolsBack

While building our house I planned to use the extra chairs from our bar height table at the kitchen island bar so they’d be within easy reach if we needed to add a few seats.  Unfortunately, we soon realized that they weren’t high enough to be used at the bar unless we wanted every adult to feel like they were sitting at the kiddie table!  So the hunt began for a set of barstools.  I found an option at Target that I liked and purchased one to bring home and test out.  It turned out to be the perfect fit and was pretty darn comfy, but with a price tag of $117 each (Alaska price)  I wasn’t about to buy all the stools at once.  About a month later the chairs went on sale and I found that the store would price match the website, so I picked up another for around $90.  That gave us two spots to sit at the bar, which was enough for us, but it drove me CRAZY having just two stools in this massive space for MONTHS.

A few weeks ago the stars aligned.  I found a Cartwheel coupon for 25% off bar stools which could be combined with a store coupon of $10 off a home purchase of $75 or more.   Added to the website price match and my 5% off for using my red card I came home with another three stools for under $75 each!  And they even loaded them in the truck for me!  I think I sang the happy song the entire day!  Those of you who follow me on Facebook probably saw my ode to Target that day.

The hubs assembled two and proclaimed that four was the perfect number of stools.  I thought he was saying that just so he wouldn’t have to assemble the final stool, but when I looked I had to agree.  You read that right.  My husband was right.  Five stools would be too crowded.  So not only was he right, he saved us almost $75!  I knew there was a reason I married him. 🙂

Barstools

But the most important reason these chairs are perfect is that they sit just high enough that when Luna sits in one she can see over the counter.  I haven’t been able to get a picture of that in action, but trust me that it happens and it’s hysterical. Just imagine a little kitty face peering over the top of the counter in this shot…

BarstoolsFront

Hydroseed Update

Grass

It’s been roughly 4 weeks since we had the back yard hydroseeded and things are starting to look a little green out there – although still somewhat sparse.  It’s a slow process, especially since we had several days without rain and didn’t have time to keep the seed damp like the company said to. However, what is growing seems pretty hardy on close inspection.

GrassCloseup

But it’s still not ready for our heathens, er, furballs to be introduced. Hopefully, the current stalks will reseed and fill in the barren areas before winter hits, but if not it should at least give us a good start for next season.  And it’s still more cost effective than sod given the square footage we’re covering, even if it isn’t as instant.

Freshening Up the Fireplace

FireplaceBefore

Somehow I’ve lived in our house for the past 9 months and never really noticed that the stone on our fireplace still had installation dust on it – that is until it hit me like a 10lb brick to the face one day as I looked at the fire while watching TV with the hubs.

FireplaceStoneBefore

But once I noticed the white dust on several of the stones it became my obsession to eliminate it. The next day I filled a bucket with hot water mixed with vinegar and started scrubbing. I decided to focus on the lower right-hand side of the stone wall since that would be the least noticeable area if there was any discoloration from the vinegar and it would give me a good section to judge the effectiveness of my chosen cleaning method

I let the area dry and was pleased with the improvement, so I added “Clean fireplace” to my to-do list for the upcoming long holiday weekend. It wasn’t a complicated process, but it was time consuming because each time I scrubbed a stone I had to wipe down the wall next to it where the dirty water would splatter.

FireplaceStoneAfter

So last Saturday I gathered my supplies and proceeded to scrub, rinse and wipe my way across the fireplace, from top to bottom.  Although I started with fresh clean water and vinegar this is what I ended up with once the entire area was done. I was pretty amazed.

FireplaceBucket

I’m sure there’s a bit of regular dust mixed in that concoction since the stones have texture which provides particles a place to accumulate. I’m thinking this might need to be a new part of my annual deep clean, but that beautiful wall of stone is sooo worth it. Check out the difference in the before and after.

FireplaceBefore
Before
FireplaceAfter
After

All that pretty clean stone will be the perfect backdrop to my fall décor! Watch for a post about that soon.

Front Porch Rockin’

I’ve always loved the look of white rocking chairs on a front porch and I vowed when we started building our house that I’d have one on mine before long. I spotted several at the home improvement stores when the patio furniture displays went up, but wasn’t ready to pay $100+ for a rocker, so I kept my eyes open for a bargain elsewhere.

A few weeks later I found this wooden rocker on the local buy/sell page for $30. That seemed like a pretty sweet price, even though I’d have to sand it down and paint it white. So I brought it home and it sat on my porch all summer, just waiting for it’s makeover.

Rocker

I blinked and summer was over and I still hadn’t started the rocker’s transformation. But sometimes procrastination pays off. Just as I was starting to make my supply list for the project I spotted some outdoor rockers for sale on the buy/sell page. Granted the price being asked wasn’t a deal, but as I calculated the cost of the supplies to do the update I realized I wouldn’t be saving much by doing it myself – especially when I factored in the value of my time being diverted from other projects.  I decided to see if the store might have them on clearance yet and sure enough they did. The ready to assemble, already painted chairs were now $88 and with our military discount I got one for just under $80.

I sold the original chair for $50 within a day of posting it, so my total investment is just under $60! Still cheaper than the retail price and about what I would have spent to finish updating the first chair without hours of prep, sanding and painting.  The hubs did a fantastic job assembling the new one and now it’s looking lovely on the porch next to my lovely milk can side table. It’s a pretty impressive combo when you realize I got both for less than $125 and they will adapt to each season’s décor!

RockerNew

I’ve already enjoyed a few sits to enjoy the view of the mountain down the driveway – which is a MUCH better way to spend my time if I do say so!

A Pretty Spot to Sit

Several weeks ago we picked up two unfinished wood Adirondack chairs at the big box store. They were pretty as is, but needed something to make them stand up to the Alaskan elements since I don’t plan to bring them inside every winter.

ChairBefore

I had some teal outdoor paint leftover from a project I never got to when we lived in Kodiak, and thought they’d look awesome painted and paired with one of my many garden stools. Turns out I was right.

Chair

I added a couple of bright outdoor pillows from my ever growing stash and some potted oregano just for fun. The wooden stool came home with the hubs from work and makes a handy little table – or footrest!

Chairs

The ultimate plan is to use them next to the fire pit, but until that’s installed they are making the barren deck more hospitable – even in the rain. Oh and that metal thing in the back corner, that’s the cat’s access to the doggie door from the yard.  I can’t wait to no longer need that once the dog run is taken down!

Next year, I plan for this space to be home for a DIY outdoor sectional that will store all the outdoor cushions and pillows during the off-season. And that pretty white cut-out stool will live between some lounge chairs on the master deck that will be installed next to the hot tub.  It’s an evolution, but I’m sure trying to make each stage as pretty as possible.

Let It Grow!

At last, the dirt patch we call a backyard is on it’s way to becoming a lawn! But it definitely took some prep work. After we installed the fence posts to mark where the yard would be, we cleared the space of sticks and large rocks to avoid having the mower kick up such things during the first cutting.  We also had to rearrange the dog run panels so they could still go outside, but stay off the seeded area.  Here’s what it looked like in preparation for the hydroseeding.

YardBefore3

YardBefore2

YardBefore1

And here’s what it looks like with the seed down!  Ok so, it’s not that different, but hopefully, that green coating will turn into a lush beautiful lawn over the next few weeks.

YardAfter3

YardAfter2

YardAfter1

Luckily, it’s rained on and off just enough since they sprayed to keep the seed damp, but not wet like they suggest.  The tech also suggested we lime the area, which we’ll do this weekend with a hand spreader.  The yard still isn’t totally level, but the lay of the land does let water drain away from the house, past the leech fields and out toward the natural gulley on the other edge of the property, all while “watering” the lawn in the process. Plus having a small hillside creates the perfect ‘bank’ for the dogs when they do the Puppy 500!  There was a section of rocks near the deck we weren’t able to get moved before they arrived, but we plan to add a little top soil over that once the grass gets established, which will help level

Notice the progress on the fence in the after photos?  Yeah, LOVING that!  The hubs does good work!  He still has a few sections to do and three gates to install, but we can get that done while we wait for the grass to start coming in.  The posts will be cut down and capped with these pretty copper toppers I found at the box store when it’s all done.  I may have him leave a few a little taller to accommodate hooks for bird feeders and such.

Once the lawn has come in and it’s tough enough for the dogs to be on we’ll take down the dog run panels and they will have free reign of the entire space.  The area they are currently using will become a pea gravel patio with a fire pit at the edge and a deck off the master to match the one the builder provided.  I also plan to put flower beds like the one along the side of the house around both decks to soften the edges.  The empty space on the other side of the house will become our garden, which will be fenced off so roaming wet noses don’t help themselves to the bounty of produce I envision having.  Of course a good chunk of that plan won’t happen until next summer, but that’s alright.  I know it will happen eventually and that’s what counts.