With Valentines Day just around the corner I thought I’d share my seasonal decorations. I kept things pretty simple, using what I already had, including multiple items I use as props for my photography mini sessions – as always, striving for items in my life to be efficient and pull double duty.
In the entry way I dressed up the large mirror with a burlap banner and added some pink, red and gold items to the entry table.
And next to the front door is my little holiday tree decked out with both red and clear glass hearts, Valentines themed ornaments and topped with cupids.
The TV stand got a little attention with flowers and hearts in an apothecary jar, paired with votives.
I also used a cute little heart cut out votive holder I found at a thrift store last year on the side table with some pretty purple and pink faux tulips in a mason jar. Unfortunately, during Stoli’s early days with us he decided that was his primary target of destruction, so the tulips are no more. I’ve since bought some cheap grocery store live flowers, which have lasted pretty well and still compliment the little votive. Somehow I didn’t take a picture of that, so maybe I’ll post one on Facebook later.
The mantel was the perfect spot for a heart garland and some pillar candles. I normally put the heart wreath on the door but I like it here better.
The dining room got the left overs. Some new felt filigree hearts on the lamps, and a rose petal filled basket that holds an XOXO piece I found in the dollar section at Target. Same as the LOVE piece on the mantel.
I really love how the heart looks on the lamp when it’s all lit up at night. And it’s pretty during the day too.
Lastly I put my “Love you more” pillow on the bench near the entry, just to give it a little something. 🙂
So that’s it. Sweet and simple, just like I said. What did you do for Valentines Day decor? Did you DIY something special, or work some bargain finds into a great display? I want to hear about it!
I have long been planning to get rid of the large doughnut dog beds we have and replace them with something more “visually appealing” and washable (a huge obstacle for my allergies). I considered a bean bag style bed since both of our dogs love to snuggle into the corners of the doughnut, but the ones I found online were pretty pricey and I couldn’t find a bean bag the right size in a decent price range locally. And as I’ve mentioned before I don’t sew, so making my own was out of the question.
Then I stumbled upon this idea on Pinterest and was sold. I showed it to the hubs, who also liked it and whipped up a ‘trial’ run version to see if our dogs would even use it before we went whole hog and replaced all their beds. That was about 4 months ago. We’ve been so busy with work and all the other new house projects that we haven’t finished the idea. But that hasn’t stopped us from putting it to use in the meantime. At first I just put the doughnut bed inside the frame, which was built about the same size to make the transition easier.
Soon after we moved into the new house I spotted some dog bed pads with removable, washable covers on sale at Fred Meyers so I snagged three. Body pillows were also on a BOGO FREE sale, so I got two of those to act as the back part of the bed. Although the body pillow fit snugly enough across the back to stay upright the pad was about 2 inches shorter than the width of the frame. The hubs claimed that was an easy fix, as he’d just take the frame apart and cut it down to size. That was about two months ago and it hasn’t happened yet. Like I said, we’ve been a tad bit busy.
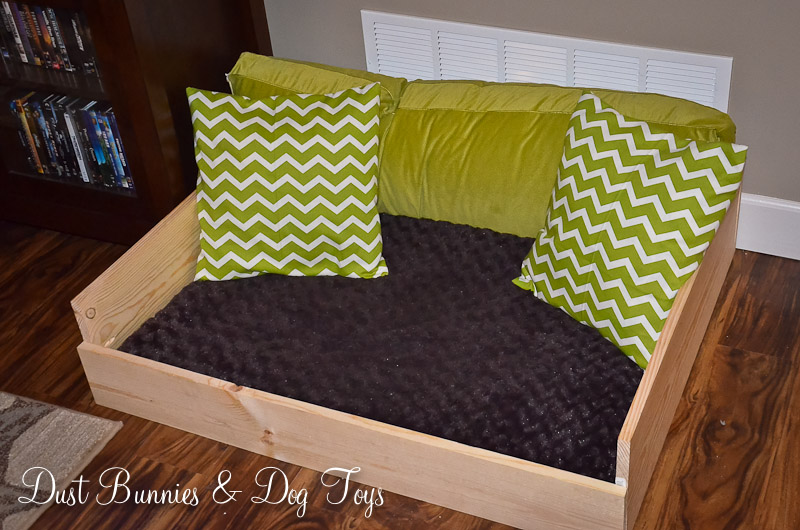
I added some extra outdoor pillows I had stashed away. I’ve found the mildew and stain resistance of outdoor fabrics work best for us since there is always drool, hair or dirt waiting to find our furniture. And when it does I can just pop it in the washer. Although the dogs loved the extra pillows and would often ‘arrange’ them to rest their head on, the pattern on them didn’t really work for me – which is why I’d stashed them away to begin with. Luckily, I snagged some cute chevron fabric on a super sale at Joanns and knew it would look perfect on the dog bed. Only 1 problem. I don’t sew.
But then a light bulb went off over my head and I decided to offer a trade in an online crafting group I had just joined. You sew me some pillow covers and I’ll make you something from my Etsy shop. I didn’t have any bites for a couple of days, but then out of the blue someone messaged me and said they could do it. I made arrangements to meet her and bring the materials to show her what I wanted. In exchange she wanted a family name platter, so I got all the details I needed to fulfill my end of the bargain. About a week later we made arrangements to meet again and trade. Here’s the result!
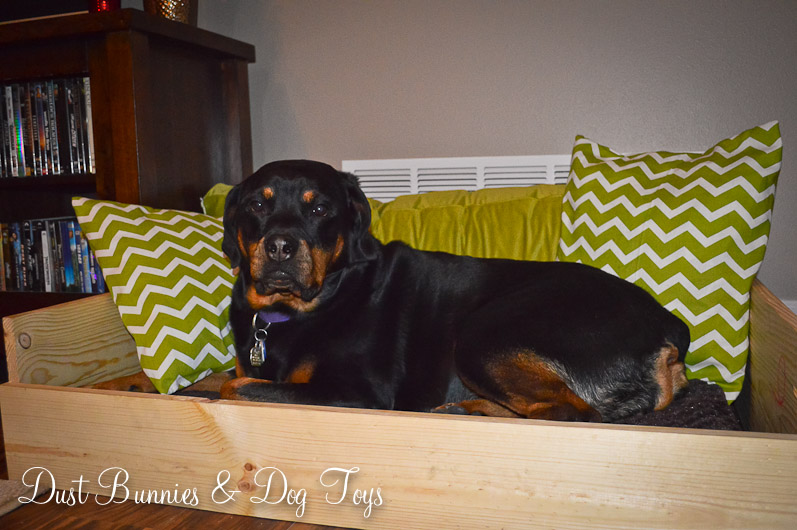
I didn’t take a before pic, but I can promise you they look SOOOO much better than they did before! We still have to resize the frame, get it painted and finish up the extra foam we plan to put under the dog bed pad, but for now the kiddos seem to appreciate having their pillows back.
Oh yeah, they’re pampered alright. Especially when you realize that most of the time they still sleep on the couch with their heads rested on the throw pillows there! But that’s how things roll in this doggie-friendly house!
Thanks to a great BOGO Free sale and gift cards from Christmas I recently finished up the pantry. Because I wanted to add some more baskets now that we had more room, I decided to replace the ones we’d been using since we were in Kodiak – which will be repurposed in the studio and the spare room.
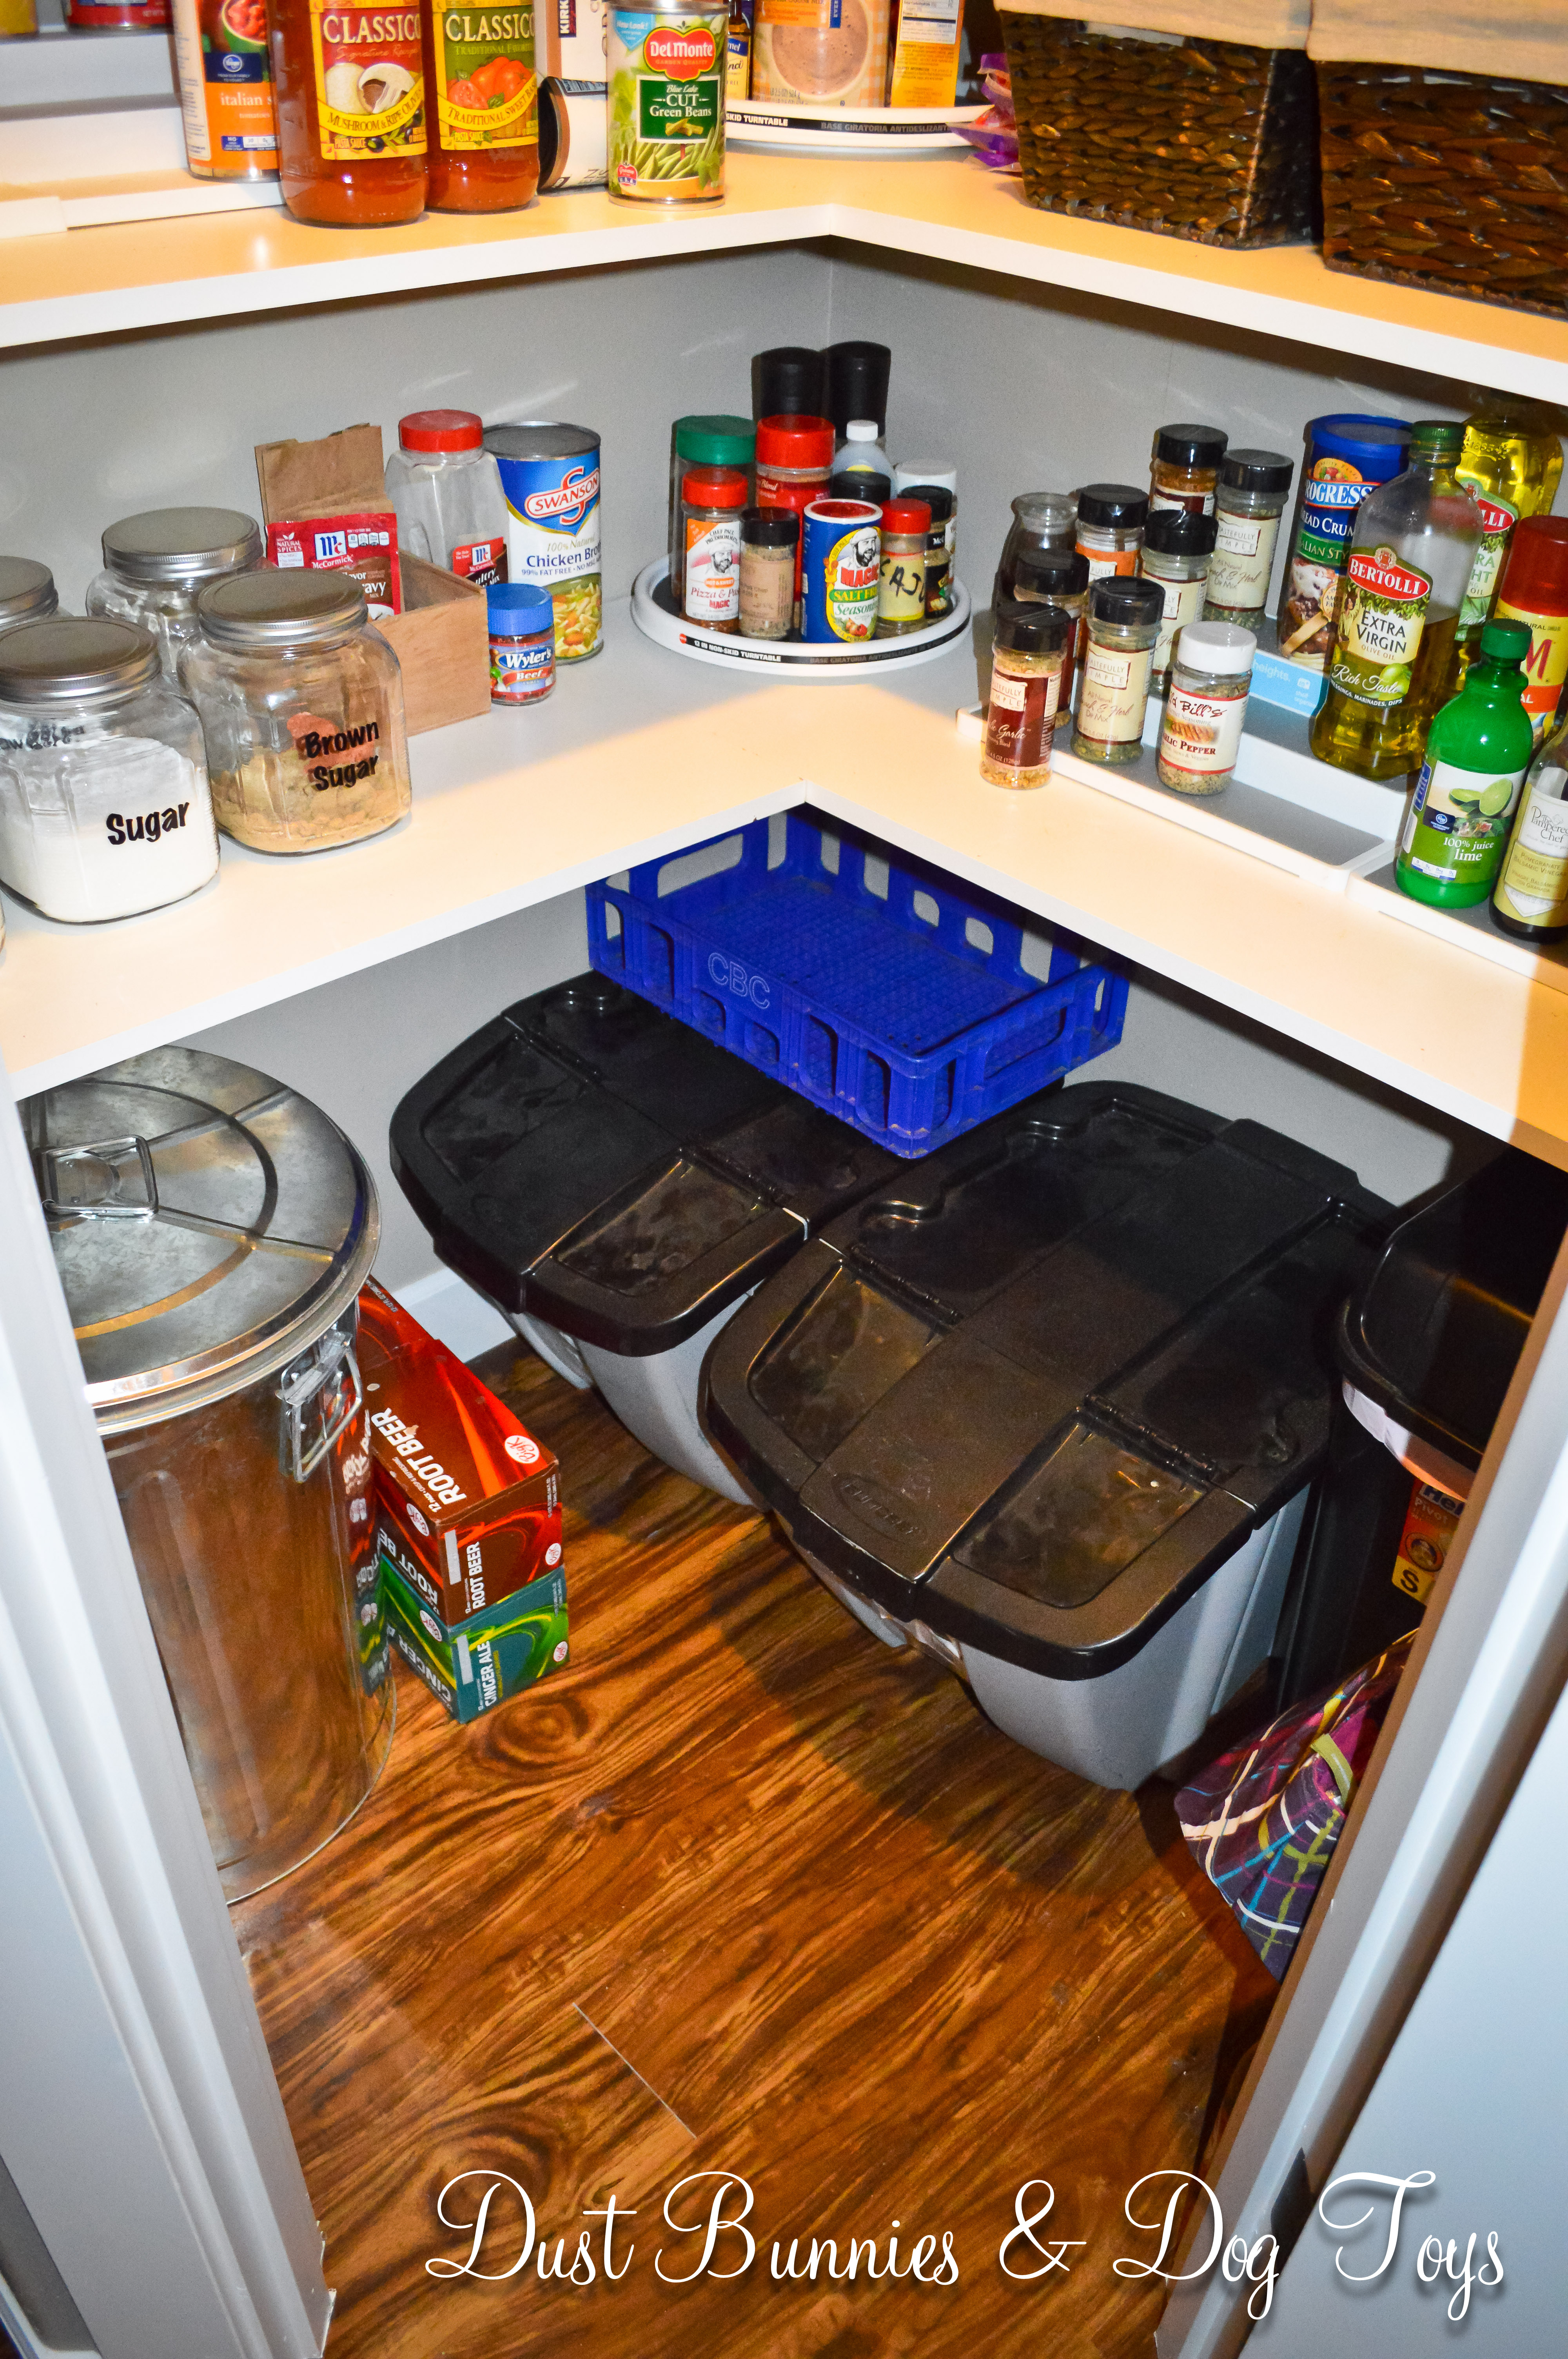
I also picked up some tiered racks for things like olive oil, bbq sauce, etc, and added a lazy susan next to it for the spices that didn’t make it into the spice rack.
Additional turntables in the remaining corners created accessible storage for drink ingredients, sauces and jellys.
The hubs made use of the wall space next to the door by hanging the cooling racks and fryer scoop.
Just like he did in the guest bathroom closet, the hubs added an additional light to the pantry for those items that are on the lower shelves.
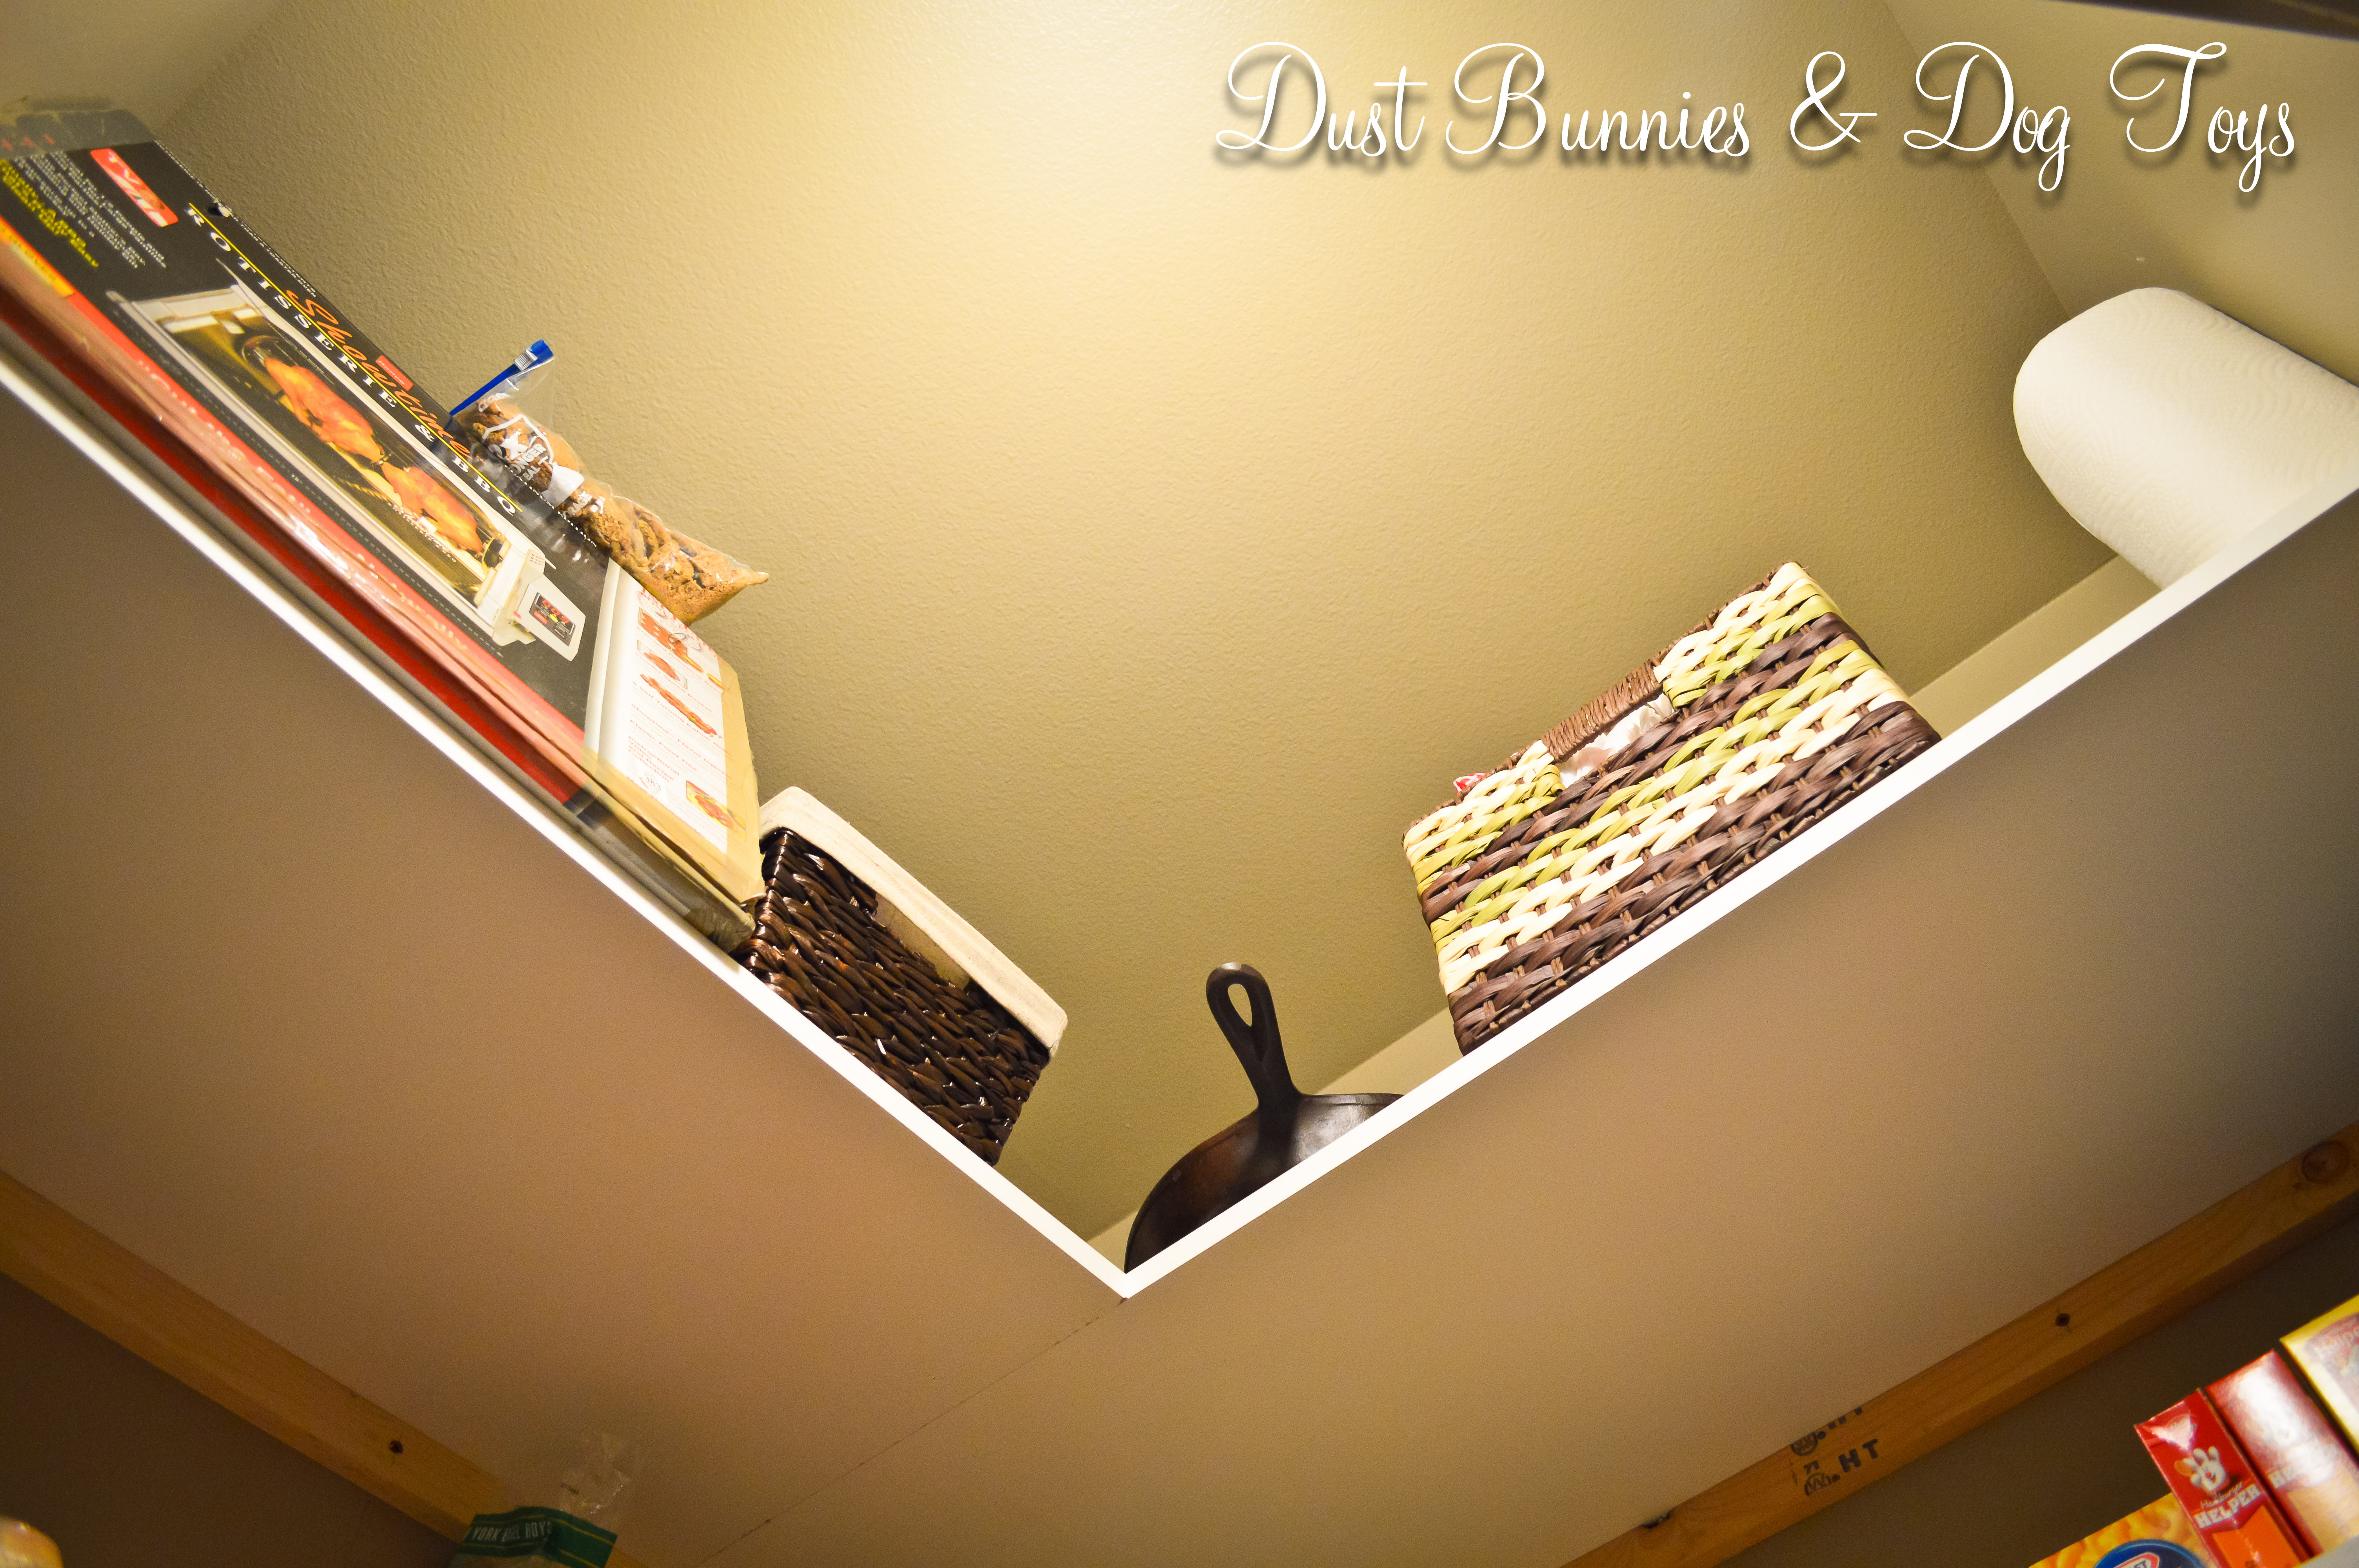
Up above there is room for the rotisserie, a basket with spare grease cans, the hubs’ cast iron pan, paper towels and a basket for storing plastic bags. I went back to get that big basket after the BOGO sale, and ended up getting a super deal because it rung up on clearance for much less than what I anticipated paying with my 40% off coupon!
The bottom of the pantry became home to the dog food and recycle containers, with room left over to store my soda habit.
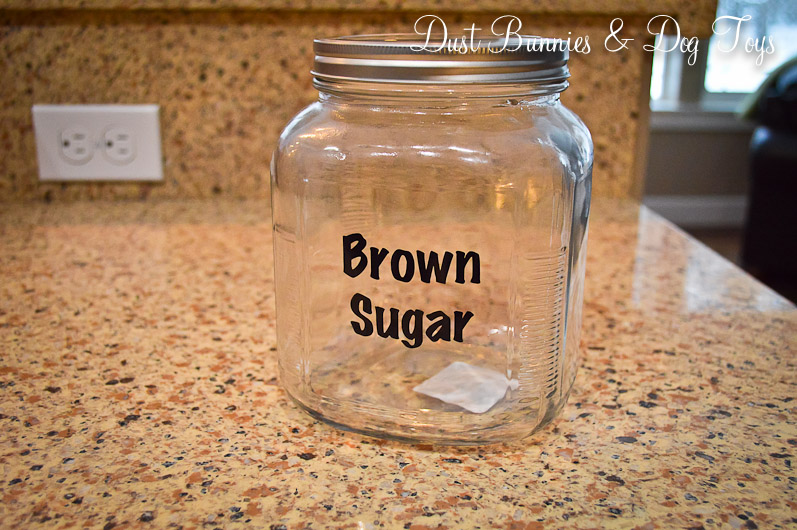
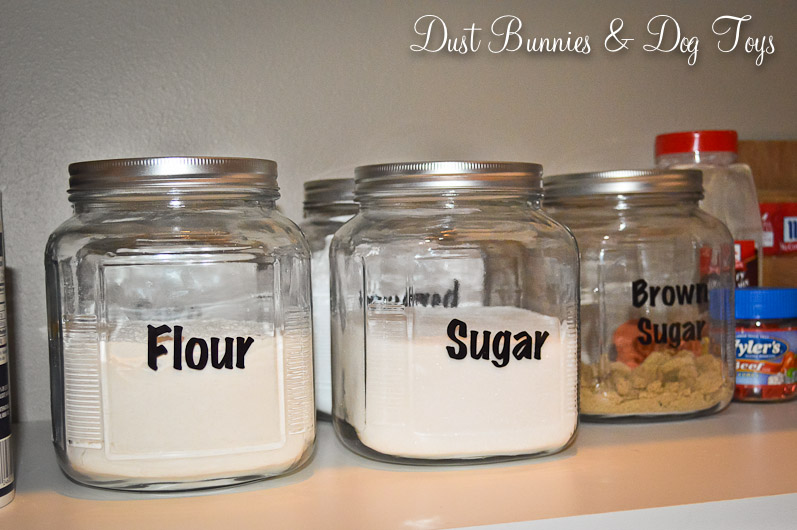
My final pantry project was the jars for our sugar, flour and other staples (seen in the picture above). It was a fairly simple project. I picked up several of these screw top jars on sale at Fred Meyers.
I put them right to use and had to come up with a quick temporary labeling system until I had time to make something pretty. So I grabbed my trusty dry erase marker and hand wrote each item. That of course didn’t last long.
Based on that, I knew I didn’t want to do the cute chalkboard labels I see all over Pinterest. Instead I decided to create vinyl labels for each with my Silhouette.
They turned out pretty nice! I love that they are easy to read and should hold up to repeated use. Plus they look pretty spiffy all together on the shelf.
And that’s our pantry. It’s the perfect marriage of organization and inventory, which not only makes me giddy, but keeps the happy as well. I think that’s a sign of a project well done. 🙂
As a hobbiest chef, my husband has LOTS of spices. We’re talking more than the tiny spinning thing on the counter can hold. In our old rental, he filled the cabinet above the stove and even had some rows double stacked!
So I knew that our new kitchen needed to have some way to organize this stash of spiciness and of course turned to trusty Pinterest, where I found this DIY pantry door spice rack. I then promptly had a Gru ‘light bulb’ moment. I showed it to the hubs, who was definitely game to build something that not only put his spices within easy reach of the stove, but also gave them a dedicated space to stay.
Please just ignore that tool pile on the counter behind the door. With all the on-going projects I’ve lined up for the hubs, I have set aside my twitchy OCD ways and agreed to keep tools in the kitchen for quick access – that is UNTIL the major projects are done, which should be fairly soon!
He followed the building plans with a slight modification. He used freebie paint stir sticks from the orange box store instead of dowels for the front retaining rungs. Told ya, he was smart! And he’s becoming quite the thrifty DIYer.. of course not counting the tools he’s recently acquired. 😉
I will probably paint it white at some point, but for the time being it works just fine a’ natural. Now if only our measuring spoons had cutesy little holes to be hung on the side! Mental note: be on the lookout for clearance heart measuring spoon sets after Valentines Day.
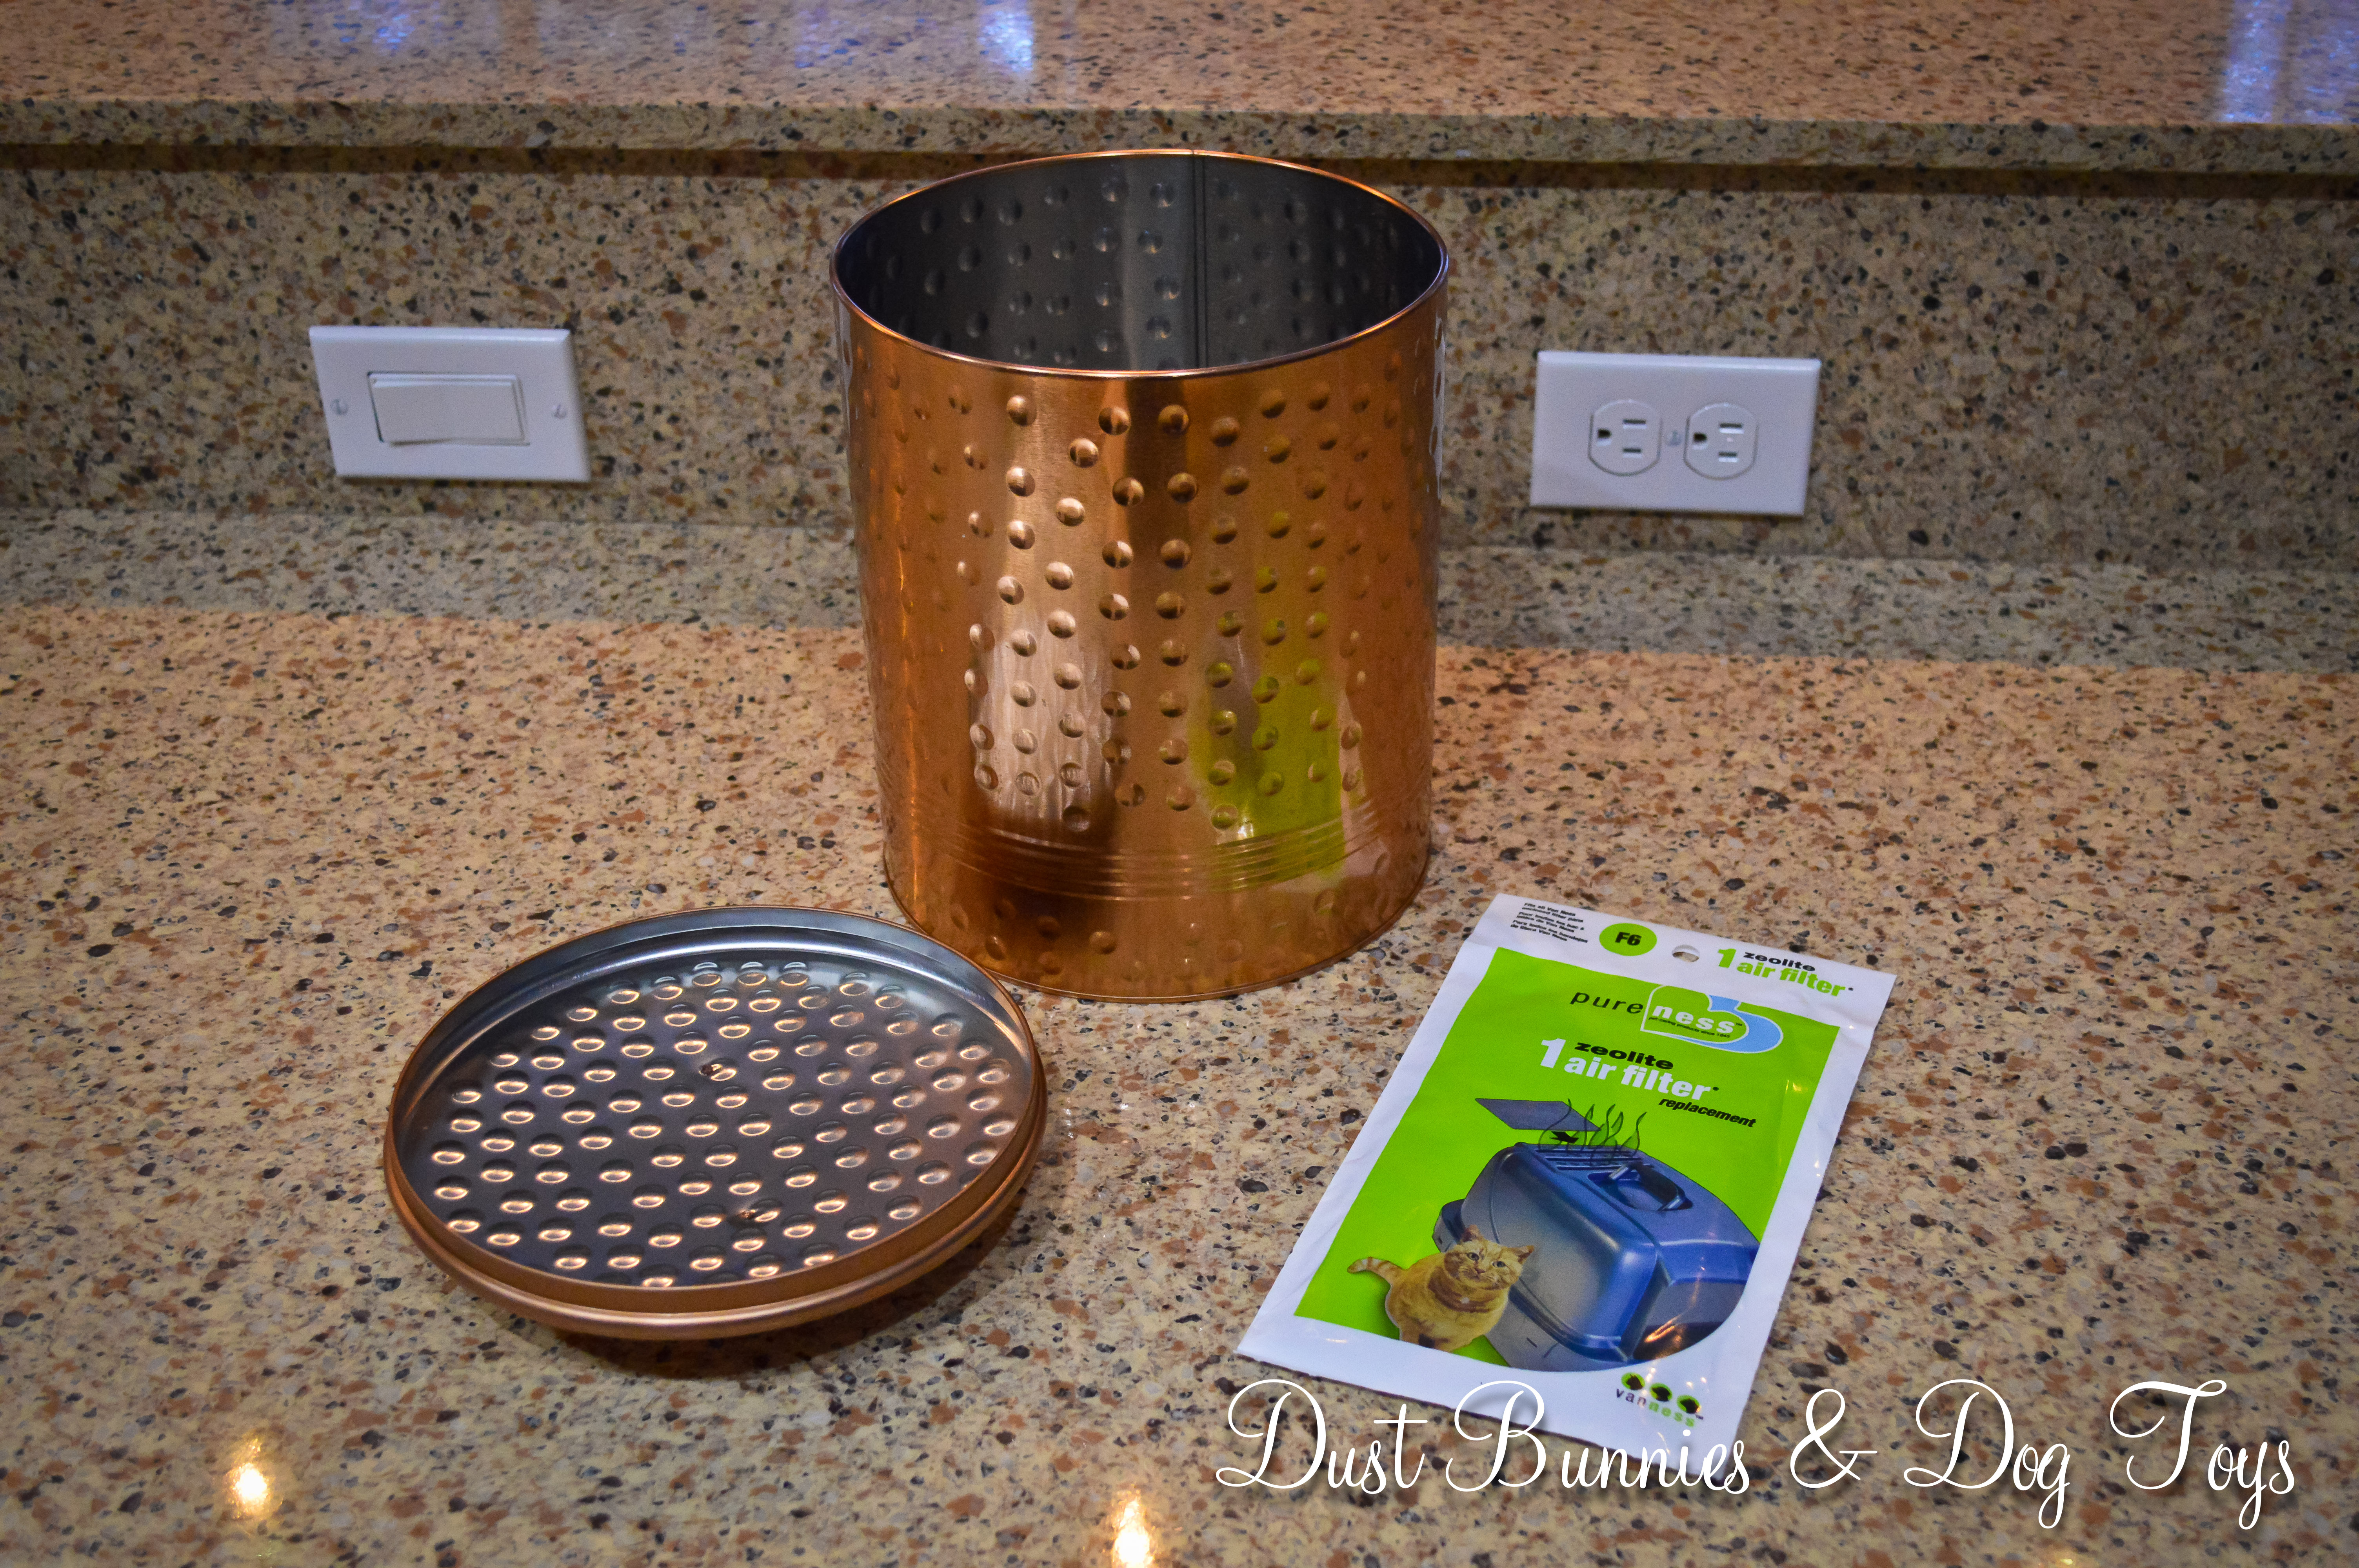
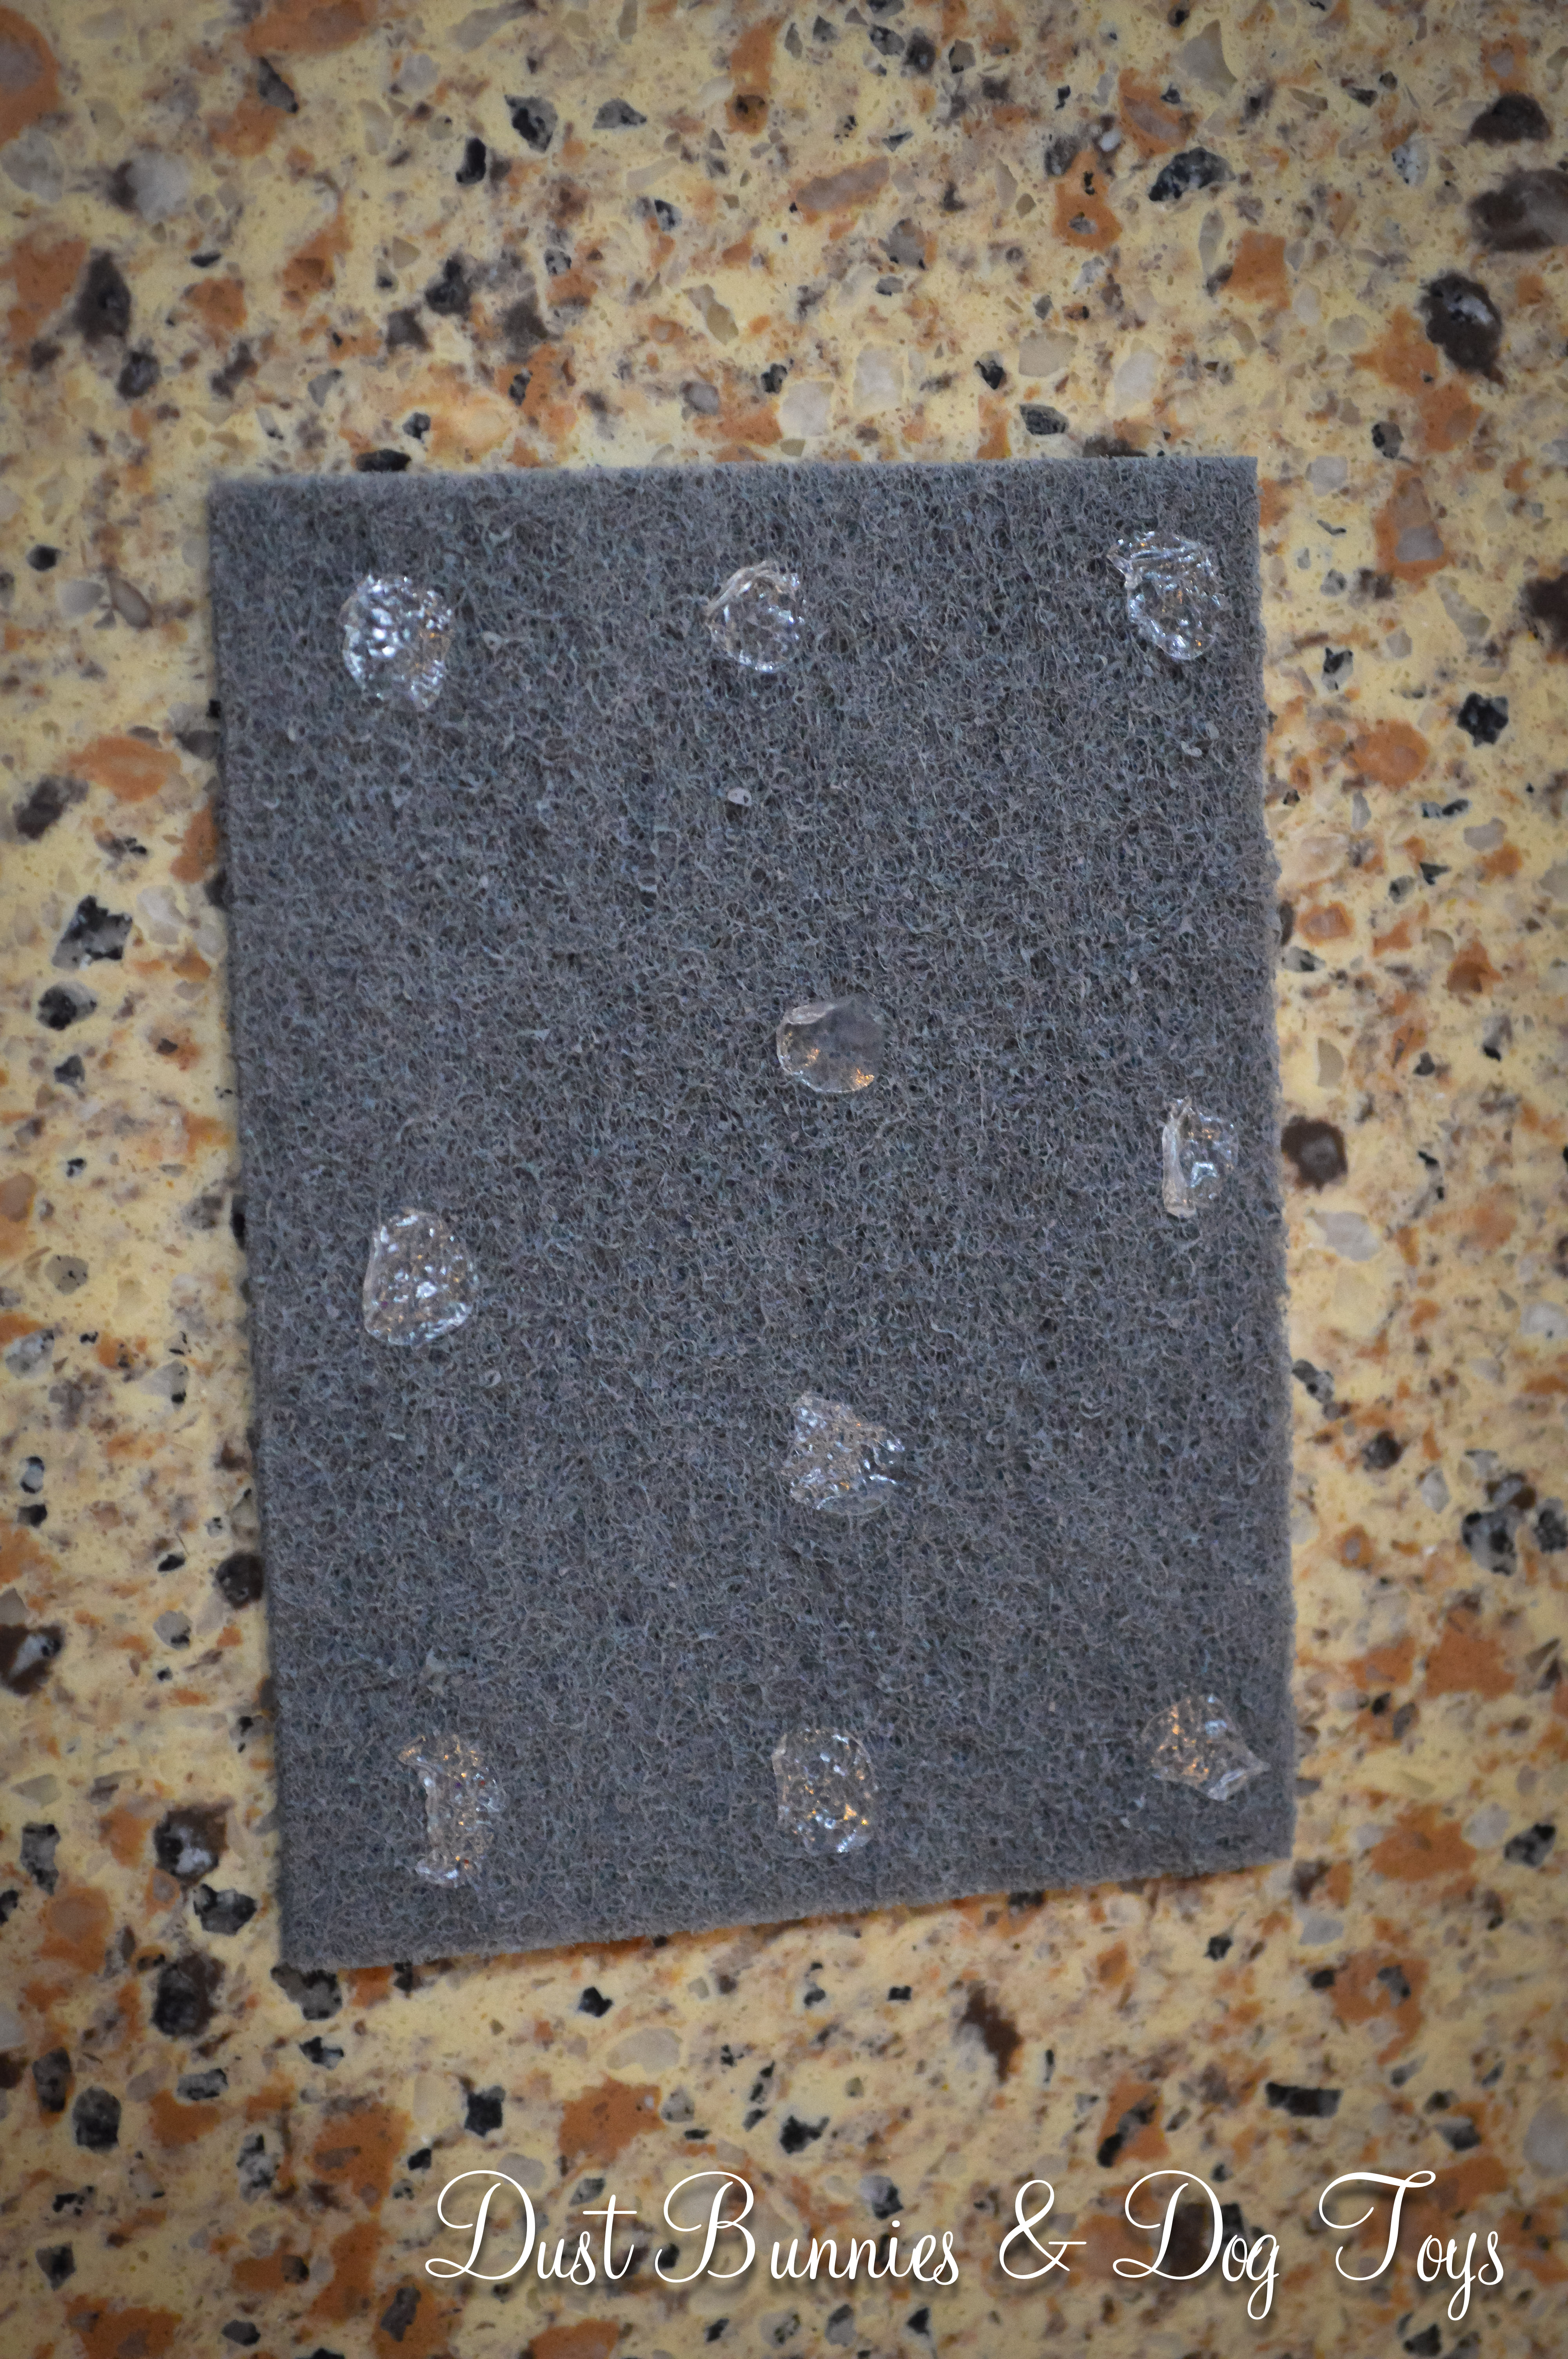
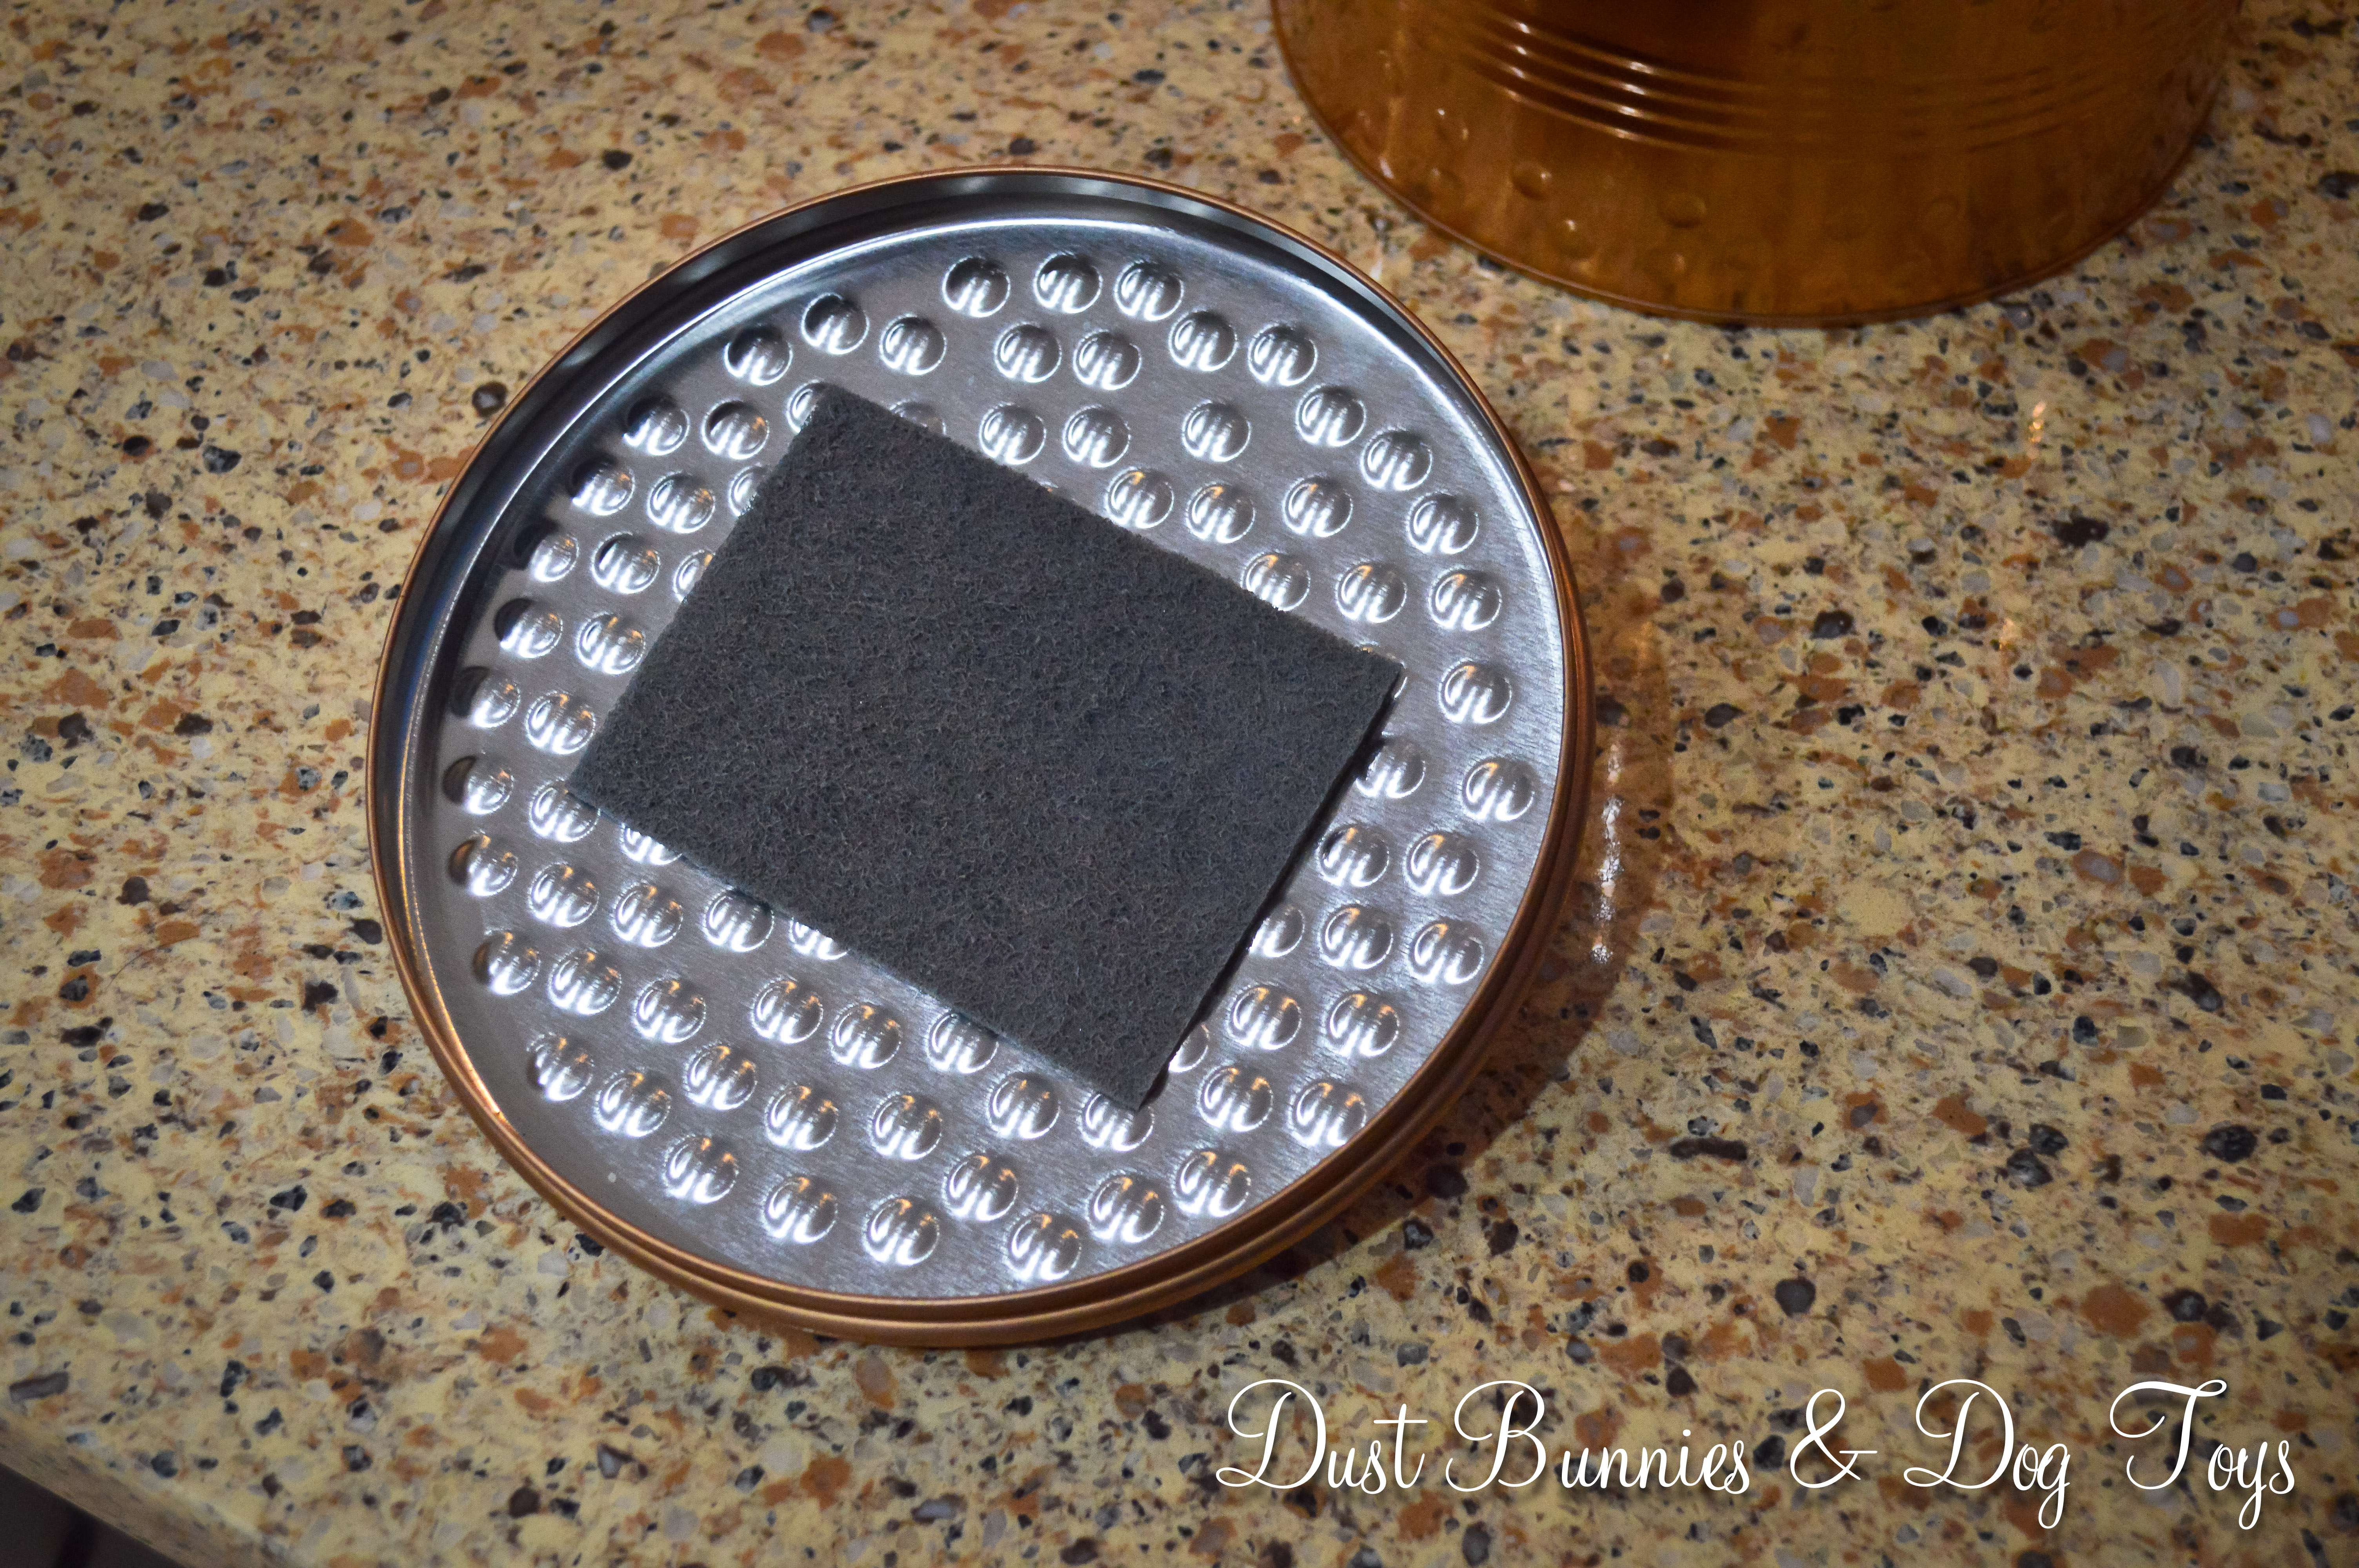
Remember that pretty copper pot I thrifted a little while back? I finally got around to converting it into my cache pot for the kitchen and it was seriously so easy I barely really don’t have much to explain. I followed the steps I found on this DIY post and I think it took me all of 10 minutes! So without further ado, here’s the how-to in just 4 easy steps.
Step 1: Gather the supplies – container and charcoal filter.Step 2: Cut filter in half and prep with glue dots.
Step 3: Attach filter to underside of container lid.Step 4: Put lid on container and sit back to appreciate your handiwork!
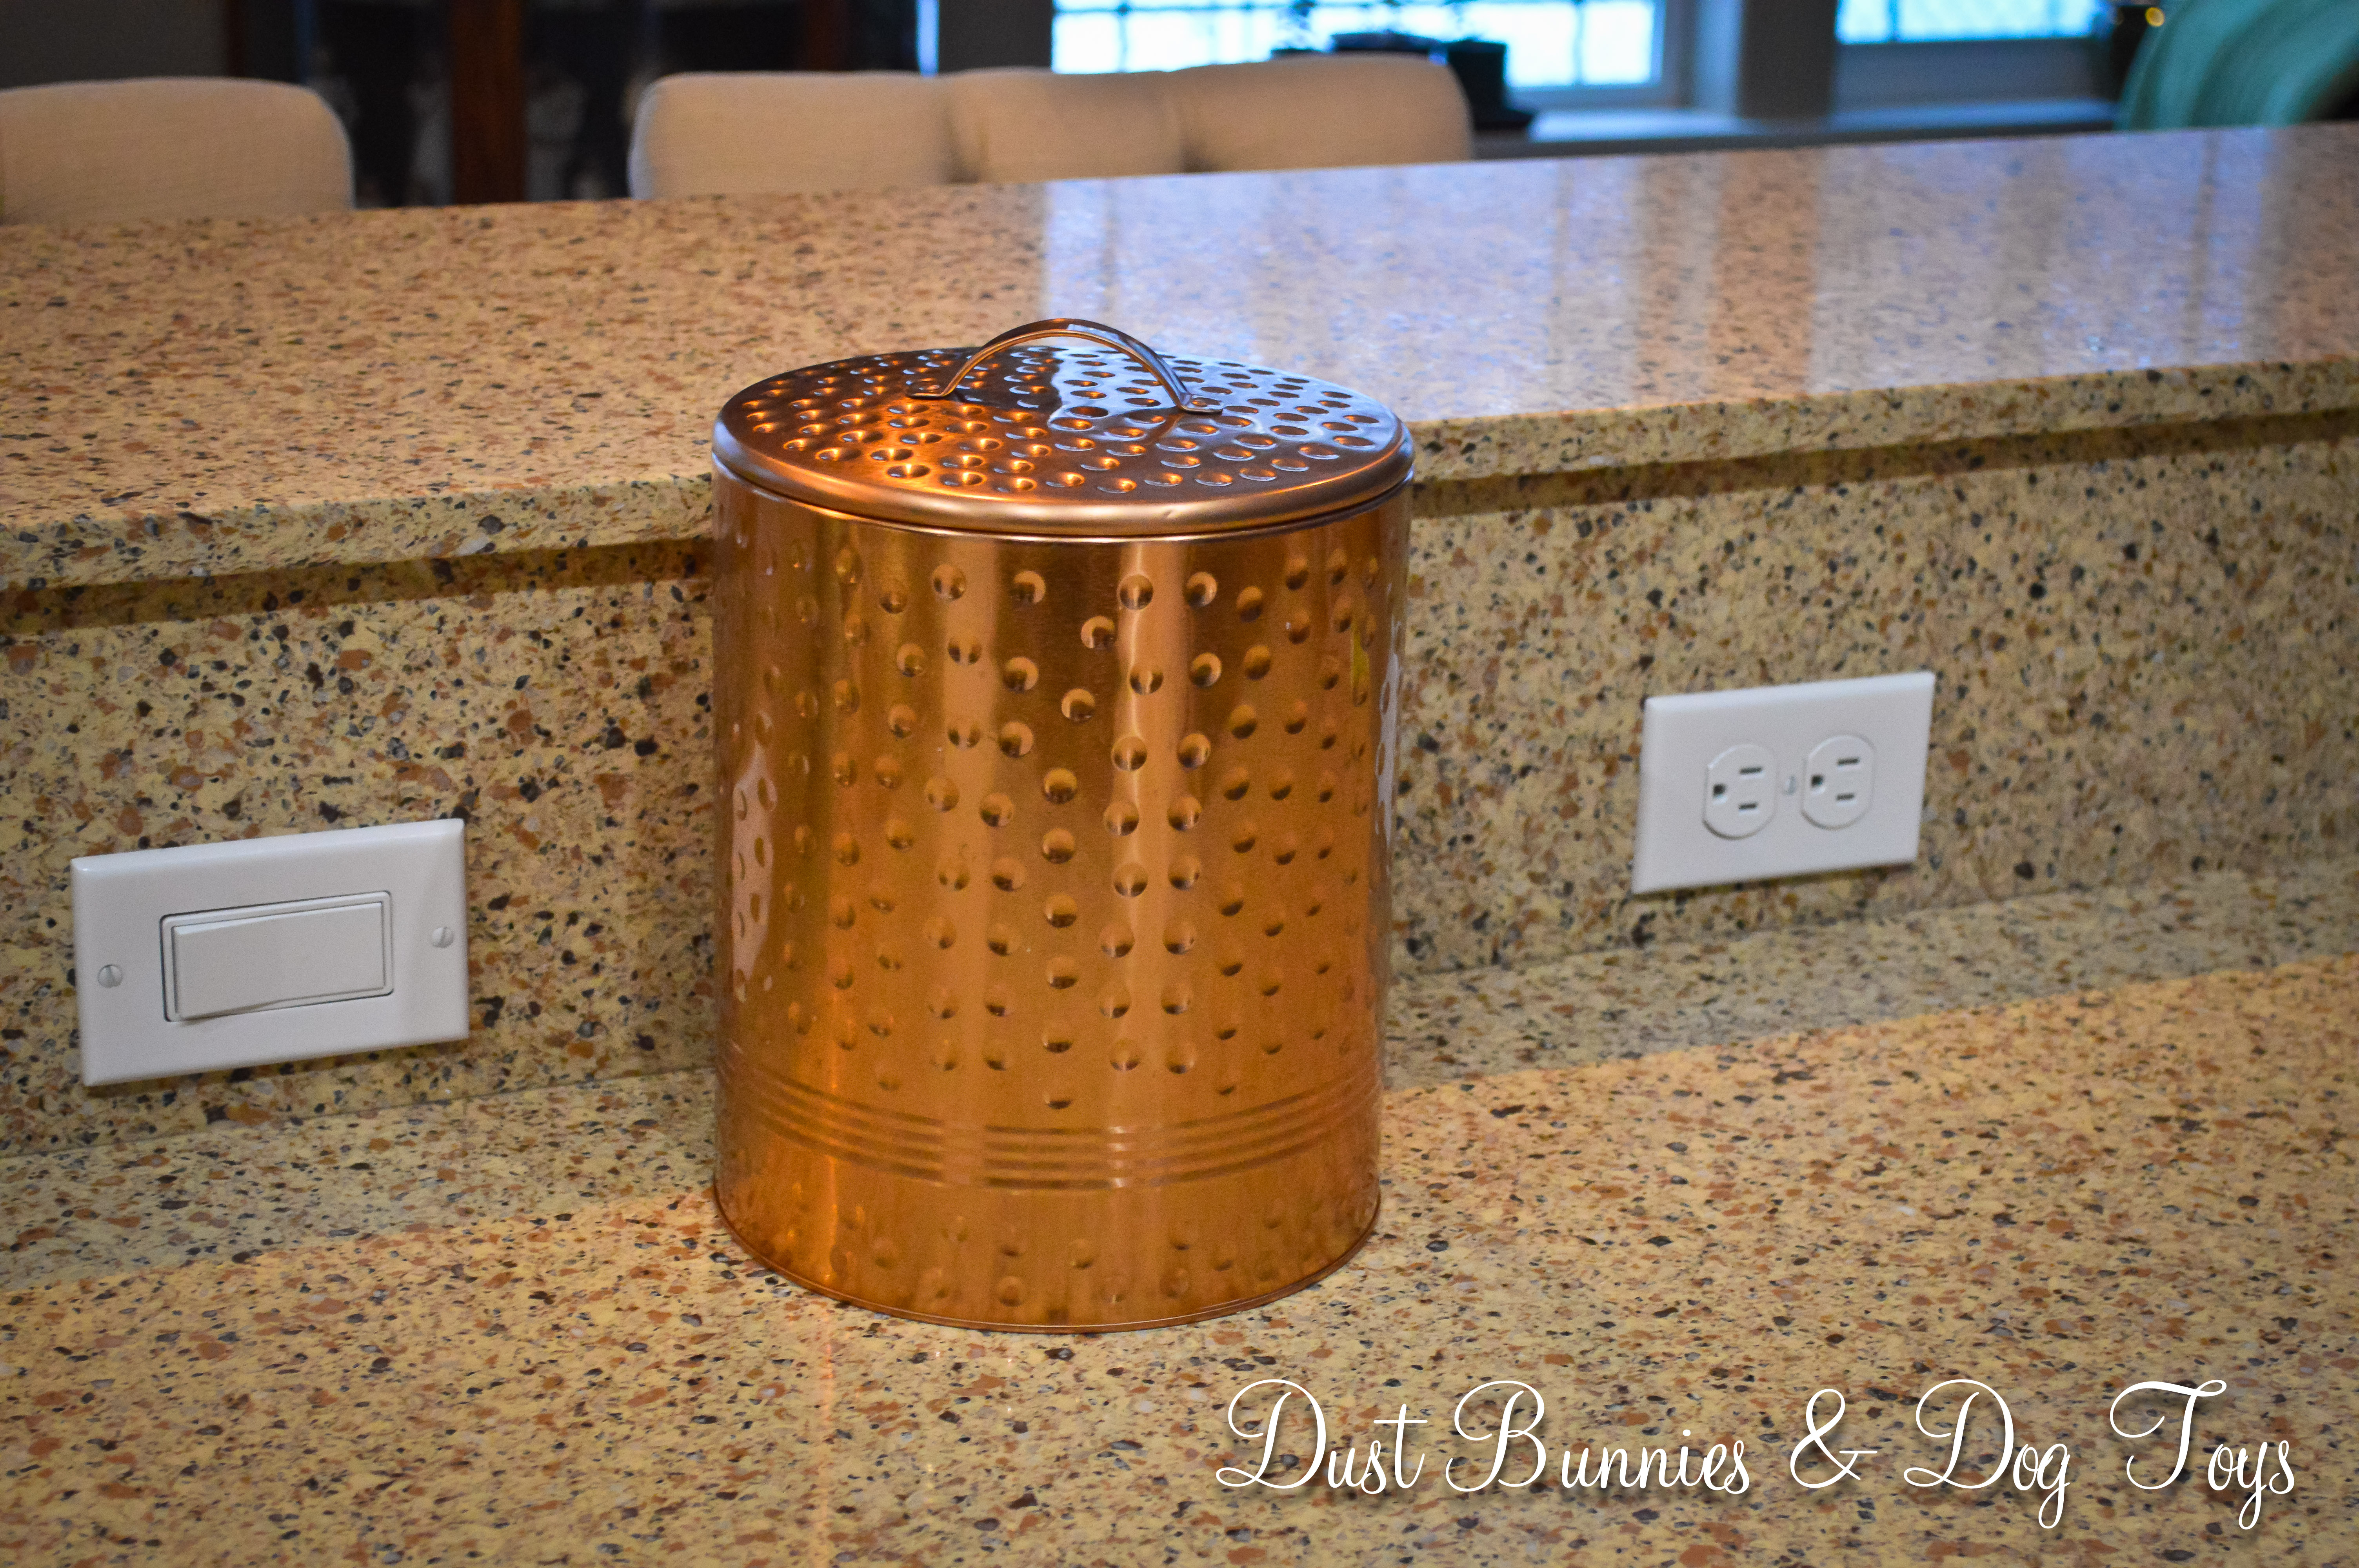
And that’s it! My pretty kitchen scrap pot is ready to collect trimmings for a future compost pile. Until then it holds the things I’d rather not put into our new septic system. For now, when it’s full I wander out into the woods on our property and dump the contents in random places so if wildlife do sniff it out, it’s never in the same area and they don’t become accustom to eating scraps.
I could have saved the other half of the filter for when this one wears out in 3 months, but instead I put it on the underside of our regular trash can lid to help with the odors that tend to accumulate there and I’m pleased to report that it seems to be helping!
After finishing the Master closet storage system, the hubs installed the shelving in the hall bathroom closet and I quickly organized the contents of the last two boxes for that space. We decided that the steam cleaner, vacuum and other floor cleaning tools would live in this space so he installed the first shelf high enough to accommodate that. He continued the same shelving material and design as he did in the pantry.
Because I didn’t need this space to do much beyond holding towels and toiletries I didn’t pre-plan the layout, which was frustrating for the hubs who wanted specific guidance on what I would like. We talked it through and hashed it out as we went and I think it turned out great.
The top shelf holds those infrequently used items like the humidifier and fan along with the “dog towels” since the tub in this bathroom is where they would be bathed when they are do get a wash at home. The next shelf hold all those medications that seem to accumulate from nowhere. Next was spare towels, which I wanted within easy reach for guests and potential future human chitlins. The bottom shelf holds the first aid kits (both human and animal – because we’re that kind of household LOL) and bandages, along with the plethora of spare toothbrushes my dentist continues to send me home with even though he knows I have a Sonicare toothbrush. With a little arranging, everything fit really well. I might add a stair step organizer to the shelf with all the medications on it to make it function a little better, but for now it’s easily accessible and it fits.
Because the space doesn’t have a dedicated light fixture, the ambient light from the vanity light is all there is. To alleviate this, the hubs also added a small LED light bar near the door for a little extra illumination when needed. I don’t think we’ll need it often, but when we do it will be nice to have at the ready. But what I like best about it is that it didn’t cost a dime, because we had it from a previous project that no longer needed it.
I recently found a new rug and shower curtain for this bathroom and also got some decor up, so now I just have a few finishing touches to make this room complete – which will be one of the first to be so in the house! Stay tuned to see the end result very soon! 🙂
I’ve had the same tree topper for years. I bought it on sale after Christmas one year and added a string of lights so that it lit up. I loved it, but it was always so heavy and cumbersome, requiring a rod to support it and a special extension cord to be run to it for the lights. After fussing with it for 15 minutes this year and still not liking how it was sitting, I decided it was time for a change.
I wasn’t sure what I wanted exactly, but figured it would be another star because that just seems right to me. I know an angel is traditional, and I think that’s what I had as a child, but many I’ve seen are down-right creepy or psychedelic. I like the symbolism of the star, which guided the wise men to Jesus’ manger and being an Alaskan, the North Star is always a favorite. So star tree topper a-hunting I went.
My first stop was Target, which had tinsel options, but nothing that seemed to fit my style. I was considering researching DIY options when I decided to stop in at Pier One because I had a 20% off coupon. They didn’t have any tree toppers but I did find this large glittered star ornament. They called it a snowflake, but it sure looked like a star to me, especially in gold. I wasn’t sure if it wold work as a tree topper so I carried it around with me as I browsed other areas of the store.
Something told me that even if I didn’t end up using it as a tree topper it would find a use in my holiday decor so I went ahead and bought it. It was already a good price at $6.95, but I also got my coupon discount on top of that, so it was a super deal.
Once I got home I climbed on a chair and placed it at the top of the tree, arranging branches to make it sit just so. After a few times off the chair to check and make sure it was straight, I was completely happy, so I cut off the hanging string and left it atop the tree. It’s just the right scale to complete the shape of the tree and it coordinates with other decor in the house, so I think we have a new annual topper! And for less than $6 it’s the best deal I’m likely to find, perhaps even after Christmas!
Although I had the movers put the Christmas tree box in the family room because I intended to put it up right away, I didn’t actually get to that task until about a week after the move. We’d just bought the tree last year, but we had to send it off to the tree infirmary after Christmas because as the Grinch says “there’s a light on one side that just won’t light” – although in our case it was a whole section. This was the first time I’d opened the box since it had been shipped back to us and had to chuckle when I spotted a tennis ball right on top! Apparently the workers found it somewhere in the tree and put it back in the box to make sure we got it back! Only us!
I initially planned to put the tree in front of the windows next to the fireplace, but once we arranged the furniture there wasn’t room for it there. So I tried it on the other side of the fireplace next to the TV, but it was too big for that spot. Then I decided to try it at the corner of the family room where the dog bed had been placed. I moved the dog bed – much to Sangria’s dismay – and started setting up the tree near the hallway, only to decide I didn’t like it there either. It still felt crowded.
At that point I stood in the middle of the main area and looked around trying to decide where to try next. It was about this time that the hubs woke up from his night shift sleeping and saw me standing there pondering. I explained my dilemma and he agreed that it didn’t fit right next to the TV or fireplace. I told him I was considering placing it next to the back door where I’d just placed the curio cabinet – one of the few pieces I hadn’t ‘envisioned’ a spot for before the move – to see if I liked it there.
Notice the fixed doggie door gap?! 🙂
The problem was I did like it there. I knew my brain would see wherever the tree was placed for our first Christmas in this house as “the spot” it would go from here on out and I didn’t want to commit to moving the curio each year to put up the tree.
Hubs said he thought that was the best spot for the tree and then wandered off to wake up further. I continued to stand puzzling, like the Grinch over Whoville. Finally, I decided to try it just to appease my curiosity, which required moving the curio to three different spots before finding it’s temporary home in the guest room. I started again with just the base section and liked how it looked, so I added the other two sections and started fluffing branches. About that time the Hubs returned and noted that the tree looked good there. I agreed and stated that he’d been right all along.
Unfortunately, I got distracted with some other project at that point and the tree remained undecorated for several days until I scheduled time to finish decorating this past weekend. And here’s the final result! I love the traditional feel of the white lights and this model has flocking and faux pine cones that make it feel real, especially when I get the sugared pine wax melts going!
Our family has a tradition of letting each child choose a new Christmas ornament for themselves each year so that when they move out on their own they have an entire collection full of memories to decorate their own first tree. I continue the tradition for myself, choosing a new ornament to add to the tree each year. This year I found a wonderful vendor at a local craft bazaar who made ornaments from clay and I just couldn’t choose between two, so I got both. One is a reindeer with a strand of lights tangled in his antlers while the other is a classic truck, much like my own 1955 F-100.
Although I love the look of themed trees seen in the magazines and stores, I still like having my eclectic grouping of ornaments at home because they remind me of the stories behind them. Here are a few of my favorites.
Still my #1 favorite, an Egyptian hand-blown glass ornament my mom got for me many years ago.
I bought this little guy on my first trip to Kodiak. He’s lost an antler since then, but I still adore him.
Found this at a craft bazaar in Kodiak and loved the simplicity of the design. I actually bought a few for my nephews too!
Antler slice ornament with an otter I picked up at another craft bazaar.
I loved the otter but also loved the reindeer on this one, which is why I bought both! I’m sensing a trend.. 🙂
One of my top faves – The Grinch, which I ordered from another crafter.
I bought this ornament for my husband to commemorate his time with the Coast Guard. He’s not super fond of it, but I am because it reminds me of his character and desire to help others in all he does.
I don’t remember where this ornament came from – probably one I picked out and mom bought me, but I love the different designs on the deer.
I picked this up on my layover in London on the way to Prague. Another great memento.
The ornament my sister got us after our wedding.
And the one my mom got us too!
Do you have favorite ornaments? If so, what makes them special to you?
The last critical move in project was a dog run for the girls, who have a doggie door at the deck. We had planned to install a fence near the clearing line, but now that winter has frozen the ground solid that isn’t an option until spring. Instead, we created a temporary dog run along the back of the house from used kennel panels I scored for just $100 on a local buy/sell page and free pallets from companies around town.
We closed off two sides of the deck by layering pallets on top of and next to the deck, screwing them together and then to the deck itself. A design the Klampets would be envious of! LOL
We tied the kennel panels together to make the main area of the run, from the deck to the hot tub, which also ended up acting as a portion of the run’s barrier since it’s so close to the house. It’s not ideal, but it gave us a place to strap the kennel panel and a single pallet to, to complete the enclosure. As you can see the girls don’t much care what it looks like, as long as they have toys to play with in the space.
It’s certainly not pretty and it’s not a big space, but it allows them to go outside during the day to go potty and play when we’re not home, so it accomplishes the goal.
We open the gate when we’re home so they can wander in the woods and explore a bit further, which they are totally enjoying. They are pretty good about sticking close to the house so that if they are out of sight it only take a few moments for them to reappear when called. Sangria has also learned that she can go out the gate and around to the front of the house when she hears someone working in the garage, so she quite often ‘shows up’ to help if you leave the garage door open! That girl is one smart cookie! Tequila on the other hand, apparently doesn’t care enough to leave her toys to see what’s happening, because she rarely follows Sangria around to the front.
Unfortunately, the snow on the roof slides off right into the run, so we’ve had to be vigilant about keeping the area shoveled so it doesn’t accumulate high enough to block the gate, or encouraging anyone to jump over – either the girls to the outside or critters to the inside!
I’m not sure how moose proof the run is as we haven’t seen any on the property since moving in, so I’m guessing that the girls make enough noise to keep them at bay. I’m certainly ok with that, especially if it means I don’t have to shoo a moose out of my garden come summer!
After the pantry, the Master Closet was the next priority project. We had a plan all drawn up and ready so the hubs just started cutting and installing. Unfortunately, he was transferred to an overnight shift just before the move, so this drastically affected how much he could get done in a day. That meant that the ladders and tools that had cluttered the kitchen for the first few days post move, now resided in our bedroom and closet for approximately a week.
For those of you who know me personally, you’ll understand that just thinking about that makes me itch because I can’t stand clutter in any sense. Finding an outfit for work from the wardrobe boxes each morning was wearing thin and I still hadn’t found my office shoes, jewelry or purses. Although I was trying to keep my side of the room as organized as possible, the hubs had gone the ‘man route’ and had stuff everywhere and anywhere. I involuntarily twitched every time I walked past his side of the bed.
My side of the room.And his side…
About the time he’d gotten my side of the closet almost finished, I found the box with my shoes and purses. I pulled out a few pairs of heels to get me through the upcoming days and put them along the wall in the closet, because well, that’s where shoes belong. I knew he would be cutting a hole in the wall to flush mount my full length mirror jewelry cabinet soon, so I held off unpacking my wardrobe and spent a half hour covering all of my shoes to protect them from the dust that would be created. Apparently I didn’t do a good enough job, because I came home to this the next day.
He’d realized that my shoes had gotten dust on them, so he thought the best option was to move them into the bathroom away from the dust. So there they were, on my bathroom counter. Who knows what germs those beauties held on their soles, which were now on my counter! When I noticed there were also Sasquatch sized “dust” foot prints on the bathroom rug, I asked if Big Foot had broken in to try on my shoes while I was at work!
I began cleaning shoes individually, which resulted in pockets of saw dust being spilled out of the inside of each all over the floor. It was at this point that I pitched a full on fit, which the hubs believed was fully directed at him and his efforts to install the closet. Many huffs and puffs from both of us and a long talk later, I was able to explain that it was the feeling of living and unpacking “in construction” that had me irritated rather than him.
We set a deadline to get the closet done and tidied up what we could for the time being. Luckily, he finished up a few days later and I was finally able to unpack all of my clothing and organize everything in the new space.
Well worth the wait! The trim leaning against the mirror will be used to cover the gap between the cabinet and the wall.My side!My side also has long hanging space and room for my boots, which I’d planned to keep by the mirror!His side
The ottoman under the mirror holds the laundry bags I use for dedicates and at-home dry cleaning, but it also makes for a great spot to sit in the mornings and put on my socks or nylons. You might have noticed the trim molding on our access panel is missing. The builder’s foreman said he moved the panel a few times and it “just fell off.” Sure… whatever, it’s a moot point now. I’ll eventually get a rug to cover the panel anyway so it’s not a huge deal, and it worked out because that’s right where the laundry baskets sit so it would have actually been in the way. I also still need to add the crown molding shelves to hold all my heels, but that will come in time. For now they can live lined up against the wall.
Overall it’s just what I envisioned. There’s a spot for everything and there’s still room to grow! Which most women would probably agree is worth the week or two of stress involved to get to say that. 🙂