Gettin Hooked

Much to my displeasure, our builder installed a single towel bar in the guest bathroom, under the window and right next to the toilet. Not only is that location not ideal because it’s several steps from where a guest would exit the shower, it’s prime germ spreading territory with each flush.

TowelBarBefore

It also wasn’t efficient because it would only hold a single towel, which had to be folded – if you wanted it to look presentable from the main living area down the hall. And my OCD tendencies require said towel to be hung perfectly straight.

I knew I wanted something different, but wasn’t sure exactly what that was at first. I first considered moving the bar to the back of the bathroom door along with another that we took down in the master bath room. The hubs wasn’t keen on the idea of drilling holes in the door, so I researched other options. The next option was buying an over-the-door hanging towel rack. Unfortunately, that still required folding towels and honestly I’d rather spend those few moments playing with my fur babies.  Then I realized I’d already found the best solution and used it in our master bathroom – hooks! Simple, easy and very inexpensive. That’s my kind of solution!

The hubs picked up two more hooks like the ones we had in the master bathroom and installed them on the back of the door.  The new set up simplifies getting ready to hosts guests and makes it easy for said guests to relax and not worry about such a simple thing.  Apparently Tequila approves!

TowelDoor

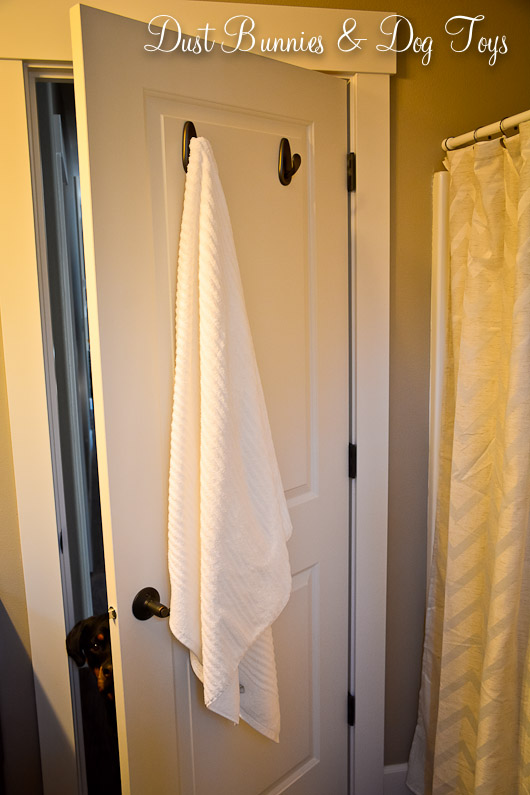
Now our guests have room to hang two towels, right next to the shower. Genius!  Should we need more towels out I can always add a third hook half way down in the middle pretty quickly.  And the towel bars sold on Craigslist for a couple dollars more than the hooks cost. Score! You could say I’m happy, happy, happy.

A Tin Crown

I picked up this beautiful tin tile at an antique show soon after we moved into the new house.  Crafted by the same vendor who I got the entry way dresser from, it was a bargain at just $7!  And I knew I wanted to use it in our Master bedroom where it would tie in with the other Moroccan patterns I’d gathered.

TileClose

Unfortunately I couldn’t seem to find the perfect spot for it.  I considered putting it over by the tub, but it felt crowded there.  I was tempted to replace one of the items hanging on either side of our vanity, but the scale was off.  I also considered using it in the bedroom, but that didn’t seem right either.  At one point I even tucked it away in the cabinet planning to use it on the shelves I want the hubs to install above the toilet.  Then I had a ‘light bulb moment’ and realized it would fit perfectly over the top of the shower tile.

I asked the hubs if he thought it would be ok in such as ‘moist’ environment and he gave a green light.  So armed with a hammer, nail and step stool I proceeded to hang my green treasure in the shower.  I’m pleased to say that I’m very happy with how it looks.  The green coordinates with the green in our decorative tile making it seem like it was painted just for that spot!  Maybe I’d go so far as to say it’s the crowning jewel of the shower.. you know, if crown jewels were made of tin! 🙂

Tile

I’ve never hung anything in a shower before (other than a shower curtain), so now I’m curious – has anyone else decorated a shower with art?  If so, leave a comment and tell me about it!

A Little Lace Makes A Big Impact

I thought I’d share the story behind the little lace votives that we’re seen in my recent Easter decor post. I made these as inventory for my recent craft show booth, but they didn’t sell so I decided they were the perfect addition to my holiday decor. They were super simple to make. I started with plain glass votives that I purchased for another project and no longer needed.

Votives

I had a bag of lace I’d been hoarding since someone gave it to me so I picked out a couple of sizes that fit the votives well in spring colors.  I measured out how much I needed to go around and added a little extra for room to glue it down.  A little hit glue and about 10 minutes later I had pretty vintage looking votives!

VotivesAfter

This has to be one of the easiest crafts I’ve done in a very long time!  And because I already had everything on hand it didn’t cost me a dime.  🙂

Bright Colors, Bunnies and Chicks

I finally took down the St. Patty’s decor and put up some Easter decorations.  I’ve actually acquired a pretty good inventory, so I spread things out around the main area of the house.

I hung an egg garland across the mantel, where my little lambs found safe haven from becoming chew toys.  I also added the pretty Pottery Barn-esque twig basket I found on sale last year at Target.

Mantel

MantelL

MantelR

Either side of the TV got a few items as well, including the larger lamb I found at a local boutique recently.  Thus far the fur babies haven’t shown any interest in these items so hopefully my fluffy new friend is safe there.

TVL

TVR

The kitchen got a few Easter towels I picked up in the dollar zone at Target and the bunny towel I got a yard sale a couple years back.

EasterTowel

StoveTowel

The entry way’s holiday tree was festooned with eggs and bunny ornaments, which was also the theme on the entry table.

Tree

Entry

EntryL

ScentsyBunny

EntryR

Across from the dresser I hung one of my favorite thrifted items, filled with pretty spring flowers.

Flowers

The front door also joined in on the bunny & egg-palooza with my clearance egg wreath from Pier 1’s end of season sale a few years back.

FrontDoor

Back inside the dining room got the last of the Easter items, my Princess House rabbit dish and some rustic speckled eggs.

Buffet

I updated the St. Patty’s Day centerpiece with a few fuzzy chicks and some more speckled eggs, much to the delight of Luna who believes they were put there just for her entertainment.

Centerpiece

That would be Luna waiting for me to turn away so she can return to playing with her new toys…

Dining

And last but not least, I added some fresh flowers from the grocery store to the side table in the green vase I found on my thrifting spree earlier this year.

Vase

I still feel like my Easter decor is a little juvenile, so I plan to add in a few more biblical pieces – beyond the lambs, which are my current favorite – next year to represent the true meaning behind the holiday.  But for now, I enjoy the pretty colors which remind me of God’s promise to make all things new again.  Did you do any religious decor for Easter?  If so, I’d love to hear about it!

Crafty Storage and Workspace, All in One!

You know I love a good bargain, and you know I love to craft, but those two things together make me positively giddy. I’ve been eyeing this craft cabinet for some weeks now, waiting for it to go on sale. Lucky for me my patience paid off because not only did it go on sale for 15% off, but I had an additional coupon for 10% off and got FREE shipping – saving around $100. I almost swooned!

I can’t wait for this sucker to arrive and get assembled so I can finally have a dedicated crafting space! Now I can spend more time crafting instead of hauling my supplies to whatever area I’m working in.

Although I originally planned to repurpose a large armoir cabinet into a crafting station, I came to realize that I tend to craft at the dining room table or kitchen island so I can watch TV or chat with the hubs at the same time. Because of that, having a piece that could accommodate a moveable work surface and storage became the priority. That ruled out a huge armoir and made a hutch or dresser the likely choice. I’d considered refinishing several thrift store pieces, but they all had minimal storage due to large drawers that wouldn’t suit my supplies well. When I saw this I knew it was perfect, although I will admit I’m NOT a Martha Stewart fan. Unfortunately, I hadn’t found anything that could compare for the price.

I plan to add large casters to the legs so it can be moved out into the living room where I can see the TV or into the center of the studio for more room when working on something large. And you know I’ve got big plans to organize all my supplies by categories into those fantastic shallow drawers, where they will be away from little customer’ fingers and puppy paws. Granted, I won’t be able to fit all of my supplies and my entire fabric stash in here, but I tend to only pull out the fabric I’m working with at the time anyway. I plan for my fabric to live on shelves in the guest closet, where they are easily accessible and out of the way.

I’ll likely add some sort of shelf or cabinet above this piece so I have a spot to store all the display pieces I use at craft shows, but that will come a bit later. And I’m thinking of doing a bulletin board between the shelves and the work surface so I can pin up inspirations and rig some system of storing the little pieces of whatever project I’m currently working on.

Hopefully I’ll get a tracking number soon so I can obsess about when it will arrive a little more concretely. Watch for a post in the coming weeks once it’s here and set up! ☺

Hanging at the Scarf Bar

Although I’m still working scarves into my regular wardrobe, I’ve somehow amassed quite a collection.  I used to have a scarf organizer similar to this that hung from the closet rod, but I found that it was too full and I couldn’t easily find scarves that were buried under those on spots higher up.

My next option was draping them in a row over the closet rod itself since I had extra space to use.  This worked pretty well, but I worried that the wooden rod would snag the scarves as I pulled them off if I was in a hurry.

So when we removed the builder’s towel bar to use hooks in the Master bathroom I had a light bulb moment.  I asked the hubs to hang the bar in the closet below my crown molding shoe racks instead.  He looked at me like I was mad until I explained what I planned to use it for.

A stud finder and a couple screws later, I now have a pretty and functional scarf bar in my closet.  I love the location because it’s right next to my mirrored jewelry cabinet which I stand in front of to decide on accessories for each outfit.  And because it’s right under my shoes I can see how everything will coordinate as I pick out options.

Scarves

Scarves2

Now my scarves have a place to belong and I have back extra rod space to fill! It’s the simple things in life that make us girls happy isn’t it? 😉

Scarves3

Kiss My Glass

I recently discovered a local artisan who does stained glass pieces and ordered this beautiful whale for my mom’s birthday.  The hubs catch a glimpse of the piece before I shipped it off and was a bit upset that we weren’t keeping it, so when the artist posted a new pattern of two whales with special multi-colored glass I knew I wanted one for our home.

Even though she follows a pattern, each piece turns out a bit differently, due to the glass variations and hand crafting.  She can also create custom pieces like this, which I’m remembering for later! 😉

I decided to hang our whales in the guest bathroom, where I have all the nautical décor.  I had been feeling like there were too many fish in there with the fish plates on the wall and the hanging fish in the window.  I simple adore my fish plates, so the hanging fish had to go.  Now the glass whales hang in their place look a million times better!  Plus the colors coordinate perfectly with everything else in this space.

Whale2

Whale

The artist calls her side business, Kiss My Glass Alaska.  Isn’t that the most perfect name ever?!  It was so great that I had to borrow it for the title of this post!

You can see other designs she’s done on her Facebook page and while you’re there be sure to click like so you see future creations too!

I’m a huge proponent of supporting small business, especially as a small business owner myself!  These kitchen table shops make a huge impact on the economy and directly support American families, rather than line the pockets of corporate tycoons.   And it doesn’t hurt that they make the world a prettier place too!

Planning by the Yard!

As I mentioned in my last post, I’m ready for warmer temps and the chance to get the yard landscaped. I’ve already shared my plans for the vegetable garden that will fill the alcove between the house and the garage and mentioned that we plan to add a deck off the Master to match the one off the Family Room, with a stone patio between for the hot tub and fire pit.

We also plan to fence in the cleared area behind the house and along the side, which will be hydroseeded to create a lawn for the dogs. We decided on using the hog panel fencing with a strand or two of electrified rope I have from an old horse pasture back home to keep what belongs in, in and what belongs out, out.

I’m considering planting my berry bushes along the bedroom side of the house within this fence so they are protected from wildlife, but I might need to add a layer of protection from the dogs since Tequila has figured out how to pick her own berries and I’m sure it won’t be long before she teaches Stoli and Bacardi! I’m anticipating blueberries, raspberries and salmon berries if possible. My strawberries will be grown in the freebie barrel I picked up last summer.

I also plan to install posts around the yard which will become mounting spots for Tequila’s favorite toy, the over-sized balls on a rope that Uncle Mark and Auntie Mere sent some time ago. This set up should prove much tougher than tying it to a tree branch, which only lasts a few minutes. I also want to use the posts of the fence to hold bird houses and feeders in strategic spots where we can see them from inside the house. I’m sure Luna will appreciate that.

Our wine bottle tiki torches will return, although I’m not sure if they will be hung on the remaining fence posts or from the posts of the pergolas we’d like to have over the decks. The pergolas might not happen until next season, so I may start with some on the fence and add more once the deck covers are finished.

Out front, I plan to do flower beds on either side of the front porch, with a walkway of some sort to garage. Because we intend to use the space off the front corner of the house for extra guest or trailer parking I anticipate adding an odd shaped area of grass between that and the front flower beds. I also want to DIY one of these pot fountains between the garage and the front door. Since my vegetable garden will take up most of my ‘gardening’ time I want these beds to be filled with bulbs and annuals that bloom in sequence such as:

  • Tulips
  • Daffodils
  • Iris
  • Daisies
  • Hydrangea
  • Lilacs
  • Salvia
  • Lavender
  • Hosta
  • Basil Lime (natural mosquito repellant)
  • Smoke bush

My rain garden will be located just down the driveway in a lower-lying area to collect run off rain water. I’m envisioning this space being my ‘cutting garden’ with:

  • Fireweed
  • Wild geranium
  • Forget Me Nots
  • Lupine
  • Daisies
  • Iris
  • Campola
  • Salvia

Here’s my horribly simple rendering of the birds eye view of all this glory. It’s not exact, but you get the idea of what’s going where.

Landscape

I anticipate there will be some trial and error with different plants in various locations, so feel free to make suggestions if you know of things that grow well in the Pacific Northwest, particularly Alaska!

What the BEEP?!

I could hear the shower going as I woke this morning, and realized I still had an hour to sleep so I promptly rolled over to snuggle back into the covers.  Just as I was about to drift back off to dreamland I heard it.  Loud. Shrill. Annoying.  BEEEP!  Immediately followed by a voice saying “Low battery.”

What the…?!  Somewhere deep down I must have known it was the smoke detector and refused to get out of bed, but the half-awake part of my brain pondered if it could be something else.  That thought was followed by “Can a smoke detector really talk?”

Apparently that mystery wasn’t interesting enough to keep me up, because I started nodding off again.  Until… “BEEEP! Low battery!”  I’m pretty sure that’s when I buried my head in the pillows.  A few minutes later the shower stopped and I mumbled at the hubs that the smoke detector was beeping.  He went to investigate, but it didn’t make a single noise for him.  Typical, dysfunctional mechanical things always know when the man is listening for them to resonate their problem and therefore don’t!

I went back to sleep and the invisible lady in the detector kept quiet until after the hubs left for work and I had gotten up to get ready.  Just as I’m crawling out of bed, she returned.  “BEEEP! Low battery!”  I’m pretty sure I flinched at the sound as I headed into the bathroom and turned on the shower to drown her out.  Once out of the shower, there was a solitary “BEEEP” every minute.  Apparently, there was some sort of cycle the warning ran on.  How wonderfully annoying.

Tequila was so upset that she came into the bathroom and hid in the water closet a “please make it stop” look.  A bit later Stoli joined her, looking confused every time it beeped.  Even the cat came in to complain at one point.  Like any good mommy would, I talked them through it, telling them it was ok, but that I wasn’t about to climb a ladder at 6 am to fiddle with the darn thing.  Finally, it stopped and we all continued our morning routine in wonderful silence.

Then just as I was picking out shoes to go with my outfit…. “BEEEP! Low battery!”   Jimminey Crickets!  I texted the hubs to tell him about the situation and he promised to check it when he got home tonight.  Luckily, it didn’t go off again before I left, although I probably rushed a bit at that point, so I was able to get all the kiddos out of the bedroom and close necessary doors before they had a chance to hide from the noise again.

Now don’t get me wrong, I know full well the importance of these devices, but how do they always seem to need batteries in the middle of the night?  I’m positive the batteries don’t go in at that time, so maybe the manufacturers need to add another 8 hours to the battery life so it warns us in the afternoon!  And perhaps our builder should have warned us that our smoke detector talks, but then again, perhaps he didn’t know there was a tiny little woman with a voice 100times her imaginary size in the detector when it was installed.  And at that rate, why is the battery dying just shy of us being in the house for three months?  That must have been some clearance rate refurbished battery!

Clearly, my sleep pattern was disturbed and my patience is limited today.  Thankfully by the time I got home my husband had evicted this invisible female fiend.  If he hadn’t, I might have found the need to re-enact the recent “Duck Dynasty” episode where they had the same situation and determined that smashing the detector to pieces was the best solution. After the 10th “BEEEP! Low battery!” in the middle of the night, that solution seems perfectly reasonable. 🙂

An Organized Routine

If you’ve read this blog at all you know I crave organization.  Maybe I’m OCD, maybe I’m just weird, but whatever the reason, I need a routine and having a ‘home’ for everything.  It makes life less stressful when I know where things are and can find them right away.

That’s exactly why my morning routine needed some organizing.  I had all the items I use on a daily basis in the bathroom, but most of them lived under the counter and had to be pulled out one-by-one as needed.  Then I saw this post on one of my favorite blogs and had an epiphany.  I could put all of those items in one container and pull it out each morning!  When I’m done, I just put it back under the counter, out of sight.

1

It took a few shopping trips to various retailers, but I eventually found a three compartment basket made of vinyl.  Not only is it pretty, it’s durable and waterproof.  Perfect for daily use in a bathroom!  I organized everything into groups of how I use each.  First are the things I apply after getting out of the shower – lotion, deodorant, perfume.  All of my hair brushes and products are in the back compartment because they are usually taller.  The center compartment holds my toothpaste, jewelry cleaner and other items that don’t fit into either of the other compartments.

I also brought some organizing to my make-up drawer, by lining all my items up in the order I tend to use them.  Luckily, I keep it pretty minimal when it comes to make-up so I was able to keep it pretty simple.  I have a few items that I only use occasionally, so I keep them in the back of the drawer. This is the same drawer I described in my last post, where I used magnets to hold my bobby pins.

Drawer

Have you organized your morning routine?  Do you have tips on what worked or advice on what not to do?  Share them below!