My Upgraded Desk

Because we know this is just a temporary space until the new house is complete we didn’t want to make anything too permanent.  So, I’ve been using a small folding table as a computer desk since we moved in back in March.  I was NOT a fan.  It wobbled, wasn’t big enough and I’d hit my knees on the supports underneath about a 100 times.  So when I saw a free interior door on Craigslist I decided it was time to upgrade.  We’d already purchased two wood filing cabinets for $50 to replace the ones we sold in the move.  We plan to paint and use them to make a wall-to-wall desk in the new studio, so we used them as the base for the new temporary desk.  A few screws to secure the door to the cabinets and we were in business.  Here’s the before (even prior to the filing cabinets, which lived next to the table for quite a while):

Before

And the after!

After

It’s not my dream creative space, but that will happen in the coming months as we move into the new house.  It is a nice upgrade until then though!  Now I just need to get my business license framed and hung so the wall art feels more balanced.  And notice how all the cords are wrangled into the little box in front of the chair?  The hubby built that based on this!  The bonus to having one made of wood?  It’s a pretty nice foot rest! 🙂

The door isn’t long enough to be a desktop at the new house, so it might become a top for a workbench or perhaps a gardening surface in the greenhouse.  I’m sure I’ll find some use for it – eventually! LOL

SURPRISE Baby Shower!

As an event coordinator for a community bank, I plan a lot of different types of events, but I was recently asked to arrange a surprise baby shower for a co-worker.  Yes, I have an awesome job! 🙂  Luckily, I already had a “Baby Shower” board on Pinterest full of ideas.  Those who know me personally would now say “but of course you would!”  LOL

My recon/planning partner learned that the nursery was being decorated in yellow and purple, so we based all of the decor off that, including a ribbon garland that can be hung in the nursery.     Garland

My co-hort picked out adorable mini cupcakes with purple and yellow frosting to match our theme so I made a simple cupcake stand with two square glass plates from Walmart and a glass candlestick from the thrift store.  Easy peasy!  And you’d never know it only cost about $8 to make! Oh yeah!  Thrifty chic!

CupcakeStand Cupcakes

And what baby shower is complete without a diaper cake?  I’d recently seen a new style done to look like fondant on Pinterest, so I gave it a try.  Note to self – next time use thinner ‘flannel/receiving blankets’ rather than the cute, but thick fuzzy blankets!  Granted the chevron one was from her registry so I just had to make it work.  A little ribbon trim and thrifted faux flowers gave it the finishing touch.  Our male colleagues were quite baffled at the idea of a cake you don’t eat, but they too thought it turned out pretty well.  Although it did look good enough to eat on my pretty cake stand I bought last year at Home Goods for a measly $15!

Cake

My Pottery Barn knock-off drink dispenser – which I found at Safeway for just $17 – finally found a use other than decorating the tops of my kitchen cabinets.  It held the very tasty pink lady punch that was a surefire hit!  And the recipe was super simple:

  • 1 quart pineapple juice
  • 1 quart cranberry juice cocktail
  • 2 quarts ginger ale
  • Cranberries to garnish (or substitute fruit or other berries)

Drink

It was actually so good that I brought the rest home to share with my hubby who liked it as well – which means it’s super good because he’s a secret chef! 🙂

Cup

I also framed a picture from the maternity session I had done with her and her husband the week prior so their baby girl will have a picture of mommy and daddy in her room from the moment she arrives!

We all chipped in to get the stroller she still needed and put together a hospital survival kit, so she’s got everything ready for the trip to the delivery room!  I’m still surprised we were able to pull it off without her finding out.  We had a few close calls and thought she might be on to our little scheme, but we were very happy that she was truly surprised!

That was my take on a simple, chic baby shower!  Whatcha think?

Gold Dipped Toes

I’d been itching to update my wardrobe for fall when I spotted this post by one of my favorite bloggers and realized I had the exact same pair of shoes!  I don’t wear them that often and figured this might make them more versatile.  So, a quick trip to Michaels with a store return gift card in hand and I was ready to make it happen.

I’m not going to do a tutorial, since it was as simple as getting my supplies together, taping off the section I wanted painted, and well – painting.  The hardest part was making sure I made the gold section the same on both shoes! Here’s a few shots of the before, during and after.

Before
Before
Step 1
Step 1
Step 2
Step 2
Finished!
Finished!

They turned out pretty darn cute, if I do say so myself!  And unless you inspect them closely, you’d never know that they were painted.  Now I’m thinking I should also paint the wedge part gold or do a similar pair of flats with polka dots!  It might also be a way to fix the scratch on the top of my favorite pair of kitten heels…What do you think?  Good idea gone bad or worth a try?

Well Worth the Elbow Grease

Yesterday I recounted all of the freebies we’ve scored on Craigslist, so I thought I’d give a little progress report on our biggest find – the hot tub.  Here’s what it looked like after the hubs gave it a good cleaning and started working on the plumbing.

B1

After he got the guts fixed, he scored a super deal on supposedly ‘oops’ paint at the box store and started updating the exterior as well.  Here’s a few shots of the difference.

Middle

Middle2

And here’s the finished product, looking pretty darn good for investing less than $100 when a new tub this large would have run us $10-15,000!

Z

Unfortunately, it’s sitting in the garage unused until we move to the new house since there isn’t an outlet for it at the rental and we learned it’s illegal to have a hot tub in your garage in Anchorage!  Who knew?!  Ironically the 220 plug at the new house has been the most expensive part of this venture, bringing our total to approximately $450.  Now we’ll just have to see what it costs us to run!  Wonder if the hubby can rig a generator to a treadmill the dogs run on.. wouldn’t that kill two birds with one stone? 🙂

A Few More Freebies

Windows These old wood framed windows are my latest Craigslist freebie score!   I don’t have a specific plan for them just yet, but I’m thinking several might be touched up and enhanced with holiday themed vinyl cutouts!

As I drove home with my new treasures, I contemplated all of the things we’ve found for FREE since moving to the mainland and having access to the genius of Craigslist.  Let’s recall some of my finds.  There was the massive hot tub, the fruitful raspberry plants and wildflowers, a future fire pit drum, next season’s strawberry planter/compost barrel, an interior door that will become a new desk top for my office, NEW Christmas decorations that came with a large heavy-duty wheelbarrow in need of a new tire, 2 chairs for photo props, shutter style bi-fold doors for craft fair booths or photography backdrops, and of course a delivered load of used tires for my rain garden!

As you can tell, I’m a regular in the free section.  It’s kinda addicting – I’ve even got my hubby scanning the list pretty often! 🙂 I actually get all warm and tingly reclaiming and reviving something that would have otherwise been added to the landfill.  But I’m apparently not the only one, as someone did beat me to the vintage metal lockers I was hoping to snap up for the garage a few weeks ago! It’s amazing what’s offered up – free for the taking if you put in a little effort.

Yet even with all these amazing finds, there are still things I’ve passed up just because it’s just better to wait until we’re in the house and ready for that item or project – like free chickens or an old fridge the hubs can convert into a smoker (luckily not in the same ad!).  And the fact that the garage is starting to feel a bit cramped… But, that’s the beauty of the Craigslist free section – there’s always more to choose from!  So I’m sure there will be another old fridge available when we’re ready to hunt and in need of a large smoker next year.  And I bet there will be an old chest freezer for free or nearly too!  As you know, I’ve also found several great deals like this and this on Craigslist that were low-cost albeit not free.

Are you a Craigslist freebie hunter too?  What treasures have you found and restored?  I want to hear about them!

Wash, Dry, Fold, Repeat

I’m so exited to have a laundry room again in the new house. Our rental did come with a washer and dryer, but they are in the garage, which doesn’t make doing the laundry very convenient.

As I mentioned in a previous post about our appliances, we’ve purchased a brand new LG washer and dryer which will be a huge improvement on the machines we had in military housing and in our current rental. Our landlord actually bought the same model we did for his new home! The new home will also have a sink in the laundry room, making treating all those doggie slobber stains super easy.

In true “type A” style I already have several plans for this space. The first is building a platform like this to eliminate bending to see into the machines, while creating a system for laundry sorting that stays tidy and out of the way since this will be a walkway to our garage.

Since our builder just plumbs for the sink and doesn’t install one, I plan to get this for the nice deep sink and storage underneath.

We will have additional storage with cabinets above the washer & dryer in the same color and style as our kitchen. There won’t be a cabinet above the sink due to the window there, so I want to install a drying rack that will open over the sink. Maybe a DIY like this.

As for decor, I plan to keep it simple with the same funny signs I had in our laundry room in Kodiak. That will give me a color palette of muted red, blue and yellow. I may update that later, but it’s not high on the priority list as there are plenty of other projects that need attention first.

And once all that is in place, it will be a steady routine of wash, dry, fold, repeat! 🙂

A Studio of My Very Own!

The studio/office is my most anticipated and daydreamed about room in our new home for obvious reasons.  Although the main colors will be the same neutrals found in other rooms of our home, there will be a healthy dose of purple accents throughout the space, including my pretty purple chair I’ve blogged about before.  The plans for this space include a wall-length desk down one side of the room with shelves overhead for storage.  Something like this.

I want enough room for both the hubs and I to have a spot to sit with the printer and Silhouette  in between.  I’d like the printer to live in a cabinet under the desk where we can store paper too.  I plan for the Silhouette to be on the desk top where there will be room to feed material into it.  Here’s the basic concept, made with two wood file cabinets we got on Craigslist right after moving to the mainland for $25 each and a cabinet we will build to house the printer and support the middle of the desk.

Picture 2Because we have more files than the two cabinets can hold as it is, I might add a file storage bench like this one.  It would provide a little bit of extra seating if I have a group of clients and can be moved around as needed or even used as a prop.

Luckily hubby uses a laptop that won’t always be on the desk, so that leaves room for me to spread out with craft projects.  I’m toying with the idea of adding peg board – likely painted purple – on the wall above the desk but below the shelves for storing things up off the desk, keeping the desktop clear.

The other wall will remain mostly bare to accommodate my backdrops for photography sessions.  I may eventually add studio lights to my photography arsenal, but for now the natural light from the window will work just fine. I may finish that wall in pallet wood like this, but that would likely be a project much later down the road.

I’m on the hunt for a large armoire or hutch for the other corner by the door to house my craft supplies like this.  That keeps things behind closed doors, both out of sight and out of reach of any clients’ little hands.  I might add something like this to the side of the armoire for a little extra work space when crafting so I’m not always spread out on the desktop.  The other option is to create something with storage underneath and above a workspace in the center like this.

Large sliding barn doors like these will added at some point to allow us to close off the space when have guests over or I need a little privacy for a boudoir session.  They’d double as a nice backdrop if needed too!  We will have to figure out a way for the doors to fit past the desk and shelves when open, but that should be simple as leaving a gap between the desk and the wall.

So that’s the grand plan to fit a photo studio, craft room and office for two into one room.  Good thing it’s a fairly large one!  🙂

Dye Job

I had a couple of white shirts with pit stains I just couldn’t seem to get out, despite trying all of my pinned tips.  I really liked both tops, so rather than throw them away I decided to dye them and disguise the issue.

2

I picked out purple and lime dye at Micheals, which then sat around for several weeks due to a super busy schedule.  Then one day it rained and I thought, “What better project for a dreary day than infusing some color into my wardrobe!”

1

I dug out a tub I use to do my foot detox soaks and gathered the other supplies needed.

3

The directions were fairly simple to follow.  Step one: Add salt to hot water and stir.

4

Step two: Add dye and stir (after watching the cool color swirls created first!).

5

6

Step three: Add item to be dyed. The directions said to stir continuously for 15 minutes, then let sit for 45 minutes, stirring occasionally. I wanted a dip dye or ombré effect, so I decided to divide the 15 minutes into thirds, one for each section of the shirt, then let the whole item sit for 45 minutes.

7

8

That theory didn’t work exactly how I envisioned on the first shirt.  Instead the entire shirt looked about the same color.  It could be because the material was synthetic and not cotton like they recommend, but I didn’t think that would make much of a difference.

The second shirt was, cotton so this time I only stirred occasionally during each 5 minute portion and removed the entire item after 15 minutes.    That seemed to create the ombré effect I wanted much better. I rinsed both tops and then washed them before hanging them to dry.

Throughout this process my assistant did nothing to help other than supervising from her favorite spot on the couch!

9

I think both turned out ok and I’m glad I decided to add more color to my closet.

10   11

I’ve worn the purple top a few times now and think its a nice casual piece.  I haven’t worn the green top yet, but plan to pair it with slacks and a cardigan for a casual work outfit.  What do you think?  Improvement or just a cover up?

Big Plans for the Back Yard

Although the house is still under construction and we won’t move in until late fall, we’ve already been thinking about what we want the back yard to look like.  The builder will install a 20′ x 12′ deck off the family room – where the three ‘pink’ footers are in the picture below.  We specifically requested an additional slider door be included in our Master Bedroom rather than just a window so we can have back yard access on that side too.  The builder will provide basic ‘steps’ at that door for now, but next season we plan to build a deck to match the one on the other side.

Back

We had originally planned to continue the deck out the entire length of the house, but we decided it would be easier and more cost effective to have the two decks with a ground-level patio in between so that the hot tub could sit lower than the deck which eliminates the need to ‘climb’ into it.  Plus I won’t fret about the deck being stable enough to support a full hot tub!

I also like the idea of breaking the space up into different areas for different purposes.  I’m envisioning something like this on our ‘private’ Master Bedroom deck for lounging and a dining set on the deck off the family room.  On the patio below I would like to make something like this where guests could sit and relax near a fire pit which will be made from this free washing machine tub we snagged on Craigslist last week!

Pit

The plan is to use pavers like this or stamped concrete like this on the patio, then use landscaping stones to create a spot that the drum will slide into.  Eventually we’d like to have one or both decks screened in or at least covered by a pergola with some sort of rain protection to extend the usability in our short summer season.  But that of course is a year or five down the road.

Beyond the decks and patio we plan to have grass for the dogs.  Depending on when we get into the house, we might buy some of the ‘end of season clearance seed’ to put out and see what we get, but most likely we will have the yard hydroseeded next spring.  I was stunned to find out that they charge just $395 if the area to be seeded is less than 3,000 sq. ft.  Um, yeah!  Sounds good to me!  Definitely better than the Craigslist ad I saw for free sod if you come cut up and haul off some guy’s yard!  I might be thrifty, but I know my time is valuable and I’d spend a whole lot more digging up, hauling and replanting his old “who knows what’s in it” grass than paying the out call to have fresh, weed free grass growing within 2 weeks!  Knowing us we’ll measure out everything before we schedule and make sure we’re just under that figure. We should be able to do an L-shape around the back and side of the house well within that figure.  🙂

I don’t have much landscaping beyond the deck-patio-deck and lawn planned for the back yard, but I will probably put a small flower bed along the bedroom side of the house for perennials like bulbs and hostas.  Our garden will be to the right of the deck off the family room in the alcove created between the side o the house and 3rd bay of the garage, which you can see on the right edge of the photo above.  Watch for a post about that plan next week!

I’ll Take That As a Yes!

In my last post I mentioned that we planned to add a hot tub to the back of the house near the slider in our Master Bedroom.  We originally thought we’d purchase a smaller close-out model as our ‘joint’ Christmas present to ourselves, but while browsing Craigslist recently I noticed that they tend to pop up for FREE with only minor issues.  Apparently many people get them or inherit them when they move in and don’t want to maintain them, so they want someone to haul it off to make room for other things.  Works for us!

We’d called about one advertised as ‘working but has a crack due to water being left in it over the winter and freezing’.  Apparently so did a lot of other people and we were too far down the list to end up taking it home.  It must have been fate because the other night I spotted another post for a free hot tub that said it ran, had a new pump and heater, but had a small leak.  I emailed the contact and asked to come take a look the next afternoon.  Luckily, I was the first to do so because the gal said we had first dibs before she responded to other emails.

The hubs went to look at it after work Monday night and made arrangements to come back when the lady’s boyfriend was off work since he owned a nearby equipment rental business and could load the massive 8 PERSON tub on our 4-wheeler trailer with a forklift!  So, later that afternoon the hubby went back to their house with our trailer in tow and came home with this.

1

It’s in desperate need of a good scrubbing, but upon inspection of the inner workings it seems to be in great shape albeit home to many creepy crawlers – who didn’t seem to faze my hubby from inspecting every nook and cranny.

3

6

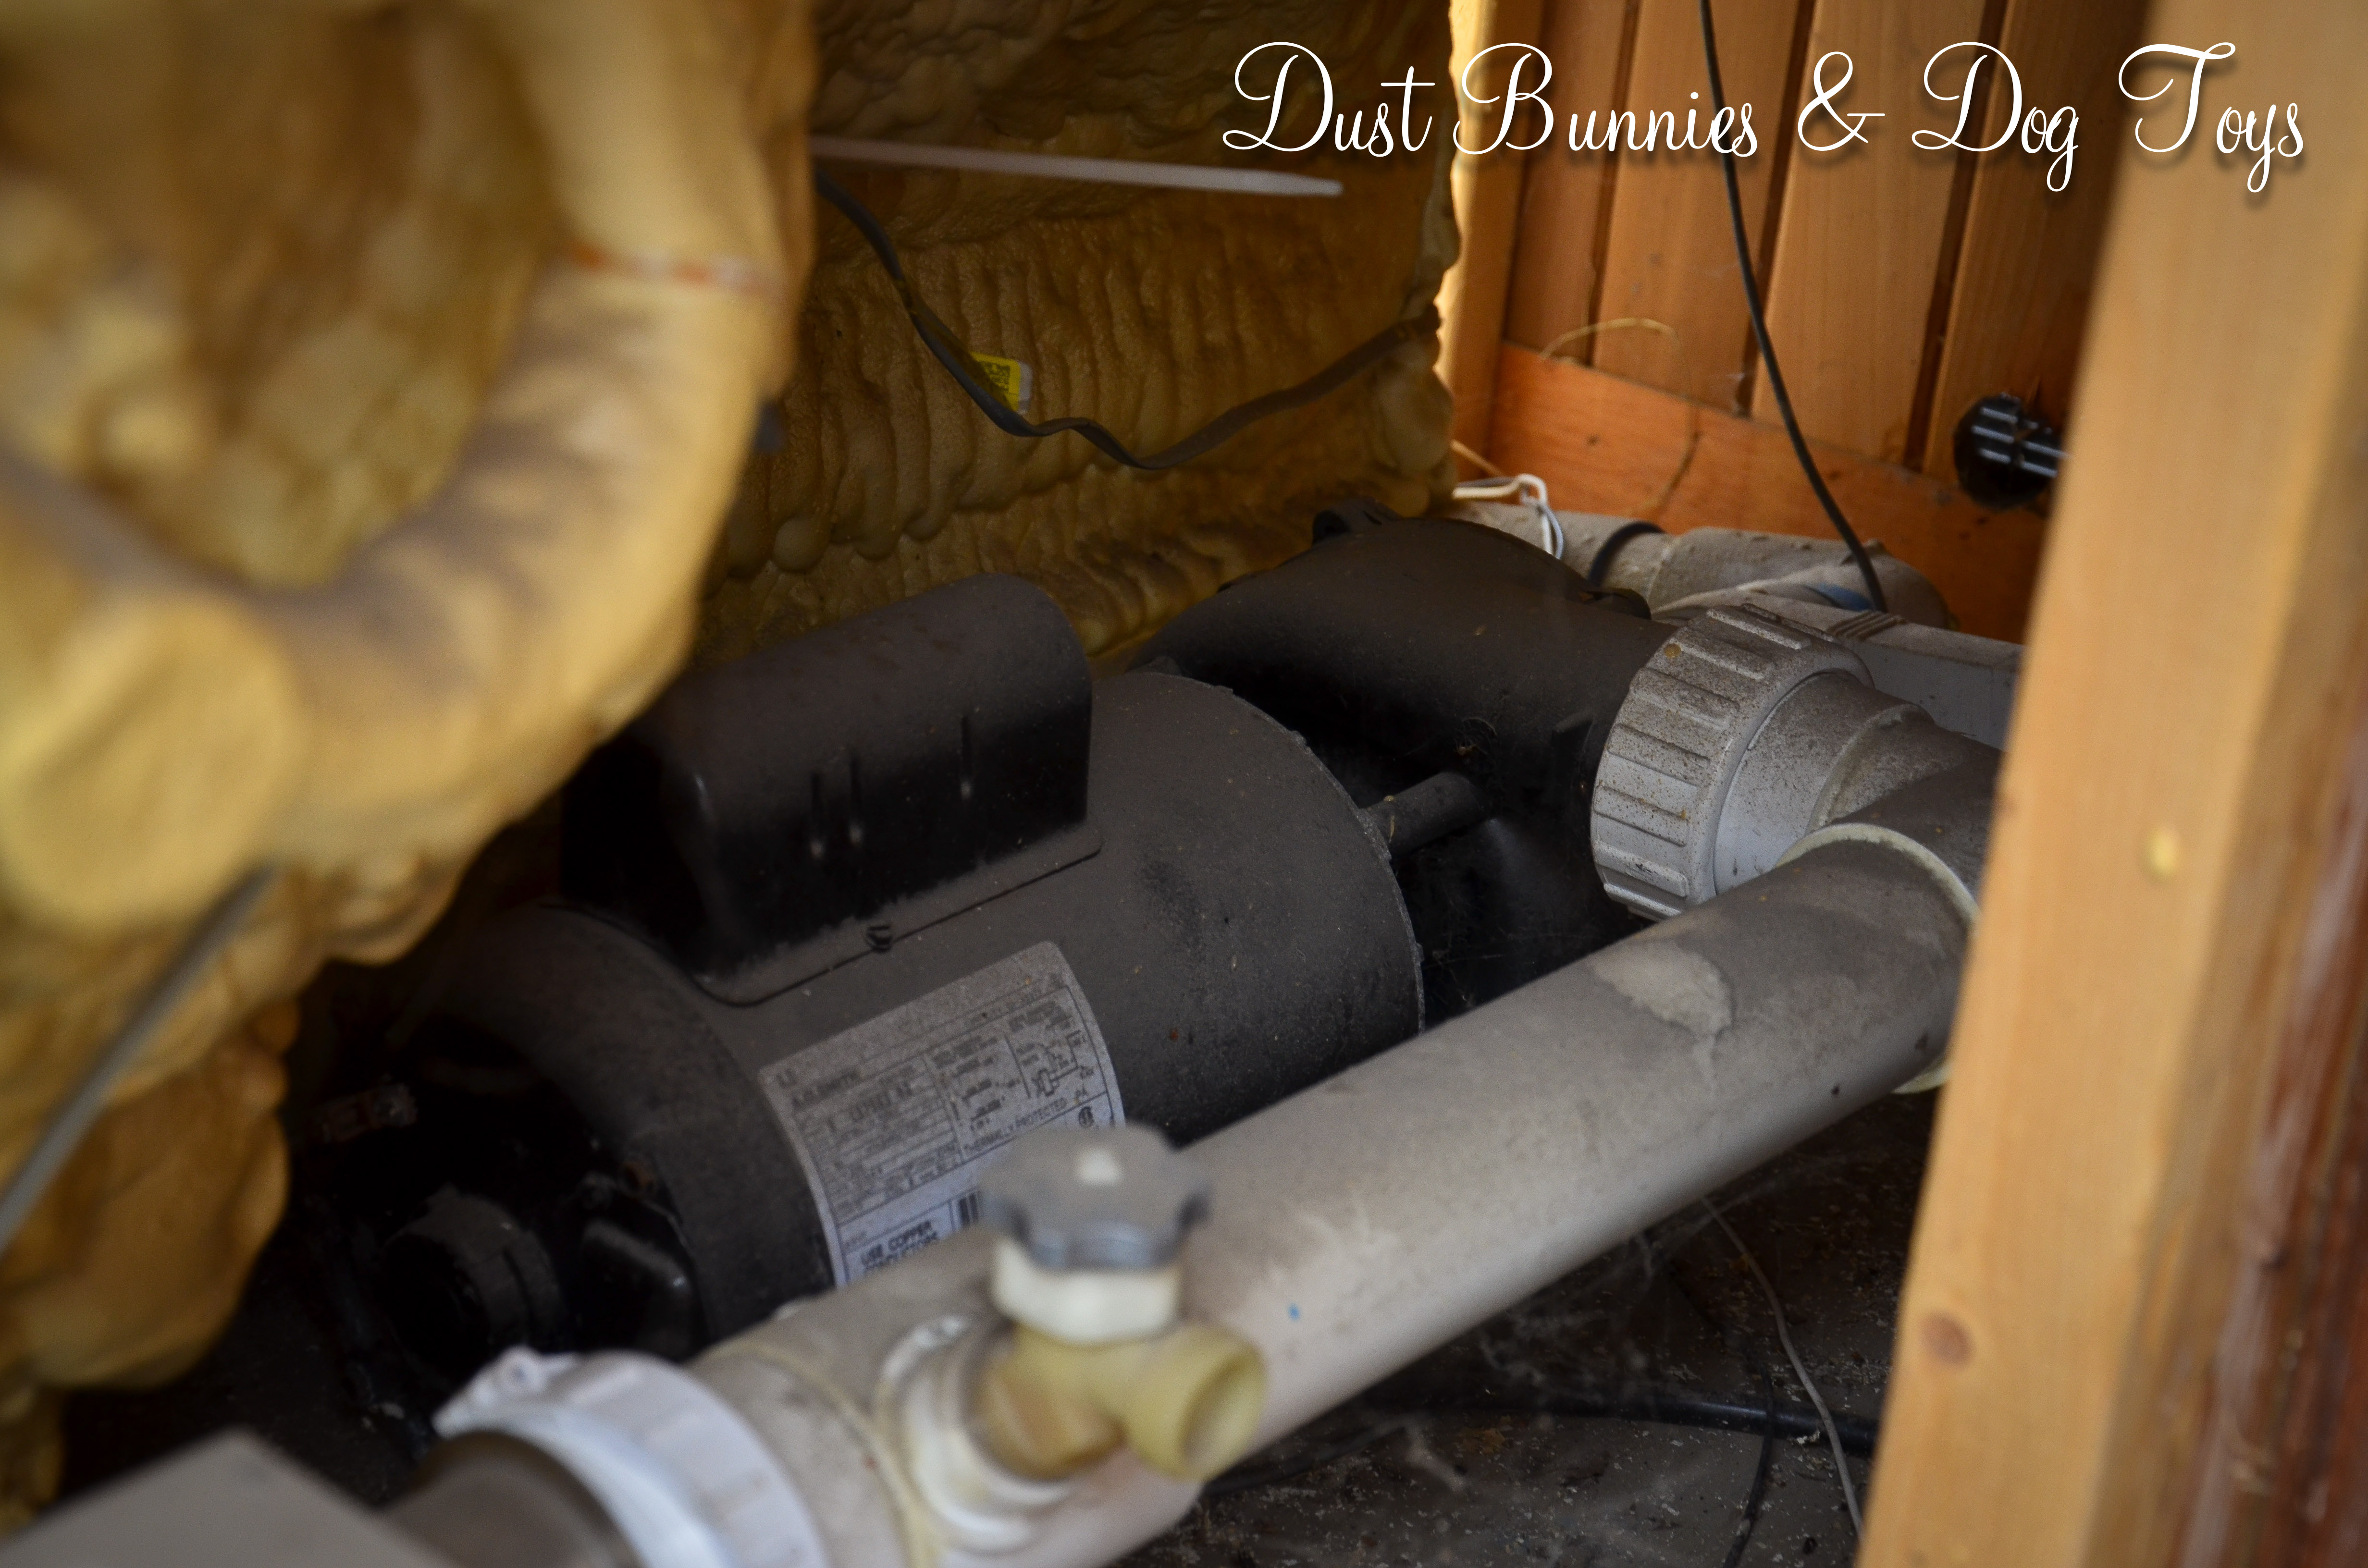
From what my jet engine mechanic husband can tell, it just needs a fitting on this pipe (photo on the left) next to the power box replaced so it looks like its match on the other side (photo on the right), and a new plug.

4  5

Hubs estimates the fitting to be under $15 and thinks the plug should run less than $50!  There is a hot tub store nearby so we plan to take it by there to confirm the parts needed and order them.

The standard cover was included, although it too needs a good pressure wash.  The new heater is still in the box, so we’ll keep it as a spare if everything works fine when we fire it up.  It also came with a box full of chemicals to maintain the PH and whatnot.  I haven’t checked for expiration dates on any of it but I’m sure there’s enough in there to get us started and figure out what we’d need to have on hand.

2

I’m sure this will be one of the first items ‘set up’ upon move in, and plan for it to be in use when we do finally have a house warming party!  We plan to build a deck off our bedroom to match the builder provided deck off the dining room and have a lower area between them covered with pavers or gravel for additional seating.  The hot tub will sit on a paver or concrete pad just to the right of the deck off the bedroom so it’s an easy step down into it rather than having to climb in and out of it on the deck.  That plan also eliminates the need for extra support beams and braces when we build the deck, saving money yet again.

Now I’m on the hunt for ideas on how to update the worn exterior paneling on the tub, which I’m thinking can be lightly sanded and restained or painted.  I’m sure Pinterest will have a host of ideas for that rather large project!   But the elbow grease will be well worth it in the end! And the hubs and I will be singing Phil Vassar’s “Hot Tub” song while enjoying the fruits of our labor! 🙂