DIY Industrial Vintage Laundry Dry Rack

2Today I’m sharing another industrial pipe project the hubs recently did for me – a dry rack in the laundry room.  I often have sweaters and tops that need to be dried flat, but since I don’t have a space to do that I usually hang those items on a folding dry rack over a vent in the adjacent dining room.  Unfortunately the hubs like his jeans to air dry and are often occupying the folding rack when I need to dry sweaters so my solution was a permanent rack in the laundry room over the sink.

1I originally asked for a bar straight across but the hubs determined that in order to get the best stability we’d have to place the bar higher than I originally thought so he created a small drop down in the design to compensate for the higher spot.  Luckily, I’m pretty tall and can reach the hanger up to catch the rod with the hook easily, so the height is no problem for me.

3

As you can see I’ve already put it to good use. It does infringe on Luna’s eating space a bit, but I think she secretly likes hiding behind the clothes when the rack has several items on it and as long as she can see out the window she’s a happy camper and I’m happy to have a space that functions and looks awesome. Thanks honey! 🙂

Shared on Knick of Time’s Vintage Inspiration Party!

DIY Industrial Cart Bed

Cart

Remember this cool metal cart I shared last month? Well the hubs has worked his magic and converted it to the coolest bed for our foster room!  I don’t have step-by-step instructions since he worked on this while I was working on other projects, but you can see the basic design in the picture below.

9

He also built a trundle frame based on a plan I found on Pinterest that rolls right underneath so we have the ability to take in siblings if needed.  Both the trundle and the bed are super sturdy so there’s no worries about having a kiddo and all of the dogs on there together, which I can envision happening.

8

Here it is all dressed!  And because we went with a simple day bed style it should be simple and easy to teach kids how to make the bed and keep things tidy.  It’s also a great new place for Luna to explore as you see below.

7

We still need to get a mattress for the trundle frame and figure out a desk and nightstand for either side of the bed, but I think this room is finally starting to come together!

Shared on Knick of Time’s Vintage Inspiration Party!

DIY Measuring Cup Storage

Hooks5

I’ve been meaning to do this project for some time now and finally checked it off the list this past weekend while the hubs was sleeping of a cold and I needed something quiet to work on.  Our stacked measuring cups always seemed to be in the way in the cabinet, so I decided it was time they found a different home, one that didn’t cause extra effort when grabbing things in the cabinet.  Since there was a little extra room on both sides of the spice rack the hubs installed on the pantry door and that’s often what we’re measuring with these cups I figured that was a logical spot for them.  A few small hooks on either side of the spice rack was all I needed.Hooks1

The hooks screwed right in, although I did create a pilot hole with a finishing nail and hammer to get things started. I placed each cup as I went so I could eyeball how much space to leave between it and the next.Hooks2

Here’s how the first side looked a few minutes later.  All but one of the set fit on this side.

Hooks3

So I put the remaining cup on the other side with our odd duck extra from an old set that is handy to keep around.

Hooks4

Unfortunately the way they were hanging you couldn’t see the measurements with out taking them off the hook.  A metallic sharpie marker took care of that problem.  We’ll see how well it holds up to the washer, but I’m thinking it should be ok since they will have plenty of time to cure and dry before they go in for a spin.

Hooks6

It might take a bit to get used to the sound they make as they sway against the wood when you open and close the pantry door, but I’m fine with that when it comes with improved organization.  Simple, inexpensive and efficient.  That’s my kind of project!

Shared on Tatertots & Jello’s Link Party Palooza.

Industrial Cart Makeover Plan

Cart

Today I’m sharing another project plan for our future Foster room.  We scored this fabulous industrial cart in a government auction for $45.  I originally planned to use it as a coffee table on the deck, but one of the wheels was missing some of the rubber tread, so it didn’t roll smoothly, which could be a pain when I want to move it around to change up seating.

CartWheel

Plus its SUPER HEAVY so I wasn’t keen on adding more weight to the deck since we already have the Green Egg table out there and a large seating area.  It was way too cool to not use it in some way, so I had to find another purpose for it.  Luckily inspiration struck quickly.  Although I’d picked up a bunk bed frame and a wooden twin bed for the Foster Room neither ended up working out like I’d hoped so I was looking for an alternative.  It dawned on me that the cart seemed to be about the same size as a twin bed, so I put the mattress on top to see how it fit.

CartMattress

I was quite a bit giddy when I realized it was a perfect match! Since I wanted the bed to be a trundle I knew we’d have to take the wheels off and create some other form of support, so seeing that the sockets at both ends of the bed were still accessible gave me another idea.

CartMattress2

We could create a frame for each end with metal pipe that would fit through the sockets! I did some searching on Pinterest and found something similar to my vision, talked it over with the hubs and confirmed it was possible.

CartHole

Armed with a plan, the hubs made a multi-project shopping trip to the big blue box and now has the materials we need to get this project underway. Hopefully that will happen over the weekend and maybe even be completed by next weekend, so stay tuned to see the progress!

More Gallery Wall Additions

GalleryWallFull

If you’ve been around the blog for a little while you know I’m slowly curating our gallery wall around the TV in the Family Room.  Today I’m sharing a few recent additions I added over the weekend.  The first is a rustic mirror I got from Michaels for free thanks to a great BOGO sale when I purchased the frame for my whale breach collage.  It originally came with a rope hanger attached to the sides, which I liked but not in this grouping.  So I removed it and will re-use it on another project I hope to wrap up this weekend.

MirrorClose

The whitewash creates a weathered patina that immediately drew me to the piece.   I placed the mirror on the side near the fireplace where it can reflect natural light from the windows. I think it also helps balance some of the bigger items in the whole collection and I love that the round shape breaks up all the square corners.

Mirror

I also added this lovely rusty cross votive holder I scored on the local buy/sell page for $15. I had planned to use it on the deck, but didn’t want to constantly be emptying the votive holder when it rains, so I decided to find it a spot inside and am in love with it here. Next to it I added a freebie frame I got on the same Michaels BOGO order. I filled it with a free chalkboard printable I found online. I might change the chalkboard print seasonally, but I like that this one can transition from season to season if I opt not to.  Plus I love the simplicity and thought behind the quote. 🙂

GalleryWallCross

I plan to DIY a long narrow Alaskan themed sign to fill the space just above the cross and chalkboard print and a shorter narrow piece to fill the space between the fireplace switch and the stone, but it might be a while before those happen.  I also have a piece of family history on the hub’s side that I want to add under the metal 7, but need to figure out how to make sure it’s secure because it’s pretty darn heavy.  Stay tuned to see how this space continues to evolve!

GalleryWallFull

Shared on Knick of Time’s Vintage Inspiration Party #209!

Fairy Tale Ending for a Pumpkin

3
This little DIY pumpkin was a happy accident, which is why I don’t have a true before shot. I bought this white craft pumpkin at Michaels last year and used it without doing anything to it, but it wasn’t quiet fitting in with my other décor this year.  I was about to add it to my sell pile but decided to give it a chance and added it to the batch being chalk painted instead. Although that did tone down the bright white it still wasn’t jiving for me.

1

As I added gold touches to the several of my vignettes, I remembered I had some gold craft paint leftover from a past project and decided to give it a try. I opted to use the rose gold rather than the true gold because it felt a bit warmer.

2

I just started brushing it on, applying a thin coat and then adding a bit in some areas, primarily the grooves, as the mood struck me.  Once that dried I painted the stem with some more left over craft paint I had on hand and suddenly that simple white pumpkin looked pretty darn glam!

4

And it was the perfect contrast to my rustic wooden DIY pumpkins from last year in the entryway!  It’s a pumpkin Cinderella story – from unnoticed to belle of the ball!

FallEntry2

Did you have any happy accidents while decorating or crafting recently? I’d love to hear about them, so leave a comment below!

DIY Rustic Fall Centerpiece

As promised, today I’m sharing how I created the DIY chalk paint fall tray centerpiece on our dining room table. I picked up this wooden tray on a local buy/sell page for $15 from the Rusty B (love her stuff!). It had a metal handle that had come a bit loose so I popped that off and gave it a quick coat of cream chalk spray paint left over from painting the pumpkins I used around the house this year. I’m really loving this stuff and it comes in lots of colors! Anywho, I forgot to take a picture before taking the handle off but here’s the before – like literally seconds before the spray paint started flying thanks to my hubby who snapped the picture with my phone as I shook the can in between sprays! (In fact, you can see a little peek of the pumpkins I’d started painting in the top corner.)
FallTrayBefore

After two coats it was looking pretty good.  Much brighter and prettier than before.  The chalk paint gave it just a bit of texture, but it looked a little flat.   So I decided to distress it a bit to get some of the black to show through.

FallTray2

A quick hand sanding later it had dimension again with a worn, lived with look. Then I reattached the metal handle and it was ready for some fall filler.

FallTrayAfter

I filled the bottom with white beans, then topped it with a variety of pumpkins and gourds in similar colors. A few pieces of leftover berry spray from the entryway and a couple filler pieces I found on a recent trip to Michaels and it was done.
FallTable

And that’s the story of my DIY fall centerpiece. I’ll be back tomorrow with the quick makeover I did on a little faux pumpkin!

Shared on Knick of Time’s Vintage Inspiration Party #209!

My Fall Decor

FallMantel
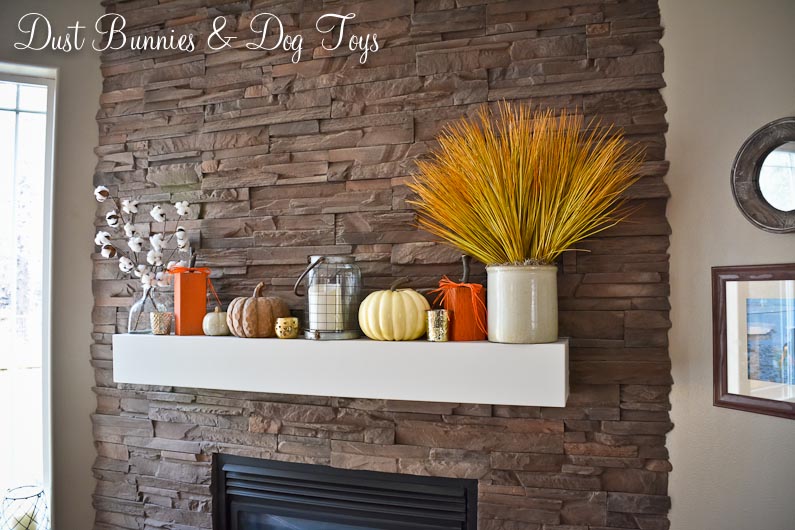
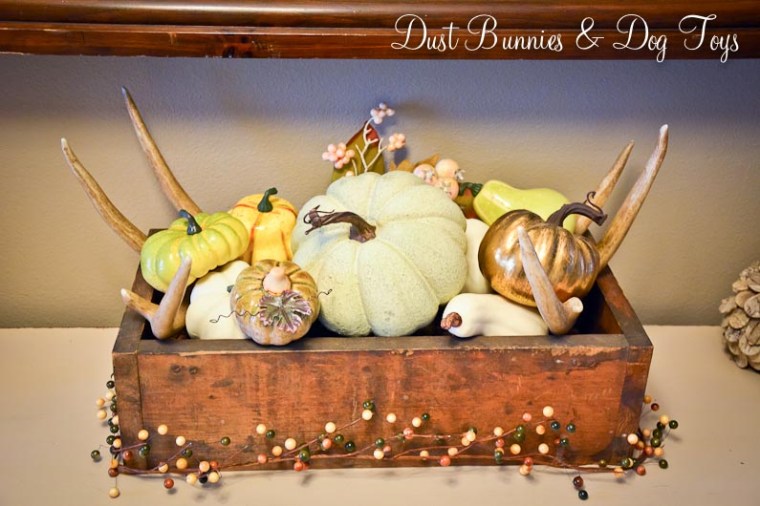
At last, I’ve finished decorating for fall and got some nice daylight shots to share.  I started with the mantel, which I kept very natural and neutral with a little pop of orange from the DIY pumpkins I made last year.

FallMedia1

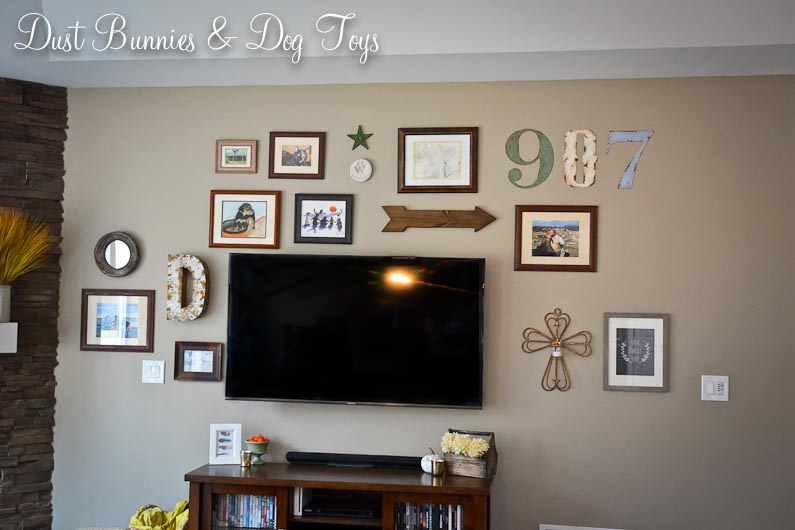
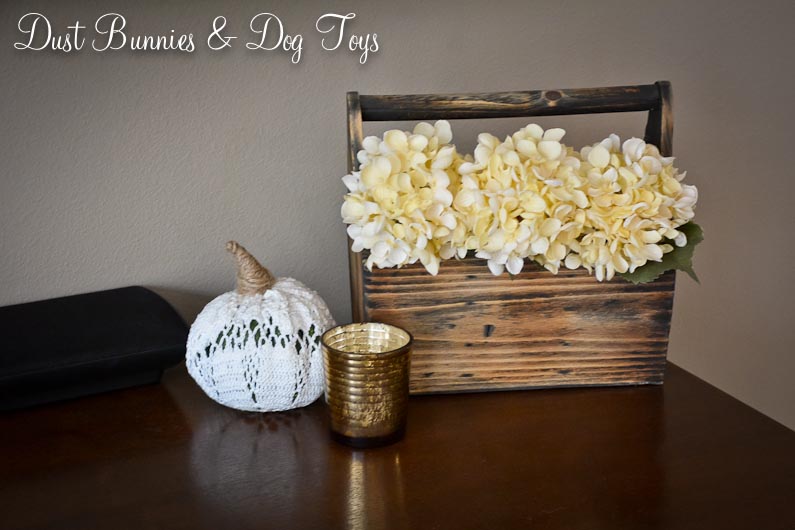
Next to the fireplace I continued the neutral theme on the media cabinet. I found the free feather print online and added a green urn filled with tiny yarn pumpkins I DIY’d years ago by wrapping orange yarn around and around to form a ball, then adding a small stick as a stem. On the other side I kept the wooden tool box filled with hydrangeas from my summer décor and added a doily wrapped pumpkin – another DIY from years past using a doily to cover a basic green plastic pumpkin and covering the gathered ends with twine I wrapped to form a stem.

FallMedia2

My yellow and orange zig zag pillow covers made the throw pillows I was using for the summer more appropriate for fall and I added a couple of clearance pillows I found at Michaels to tie in the neutral colors I’d used elsewhere. I also picked up a white striped pillow in the same pattern as the black ones and have it on the chair next to the couch, although I somehow forgot to take a picture of it.

FallCouch

On the side table I placed a ceramic lantern and pumpkin in a metal tray and finished it off with a cute little wooden crow I’ve had for years. The lantern and tray were both recent Michaels finds. And the arrangement leaves just the right amount of room for the TV remote to be stored in the tray where it can be found.

FallSideTray

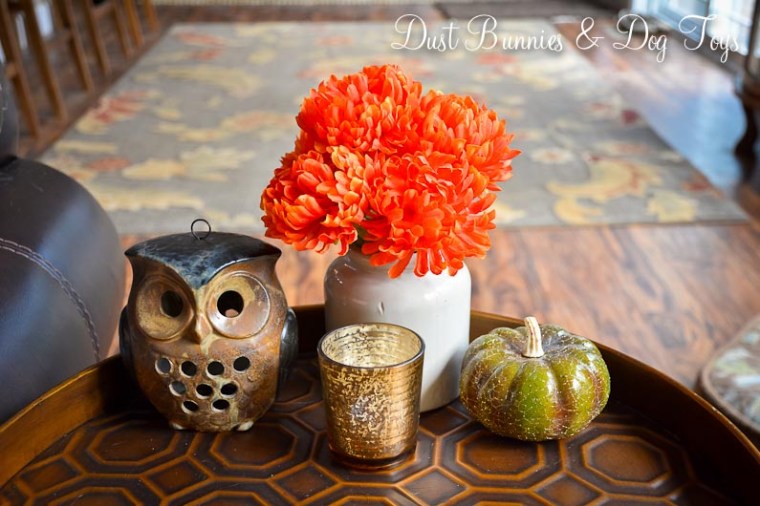
The metal table between the chair and couch holds my favorite thrifted find, a little owl lantern with some orange mums in an old crock and a pretty glittery green pumpkin I found at Walmart for under $1.

FallSideTray2

I put my little scarecrow on top of the curio cabinet, where his little button legs are safe from puppy teeth.  I like to display him with them dangling like I did last year, but now that the dogs are home alone for a longer portion of the day I figured it was better to be safe than sorry.

FallScarcrow

I kept things simple in the entry way, using more of my DIY wooden pumpkins and an old wood tray I got at the estate sale this summer.

FallEntry

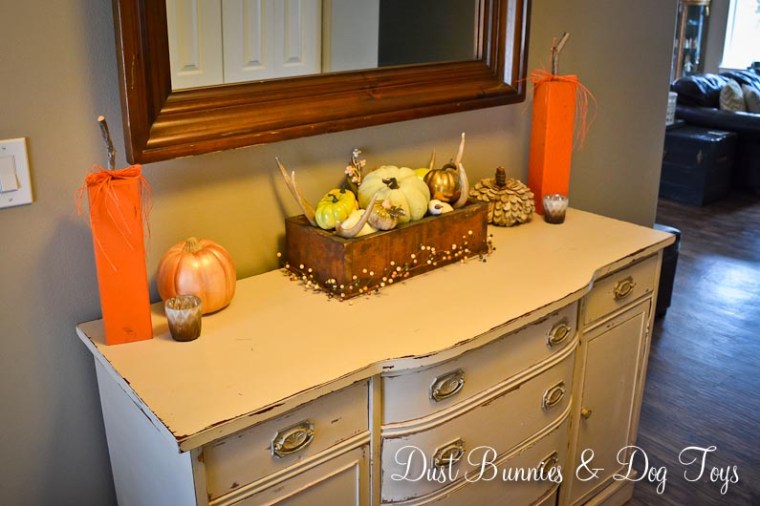
I filled the tray with a variety of green and neutral colored pumpkins and gourds, including several I painted white with chalk spray paint after seeing one of my favorite bloggers create some for her home the same way, although I painted the stems of mine green and brown for a little contrast. I added a berry spray I got at Michaels around the base for a little extra color.

FallEntry4

I also DIY’d this gold pumpkin, which picks up some of the golds in the pumpkins in the wooden tray. It was a super simple project using craft paint I had on hand, but I’ll share a recap of it in the next few days.

FallEntry2

On the other side of the entry table, I used a textured wooden pumpkin I found at Target. I’ve seen them all over blog land and there were only a few left at my store, so if you want one you better hurry.

FallEntry3

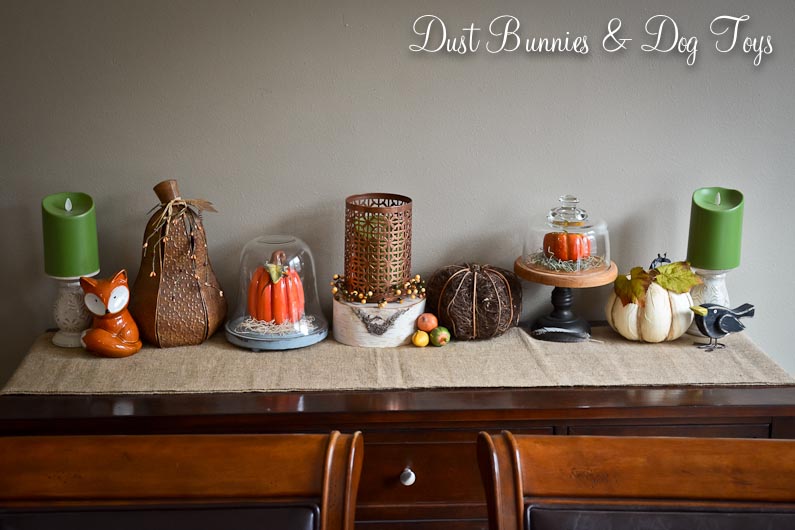
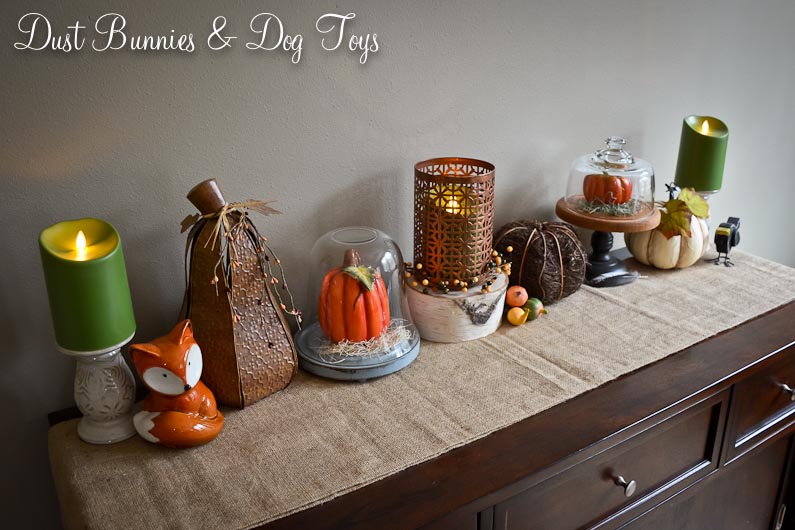
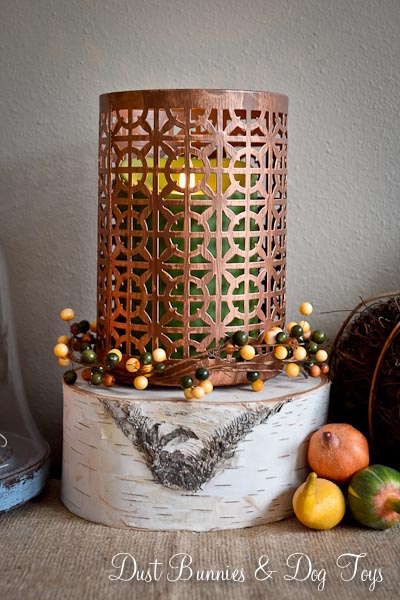
Over in the dining room the buffet became home to a mix of old and new pieces with a variety of textures.

FallBuffet

In the center is a new copper lantern I found on sale at Michaels. I paired it with a birch log stand and a piece of the berry spray I used in the entry way.

FallBuffetLantern

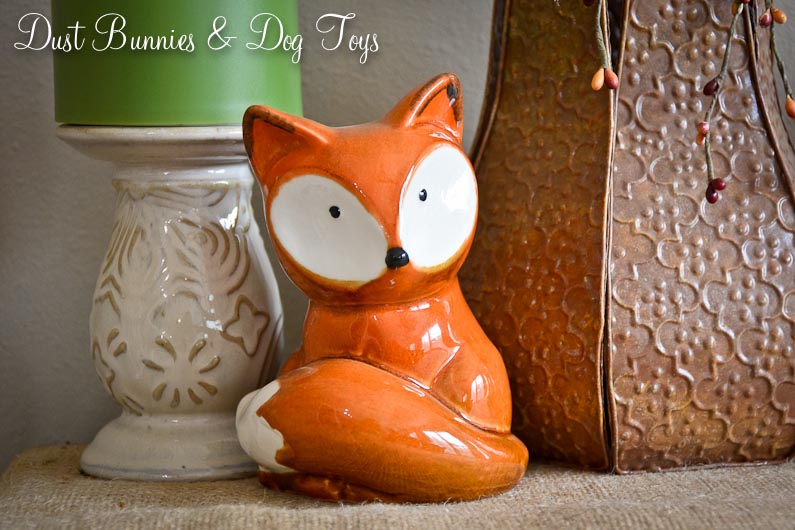
I found this little fox at Fred Meyer and knew he had to come home with me. I loved his graceful curved tail and adorable face. And since it was a BOGO half off sale he made a cute green ceramic pumpkin only a $1. The pumpkin ended up in the wooden tray in the entry way.

FallBuffetFox

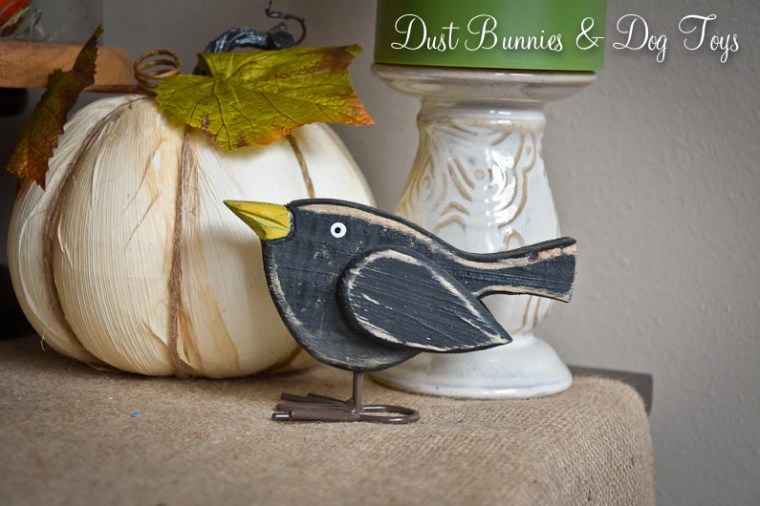
Another new find this year was this rustic crow. He’s super sturdy with his strong metal feet and his distressed colors blend perfectly with the rest of my décor this year.

FallBuffetCrow

And here’s the whole scene with the candles on and flickering. I’ve set them all on a timer so they automatically come on about the time we get home each evening and I’m enjoying the pretty warm glow they create.

FallBuffetLighted

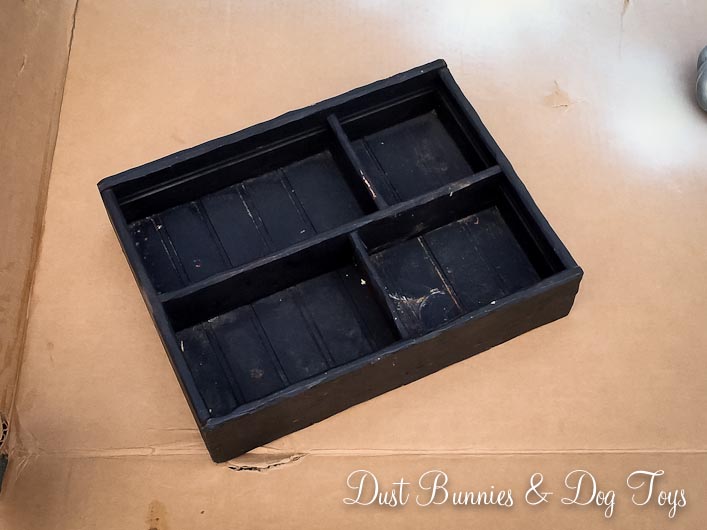
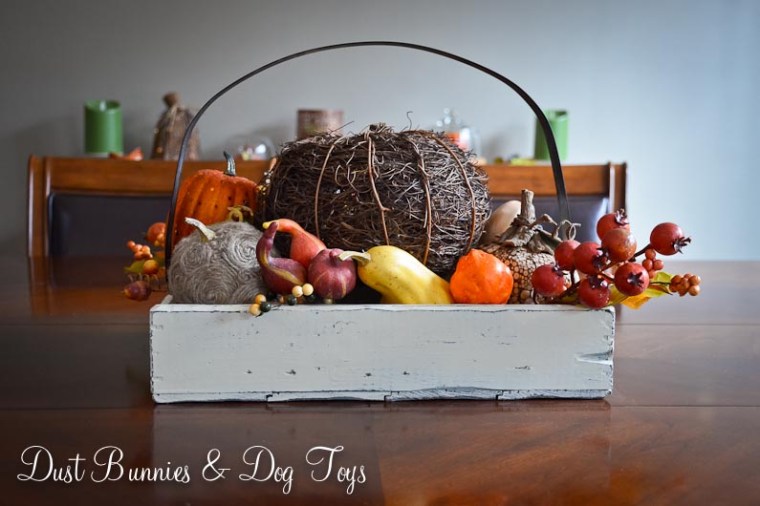
In front of the buffet I put together this little basket of harvest goodness. This was another revamped DIY piece created from a wooden tray I found on the local buy/sell page. I’ll share that project tomorrow.

FallTable2

FallTableSo that’s my fall décor.  October is shaping up to be a very busy month, including a work trip to Southeast Alaska, so I might just skip decorating for Halloween this year and leave these pieces up through Thanksgiving, but we’ll see.
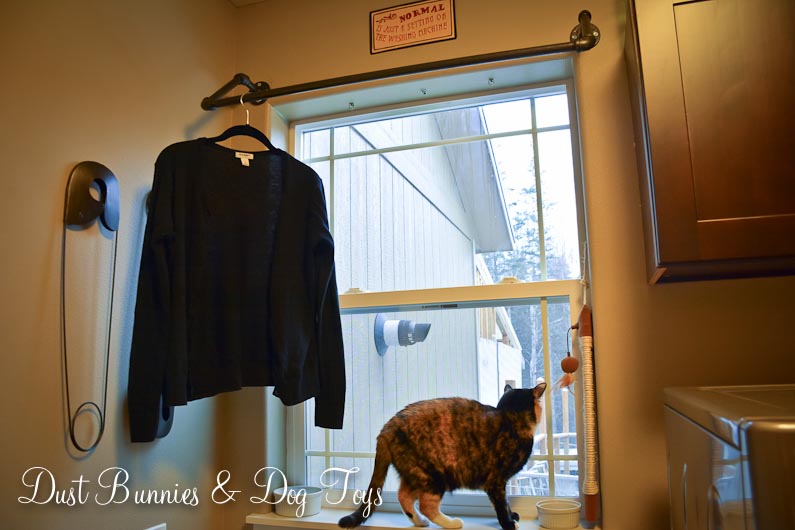
Rustic Humble Sign

4

I spotted this large sign at an estate sale we attended this summer and immediately wanted it.  Unfortunately, the auction was done “by the pallet” and it was the only thing on the pallet I wanted so when the price went up I bowed out.  When I spotted the winning bidder sorting through the rest of the pile I figured it was worth a shot to ask if they wanted the sign and if they would be willing to sell me just that item.  He replied with “$20 and it’s yours.”  Needless to say I quickly dished out a $20 and practically skipped away with my sign.

Once I sat down with it I realized it wasn’t a true antique.  Instead it was a paper print on a metal base and because the auctioneers had taped across it to secure it on the top of the pallet the original buyer had realized that the tape was ripping the paper decal as you tried to take it off.  I was pretty bummed but decided to give it a shot.  I slowly worked the tape off so it wouldn’t damage any more of the decal and was able to get the entire strip off without further damage.

Once I got it home I Modge Podged the ripped section, which left a thin white line on either side of the tear.  To disguise that I took some wood stain and applied it lightly to the area wiping it off quickly.  A few coats made it blend right in.    You can still spot it if you look for it, but otherwise you’d never notice.  I decided to hang it in what will become our Foster Child room above the closet.  Being up high helps hide the blemish and I thought it was a great sentiment for a child’s room.

5

I’ve got some other exciting revamp/DIY plans for getting this room set up. We need the room to be gender neutral, so I’m going with an industrial/vintage style that can be personalized a bit for whoever comes to stay with us. I’ll be sharing those details over the next few weeks, so stay tuned!

Shared on Knick of Time’s Vintage Inspiration Party #209!

Rustic Windmill Becomes Art – The Plan

So it should come as no surprise that I’m a huge fan of the show Fixer Upper, and if you’ve watched it at all you know Joanna Gaines’ penchant for using windmills as wall art. I loved the look and decided to make the same happen in our home. Luckily, we have a fantastic local antique store who does picking trips across Canada and the lower 48. So when they asked if anyone was looking for something in particular I made sure my request got on the list. It must have been fate because they found one in Wisconsin! Unfortunately they didn’t have room to bring it back that trip, but they were able to store it at a partner’s warehouse until the next trip when they cut it in half and wedged it into the trailer with all their other found treasures.

Windmill

Usually they have a big one day sale a few days after they return from each trip where the items they pick are available, but since it was a special pick just for me,  I got to come pick it up as they were unloading.  It’s definitely a large scale piece, measuring about 8′ wide and 4′ tall!  The picture above is a shot of it on our big flatbed trailer in the yard.  It’s so large that I had to take the photo vertically and rotate it because I couldn’t get high enough to fit the whole thing in the frame!  Although they brought back the better half for me, it is missing half of two of the blades, but because they are in the center it doesn’t bother me much.  And how can you not love the amazing patina this thing has?!

WindmillLeaf

The plan is to mount this massive piece of rustic art on the dining room wall, which I’ve cleared in preparation.  The small yellow stickie notes are an approximate of the size for reference.  I’d like to have a white plank wall (another Fixer Upper inspiration) behind it so that has to happen first because I have no intention of making the hubs help me move and mount this mother more than once. He loves me, but I’m not sure he loves me enough for that! 😉  I’m hopeful that we’ll get that done before December so I can clip all the holiday cards we receive to it, but life might get in the way of that, so we’ll see.

1

For now I’ll just envision it there above the buffet, which includes a sneak peek of my fall decorating that I’ll be sharing soon – including a few DIY revamps!  I’ll be sure to share both the plank wall install and final look with the windmill in place, so stay tuned!