Tobacco Baskets in the Laundry Room

basketclose

Today I’m sharing another quick project that came together after our trip to Portland in the fall.  I found these amazing reproduction tobacco baskets on a decor website I frequent and purchased two sets of a large size and a small size.  Unfortunately the distributor wouldn’t ship to Alaska, so I had them sent to the Hub’s Mom’s house in Portland knowing we’d be visiting soon.  I told the Hubs that these were part of the “must come back” pile and he made it happen, even with their fragile construction.  Have I mentioned recently how much I love that man? 🙂

basketswide

I’d been on the hunt for tobacco baskets for some time when I found these and knew exactly where I’d use them when I bought them – in the laundry room above the board & batten we installed earlier this year.  My vision of having one large basket in the middle of the wall flanked by the two smaller ones worked out perfectly.

basketsside

It’s just enough to finish out this wall in farmhouse style without being too heavy and it adds a bit more texture to the space.  Plus the fact that I was able to put them up all by myself with a couple of finishing nails made the whole project even simpler.

basketsview

Here’s how things look from the dining room.  I ended up selling the other large basket so my total cost for this project, including shipping to Portland was around $55.  Not bad for three good sized pieces of art.

We also brought back another large piece of art I had to ship to Portland for pick-up.  That piece ended up in the dining room and I’ll be sharing it here soon, so stay tuned for that!

A New Roof for the Chicken Yard

6

Hi everyone!  I hope you had a wonderful Christmas.  Now that we’re through the big holiday I thought I’d catch you up on several projects that happened around the house in the past few months as we prepared for winter.  The first was replacing the netting over the chicken yard with something sturdier.  The netting had started to tear in several spots and had actually come loose from where it was attached to the wall of the house, leaving our flock vulnerable to attack from above.  The Hubs wanted something more permanent that would stand up to snow, so he found these metal fencing panels at a local fence company.

2

First he removed the old netting (note the large ball of it on the roost to the right in the photo above).  Then he cut the panels to fit the space and zip tied them together where there were seams.  He also used zip ties to secure the panels to the support beams of the run.

4

Over by the run door he had to get creative to make enough room for the door to open but still work against the laundry room window.  He decided to create an angled panel for this section and it works pretty well.

3

He had to trim down the hen house doors so they open underneath the support beam on the front of the run.  It’s so much nicer being able to open these doors all the way without worrying about the edges catching the netting overhead!

5

He also added a small metal flashing to act as a gutter along the roof of the run.  This keeps the large amount of water that comes off the run’s roof from flooding the chicken yard, which was a constant problem this summer.  Now it drains right over the blocks I placed around the yard.  This might be too much water for the plants in the blocks next summer, so I’ll have to watch it and decide if I need to set up a water barrel to collect the water and reuse it for the chickens or watering the garden.

1

We may eventually cover the panels with clear plastic roofing panels, like those used on greenhouses, to help reduce water pooling more but for now the upgrade is the perfect protection for our cluckers and blends in well with the panels we used for the sides of the yard.

snow

And it’s been holding up to the snow very well, even when it gets a bit thick.  Looks like another great job by the Hubs!  It’s a good thing he found me so he has reasons to use all those mad skills he’s got. 😉

Save

Last Minute Finishing Touches

1It’s the week of Christmas and I’m still tweaking my holiday decorations.  I wanted something above the mantel in the family room and had been looking for a farmhouse style sign that said “There’s no place like home for the holidays” but hadn’t been able to find one locally.  I considered DIY’ing one, but knew that wouldn’t happen with my current to-do lists.  So I came up with a quick DIY alternative using items I already had and a free printable.

I dug out this large classic frame I’ve used on the mantel several times before including St. Patrick’s and Halloween.  I filled it with some light colored burlap material from my fabric stash and used the cardboard baffle inside to keep the fabric tight.

bcOnce it was closed up, I turned it over and added a free printable I found online thanks to  fellow blogger Lil Luna to the glass on the front using glue dots.  This made placement much easier than trying to attach the print directly to the fabric and center it in the frame under the glass.

dHere’s how it looked all put together.  Sorry for the late night photos, but daylight is a rare thing when I’m at home working on projects these days.  Unfortunately this frame has seen better days and no longer has good hanging options on the backside, so we had to get creative when we went to put it on the wall – especially one made of stone.

aThe Hubs and I came up with a solution using more items we had on hand and now it completes the fireplace wall – just in time for Christmas!

eAnd while we’re talking Christmas decor, I’ll give you a quick tour around the house of my other displays, since I’ve been meaning to do that with photos I was able to take during our minimal daylight hours.

Next to the fireplace I used my collection of bottle brushes along with another free printable I found on the Little Glass Jar blog.  I flanked everything with two of our favorite lanterns filled with pine cones and mini light strings.  Please overlook the dust I apparently didn’t notice when taking these photos – because it’s so common in our household, hence the name of this blog!

treestrees2In the entry way a lighted garland is the perfect base for several woodland style characters, including this super cute driftwood reindeer I just added to the herd this year!  I haven’t named him yet, so if you have suggestions I’d love to hear them.  I also picked up that cute little stuffed fox this year and think he makes a perfect buddy for Santa – plus he makes a great prop for winter time photos shoots with small children!  He’s in need of a name as well so share those ideas too.

entrydeerfoxOut front there’s a new wreath on the door as Rusty greets visitors.  I usually get a live wreath, but the fundraiser I used to buy from is no longer available through a friend, so decided to go faux and get something I can use for several years.  The classic combination of silver and gold should fit in with any holiday style I try over the coming years.

doorwreathI shared my decor on the dining room buffet on Facebook a while back, including the new wall decor I got this year so be sure to get a peek at that.  On an adjacent wall I placed another new piece, this barn wood angel.  I picked her up at the Colony High School Holiday Bazaar that I attend every year.  She was created by the same vendor who made the barn wood star that hung above our nativity set last year and then became part of the gallery wall.

angelThere are a few other decorations around the house, but they are minimal and most have been shared here on the blog before so I won’t rehash them.   I hope you enjoyed the project and quick holiday tour!

Our New Star Tree Topper

I’ve been on the hunt for the past several weeks to find a new star topper for our Christmas tree.  Although I’ve seen a variety of adorable alternate tree topper ideas, I like the tradition of a star atop the tree.  We used to have a large glittery copper paper star, that met an unfortunate demise when it fell off the tree and Bacardi ‘revamped’ it.  Last year we used an IKEA star, which is now on the nativity creche I shared last week.  It worked, but I didn’t love it and knew I wanted something new this year – besides, it looks a lot better with the nativity set than it did on the tree.

I was planning to DIY a star topper I saw on Pintrest but couldn’t find the right materials locally.  I also browsed Etsy for some ready to buy options, yet couldn’t find anything I loved.  So the top of our tree sat naked for the first few weeks it was up while I continued the hunt.  Luckily, during a recent stop at Walmart I spotted a gold colored faux mercury glass star that was ready to plug in and light up.

a

The box it came in was fairly beat up, so I looked for another one that hadn’t been abused, but after searching through all of the tree topper shelves I confirmed this was the last one in that style.  While it would still be pretty even if it didn’t light up, I didn’t want to pay full-price if I wasn’t going to get the glow atop my tree like I was envisioning.  Since it was quite early in the morning, the store wasn’t busy and a very nice sales associate helped me find an outlet make sure it still worked.  It lit right up as soon as he plugged it in, so I said I’d take it.

b

That night it went on top of our tree.  Since the plugs for the tree lights are in the middle of the tree and the star’s cord didn’t reach that far, I had to run an extension cord through the tree to plug it in.

c

It’s the perfect finishing touch to our tree and well worth the little extra effort and hunting.  It’s got a rustic and vintage vibe with the mercury glass look, yet is classic and modern too.  If only I’d known to search for mercury gold star to begin with!

I’m pretty sure we will be replacing the tree for next year – I’ll be on the hunt for a bargain during the after Christmas sales – but the size and style of the new star should work well with any tree we get, so I’m planning to enjoy it for many more years. 🙂

Updating a Tired Creche

z2Hello lovelies!  Did anyone else blink and last week fly right by?  It sure did for me!  Although it went by fast I was able to enjoy some downtime with the hubs and our fur babies while catching up on editing client photos and several holiday projects I’ve been wanting to do.  The first was creating a creche for my Willow Tree nativity set.

I wanted something rustic to compliment the rest of our decor so the creche that Willow Tree sells wasn’t going to fit the bill.  I’d pinned several DIY ideas on Pinterest but none had tutorials so I was planning to wing it and see what I came up with.  Luckily before I dove in and attempted anything I spotted this creche on one of the local buy/sell pages for just $7!  I quickly messaged the seller and arranged to pick it up that evening before someone else could swoop in on my bargain find.

crecheI knew I was going to revamp it a bit so when I got it home I gave it a thorough once over and came up with a game plan.  The first thing I did was remove the battered pine cone on the corner.  Then I removed the extra pieces of bark on the beam at the top and loft area to simplify the overall look.  I set it up on the curio cabinet and filled it with the nativity set to see how everything fit and decide my next step.  It sat like this for a few days while life rolled on but this past weekend I enlisted the Hubs help to make the final few changes.

1

I wanted a star above the roof of the stable because it’s such a huge part of the story.  I had an IKEA tree star we used last year that I was replacing and on a whim tested it with the creche.  It was the perfect proportion!  I had planned to have the Hubs clamp a dowel to the back of the stable but we didn’t have a dowel or clamps that were the right size.  The Hubs suggested we use a piece of pipe left over from the foster room bed and gave it a test fit to make sure it would fit in the base of the star and inside the clamp.  He had to grind the end of the pipe down a bit but it fit like a glove.  When we were test fitting the whole assembly on the back of the creche we discovered that the base of the star itself fit in the clamp and decided to forego the pipe and just use the clamp.

2Unfortunately, the back of the creche was very thin and didn’t provide enough grip to hold the screw and soon the weight of the star had spun the clamp out of position.

3My crafty Hubby came up with a solution quickly, recommending I hot glue the bracket in place and we put a brace below the bottom of the star to hold it in place.    It was such a simple idea and it worked like a charm.

4With the star secured, I filled in the open areas of the back wall with the pieces of bark I’d removed from the other areas along with moss from my crafting stash.  I attached it all with my new glue gun, which replaced it’s aging predecessor after it started splitting along the seem and oozing glue everywhere.

The screws for the star bracket and brace were visible inside of the creche, but I was able to hide them with strategically placed pieces of bark on the back wall and the cross beam at the top of the roof so they aren’t even noticeable.  I also had the Hubs trim the two front corners of the base at an angle to better fit the top of the curio cabinet.  (Sorry for the late night photos, but daylight hours are extremely limited around here this time of year so I tend to just let the Christmas tree be our light source, hence the glow to the right.)

0I re-positioned my nativity set inside and covered the bottom board with paper shavings from one of the holiday sausage gift sets we’d bought to enjoy together.  The brown coloring camouflaged the bottom board and coordinated with the bark perfectly.

zNotice that open spot in the shavings on the left?  It’s where I plan to place one of the three wise men from the set I just won on eBay!  I also scored the ox and goat set for a super deal so now I have a whole set minus the camel, which I’ll look for next year.  Until then I’m absolutely giddy with how the whole project turned out and am looking forward to using it for many years to come. 🙂

Save

Save

Save

Save

Denali Road Lottery

9So apparently tomorrow turned into a week – but that’s how life happens around here.  Soon the projects that are pulling my attention in 200 directions will be complete and I can refocus on celebrating the holidays.

Ironically, I was feeling about the same way when we took our quick trip to Denali several weeks back.  Too much going on and not enough hours to get it done, but in desperate need of a break to recharge.  Fortunately winning the Denali Road Lottery gave us just that opportunity.  If you haven’t heard about the lottery here’s a quick recap – the general public pay to enter the lottery for a chance to purchase a day-long permit on one of four selected dates.  You can get the full details on the program here.  Both the Hubs and I entered this year and I won for a date in late September.  In that area of Alaska, September could still be fall but often, it’s the beginning of winter weather so we knew we could experience either.

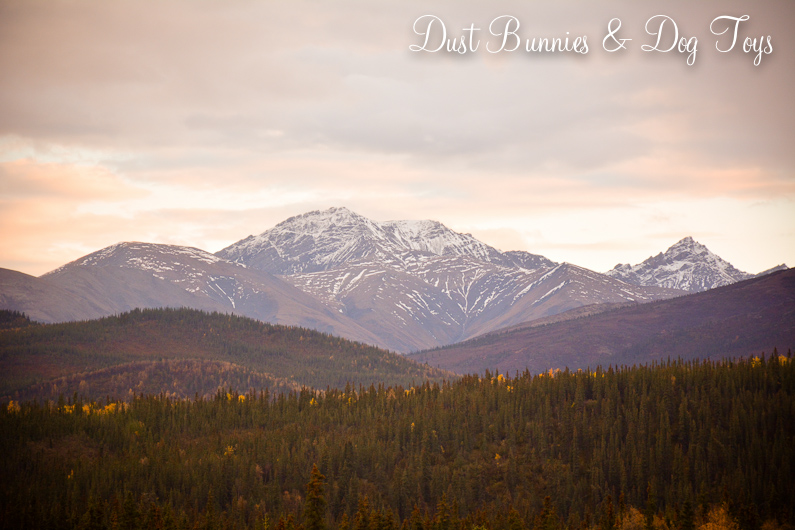
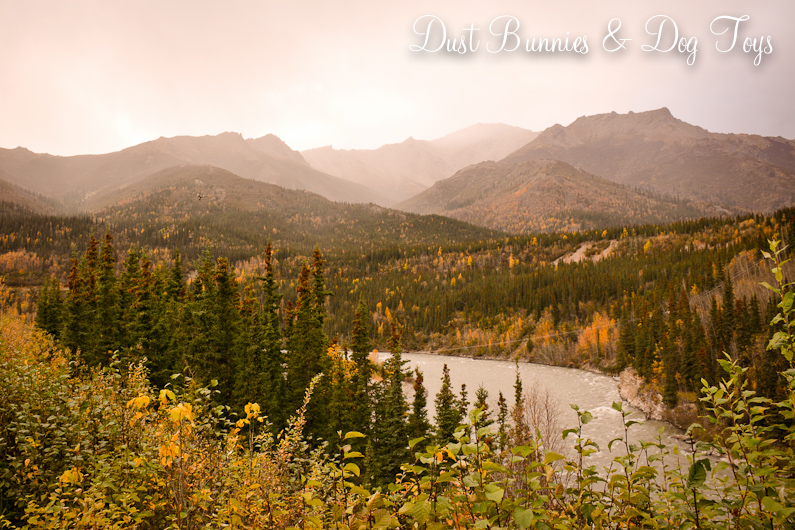
The scenery was definitely fallish on the way to Denali from the Mat-Su valley.  The views reminded me of Colorado, but on a much grander scale.

12We went up the day before our permit so we could make the most of the trip.  We stayed at the McKinley Chalet just outside of Denali.  As we entered the lobby to check in I spotted this statue of Balto the famous sled dog from the Iditarod.

baltoOnce we were checked in and had dropped our stuff off at the room, we made our way over to the welcome center at the park to purchase our permit pass for the next day.  While standing in line I heard someone call my name and turned around to see a lady who had retired from the company I work for in line behind me.  We’ve run into each other on adventures like this a few times since she’s retired, so we had a good chuckle over it.

I had been to the welcome center once before but hadn’t had time to wander and explore, so I enjoyed checking out the many displays they had, including this large exhibit that had lots of information about the wildlife and local ecosystem.

wildlifecenterOf course we had to take a selfie with the giant moose, since you can’t do that in real life!  Other interesting animals were the adult and baby mountain goats, marmot and pika, which I’d never heard of before.

wildlifeselfiegoatgoatkidmarmotpikaThis display of the different types of volcanic rock in the park reminded me of similar exhibits we saw in Hawaii.

rocksIt was nice to see the local plants on display since most of them were now gone for the season outside.

flora2floraOther displays explained how researchers track the movements of predatory birds in the region and monitor the fault lines that formed the landscapes surrounding the park.

birdradiosfaultlineWe headed back to the hotel to get dinner and enjoyed the view from the dining room as we leisurely ate and chatted about the sights.3After our bellies were full we wandered out to the lookout on hotel property where a vintage tour vehicle was on display.  It was nice to see the time and effort the preservation groups had put into rescuing a piece of the park’s history so future generations could appreciate it.

86457Next, we hit the tourist shops where we tried out several crazy items like this mountain man hat that hid half the Hubs face when he tried to photo bomb me!

hatphotobombThere were also plenty of Alaskan puns on everything from T-Shirts to wall decor.  Here were a few of our favorites.

shirtakambearshirtakbearlyawakeshirtakchocmooseshirtakdeereshirtakhighlifeshirtakmealsshirtakmoosewmeshirtakpolarbearshirtakredbearshirtakredmoose
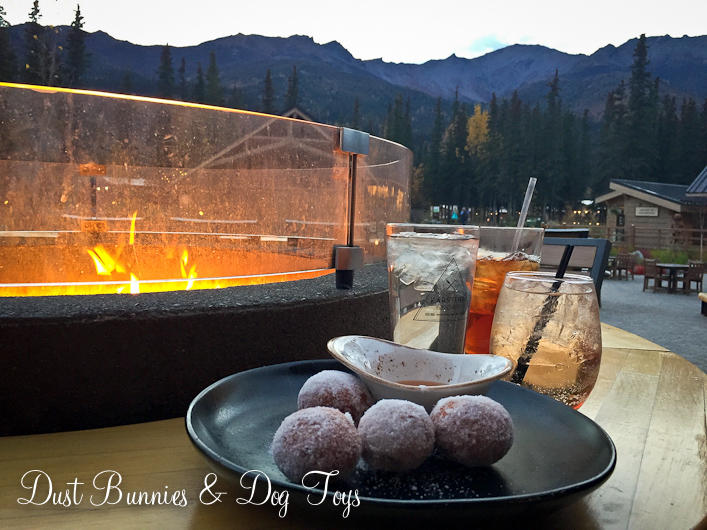
After we had our fill of shopping we went back to the hotel where we decided to spend the rest of the evening at the new Denali square.  We browsed the artist gallery and the small shops around the amphitheater before snagging a spot at one of the many fire pit tables with a view of the mountains.

commonsWe sat enjoying the crisp air and the view as sunset faded.  Eventually we ordered a few drinks and some very yummy beignts with caramel sauce as dessert to our earlier dinner.  In fact they were so good, we had to order a second round!

firesideviewfiresidedessertWe stayed well after dark to chat with a group of tourists from the east coast of the US who joined our table.  We had lots of laughs as we shared the difference between real life in Alaska and what they see on TV.

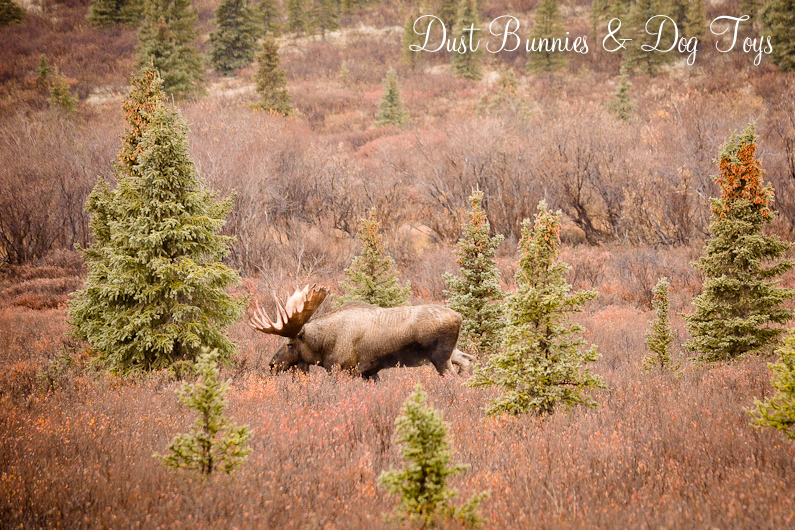
The next morning we met up with friends we’d invited to join us on the road lottery and had breakfast together at the hotel before heading into the park.  Not far past the welcome center we spotted this big guy in the brush.

10As did several other park visitors.  He was apparently quite used to this chaos and wandered across the road right between the groups of cars before heading on out into the next field.

1211A little further up the road we spotted a flock of ptarmigan who were already switching to their winter camouflage, which made them stand out against the colorful vegetation.

13
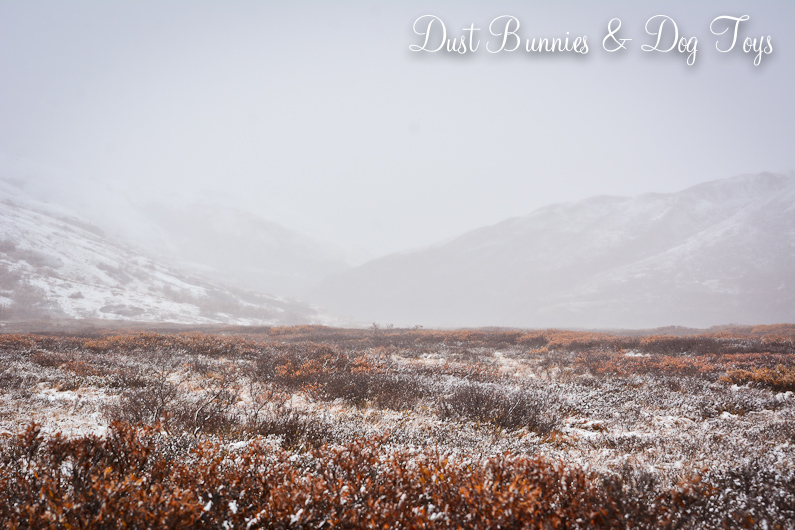
Soon the snow that had been forecasted made it’s appearance with a dusting over the low brush.  While not the look we were hoping to see, it was pretty in it’s own right.

14Now that there was snow on the ground we spotted these tracks on a hillside and all pondered what animal might have made them.

15We soon discovered the answer and watched as this ptarmigan darted up the hillside.

16It paused at the ridge to look back and before we knew it one had become many!

171819The weather made wildlife sighting quite difficult so we continued on to the Eielson Visitor center where there were several antler displays around the building.  The first was a caribou set that would have overlooked the view of Denali if it had been a clear day.  The most impressive was the two bull moose antlers that were locked together after their rutting battle led to them getting tangled.  Unable to pull free of each other, the encounter eventually led to both o their deaths.

202122The weather was cold and wet so we turned around to head back toward the park entrance.  Along the way we spotted a group of moose we’d seen on the way in and decided to sit for a bit to see if they’d come any closer.  All we could see of the bull was the very tips of his paddles above the brush, just visible through the misty snow.

23The cow on the other side of the same knoll was easier to spot.  She was very aware of the bull’s proximity and was keeping a close eye on her two yearling calves nearby.

24Eventually the bull decided to come out of hiding and show off his enormous rack.  The distance made his size a bit deceiving, but as the men in our vehicle noted very vocally you could sit a full grown man in his paddles and still have room to stretch!

2526We left the moose to woo his cow and headed down the road were we spotted a bear crossing the road in front of several cars on the hillside above us.  By the time we got to the same spot he was more interested in foraging in the brush, so all we could see was the top of his back.

27We came back through the lottery check point and were amazed at the difference in climate from one area to the other as we looked back across the landscape at this pull off.

28There were several more wildlife sightings before we left the park including this strutting male grouse who caused another slowdown in traffic and a small herd of caribou, including a few who had radio transmitters like the ones described in the exhibit at the welcome center.

29

30A bit further, we encountered a massive traffic jam which meant there had to be something big nearby that was causing everyone to stop on the road.  I hopped out to investigate while the Hubs navigated the congestion.  A few steps from the truck I spotted antlers in the brush.  At first I thought they were a shed from a bull last season, but then I saw them move and realized they were still very much attached.

31
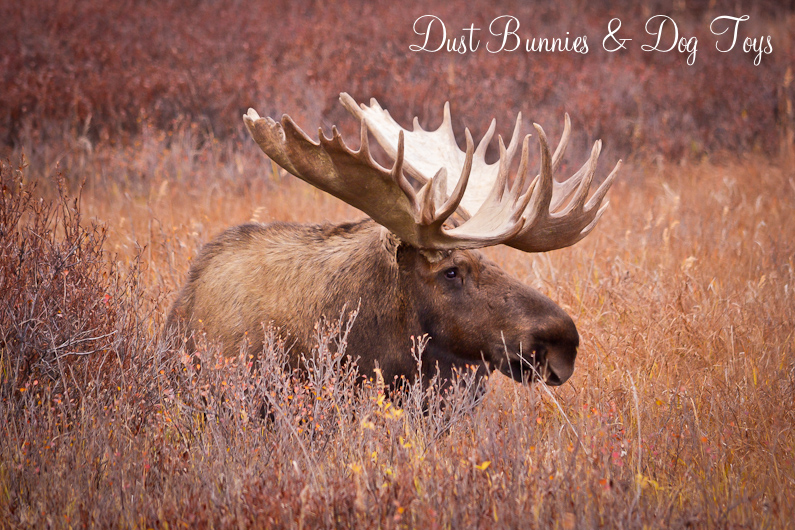
I rounded the bend to see this cow standing nearby and a few more steps brought the bull into full view.

3233He was absolutely stunning there in the colorful grasses.  He didn’t seem to interested in his crowd of admirers and neither did his female companion.  So when the Hubs had finished making his way through the congestion I bid them farewell and hopped back into the truck.

34
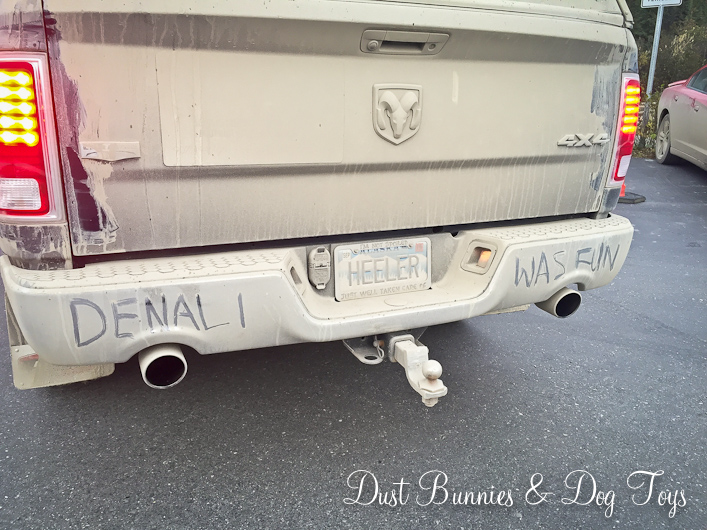
We headed back to the hotel so our friends could pick up their vehicle and head home for a final exam the next day.  While we were in the parking lot with them we noticed just how dirty the truck had gotten on the back-country roads.

dirtytruckThe mud was so caked on that you couldn’t even read the magnet sign for my photography business on the tailgate!  I took the rare opportunity to leave a message for other highway travelers as we headed home, much to the Hub’s dismay.

dirtytruckmsgAlthough our friends had to head out, we decided to enjoy one more meal with the view.  Since the Hubs was driving, I ordered my new favorite liquid libation.  Made with an Alaskan wine, this drink is a very simple sangria mixture which is probably why I like it so much.  In fact we bought a bottle of the wine used so I can have them at home occasionally and will know what to buy when this one runs out!

drinkIt was the perfect ending to our little get away.  And thanks to the very nice ranger at the welcome center who pointed out that we could buy an annual pass for the same price we expected to pay for the per head pass this time we can come back to enjoy the park again through next September!  Although we won’t be able to access the entire road system, it would be nice to see the park in the other seasons and compare the differences.  There just might be a few more weekend getaways coming up next year to this destination! 😉

Save

Save

Save

Save

Save

Save

Save

Save

Save

Save

Save

Save

Fall Decor & Fireside Chats

Happy Thanksgiving!  I hope you’re enjoying the day and giving thanks for the blessings in your life.  Since I plan to switch all the decor over to Christmas today because I don’t have another chance to do so for quite a while, I thought I’d take this last opportunity to share my fall decorations. If you look really closely, you’ll catch a sneak peek of another decor change I’ll be sharing soon.

I’ve found that using pumpkins and autumn elements can carry me from the first signs of fall in September all the way through to Thanksgiving.  This theme starts in the entry way with a collection of pumpkins flanked by lanterns with large pine cones and light strands I found in the dollar zone at Target.

0Next to the dresser I have a pumpkin wax warmer.  It casts a pretty orange glow near the front door and looks like mercury glass which is a favorite of mine.

1Over in the family room I featured a fancy purple velvet pumpkin in the new cloche I got at Home Goods during our recent trip to Portland along with my favorite woodland creatures, Mr. Fox and the thrifted Whooty Owl.

3On the mantel there are, you guessed it, more pumpkins.  The velvet one in the center is a rich burgundy so I gave it a bit of prominence on a birch round.  The new lanterns I got at the end of season clearance sale for outdoor accessories will work well for several seasons thanks to their neutral classic style.  And my favorite little raven is tucked up in front hiding out after he saw Brinley chew his buddy’s beak off after she mistook him for a chew toy and snagged him from the windowsill.  He’ll get some reconstruction soon so he can join his buddy again next season.

2The tray on the end table got a gold votive and a glittery pumpkin.  I thought for sure that little sparkle would make it fall prey to Brinley’s teething chompers but she never showed a bit of interest in it thankfully.

4Over on the curio, my favorite little scarecrow is guarding some gourds.  He also stays up high because his button legs would be too much temptation for our fur babies.

5Over in the office a metal lantern goes autumnal with some mini pine cones and two colorful floral picks.

6In the dining room I filled this large glass lantern with moss stones, mini yarn pumpkins and pine cones.  These antlers fit perfectly around the curve of the glass give the whole arrangement a more rustic style.

7Beyond the centerpiece is this vignette with another velvet pumpkin, my little turkey votive holder and this fun rusty cup I picked up at a new local shop filled with orange mums.

8On the next windowsill I added a fun little dollar store pumpkin I snagged on our recent trip to Portland next to the creeping Jenny I brought inside for the winter.

9On the sideboard a crock with decorative grass takes center stage with my rusty owl.  More velvet pumpkins line the top of the sideboard leading to more lanterns with moss and pine cones.

10Outside there are even more pumpkins, including the only REAL one in the entire collection which is being perfectly preserved by the recent low temps.

outside My wooden pumpkin stakes and the metal spheres from the garden adorn what’s left of the dusty miller in the whiskey barrels out front.  Behind them my DIY 4×4 pumpkins decorate the steps next to the metal and burlap planters.  outside5 outside6outside3

outside4Up on the porch my welcome pumpkin hangs on the front door and a ceramic one joins a metal lantern on the milk can table.  In front of the table is the lovely fairytale pumpkin I bought at the local grocery store.  It was originally inside but Brinley attempted to make her own pumpkin treats with it so it moved outside before she could really do damage to it.

outside7 outsidepI’d never seen a real white pumpkin before so I had to have one when I saw them at the store.  I’ll be saving the stem from this one for DIY projects next year, but the rest of this large beauty will become compost in the garden.

And while we’re still thinking fall, I had to share this pretty set-up one of my networking groups did for our “Fireside Chats” meeting.  This is a group of wedding professionals – event planners, photographers, cake makers, and more so there is usually some sort of decorations but this was the perfect mix of rustic and chic.

1The smores themed cupcakes were quite yummy and those who wanted the real deal had the ingredients ready just steps away from the fire.

24And if you wanted a snack to go, they had that covered too.

3Just shows you don’t have to make things complicated to create something special.   I hope the rest of your Thanksgiving holiday is fun and relaxing.  I’m gearing up for the big bazaar I have a display at this weekend and then more photography clients in need of Holiday portraits. I’ll be back tomorrow to share our quick trip to Denali with friends, so check back for that after you emerge from your turkey coma! 🙂

Save

Save

Our New Media Cabinet

0

Today I’m sharing our fantastic new media cabinet.  This is another piece created by Anne-Tiques who refinished my family heirloom hope chest and did our dining room sideboard.  If you’ve been around the blog a while you know this is what our previous media cabinet looked like.  It was nice, but seeing all those DVDs made it feel cluttered and I was way over constantly cleaning dust bunnies out from underneath it.  Once we’d found a piece to refinish we posted this one for sale and it sold instantly.

before

Unfortunately, the new cabinet wasn’t ready yet so we lived like the Clampits for a few weeks using a Rubbermaid tote as a stand for the cable box.  We’re classy like that… 🙂

between

I knew I wanted a printer cabinet style piece for this spot and had Anne on the lookout for one, when she suggested we consider reworking a piece she’d picked up a while ago but had been buried in her stash.  It originally had drawers so she removed those and made doors with faux drawer fronts and created a panel at the bottom to continue the faux drawers all the way down.  She also closed in the sides so I didn’t have to worry about dust bunnies!  Here’s a great before & after shot she did.

ba

It’s got a completely different look now and works perfectly in the space.  I love how the grey grounds the area without being heavy and the distressed finish is perfect for my crazy household.

1

It was fate that we ended up with this piece and requested it when we did because Anne had just purchased the exact amount of handles we needed and they were the style I requested.  I wasn’t sure about the brassiness at first, but I like a mix of metals and it gives a good contrast to the panels.

4

The top drawer became an open shelf to house the cable box, DVD player and Wii.  Now that they each have their own space we can put them all on risers to help with the heat these types of electronics create.  Inside she created multiple shelves where the drawers used to be so we have plenty of storage room.  And because there’s no dividers inside it frees up extra room that we can utilize.

inside

She also created a secret compartment at the bottom where we can store our Wii Fit board and accessories.  It’s a great spot for all those larger pieces that I want handy but not out in plain sight.

3

And of course it look absolutely fabulous combined with my favorite show, Fixer Upper!  I think it looks like something Joanna would use in the houses she designs.  It’s gone from an Asian style to farmhouse chic with this revamp.

5

Luna was quite interested in the piece when it arrived, and had to check out every nook & cranny to see if she could fit in any of these new hiding spots.  Luckily they are just a tad too small for her and because they are higher than the last piece it’s too awkward for her to try to squeeze into.  Although that’s what I thought with our last set up and she proved me wrong with this sneaky little move so who knows what she’ll attempt.  So far, she’s content to sit on the top and block the TV.

lunainvestigate

This was the first of a couple changes I have planned for this room.  We’ll be switching to a sectional sofa and that rug will move out to the deck we’ll be building next summer so I’ll be replacing it with something else.  I’m still on the hunt for the perfect option for both of those changes, but there’s no rush.

2

For now I’ll just enjoy the handiwork of my idea and a great local maker’s skills.  Remember this Saturday is Small Business Saturday, so shop small and support your favorite local shops.  Doing so can have a big impact on your community!

Life Lately & Feeling Grateful

return

Hi everyone!  I hope you’ve all been well during my recent unplanned hiatus from the blog.  Life got a little crazy and I felt like not only was my candle burning at both ends but somehow the wick in the middle had been exposed and lit as well.  We were dealing with medical issues for both the Hubs and the fur babies, as well as a death in the family, compounded with a rush of photography clients, several big changes at my day job, preparing the house and yard for an Alaskan winter, a trip out of state, creating inventory for the big upcoming holiday bazaar and everyday life.  It was too much all at once, so blogging had to take a backseat for a bit.

Although there was plenty to write about over the last few months, there just weren’t enough hours in the day to get it all done and I didn’t want to rush to provide you with posts that weren’t well thought out.  But I can say that I’ve truly missed writing and sharing our adventures with you all.  So I’m back and will try to stick to the regular schedule now that my big commitments are about to wrap up for the year.  In the coming weeks I’ll be sharing a recap of our trip to Denali, several changes we’ve made around the house and our experience at the Junk Bonanza show in Portland.

During my time away from the blog, I also witnessed several moments that made me appreciate the blessings I have.  As we prepare to gather with thanksgiving this week I thought I’d share them with you as a reminder to be grateful for the positive things we often take for granted in the daily rush of life.

  • The first was when I spotted a homeless man shuffling alongside the road during my morning commute and watched as he stopped to inspect a splatter of spilled food on the sidewalk before bending over to scoop up a handful of what was there and shove it in his mouth.  It made me thankful to have a warm home and plentiful healthy food to nourish my body.  And when I saw another homeless man changing clothes on a bus stop bench the following week I was reminded to be thankful for the security I enjoy knowing I have a safe place to rest and meet my daily needs.
  • A few days later there was an active shooter situation near an elementary school just a few blocks from my office.  As I drove past the SWAT officers in full tactical gear with their weapons at the ready I was thankful for those who serve and protect when danger hits close to home.
  • That afternoon I passed a car accident where both vehicles were heavily damaged.  Beyond the wreckage I saw a couple embracing as they cried, obviously in shock over what had just happened but happy that they were both OK.  It made me thankful for the time I get to spend with loved ones because you never know when life can change suddenly.
  • Later that week I went to the large medical center for a routine appointment during my lunch hour.  I was flustered and in a hurry, but the sight of a young girl in wheelchair with a bandanna poorly hiding the fact that she had no hair and a nasogastric intubation coming out of her nose who was smiling from ear to ear made me pause.  This child, who was obviously battling a serious medical condition, was joyful while I was mumbling under my breath about some minor stress at the office.  It made me think twice and reminded me to be thankful for the relative good health both I and my family enjoy.

So take a moment to reflect on all the things we have to be thankful for.  Life is never perfect, but when you choose to focus on the good things it sure is a lot better for everyone.

My New Jewelry Rack

1

Today I wanted to share a little change I mentioned when I showed off the new bench I added to our Master Closet.  My mother-in-law gifted me this cool rusty rake head after I’d sent her some gardening organization ideas using some.

4

We used it in the dining room over the summer to hang cut herbs as they dried which worked quite well.  But when I was purging my jewelry for an upcoming consignment sale and wanted to rearrange the larger pieces I keep next to the jewelry cabinet I thought using the rake would work much better than the thumb tacks I was currently utilizing.

3

So the rake head moved from the dining room to the closet, where it gives a much cleaner look.  I reused those thumbtacks to hang the rake head, but I might swap them out for smaller finishing nails to make the look even cleaner.

2

I like that I can hang items using one tine or multiple depending on how heavy and wide each piece is.  And it’s easy to grab an item when getting ready and just as simple to put it away at the end of the day.  But the best part is that the update didn’t cost me a single dime **cue heavenly music** and took less than 5 minutes to do!

5There’s room to add another if my jewelry collection grows, so I’ll be on the watch for both a second rusty rake head and more pretty large jewelry!  Like I said, there’s some big consignment sales coming up! 😉