Tea Time

TeaFinal
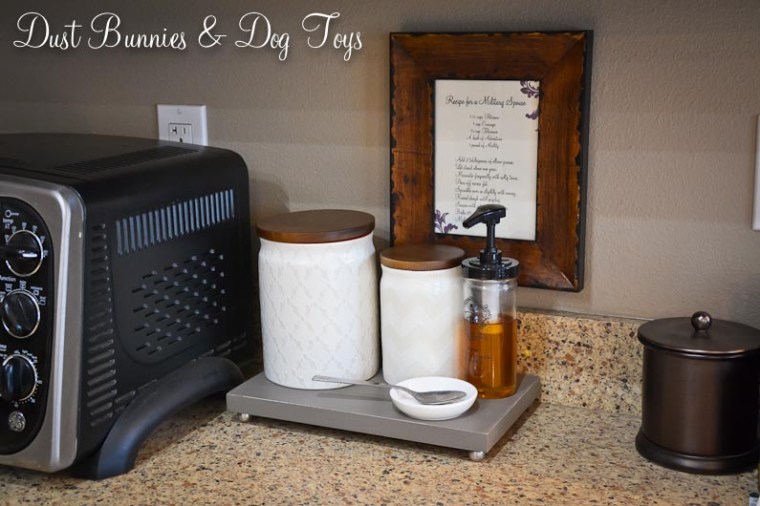
The hubs and I aren’t big coffee drinkers, but we do enjoy starting the day with a warm tea, especially since our early mornings are still pretty chilly.  Because it’s a daily routine, the tea supplies tended to be left out on the counter.  While that made the process more convenient, it also created clutter.  So I decided to create a tea station where all the ingredients are readily accessible and organized.  I found this little stand on the clearance shelf at Pier 1 recently and thought it would work perfectly. Except for those gigantic elephant handles.  Although interesting, they’re just not my style.

TeaBefore

But with a price tag of just under $12 and a gift card in hand that would cover that and then some, I was up for a little revamp.  A quick inspection revealed a single screw head for each handle underneath, so I knew they could be removed.  I was hopeful that the jars I planned to use on the board would cover the holes and I could just leave the wood as is.

TeaBeforeUnder

However once the screw was removed, the handles didn’t budge.  Apparently there was also glue underneath.  I was a little worried that prying the glue up would disturb the finish on the sides of the board since the handles had a small lip over the edge, but there was only one way to find out.  TeaBefore2

Luckily, the glue was only around the hole, but it did leave a bit of damage to the top of the board on each side.

TeaRemove2

TeaRemove

It was pretty minor damage, but I knew it would drive me batty, so a little filler and some sanding were in order.  Here it is prepped and ready for paint.

TeaDuring

A few quick coats of grey paint we had sitting around gave it a whole new look.  I lightly sanded the edges so a bit of the wood color shows through to coordinate with the other wood tones we have in this space.  The two types of tea we use are now stored in these cute patterned neutral canisters from Target and a sleek pump replaced the squeeze bottle honey we’d been using.  A small spoon rest completes the set-up.  It’s simple, functional and pretty, which makes me oh so happy. 🙂

TeaAfter

This post linked to Tatertots and Jello’s Link Party Palooza!

and

TDC Before and After

The Great De-Crapification of 2015

Well howdy strangers! I bet you’ve been wondering where I’ve been the last two weeks. I’ve been on a mission – the Great De-Crapification of 2015! It began at work with the announcement that my department would be moving to a new suite. Because our new space didn’t have as much storage for all of our materials we had to downsize, which led to me purging years of accumulated stuff that pre-dated my time at the company ranging from tools and promotional items to costumes and party décor.

Once I’d sorted everything and packed what the movers needed to take I was left with a mountain of ‘un-needed stuff’ which was offered to the employees of other departments and promptly disappeared in what can only be described as a cloud of human locusts.

Although I admit that a few items came home with me rather than go in the freebie bin (it is still no-spend January after all and I’m an employee too!), I was still in decrapification mode, so the purging continued at home. The spare room – AKA “I don’t know what to do with that yet, so put it in there and close the door so I don’t have to look at it in a pile” room – became my next target.

Here’s how the room looked before the great decrapification. Seriously, that’s a lot of stuff!

SpareRoom

And here’s how it looked after. I think I hear angels singing!

3

Granted, a good portion of the stuff went elsewhere for storage (i.e. the crawlspace and the shed), but at least it found an appropriate home. There are still several items in the space including a box of military stuff belonging to the hubs that I refuse to go through because I’m sure to throw out something important from his career, things that won’t have a home until other projects are completed around the house and the two extra chairs for our dining room table. Amazingly all that fits in the closet or along the far wall, making the main area of the room a perfect open spot for an elliptical the hubs scored on a local buy/sell page for $50 to help him lose weight. At least it’s not in the living room and since I have a list of projects to do before I work on this room it’s the logical place for it. For now.

Luckily for me, the hubs caught the decrapification bug too and started cleaning in the garage! It went from this:

GarageBefore2

GarageBefore

To this in just a few short days!

GarageAfter

GarageAfter2

It still has quite a ways to go, but being able pull in without calculating how far I can open my door is so much less stressful.

During the Great Decrapification I also completed a couple more projects with items I already had, to further reduce clutter. I’ll be sharing those next week, so make sure you come back to see them! Until then I wish you a wonderful, clutter free weekend! 🙂

No Spend January – Project 2: Laundry Supplies Labels

Bottles2Shortly after we moved into the new house I found a wood tray from a cannery at an antique store.  With three compartments, I knew it would be a great way to organize my laundry supplies. Later when I saw these cool bottles on clearance at Pier One I knew they would be perfect for storing things like bleach. I also keep vinegar and hydrogen peroxide in my laundry arsenal so I got a couple extra bottles to hold those items as well. Luckily, the bottles fit perfectly in the compartments of the tray when paired.

When we had the utility sink this handy little tray lived on the base of the washer/dryer pedestal because there was no room for it around the sink. Now that the cabinet has been installed (cue heavenly music) and there is a workspace, it finally has a respectable home on the countertop.

Since I knew how they were arranged in the tray it didn’t bother me that the bottles weren’t labeled, but the hubs will occasionally start a load of laundry for me and requested that they be so he doesn’t “screw it up”. That seemed like a legitimate request, so I agreed and then promptly put it on my to-do list where it got lost among a myriad of other items.

So while he was working on the laundry cabinet I decided it was high time I cross this task off the list. I originally planned to make a stencil with my Silhouette and etch a letter on each, but that genius hubby of mine pointed out that I could simply use vinyl.  That simple idea took this project from difficult to super simple.  And because I keep scrap pieces of vinyl for small projects like this I had a perfect sized piece ready to go.  The hardest part was choosing the font!  Another project checked off the to-do list without a dime spent.  Love it. 🙂

Bottles

Merry Christmas, Happy Birthday and Happy Anniversary – All in one!

EggTable

I decided to splurge a bit and get the hubs something special for Christmas so I had a handyman build a table to fit his big green egg BBQ based on the design he’d drawn up several months ago. Although he planned to build it this summer when we start working on the yard again I knew he’d never get to it with all the other projects we I have planned. Hopefully it also serves as an inspiration for all those projects!

It ended up being a bit more expensive than I originally expected, but it will get lots of use and since I told him it’s a Christmas/Birthday/Anniversary gift he isn’t expecting anything else until next Christmas! LOL

I asked the handyman to leave the wood unfinished so the hubs can decide if he wants to paint or stain it, which lets him still have a hand in “making” it. He’ll also add some large casters to the legs, just like he did for my craft cabinet, so the almost 200 lb. egg can be moved around the deck easily. In addition to using a patio paver from our current stash as a thermal base for the egg to sit on, he can put one on the top as a trivet for any hot plates. And maybe down the road he’ll add some fold down extensions on the sides for extra workspace.

But the best part is that there’s now plenty of out of sight storage for all the accessories that have accumulated since we got the egg, including room for the not-so-lovely deep fryer burner and propane bottle! I’m secretly doing a happy dance over that fact. 🙂

I’ll share more photos of it once everything is finished, organized and in place, but it might be a while due to our longer than average winters in Alaska.

More Crafty Storage!

CraftShelves
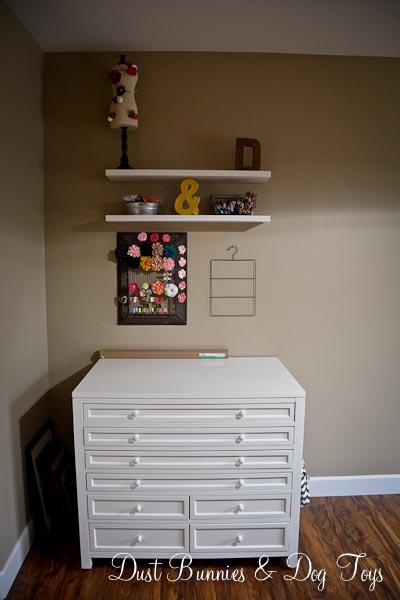
I recently picked up some simple white floating shelves at Lowes and had the hubs install them above my craft cabinet for some additional storage. I originally planned to DIY these, but at $20 each it was worth saving the hub’s time for other more important projects. 🙂

Although they can only hold a few pounds, they are the perfect way to display some of my finished crafts and inventory as I prep for the upcoming holiday bazaars.  Of course what I display here will change as my projects do, but it’s nice to have a spot to show off my work or stash things that are “in-progress” while keeping my table top clear for working.

That roll of kraft paper you see on top of the cabinet will soon be mounted to the wall just an inch or two above the table surface so I have a quick and easy wrapping station as well!

Our Massive DIY Desk – Part I

From the moment we signed the contract to build our home I envisioned a massive wall-to-wall desk in my office/studio, with enough room for both the hubs and I to have workspace.  But that wasn’t a high priority project, so the DIY desk we fashioned from a freebie door and two filing cabinets while in the rental was serving the same purpose at the new house.  It was certainly functional, but definitely not anything amazing.

DeskBefore

After moving into the house we’d purchased a few other filing cabinets to serve as the bases for the rest of the desk, but they sat collecting dust in the garage for months.  Then, a few weeks ago the hubs decided it was time to make room in the garage get this project rolling and purchased wood for the desktop.  He brought in the other two filing cabinets and then lined up the wood planks to form the top.

DeskSwap

At some point we took the top drawer out of one cabinet and Luna decided that was the perfect hiding spot, at least until she realized it was right at doggy viewing height!  Tequila was very concerned that her kitty was trapped in the cabinet. 🙂

DeskPrep

The hubs had prepped the boards with small biscuits to create joints between the planks.  He also predrilled counter-sunk screws down the length of the boards.  The combination of the biscuit joints and the screws make the entire top a sturdy and solid piece.

DeskBiscuit

DeskScrew

Here’s the new set up!  As you can see the desktop doesn’t go all the way to the wall on the near end, but that leaves room to install the sliding barn doors in the future which will allow me to close off the studio for clients when needed.

DeskCurrent

We still need to add molding around the bottom of the two new cabinets, add a pull-out shelf to the middle cabinet for the printer to sit on, paint all the cabinets white, stain the top and then install shelves above the desk for storage, but for now it’s just nice to have a little extra room for us both to work.  I’ve since found a new chair to replace the camp chair on the hub’s side, thanks to a great deal at Target.  Watch for a post on that soon!

My New Crafty Corner

CraftCab

I’m super excited to share my new craft cart with you!  Although I ordered it back in March with free shipping, the company insisted that offer didn’t apply to Alaska, so we had it shipped to my mother-in-law’s house in Washington, where it sat until we visited a few weeks ago.  It then made the long haul up the AlCan with my classic truck and took shape after several hours of assembly by the hubs.  But it was sooooooo worth it!

I’m still filling some of the drawers, but most are packed with my craft supplies.  I’ve been able to fit everything in this one cabinet, sans fabric – which will soon be organized and stored in a rarely used space, so watch for a post on that too.  The top two drawers have movable dividers which make organizing super easy.

CraftDrawer2

I scored some favor tins at the craft store with a coupon sale to organize the little things like beads and buttons.  The clear tops make it easy to find exactly what I’m looking for and I still have a few empty containers to grow into!

CraftDrawer

I hung my cutting board on the side with a few hooks, so it’s easy to pull out and trim things quickly.  I plan to add a roll of craft paper above the cutting board for gift wrapping and easy cover for messy projects.

CraftCabCutter

On the other side I put a hook for my craft bag, which holds my current craft project.  It’s the best way I’ve found to craft on the go. 🙂

CraftCabWide

I hung a few display boards above the cabinet and set my mannequin bust on one corner with a wire basket to hold prepped inventory.  The little ceramic pot acts as my trash can and a couple metal tubs hold recent projects that are awaiting prepping for their Etsy closeup.  A fellow crafter is making me an adorable owl tool holder, which I’ll be sure to show off when it’s ready.

Eventually, I’ll add some shelves above the display boards to hold some of my other display pieces and finished inventory, but for now it’s just great to have a dedicated space for creating.  Not having to first find the materials needed, then haul them out and set them all up, to craft for a few minutes and then have to gather it all back up to go back into storage again is HEAVEN!  I can be working on something and realize I need another material or tool, roll out a drawer, grab it and keep on crafting.  That alone inspires me to work on projects.

Even better is that we added wheels on the bottom so it can move!  I can pull it out into the middle of the room so I can work on a project from all sides or invite friends over for a craft session.  But the real reason for the wheels is so I can pull it out into the living room and watch TV with the hubs while crafting!  I did just that when I was organizing everything into it and it was perfect.  Now I just need the stool I want to go on sale, so I have a seat at the ready to serve as a crafting post or a photo prop!

An Organized Routine

If you’ve read this blog at all you know I crave organization.  Maybe I’m OCD, maybe I’m just weird, but whatever the reason, I need a routine and having a ‘home’ for everything.  It makes life less stressful when I know where things are and can find them right away.

That’s exactly why my morning routine needed some organizing.  I had all the items I use on a daily basis in the bathroom, but most of them lived under the counter and had to be pulled out one-by-one as needed.  Then I saw this post on one of my favorite blogs and had an epiphany.  I could put all of those items in one container and pull it out each morning!  When I’m done, I just put it back under the counter, out of sight.

1

It took a few shopping trips to various retailers, but I eventually found a three compartment basket made of vinyl.  Not only is it pretty, it’s durable and waterproof.  Perfect for daily use in a bathroom!  I organized everything into groups of how I use each.  First are the things I apply after getting out of the shower – lotion, deodorant, perfume.  All of my hair brushes and products are in the back compartment because they are usually taller.  The center compartment holds my toothpaste, jewelry cleaner and other items that don’t fit into either of the other compartments.

I also brought some organizing to my make-up drawer, by lining all my items up in the order I tend to use them.  Luckily, I keep it pretty minimal when it comes to make-up so I was able to keep it pretty simple.  I have a few items that I only use occasionally, so I keep them in the back of the drawer. This is the same drawer I described in my last post, where I used magnets to hold my bobby pins.

Drawer

Have you organized your morning routine?  Do you have tips on what worked or advice on what not to do?  Share them below!