New Bedding in the Master

WideAngleFromDoorI know what you’re thinking, it’s No-Spend April so why is she telling us about new bedding?!  Don’t worry these changes were made back in February and March, I just haven’t had a chance to share them yet.

Just before our vacation in Hawaii we agreed to temporarily take in a friend’s dog when his roommate got deployed suddenly and could no longer watch the dog while our friend was out of state.  The dog stayed with our pups while we were in Hawaii, but apparently had some anxiety about the change and ATE a huge hole in both the coverlet and throw on the bed overnight!  Our poor house sitter was pretty upset to discover the problem.  We confirmed that both pieces were not repairable and had to be replaced so we went shopping for new bedding in Hawaii and brought it home with us.

MasterArt2

Here’s how the room looked the last time I shared it.  Not bad, but not amazing either.  I began changing things up in here last year, starting with selling the art over the bed.  It was pretty but didn’t jive with what we had going on in the rest of the house and I felt it was a tad small for that spot anyway.  I updated the curtains and throw blanket after our trip to last summer, but didn’t share them on the blog because I wanted to wait until it all came together.  You can see peeks of those changes when I shared the bench the hubs built for the foot of the bed.

During that time I also agreed to reduce the number of pillows on the bed.  The hubs is not a fan of multiple pillows and having to move them every night only to put them back the next morning so they often ended up stacked on the tub in our bathroom, which drove me nuts!  Rather than fight the idea I decided to try simplifying and see how I liked it.  Turns out I don’t miss moving the pillows either and I like that making the bed is easier with three pillows opposed to 8!  In fact, I like it so much that I’ve reduced the pillows in the foster room as well!  But even with less of them, the new grain sack pillow in the middle is what really what made this room come together for me.

ColorCloseup

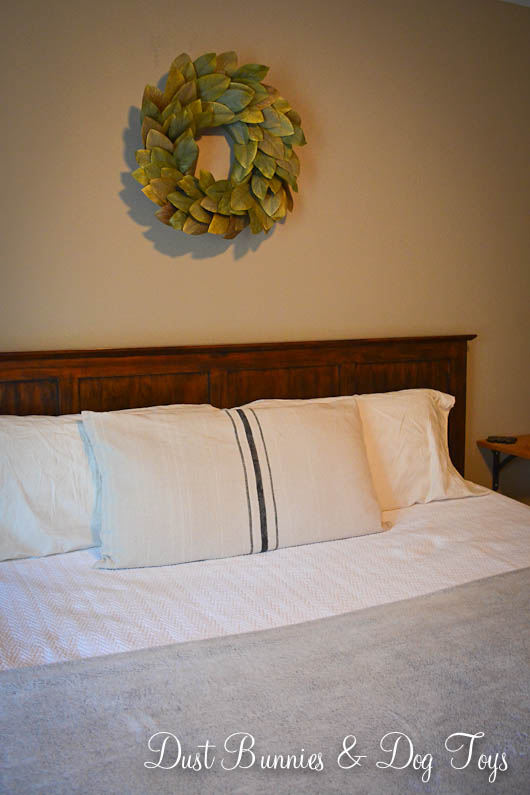
The new coverlet and throw came from TJMaxx in Honolulu and I wasn’t sure about them at first.  It wasn’t a dramatic change from the tan coverlet and blue throw, but it took me a while to get used to the new colors.  Adding the grain sack pillow I ordered at the Vintage Market last month was the key.  The grey stripes coordinated with the grey throw and the black stripe tied into the metal of the bench at the food of the bed.  I moved the magnolia wreath I’d had out in the family room over the bed and suddenly I had a simple but pretty farmhouse style bedroom!

StraightOn

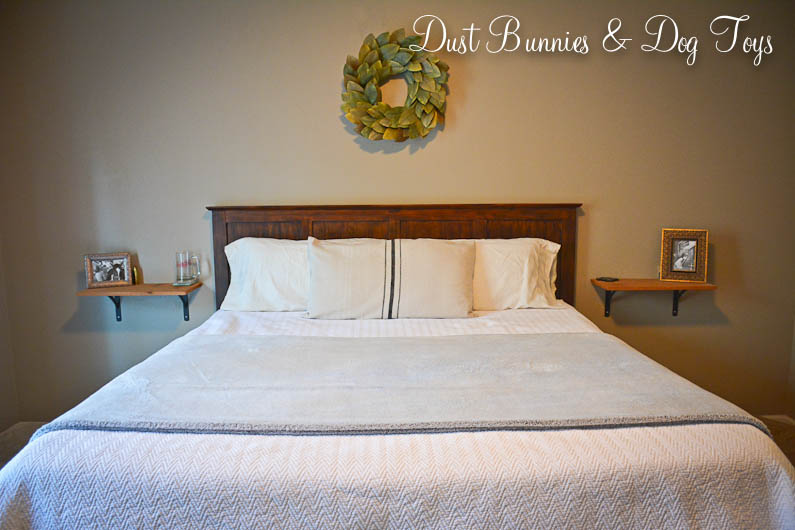
That little bit of green in the wreath and the blues and greens in the curtains pop against the the neutrals but in a classic way.  It feels chic, but simple and very relaxing – just as a master bedroom should be.

AngleFromBathroom

Here’s a shot where you can see the whole combination of the bed, bedding and bench.  There’s a lot of textures going on, but because most are neutrals it’s not overwhelming like the darker bold colors we had before.

Closeup

The grain sack pillow is actually painted rather than authentic fabric.  Although I’d prefer the real deal, it was out of the budget and this option allowed me to support another local artisan who let me customize just what I wanted.  In my excitement about the market I only specified which colors I wanted when I ordered and forgot to mention which direction I wanted the stripe to go, but I think the end result works perfectly.

Ties

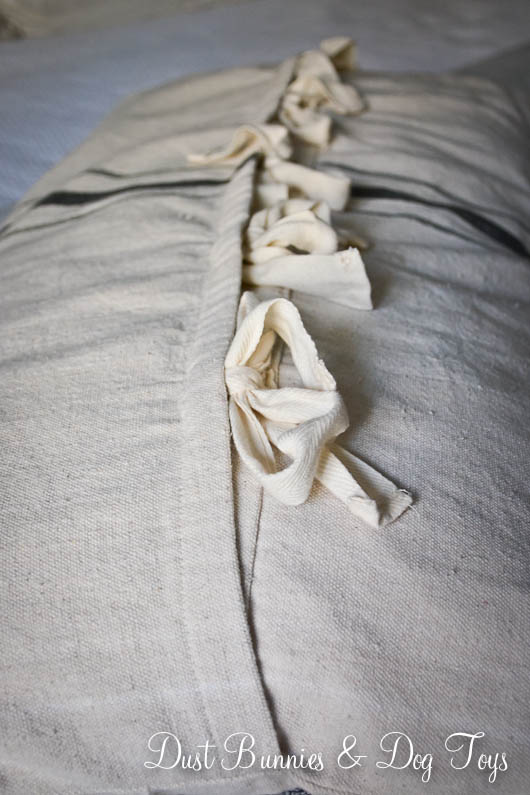
The back is closed with simple ties down the length of the pillow, which makes taking it off for cleaning super easy.

DoorAngle

The changes make the space so bright and inviting.  Plus it ties into the modern farmhouse feel in the rest of the house.  Now I just need to find more time to enjoy naps in here! 🙂

TDC Before and After

The New Chicken Yard

Z

Today is the 3rd anniversary of the blog!  It’s amazing to think of how far we’ve come since this journey began, but I’m glad you’re here to share it.  To celebrate I’m sharing a big project that the hubs recently did, the new chicken yard!  Although their coop was pretty big we spoil our critters and wanted them to have lots of room to spread their wings and do their little chicky thing.  Plus happy chicks = constant egg production so we’re all about keeping these ladies happy.

1

To get things started the hubs rented this mini excavator to dig a trench around the perimeter of the space.  Although I’m practicing no-spend April he isn’t and since it was his idea and project it doesn’t impact my no-spend goal.  He did have costs for the equipment rental, posts and concrete but the main panels were freebies from Craigslist last fall and we had a gate building kit left over from installing the yard fence so he did save where he could.

2

The dogs were pretty interested in this new contraption and wanted to hop on for a ride.  When they realized that wasn’t going to happen they decided to hop into the side by side which was parked nearby with supplies in the back.  Apparently Stoli thought he was going to drive Tequila and his expression when I told him he couldn’t reach the pedals was priceless!

3CMDR

3CMDR2

Here’s how things looked once the trenches were dug.  Like with any project it always looks worse before it looks better.  The chickens were pretty interested in what was going on and watched from inside the coop run, hoping we’d let them out to investigate.

3

4

Next came installing the posts and panels.  The hubs cut a groove in the sides of each post so the panels would nest in the groove for added stability.  I felt bad that I wasn’t able to help much with the install due to photography sessions but I will say he did an amazing job for putting this together almost 100% on his own.

5

Above is what things looked like when I left for sessions and below is what I saw when I got home that evening!  All of the posts and panels were installed and concreted in which makes the entire thing SUPER sturdy and predator proof.

Concrete

Concrete2

A few days later I helped install this thin bird netting over the top so that eagles and owls can’t attack from above.

Net

And here’s the finished project with the gate installed.  I’ve started lining both sides of the yard with cinderblocks, which I’ll plant with simple flowers to make things pretty and attract flying insects the chicks might enjoy catching.  It will also help keep the digs a foot back from the fence when they come to visit, which I’m sure the chicks appreciate.

Z

Now that they have more space I moved their outdoor roost and dirt bath tub from the run out into the yard. The hubs also plans to build a new storage area for the chicken supplies to replace the plastic one we currently have and I’m planning a few aesthetic improvements such as a coop sign, pavers next to the coop door and planting a rose bush to help keep the area smelling pretty too.

I don’t think the chicks will notice most of those things but I’ll appreciate them. They are just happy to have more freedom and room to run around but they are still creatures of habit and all gather back in the hen house each evening to roost, which makes this momma happy. 🙂

New Décor in the Laundry Room

4

Is anyone else out there a serial fluffer when it comes to laundry? The hubs knows full well that just about every load that goes in the dryer will be fluffed at least once before I break down and pull it out to fold or put away. I’d seen several signs that said “Wash, Dry, Fold, Repeat” but none that included Fluff in the process so I decided I needed one for our laundry room. I originally planned to DIY this but when I discovered Rustic Champagne at the Alaska Chicks Vintage Market I decided to have her create one for me instead.

1

I originally planned to hang the sign above the door to the garage but while measuring the space for it I noticed it would work better where the metal safety pin art I had previously DIY’ed was, so I opted to sell those and replace them with the sign. Luckily, the sale of the pins and another item paid for the new sign, so I was ok with bending the rules of No-Spend April since it worked out to be trading two things for one better one. Plus I started arranging the order back in March so it doesn’t count *cough*cough*.

It will look even better once we get the countertop installed on the cabinets in here, but that will definitely have to wait until No-Spend April is over and based on the quote I got recently it will probably be a while before we commit to that project.

2

I love the rustic finish and the white background lightens up the space by reflecting the light from the window, which the safety pins never did. Plus the simple design keeps it from feeling too fussy or overwhelming the space.

3

And if you look closely, you’ll notice a little clue about the next project I’ll be sharing just outside the window. It’s been a big one, but definitely brought a vast improvement thanks to a lot of hard work by the hubs!  Check back soon to find out what it is!

Our Family is Growing by Four Paws!

PupBy the title of this post you can guess what the big announcement I promised is!  We’ve been talking about adding a third dog to our family for a few weeks now.  We’ve had time to grieve the loss of Bacardi and feel ready to welcome a new heeler to our home.  For us, pets are family and that means they stay until their last days so we always make sure that any new addition will get along with our other fur babies and be able to adapt to our busy lifestyle before we commit.

We started looking around locally for a young heeler that we could adopt who would be a good fit.  Since most heeler owners in Alaska brought their dogs here from the lower 48 and cherish them dearly there aren’t many who end up needing a new home.  Although we found a couple, there wasn’t a perfect match so we started looking at breeders as well.  We contacted several and found one that we liked in Oregon, just a few hours from the hub’s mom’s house.

This breeder matches puppies with new families based on personality and what is desired from the pet – companion, working dog, etc.  She had just had a litter of pups when we contacted her so we put our name on the list and eagerly awaited the puppies 4 week birthday when the breeder starts to pair pups with prospective families.  Luckily, because we were very open in what we wanted we were matched with this adorable female blue heeler, who will be joining our family Mother’s Day weekend!  How perfect is that?!

The hubs and I will fly down to pick her up and have a quick visit with his mom while there.  The breeder has already been taking the pups on car rides and starting house breaking with good success so hopefully she will adapt quickly to us and her new siblings.

While we wait we’re trying to decide on a name to continue our alcohol theme.  A few of the current contenders are Brinley (from Brinley’s Goldcoast Rum), Brandy and Julep.  We’ve also considered Grenadine, Hennessey, Disaronno, Grigio, Kahlua and Chardonnay but decided they don’t quite fit her.  I also like the names Mojito and Martini but they both sound like names for small dogs to me.  We’re still considering other options so if you have a suggestion we’d love to hear it, especially if it’s rum related since that’s my alcohol of choice on the rare occasions we do drink!  It is pretty ironic that we have alcohol named pets since we aren’t big drinkers, but they are strong lickers! 🙂

Traveling Momma

I’ve been traveling most of this week for events in three cities across Alaska.  That means there hasn’t been much time to do things at home or blog, but I wanted to share a few images from my overnight trip down to Juneau.  I’ve been to Juneau several times now for work, including a visit where the hubs got to join me and we stayed a few extra days to see the sights like this, this and this then toured downtown and visited the famous Red Dog Saloon. This trip was all work, but I did catch a pretty sunset just after take off on the way down and a quick view of the mountains along the way.

12Since we arrived late at night I quickly settled into my room and hit the sack, but in the morning I awoke to a lovely view of the channel and the Coast Guard boats.  Luckily our event was happening right next door so I got to check out the view as I walked over too.

3Once the event was done I considered stopping in at the Alaskan Fudge Company to get some of their cranberry white chocolate bark, but I didn’t have a rental car and had several heavy bags to carry on the 6 block walk from the convention center which would put me another 5 blocks downhill from our local office.  It was about that time that the wind and rain that had been forecasted decided to make an appearance so I opted to lug my gear and aching feet straight to our office instead and get some work done.  It is no-spend April after all and skipping the calories is probably a good thing anyway.

I’ve got one more event tomorrow and then things will be back to the normal schedule.  After all this work I’m certainly looking forward to the massage I have scheduled on Saturday, which is also a freebie thanks to a trade I did with an in-home masseuse a few months back!

The hubs has been working on a big project while I’ve been gone so I’ll be sharing that next week and check back tomorrow for a big announcement! 😉

The Garden Plan

FlowersJust as I was about to start a photography session the other day I spotted these pretty little flowers next to a building and immediately the gardening bug took hold.  I’ve been day dreaming about what I’ll do in the yard this season for weeks as the temps have started to warm early for Alaska standards, but now that I’ve seen sprouts in person I’m narrowing down the plan so I’m ready to get going May 1 as soon as No Spend April is over.  While that might seem a long time to wait in most parts of the country, it’s pretty typical for our zone and the local nurseries won’t have many items available until around that time anyway.  I spent a chunk of the weekend cleaning out the remnants of last year’s annuals from the pots around the yard and spreading marigold seeds from the deadheads I’d pinched and dropped at the roots all last season.  Since the deadheads had enough seeds to cover all of the whiskey barrel planters, I’m hopeful they will produce at least enough to fill those so I can spend a few more dollars on other items when I do head to the nursery.

GravelFirst up on the plan is the garden box we installed just off the deck last season.  I’m planning on having lettuce, cherry tomatoes, peppers and onions (which I’ve got in water growing roots after one sprouted in the pantry!) in this space.  I may put the tomatoes in a separate container – like a cool old wash tub or burlap covered bucket – on the far side of the box so they don’t block the view of the yard from inside but we’ll see how it works out once I have everything ready to be planted.  The box itself will need a little tune up after the beating it took all winter.  When we placed it here I thought the water coming off the roof would be helpful, but too much of it created serious problems including flooding in the box bins which then turned to blocks of ice with winter’s early arrival last year.  Although we didn’t get a lot of snow last season, what we did get came off the roof in batches and formed a small mountain range of snow across the top of the tubs which added to the weight of frozen water inside.  To solve those issues this year we’ll be installing a gutter across the back of the house which will empty into the rain barrels relocated from the front flower beds at either end.  That will make it easier to water the gifted garden on one side and should provide a constant water supply for the chickens during the summer on the other!

The big metal wheel the hubs brought home for me is still against the fence in the low spot across from the corner of the deck where I put it at the beginning of last season.   I’ve decided to add a small retaining wall in a semi-circle around it and plant cucumbers there so I can train them to use the wheel as a trellis.

Of course I’ll have strawberries again this year, but I’m going to try the hanging gutter system I’ve seen all over Pinterest.  There is a good spot between the fence posts behind the shed, where I think the moose wouldn’t be able to reach them easily and if they did the dogs would soon chase them off.  I signed up for a “Do It Herself” (DIH) workshop at Home Depot later this month where I’ll make the gutter planters with the assistance of an instructor, so that should be ready in advance of my nursery shopping trip.  I may also do potatoes in a pallet planter below them, if I have enough budget left.

The herbs will go in a bucket tower like I’ve done for strawberries in the past.  I’ll put that right next to the Big Green Egg table so the hubs can snip things he wants to use while cooking quickly and easily.  I plan to have oregano, basil, parsley, cilantro, garlic and possibly dill depending on space and budget.

DeckBushes

One of the bushes I planted on the side of the deck *mysteriously* came unrooted back in the fall, which I’m sure the dogs had a paw in.  Ultimately that works out because the rain barrel will need to sit right on the corner of the house and would have crowded the bush anyway. The remaining bush took the brunt of the snow shoveled off the deck during the winter so I’m not sure how well it will bounce back, but I’m hopeful it will at least add some greenery if not bloom.  I have two more spirea bushes I picked up at the end of the season and never planted that have been sheltered next to the house, so I’ll plant those along the deck as well if they show signs of growth.  I also have a large purple ceramic pot that will become a recycling fountain and will find a spot in this bed.  I originally planned to have it out front but we don’t spend as much time on the front porch as we do on the deck so I think it will be enjoyed more here, plus it will help fill in some space since this is a large area to cover.  The pretty blue planter that was on the deck last year will also move down into the bed around the deck, to create a bit of height and plant variety with an annual or two.

I’m considering adding a rose bush next to the house in the area that will become the expanded chicken run once we get that done. I did a bit of research on what plants can survive a chicken flock and roses seem to be the top choice – likely because of their built in defense system of thorns.  Although I love their fragrance, I usually find them too fancy for my style, so this is a good opportunity to give them a try, where my usual choices would be torn to shreds.  And it might just provide cuttings that can be added to summer bouquets. 🙂

LillyOrange LillyPink

I’ll be moving things around in the flower beds a bit too.  The lilies out front will be moved to the gifted garden to fill in some holes there and make room for several new plants including salvia, lavender, delphiniums and daisies to fill in around the iris and hostas that are already in the front beds.  My plan is to fill the entire space with perennials that come back each year bigger and bigger so it creates something like my co-worker’s bed which provided the beginnings of my gifted garden.

1

Although I planted the freebie lilacs in the rain garden when we first set it up, I knew they would eventually be moved elsewhere. That was just a convenient spot for me because I could tend and water them as part of the rain garden.  They struggled a bit last year, and rather than wait for them to develop and shock them again with a move I’m going to go ahead and relocate them now.  I figure if they don’t survive this move it’s not a huge loss since they were freebies anyway and haven’t shown much in potential yet.  They will be moved to the hillside next to the garden where hopefully they will take root and establish themselves with plenty of room to grow and spread. Their departure will make room for a third clematis along the tire wall in the rain garden.  That will put it in the center of the curve along the back portion, so when it grows in it should help fill the space between the two existing clematis on either end of the tire wall.

Raspberries

Finally, the hubs plans to install a gutter on the side of the shed which will feed the freebie water tank we picked up last year.  That will be the water supply for the raspberry patch near the shed and the rain garden if needed.

Apparently no spending equals lots of planning!  It seems pretty intense when it’s all written out, but I think I’ve got my list ready so I’ll have a plan when I go plant shopping which should keep the budget in check and fill the yard with plenty of pretty!

April Fools

Yarrow

Oh, hi April.  I knew you were coming, but I didn’t realize you’d be here so soon!

Anyone else feeling that way today?  It’s hard to believe that it’s already April and spring is upon us.  I typically don’t partake in April Fools shenanigans but it seems that April had other plans for me starting with my phone deciding to install a software update overnight that required extra setup upon restart which didn’t allow my alarm to go off!  Luckily the hubs woke me up with plenty of time to still get ready and out the door on schedule.

Hopefully that’s the last of the trickery today because it’s been a very busy week and next week will be even more so.  I’ve got a couple of projects in the works that I’ll be sharing soon, but am also declaring April a no-spend month – no joke.  I’ve got a lot on my plate right now and am still paying off our Hawaiian adventures so I’ve decided this is a good time to focus on completing outstanding projects and prepping items I’ll be selling at the Urban Junktion show in July, because that will be here in the blink of an eye!

My one exception to the no-spend rule will be the Consign 49 sale coming up next week since I have a gift certificate from the last sale and have items on consignment that should sell well so I’ve set a strict $50 budget and will utilize my consigner pre-sale pass to shop before the crowds.  If I don’t find something I can’t live without I’ll hold on to that gift certificate until next time, but if I do it shouldn’t cost me anything once my sales are tabulated.

Well, that’s all for today.  I hope you have a wonderful weekend and will be back next week for a post on the custom grain sack pillow I ordered at the Vintage Market now that it’s done!  🙂


Vintage DIY Magnets

magnetsdone

Today I wanted to share a quick DIY project I did with some of my Vintage Market finds.  Remember these fun antique letter blocks I got from Alaska Picker?  They were the perfect size to work as magnets on our chalkboard portion of the new command center.

Home

The backs were solid blocks of wood so there was a perfect surface to attach magnets.

magnets1

I picked up a pack of strong magnets at Michaels.  Other shoppers probably thought I was a nut-job as I tested several packs on various metal items around the store before deciding which option had the best grip.  But I a gal’s gotta do what a gal’s gotta do to make sure her project has staying power. 🙂

magnets

I was pretty sure the magnets were strong enough that I could use one per block, but since the pack came with 8 I decided to double them up on each just for good measure.  A little hot glue and we were in business.  It seriously took longer to wait for the glue gun to heat up than it did to glue the magnets down.

magnets2

One of the blocks apparently had some paper backing still attached where I added the magnet so it came off, but I cleaned both up and reapplied it without issue.

magnets3

And here they are on the chalkboard.  They do blend in a bit with the colors but that’s ok because they are the perfect size for the space.  Once they were up I noticed that having magnets on each corner kept the blocks level rather than having one in the center where the block might get bumped and loose grip, so I’m glad I decided to go that route.

magnetsdone
So what do you think of my new/old magnets? I’d love to see how others have used vintage letter blocks in their décor, so leave me a comment with a photo if you have!

A DIY Command Center

Full

Containing paper clutter is a constant battle in our home, just as I’m sure many can relate.  Because we enter the house from the garage through the laundry room most of the stuff that comes home ends up dumped on the dining room table or kitchen counters so I figured that was a good place to start.  I decided to create a command center in this little corner where we could write notes, stash important papers and organize the hub’s stuff.

f

I started with a small wooden organizer where the hubs can stash his wallet, receipts and notes.  I also found him a small jar with a lid for loose change.  That worked fairly well, but he often had full size papers that he needed handy so I decided to add a wire rack we picked up during one of our trips to Portland.  It had been in the laundry room for a while but never got used there and came down when I did my DIY Ballard Knockoff Décor for that space, so I’m glad it’s found a useful home here.  I used two clear hooks with removable adhesive tape to hang it just under the countertop.  It fits the small nook of space perfectly.

a

Originally I wanted to paint the side of the top cabinet to create a chalkboard but the hubs nixed that idea noting that if I changed my mind later removing the paint would damage the cabinet.  What?!  I never change my mind! Well ok.  He might have a point there. 🙂  So I came up with a better idea.  I’d paint a piece of sheet metal and install that on the side of the cabinet so it was both chalkboard and a magnet board!  Of course they didn’t sell a piece that was just the right size so the hubs cut one down for me.

b

A couple thin coats of chalkboard paint and it was looking pretty good.  The hardest part was waiting for it to dry in between coats.

c

Next I seasoned the chalkboard by rubbing a piece of chalk over the entire surface and then wiping it down.  This helps prevent things from “staying” on the surface after you wipe them down.

d

Since the hubs wanted the piece to be removable I attached it with the same removable adhesive strips I’d used on the hooks for the wire rack.  IF I every change my mind I can start at the bottom and work my way up pulling the tabs to release the adhesive.

e

I stuck it up on the side of the cabinet against the trim on the front and top of the cabinet so the edges weren’t exposed.  And as you can see, it works great as a magnetic board too holding our early bird tickets for Junk Bonanza outside Portland in October!

g

Things were looking pretty good at this point but I wanted to address the uneven edge of the metal along the wall.  The hubs did a great job cutting the sheet metal, but the tool he used had to take a 1/4″ off at a time so he wasn’t able to match the size exactly.  He was pretty frustrated that it wasn’t perfect, so I wanted to find a way to make it work.

gap

I tried a few pieces of trim we had on hand but most were too big or bulky.  I picked up a square dowel at Lowes but that was too narrow and too thick, so I returned that.  A few days later I was at Michaels and figured I’d look at what they had.  I’m glad I did because I found a piece of balsa wood that was the right thickness and width for what we needed. At less than $2 plus a coupon it was the perfect solution. I gave it a couple coats of stain to match the cabinet color.  It fit so well that it actually stayed up without any adhesive but I wanted to make sure it wouldn’t get bumped off so I added a little hot glue on the backside before putting it up.  The glue should be easy to peel off if I ever need to.

trim

trim2

Now I needed somewhere to store my chalk.  I originally planned to use colored chalk pens like the yellow you saw above, but they have to be primed and I didn’t want to deal with delays when I needed to work up a grocery list, so I opted for old-school white chalk instead.  I used more hot glue to attach this pull handle upside down to create a cup where the chalk sits.  I did have to reposition the cup due to installing it unevenly, which caused the chalk paint to peel up a bit which caused the bare spot under the holder, but I touched that up with a thin coat of chalkboard paint and it looks fine now.  I still need to touch up the wall paint, but I’ll get to that at some point.

chalkholder

Since the papers in the rack still looked messy I found these simple poly vinyl folders to clean it up a bit.  I wanted something a little cuter, but apparently mid-March is not prime season for two pocket folders.  Who knew right?!  I’ll keep an eye out when the back to school supplies come out in the fall, but for now these seem like they will hold up pretty well and could be easy enough to add simple decoration to with paint or vinyl designs.  That might just be a future post if I do!

folders

Total cost for the all the materials came in around $50. Because the extra metal and chalkboard paint can be used for other projects that lessens the total a bit too.  I love it and I’m sure it will be super handy once we start fostering and have kiddo’s school papers to manage.   I’m going to keep an eye out for another wire rack that matches this one when we are in Portland this fall in case we need to expand since there’s still room on the bottom cabinet to accommodate another.

I’d love to hear what you think of our new DIY command center or how you created one of your own, so leave me a comment below.

Talk of the Town featured button

TDC Before and After

Alaska Chick’s Vintage Market

pano

Last weekend I visited a fun Vintage Home Market, which I had been eagerly anticipating for months.  I attended the event last year when it was held at a smaller venue which became very crowded, so I was glad they were able to move to this larger space.  I had a wedding booked that afternoon so I went first thing in the morning, despite the late spring snow storm that had rolled into the area.  Tickets went on sale at 8 am and doors opened at 9, so I arrived a little after 8 to pay and get in line.  The picture above is the view as you enter the building.  On the other side of the entry was this beautiful set up.

c

I browsed the front booths from the line, including this double space booth done by the market coordinator, Alaska Chicks.  There were so many great items packed into the space that you had to look several times to see them all.

a

b

They also had this fun photo booth at the front of the line where you could take selfies with the vintage car and model.  It was a great idea to utilize the wait time, which several folks did.

f

The line grew as the opening time got closer and eventually filled the whole staging area, with several groups flowing out the door.  I took this shot just 10 minutes before they opened the market with a vintage air raid siren from Alaska Picker, who we bought our windmill art from!

crowd

I was so busy shopping that I didn’t take any pictures once the market opened, but you can see lots of the vendor’s booths and wares on the event page here.  My favorite set up was this rustic truss with moss.

d

And of course I found a few treasures to bring home.  The first thing I got was a custom order for a grain sack sham for our bed from this amazing vendor.  I made a beeline for her booth as soon as they opened because that was my one MUST get item for the show.  Across from her space was a vendor with repurposed wine barrel furniture and décor where I found these cool barrel band hearts!  I’d seen some on craigslist back in February and messaged the seller but never got a response so I was giddy to find them here.  Plus they were the same price, just $10 each!  They will be going up on the side of the house when we expand the chicken run later this spring.

hearts

I also found several “little” treasures, including a handmade whale and fun Alaska art print for the foster room, a large ampersand that will be added to the gallery wall soon and vintage letter blocks that I plan to make into magnets for the project I’ll be sharing next!

Haul

Home

This show has me so motivated to start making things for the Junktion Market in July where I’ll be sharing a booth with the gal who does our furniture refinishing, where I plan to do a little browsing as well.  I’ll also be shopping the Alaska Picker Day in June, then hit the Junk Bonanza outside of Portland when we visit in October!  I’m sure I’ll find more rusty, vintage goodness to bring home at each and will certainly share my finds with you all right here on the blog. 🙂