
 Hi lovelies. I took a little break from blogging last week to get caught up on that crazy thing called life. Things have been a little overwhelming recently and I just needed some down time to tie up those pesky loose ends that seem to multiply just when things are busiest. But now that I’m back, I thought I’d share a little about our kitty, Miss Luna. She’s had cameo appearances in several posts since we brought her into the family just over a year ago, but I haven’t posted much about her personally during that time. So here’s her moment in the spotlight. Although she wasn’t much pleased to have doggie siblings when she first came home, she’s adapted and certainly holds her own. These days she tolerates standard doggie behavior such as sniffing rears and barking so long as it doesn’t interfere with her kitty duties of monitoring the bird and squirrel population in the backyard and nap time. If you follow the DB&DT Facebook page you’ve seen this photo of her and Bacardi enjoying each other’s company – within limits.
 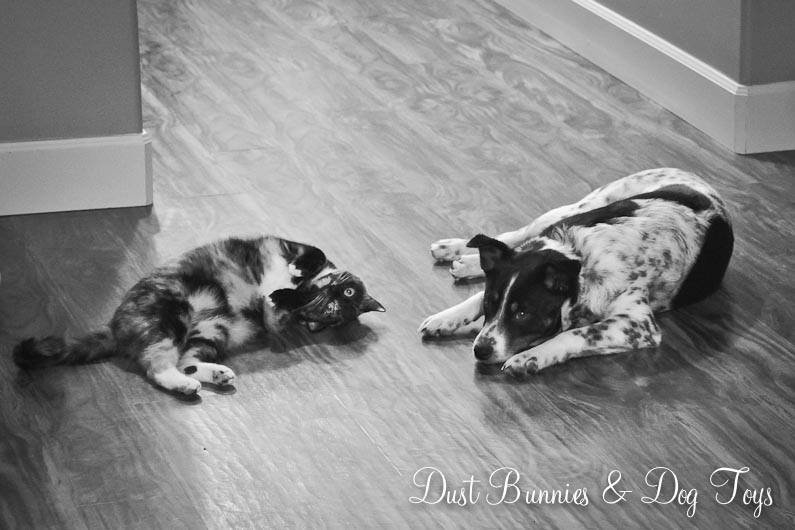 While she’s certainly lived up to the nickname “Princess” as most cats do, she’s also had plenty of “Luna-tic” moments such as darting through the house at full speed while the rest of us are snuggling on the couch watching TV or attacking a small remnant of a dog toy as if it were the most interesting prey you’d ever seen. Recently, she’s been climbing the ladder that is sitting in the office for an in-progress project I’ll be sharing in the near future, but she makes her way to the top via the wrong side of the ladder which makes for some hysterical stretching techniques. Occasionally I can document these odd behaviors with photos on my phone such as when she decided to help with the laundry, or when she explored every inch of the garage and the kitchen or when she inspected the kitchen faucet. Sometimes I’m lucky enough to have my real camera ready for these shenanigans like when she attempted to climb the columns on the front porch. Not sure where she thought she was going, but she was pretty determined to get there.
  Plus she’s fascinated with drawers. If you leave a drawer open in our home you’re bound to have a cat in it within minutes. She’s even tried to open drawers herself by pawing at them! But one of her all-time favorite things is plastic bags. Every time I switch out the holiday décor and have a pile of bags on the floor, there’s bound to be a cat in it.
 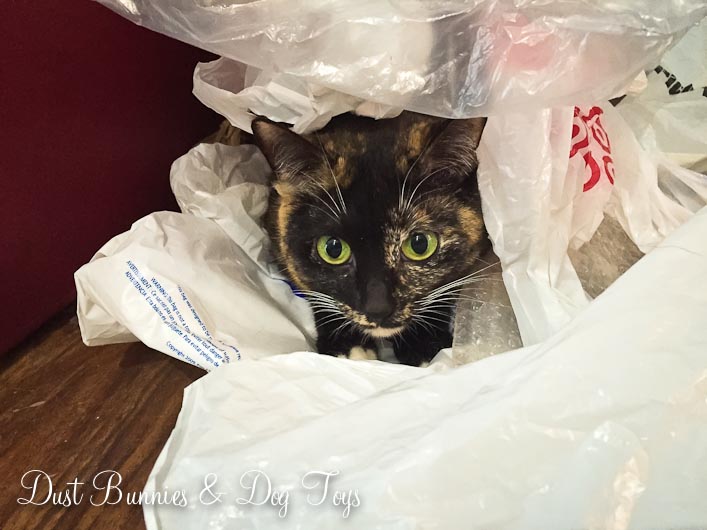 Unfortunately the bags don’t seem to love her back quite as much. She recently took a tumble off the bed when she decided to sneak into an online order shipment bag I had just emptied and we’ve found her in this situation twice now. The look of embarrassment on her face is priceless!
  She certainly is a curious kitty, but she’s smart too which keeps her from using up those extra lives in pursuit of adventures. I’m so happy to have her as part of our family and I look forward to many more “Luna-tic” moments in the years to come. 🙂
Author: Jenna
My Pants Crisis
In the midst of No Spend January my fur babies decided I needed a little extra drama in my life, so they pulled two of my dress pants from the hamper and ‘restyled’ them with huge holes. Yeah…. Let’s just say they’d be considered indecent exposure, especially in a corporate office!
Two may not seem like a huge deal, but because I’d been losing weight I was down to a handful of pants that still fit at the time. So my little problem became a mini-crisis. As an event planner, I am usually on the go at work and don’t often wear dresses or skirts because they just aren’t suitable for what I’m doing most days. Thus, having multiple pants options is a must and now that I no longer had enough to rotate through each week it became something I actually NEEDED, although I hadn’t planned on clothes shopping for the month.
I hit a few thrift stores and consignment shops in the hopes that I’d find the ever elusive style that fits my long legs and curves – in the right size, but that didn’t happen and I didn’t have time to keep searching. Luckily, retailers were gearing up for the Martin Luther King, Jr. Day sales so I ordered several pants in different styles and sizes from Macy’s. Although the total price tag was a bit hefty even with the sales, I figured whatever didn’t fit would be returned – keeping me on par for No Spend January. Unfortunately, NONE of them fit and I had to return the entire order! Although that meant I still fit within No-Spend January’s rules I still needed pants.
By this point I was desperate. That’s when I decided to try The Limited. I’d never ordered from them before, but had heard about them on several fashion blogs so I figured it was worth a try. I placed an order for 11 pairs of pants in various sizes and cuts so I could see what worked for me and what didn’t. I ended up keeping two of the 11 pairs which thankfully put me back in balance for my weekly rotation.
Because I’d placed such a large order I received a sizeable amount of “virtual dollars” to use later in February. Now that I knew what style I liked and size fit me, I used those dollars along with the President’s Day sale to purchase another round of 10 pants. This time I kept all but one pair, giving me a whole new arsenal of pants for my wardrobe!
I’m still losing weight, so eventually I’ll have to get most of them taken in, but it was worth it to have the pants crisis abated. I’m still on the hunt for a few additional colors since several of the ones I kept ranged from gold to khaki, so I might pick up a few more with the coupon included in the recent shipment. And since I just purged my closet in preparation for a big consignment sale later this month, I’ll have a few dollars to reinvest!
Hopefully, I’ll find time to start sharing some of my outfits soon so you can see all these new duds in action! 🙂
A Master Bench

This is my final No-Spend January Project recap and it’s one of my favorites! Yes I know it’s now March, but life happened and I’m just getting to sit down and write this up. I’d had this project in mind for a while and had gathered all of the supplies we’d need over several months. It was just a matter of actually spending the time to put it all together.
We started with the legs, which we picked up unfinished at the hardware store for around $7 each. I decided to stain them with an oak color we had on hand and then did a light coat of rose gold paint to give it a little sparkle and depth. The hubs created this genius holder so I could do the whole leg at once and leave it to dry! It’s just a piece of scrap lumber with holes to hold the threads on the tops of the legs. (Notice my last no-spend project there in the background? You’ll see the pedestals mid-painting in the background in one of the upcoming pictures too!)

Next we attached the legs to a simple box structure the hubs built based on the dimensions we’d taken to fit the foot of our bed. He used scrap 2×4’s for the frame and a piece of plywood for the top.

I’d found a huge section of foam for just $3 at a rummage sale, which was a much better bargain than the pre-cut pieces that sell for $25 or more and weren’t the right size. We cut a piece of the foam to fit and used spray adhesive to attach it to the top of the box frame. And as you can see behind the bench, there’s still plenty of foam left over for future projects!

Since I planned to upholster around the sides of the box, I wanted it to have a bit of cushion too. A layer of batting accomplished that and made the edges of the foam less square. We realized the next few steps would work better without the legs so we removed them and stapled the batting down on the underside of the frame, pulling it tight as we went. It took us a few tries to figure out exactly how we wanted to wrap the ends, but we finally figured out the method that involved the least amount of bunching.

Next came the outer fabric, which had been a shower curtain I picked up at good will for around $4. I chose this material because it seemed to have a bit more tear resistance, which was important with three dogs and a cat! We stapled down either side of the fabric avoiding the staples from the under layer of batting.

Just like the batting, we tried several methods of folding the ends before deciding on one that kept the lines of the fabric straight. We had to cut a bit of excess fabric from the folds to keep things smooth, but the end result turned out pretty good.

Finally we reattached the legs by cutting holes where the threads attached to the frame and screwing them back on. (Notice that antique table we’re using as a work bench? I snagged that just before Christmas for $20 and plan to refinish it as a nightstand for our guest room!)

Now we have a custom bench along the foot of our bed, which is the perfect place to hold all those extra pillows each night! Which also keeps the fur babies from using it as a launching pad onto the bed! 🙂

DIY Glass Hurricanes & Pedestals
This was seriously one of the easiest DIYs I’ve ever done. All it took was some glass candle sticks, glass candle trays, a couple simple vases and some industrial strength glue. I found several tutorials on Pinterest for both the hurricanes and pedestals, so it’s certainly not a new idea.
The hardest part was deciding which glass candle sticks to pair with each topper. I mixed and matched the different pieces, doing a “dry fit” to finalize my selections. I decided to use the taller candle sticks for the hurricanes since the added height made them feel a bit more like the expensive versions I’ve seen in the designer catalogs.

The three shorter candlesticks were paired with the glass trays to create pedestals of varying heights. I think one of the trays was actually a paper weight, but I like that one has a thicker platform since some items might look better with that.

Once I was happy with the dry fit, I lined up all my pieces and broke out the super strength glue, which other bloggers recommended. This stuff is pretty strong, so I wore gloves while working with it as a precaution.
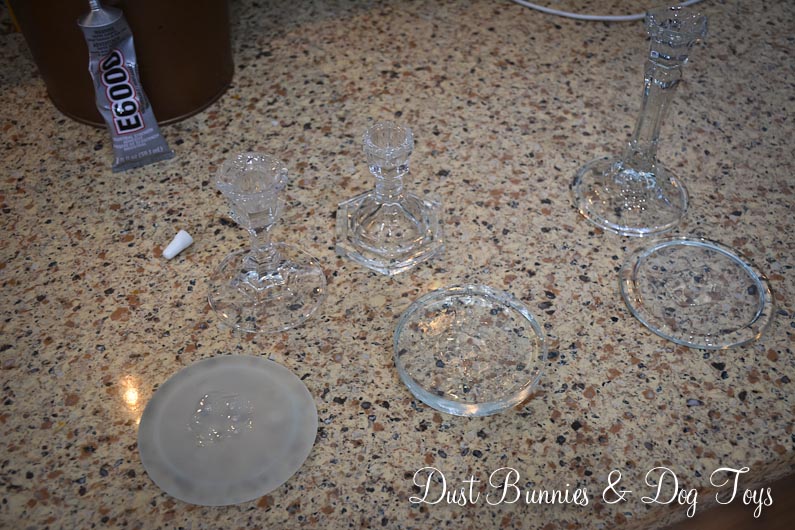
The directions say to apply the glue to both pieces, wait 2 minutes and then join them, so that’s what I did. And it worked like a charm. The glue does need 24 hours to cure, but once it did it created a super strong bond. I painted the pedestals white, so I could use them for multiple occasions.

My only disappointment with this project is that I don’t have a large pillar candle that fits in the curved vase hurricane so I have to use a smaller votive candle. But for a fraction of the designer price I can work around that.

Since I already had the spray paint and had picked up all the glass pieces for about $25 at thrift stores before January, all I needed was the glue which runs about $5 at the hardware store – although after a military discount and a gift card it was free. So there you have it, another 0-cost project wrap up for No Spend January!
The Sickness
Hi, there. After a lengthy battle with “the sickness” – a nasty, allergy-induced, head cold – I’ve finally returned to feeling human. The hubs was amazing through it all. He drove two hours to pick me up at work and bring me home early because I car pooled the day I got sick and then took great care of me until he came down with a bug himself. We’re both still fighting some congestion, but at least we’re back in action. And now begins the game of playing catch up since I spent my long holiday weekend, including Valentines, hacking up a lung instead of making progress on my to-do list.
One of the items on that list was sharing my Valentines décor with you. I know it’s now passed, but I wanted to share what I did anyway. I had this grand plan to make a sweet X & O like this, but things didn’t pan out quite how I hoped. I bought plain white X and O letters at Michaels with the rest of my no-spend January return gift card.

I originally planned to paint gold stripes on one and gold dots on the other, so I taped off the stripes and poured a bit of craft paint.

Apparently the finish on the letters wasn’t well suited for painting because the paint didn’t adhere well and bled, even with the tape.

I decided to try making the dots with the end of a large brush. That didn’t work out so well either.
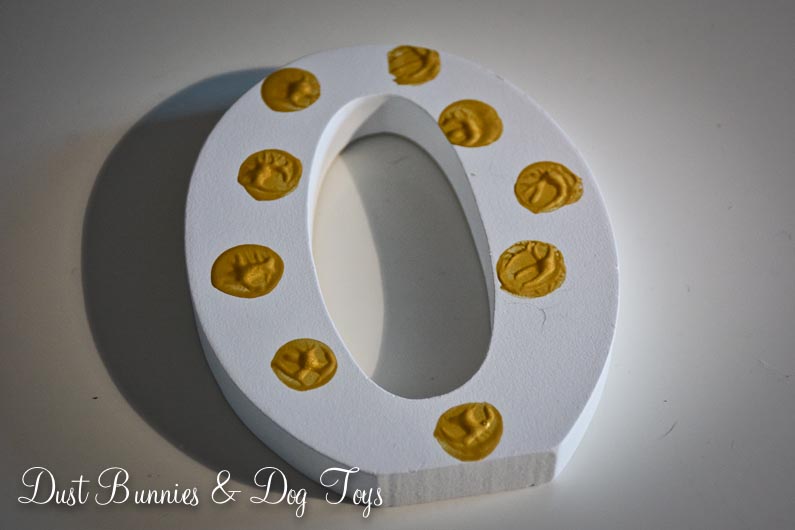
Since I had limited time and didn’t feel like sanding anything, I ended up just wiping off the paint and leaving them plain, atop the curio cabinet.

The media cabinet got some love from a few of my recent bargain finds, including a super simple DIY glass hurricane candle votive, which I’ll share a tutorial for in my next post.


I was pretty happy with the mantel arrangement, which included another DIY glass hurricane votive, milk glass and a DIY lipstick heart framed art thanks to several of my gal pals donating their old unwanted lipsticks. They all thought I was nuts when I asked if they had some to donate, but thought the end result was pretty cool.

The side table held some faux tulips in a white crock (another fairly recent bargain find), paired with a long-ago thrifted gold heart votive candle. And my chair became home to my “Love you More” pillow.

I added a “Love” cover to a pillow I already had and it looked perfect on the bench near the entryway. Beyond that you can see the heart rose wreath on the wall in the entry.

The dresser in the entry gave me fits. I just couldn’t seem to make it work. I started with this set-up on one corner and really liked it, but that left the other side barren.

So I reworked things and ended up with this arrangement. Certainly not amazing, but it filled the space and didn’t cost anything, so I decided to go with it.


Clear and red glass heart ornaments, along with some pink ribbon brought my holiday tree to life. I used to have a topper for this holiday but it bit the dust last year so I just went without this time.

I kept the dining room simple, with two large felt hearts on the buffet lamp shades and a little bear holding the wooden heart the hubs mom brought back from Jerusalem under a cloche.


A flameless candle and some rose petals finished off my recent bargain hurricane for the perfect simple centerpiece.


There you have it – my 2015 Valentines décor. Just in time for me to switch it all out to for green St. Patty’s stuff! LOL. I’ll try to get that glass hurricane tutorial posted tomorrow, so stay tuned for that!
Recent Bargains

Just before No-Spend January started (hence the Christmas centerpiece) I snagged a couple really good bargains on a trip to the thrift store. I only paid $45 for all of this! Several of them got a makeover during the last month – I’ll be sharing those very soon – and several became part of my Valentine’s décor – which will also be shared soon.
Although my favorite find was the milk glass vase for $0.99, I was pretty excited about the tall hurricane vase since I had bought one on the local buy/sell page for $5 about this time last year and ended up selling it to someone at a spring bazaar even though it was only part of my display because she liked it so much and offered me double what I paid for it! I snagged this one for $12 and although I originally planned to paint the base I’ve decided to leave it as is for now. The wooden pedestal bowl is still mid-transformation, but I think it’s going to be fantastic when it’s done – just in time for some spring decorating.

But the best recent bargain is this leather arm chair. Wanna know what I paid for it? NADA! Zilch! Absolutely nothing! Every once in a while trolling Craigslist’s free section pays off! 😉 One of the arms is a bit wobbly and needs some reinforcement, but the hubs is pretty sure he can take care of that at some point. That point will probably be right before we have company coming one day when it’s a priority. Oh well, at least for now it looks pretty darn fancy!
Now that No-Spend January is over, I decided to check out a local clothing consignment store last Sunday and brought home a lovely Banana Republic jacket for just $7! I also found a pretty pink scarf at the thrift store in their ‘new/retail donated’ section for just $9. I’d been on the hunt for one for some time now so finding one at such a great price was even sweeter. Isn’t finding a great bargain wonderful? Tell me about your recent favorite in a comment!
Organizing My Crafty Storage
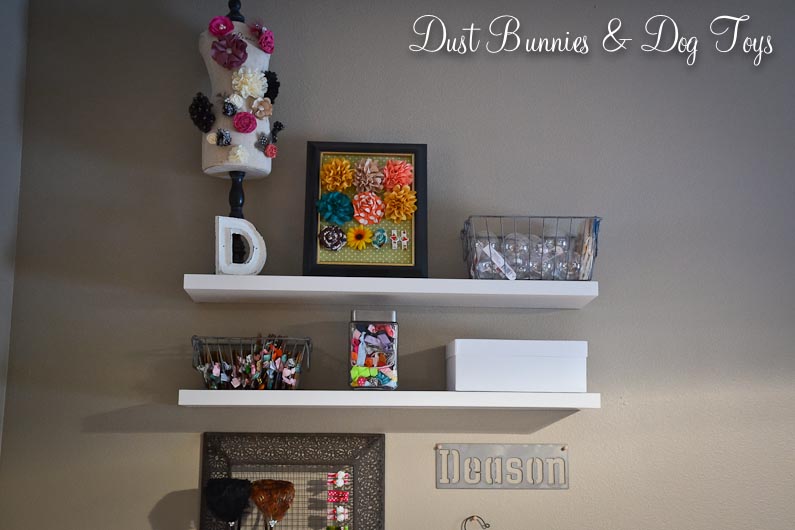 Since I’m running behind recently I still have a few No-Spend January projects to share including getting my craft shelves organized. Although it’s not really all that exciting, I’m happy with the result and the fact that I crossed another “to-do” off the list without spending a dime. I liked the mannequin bust and wire basket I had up there already, but I had a few other items I wanted to store including already made elastic headbands, clear ornaments I never found time to make into minions back at Christmas and my inventory of seasonal hair accessories. I dug out a matching yet larger wire basket from my décor stash to hold the ornaments on the top shelf, which left just enough room to place a display board I already had made up. To finish up the lower shelf, I purchased the glass jar with my Target gift card for the headbands and returned some unused items to Michaels which gave me enough to buy the little storage box for my seasonal inventory. I may eventually paint some gold dots on the box just to give it some interest, but that’s not a huge priority right now. While I was arranging the shelves I realized that if I moved the hanging wire rack down a bit it would create the perfect space for the name plate I still hadn’t figured out how to use. Will it stay there forever? Probably not. But at least it has a home and is on display for now. The open jar on the right of the cabinet top is my trash can when working on a project and the containers on the left currently hold projects that need a little fixing.
 Here’s a full shot of the shelves and the cabinet. Normally the cabinet is centered below the shelves, but apparently I bumped it out of whack before taking this picture!. Still it’s pretty darn inspiring – especially when it’s cleaned off!
  If you look closely you can see the roll of kraft paper standing up next to the cabinet because I still haven’t decided how and where I want to mount it yet. I’m leaning toward mounting it with some simple hardware on the side of the cabinet so I can still use it when I roll the cart out into the living room, but it doesn’t fit quite right so I might have to pick the hubs brain to make that idea work. 🙂
Fit Club
Although I wasn’t one of the masses that resolved to lose weight in the new year I do have a few extra pounds I wouldn’t mind parting with so I decided to check out the wellness programs my employer offers. There were two options: “Biggest Loser” which calculates weight loss just like the TV show and “Fit Club” which is intended to provide motivation to maintain or lose weight. I knew I wouldn’t be shedding enough pounds to be competitive in the Biggest Loser group, so I chose Fit Club.
The rules are simple, you must have maintained or lost weight at 5 of the 6 monthly weigh-ins to be eligible to win the pot of everyone’s $10 join fees. There are also monthly drawings just for showing up to the weigh-ins if you weigh the same or less than your starting weight.
My first monthly weigh in was last week and I’m happy to report that I’m down 3 pounds from my starting weight. It may not be a lot, but I haven’t made any drastic changes to my diet or lifestyle, so it’s a good result for just making healthy choices.
One of those choices is taking the stairs now that my office is on the 5th floor. I do sometimes ‘cheat’ when I want to catch up with a co-worker who is getting on the elevator or if I’m carrying something that would make stairs hazardous, but for the most part I’m sticking with it – even when I’m coming back from the basement. I still get winded part way up, but it’s getting better the more I do it. Plus getting my blood pumping every so often is nice for those days when I’m stuck at my desk and not running around managing events.
Hopefully I continue on this trend, creating a healthier me one step at a time along the way and winning the jackpot just about the time I’ve got a vacation planned to the land of heat and humidity back east this summer where a few less pounds will be welcome!
Look Ma, No Wires!
Ok, who decided to hit the fast forward button this week? I blinked Monday morning and now it’s Friday afternoon without a single post! Anywho, I’m here now and wanted to share another No-Spend January project. Several months ago the TV in our family room started having speaker issues, so I agreed that it was time to replace it. The hubs researched options and found the exact one he wanted at Best Buy just in time for one of the fall holiday sales. Unfortunately, when he arrived at the store they didn’t have any in stock, despite the website showing several available at that location. So the sales associate made him a deal, a bigger TV for the same price! And do you know what my hubby said to that? “Well I didn’t really want a TV that big….” Say what?! He’s got to be the first man in history to ever have that thought cross his mind let alone his lips. And that’s why I love him. Still, it was an offer too good to refuse and he came home with a monster 50” TV.
The old TV, which we sold to recoup some of the cost of the new one, left room on either side for my decorating but this new behemoth filled the entire top of the TV stand. I don’t have a picture of the old TV in the space, but you can see how large the new one looked in the background of this shot.

I suggested we hang it on the wall so it wouldn’t feel so massive once I did the gallery wall I was planning for the space, plus that would leave the top of the TV stand available for decorating improve the view of the screen from the dining table. 😉
I’d pinned another blogger’s post about mounting her TV and hiding the wires which I showed the hubs. He liked the idea and ordered the kit we needed online. It arrived right before Christmas, just in time for a few days off he had planned. He installed it while I was at work one day so I don’t have any pictures of that process (apparently it’s impossible to hold up a huge TV and take pictures of doing so at the same time. LOL), but it’s fairly simple. Attach bracket to the wall, then attach the TV to bracket. That’s about when I got home and said “but what about the wires?”
Although he was hesitant to put a hole in the wall, I insisted the wires needed to disappear and not just be camouflaged. A few days later he consented and cut two holes – one behind the TV and another behind the TV stand – so he could fish the necessary wires through the wall. Here’s the end result!

Soooo much better! Just look at all that open space on the TV stand just begging to be decorated for Valentines! Oh, and that extra speaker thing now has breathing room (cough, cough). Another improvement is the side view, which is seen from our entry way. No more mess of wires behind the stand.

Now I just need to finish prepping a few items for the gallery wall and figure out the best layout for them around the TV. I’ll be sure to share that project when I do! After that, I plan to replace the current TV stand with something like this for more storage. But that’s projects for another day. 🙂
The Great De-Crapification of 2015
Well howdy strangers! I bet you’ve been wondering where I’ve been the last two weeks. I’ve been on a mission – the Great De-Crapification of 2015! It began at work with the announcement that my department would be moving to a new suite. Because our new space didn’t have as much storage for all of our materials we had to downsize, which led to me purging years of accumulated stuff that pre-dated my time at the company ranging from tools and promotional items to costumes and party décor.
Once I’d sorted everything and packed what the movers needed to take I was left with a mountain of ‘un-needed stuff’ which was offered to the employees of other departments and promptly disappeared in what can only be described as a cloud of human locusts.
Although I admit that a few items came home with me rather than go in the freebie bin (it is still no-spend January after all and I’m an employee too!), I was still in decrapification mode, so the purging continued at home. The spare room – AKA “I don’t know what to do with that yet, so put it in there and close the door so I don’t have to look at it in a pile” room – became my next target.
Here’s how the room looked before the great decrapification. Seriously, that’s a lot of stuff!

And here’s how it looked after. I think I hear angels singing!

Granted, a good portion of the stuff went elsewhere for storage (i.e. the crawlspace and the shed), but at least it found an appropriate home. There are still several items in the space including a box of military stuff belonging to the hubs that I refuse to go through because I’m sure to throw out something important from his career, things that won’t have a home until other projects are completed around the house and the two extra chairs for our dining room table. Amazingly all that fits in the closet or along the far wall, making the main area of the room a perfect open spot for an elliptical the hubs scored on a local buy/sell page for $50 to help him lose weight. At least it’s not in the living room and since I have a list of projects to do before I work on this room it’s the logical place for it. For now.
Luckily for me, the hubs caught the decrapification bug too and started cleaning in the garage! It went from this:

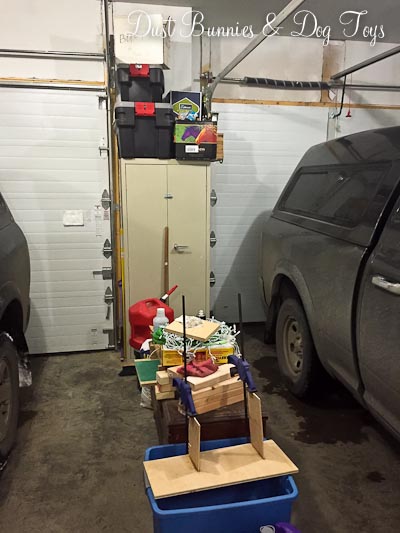
To this in just a few short days!


It still has quite a ways to go, but being able pull in without calculating how far I can open my door is so much less stressful.
During the Great Decrapification I also completed a couple more projects with items I already had, to further reduce clutter. I’ll be sharing those next week, so make sure you come back to see them! Until then I wish you a wonderful, clutter free weekend! 🙂
