Going Gothic for All Hallows Eve

1

This is our first Halloween in the new house and I knew I wanted to switch up my decorating style to be more Pottery Barn ‘gothic’ than the typical ‘cutesy’ or all out ‘gore’ you often see this time of year. I purged my decorations and sold quite a few items on the buy/sell pages to fund the purchase of new items. But I ended up only spending about $18 for this new look!

I started by pulling out anything in my décor stash that was black or white and tackled the mantel first. A couple of candle sticks topped with flameless candles, a doily wrapped pumpkin, some spooky artwork, a skull and my pretty raven make up a simple, but spooky arrangement.

2Mantel

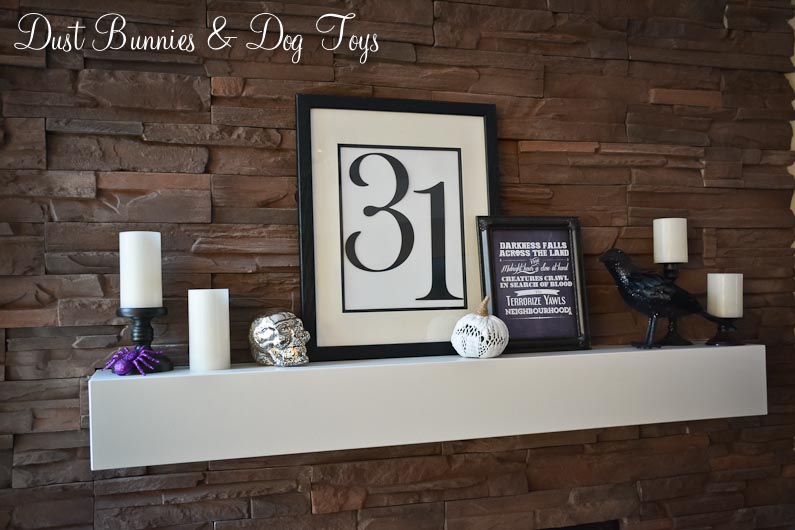
The artwork was a free printable quote from Michal Jackson’s “Thriller” that I found here and an oversized numeric cut out I made with my Silhouette. Both frames were items I already had on hand, so I just repurposed them.  The skull lights up and was one of only two items I purchased this year. Originally priced $12.99 I got him on sale for 20% off, saving me a few dollars and the time I was planning to spend to create one that looked similar!

3Entry

I wanted the entry way to feel like a witch’s potion brewing station, so on one side I filled a pedestal that I DIYed forever ago with several different size and style bottles holding various items you might expect to be in a spell recipe. I planned on creating vintage-looking labels for each, but ran out of time. So here’s what they are labeled in my head:

  • Full moon dust (sugar)
  • Goblin teeth (candy corns)
  • Eye of newt (white pebbles)
  • Black magic beans (navy beans)
  • Spider venom (purple glitter)
  • Toad tongues (split pea)

5Entry

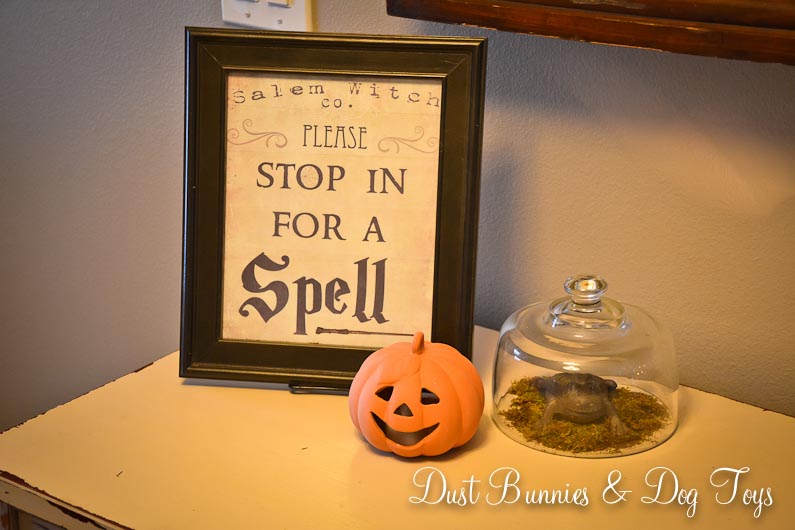
I added a little flameless votive in a small jar and a chalkboard sign to round out the vignette.  On the other side I used another free printable, found here, paired with a fun little jack-o-lantern votive and a cast iron frog under a cloche. The jack-o-lantern is part of a set with metal hook posts that are meant to be put along a walkway, but I always worry that they will get blown off by the wind and break so this is a much safer option.

4Entry

I finished off the area with a pretty orange and black bunting from my photo props and my ‘welcome’ ghost sign on the opposite wall.

6Entry

Out on the porch, I added a new welcome mat with an adorable ghost and some spooky pumpkins. Pay no mind to that empty pot on a pedestal in the corner by the door. I had plans to add some painted branches to it with lights and spider webs, but I never got that far and at this point it just ain’t worth the effort for one day! Those spider webs are the other item I bought and since I didn’t use them they will be in my tub and ready for use next year!

7Porch

In the dining room I used two more jack-o-lantern votives from the same set I mentioned earlier and paired them with my cherished “Boo” Ghost lantern.

Buffett

So that’s my Gothic Spooky Halloween décor. It’s not much this year, but it’s a good starting point for next year. So what do you think? Is the old fashioned gothic look better than the cutesy scary stuff or do you prefer a more “goriesh” style for Halloween decorations?

More Crafty Storage!

CraftShelves
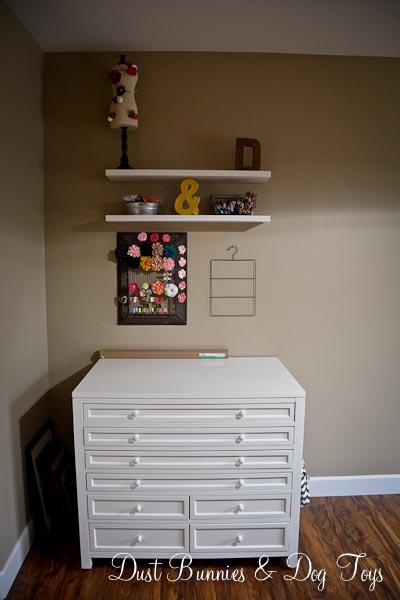
I recently picked up some simple white floating shelves at Lowes and had the hubs install them above my craft cabinet for some additional storage. I originally planned to DIY these, but at $20 each it was worth saving the hub’s time for other more important projects. 🙂

Although they can only hold a few pounds, they are the perfect way to display some of my finished crafts and inventory as I prep for the upcoming holiday bazaars.  Of course what I display here will change as my projects do, but it’s nice to have a spot to show off my work or stash things that are “in-progress” while keeping my table top clear for working.

That roll of kraft paper you see on top of the cabinet will soon be mounted to the wall just an inch or two above the table surface so I have a quick and easy wrapping station as well!

My New Crafty Corner

CraftCab

I’m super excited to share my new craft cart with you!  Although I ordered it back in March with free shipping, the company insisted that offer didn’t apply to Alaska, so we had it shipped to my mother-in-law’s house in Washington, where it sat until we visited a few weeks ago.  It then made the long haul up the AlCan with my classic truck and took shape after several hours of assembly by the hubs.  But it was sooooooo worth it!

I’m still filling some of the drawers, but most are packed with my craft supplies.  I’ve been able to fit everything in this one cabinet, sans fabric – which will soon be organized and stored in a rarely used space, so watch for a post on that too.  The top two drawers have movable dividers which make organizing super easy.

CraftDrawer2

I scored some favor tins at the craft store with a coupon sale to organize the little things like beads and buttons.  The clear tops make it easy to find exactly what I’m looking for and I still have a few empty containers to grow into!

CraftDrawer

I hung my cutting board on the side with a few hooks, so it’s easy to pull out and trim things quickly.  I plan to add a roll of craft paper above the cutting board for gift wrapping and easy cover for messy projects.

CraftCabCutter

On the other side I put a hook for my craft bag, which holds my current craft project.  It’s the best way I’ve found to craft on the go. 🙂

CraftCabWide

I hung a few display boards above the cabinet and set my mannequin bust on one corner with a wire basket to hold prepped inventory.  The little ceramic pot acts as my trash can and a couple metal tubs hold recent projects that are awaiting prepping for their Etsy closeup.  A fellow crafter is making me an adorable owl tool holder, which I’ll be sure to show off when it’s ready.

Eventually, I’ll add some shelves above the display boards to hold some of my other display pieces and finished inventory, but for now it’s just great to have a dedicated space for creating.  Not having to first find the materials needed, then haul them out and set them all up, to craft for a few minutes and then have to gather it all back up to go back into storage again is HEAVEN!  I can be working on something and realize I need another material or tool, roll out a drawer, grab it and keep on crafting.  That alone inspires me to work on projects.

Even better is that we added wheels on the bottom so it can move!  I can pull it out into the middle of the room so I can work on a project from all sides or invite friends over for a craft session.  But the real reason for the wheels is so I can pull it out into the living room and watch TV with the hubs while crafting!  I did just that when I was organizing everything into it and it was perfect.  Now I just need the stool I want to go on sale, so I have a seat at the ready to serve as a crafting post or a photo prop!

A Little Lace Makes A Big Impact

I thought I’d share the story behind the little lace votives that we’re seen in my recent Easter decor post. I made these as inventory for my recent craft show booth, but they didn’t sell so I decided they were the perfect addition to my holiday decor. They were super simple to make. I started with plain glass votives that I purchased for another project and no longer needed.

Votives

I had a bag of lace I’d been hoarding since someone gave it to me so I picked out a couple of sizes that fit the votives well in spring colors.  I measured out how much I needed to go around and added a little extra for room to glue it down.  A little hit glue and about 10 minutes later I had pretty vintage looking votives!

VotivesAfter

This has to be one of the easiest crafts I’ve done in a very long time!  And because I already had everything on hand it didn’t cost me a dime.  🙂

Crafty Storage and Workspace, All in One!

You know I love a good bargain, and you know I love to craft, but those two things together make me positively giddy. I’ve been eyeing this craft cabinet for some weeks now, waiting for it to go on sale. Lucky for me my patience paid off because not only did it go on sale for 15% off, but I had an additional coupon for 10% off and got FREE shipping – saving around $100. I almost swooned!

I can’t wait for this sucker to arrive and get assembled so I can finally have a dedicated crafting space! Now I can spend more time crafting instead of hauling my supplies to whatever area I’m working in.

Although I originally planned to repurpose a large armoir cabinet into a crafting station, I came to realize that I tend to craft at the dining room table or kitchen island so I can watch TV or chat with the hubs at the same time. Because of that, having a piece that could accommodate a moveable work surface and storage became the priority. That ruled out a huge armoir and made a hutch or dresser the likely choice. I’d considered refinishing several thrift store pieces, but they all had minimal storage due to large drawers that wouldn’t suit my supplies well. When I saw this I knew it was perfect, although I will admit I’m NOT a Martha Stewart fan. Unfortunately, I hadn’t found anything that could compare for the price.

I plan to add large casters to the legs so it can be moved out into the living room where I can see the TV or into the center of the studio for more room when working on something large. And you know I’ve got big plans to organize all my supplies by categories into those fantastic shallow drawers, where they will be away from little customer’ fingers and puppy paws. Granted, I won’t be able to fit all of my supplies and my entire fabric stash in here, but I tend to only pull out the fabric I’m working with at the time anyway. I plan for my fabric to live on shelves in the guest closet, where they are easily accessible and out of the way.

I’ll likely add some sort of shelf or cabinet above this piece so I have a spot to store all the display pieces I use at craft shows, but that will come a bit later. And I’m thinking of doing a bulletin board between the shelves and the work surface so I can pin up inspirations and rig some system of storing the little pieces of whatever project I’m currently working on.

Hopefully I’ll get a tracking number soon so I can obsess about when it will arrive a little more concretely. Watch for a post in the coming weeks once it’s here and set up! ☺

Gettin’ Crafty

I’m happiest when I’m creating something. Although I have two creative jobs – a full-time gig as an event planner and a side photography business – I still see crafting as my ‘hobby’. I call this hobby Thrift D’ Creations and share it with a Facebook page and an Etsy shop, where I sell my wares.

I have also showcased my work at local craft bazaars for the past several years, but the cost and time involved became overwhelming. So I decided to limit myself to two shows a year – one in the fall for Christmas and one in the spring for Easter and Patriotic holidays. Luckily, now that we’ve moved to a new city, I’ve found two such shows just 15 minutes from home. Both have reasonable booth fees and draw a sizeable audience, which is not always the case, so I’m thrilled to be involved.

Tomorrow is my spring show, the Gifts Galore Bazaar, which benefits the Cystic Fibrosis Foundation. Held at a local high school, there is room for over 70 vendors, including everything from hand-made items to Tupperware.

Besides creating all the inventory for my booth, the biggest investment has been determining how I’d set up my booth. I decided to split a booth between my photography and crafting so it’s a business expense. I had originally planned to use free bi-fold shutter doors I’d gotten on Craigslist as a backdrop for my booth, but then I spotted a gal at a recent show with this display.

Display

I asked her about it and she demonstrated it quickly. The simple design folds up for portability, but includes several shelves can hold LOTS of stuff! GENIOUS! And because the materials were basic the cost would be minimal as well.   So I did what I always do. I showed the hubs. And that wonderful man made it happen, just in time for the show!He also rigged up some pipe stands that I can hang canvas drop cloths as backdrops from for the other two sides of my booth.  I’ve been so busy making inventory for the show I haven’t had time to get a picture of either just yet.  I plant to post a picture on my Facebook page after I get all set up tomorrow, so be sure to like my page so you see it!  I’m excited to see how it all comes together on-site, but I’m sure it will look great and all the other vendors will be envious.  And don’t worry, those shutters I mentioned earlier will find a new purpose come my Christmas show thanks to some Pinterest inspiration! 😉

Kiss My Glass

I recently discovered a local artisan who does stained glass pieces and ordered this beautiful whale for my mom’s birthday.  The hubs catch a glimpse of the piece before I shipped it off and was a bit upset that we weren’t keeping it, so when the artist posted a new pattern of two whales with special multi-colored glass I knew I wanted one for our home.

Even though she follows a pattern, each piece turns out a bit differently, due to the glass variations and hand crafting.  She can also create custom pieces like this, which I’m remembering for later! 😉

I decided to hang our whales in the guest bathroom, where I have all the nautical décor.  I had been feeling like there were too many fish in there with the fish plates on the wall and the hanging fish in the window.  I simple adore my fish plates, so the hanging fish had to go.  Now the glass whales hang in their place look a million times better!  Plus the colors coordinate perfectly with everything else in this space.

Whale2

Whale

The artist calls her side business, Kiss My Glass Alaska.  Isn’t that the most perfect name ever?!  It was so great that I had to borrow it for the title of this post!

You can see other designs she’s done on her Facebook page and while you’re there be sure to click like so you see future creations too!

I’m a huge proponent of supporting small business, especially as a small business owner myself!  These kitchen table shops make a huge impact on the economy and directly support American families, rather than line the pockets of corporate tycoons.   And it doesn’t hurt that they make the world a prettier place too!