Progress…

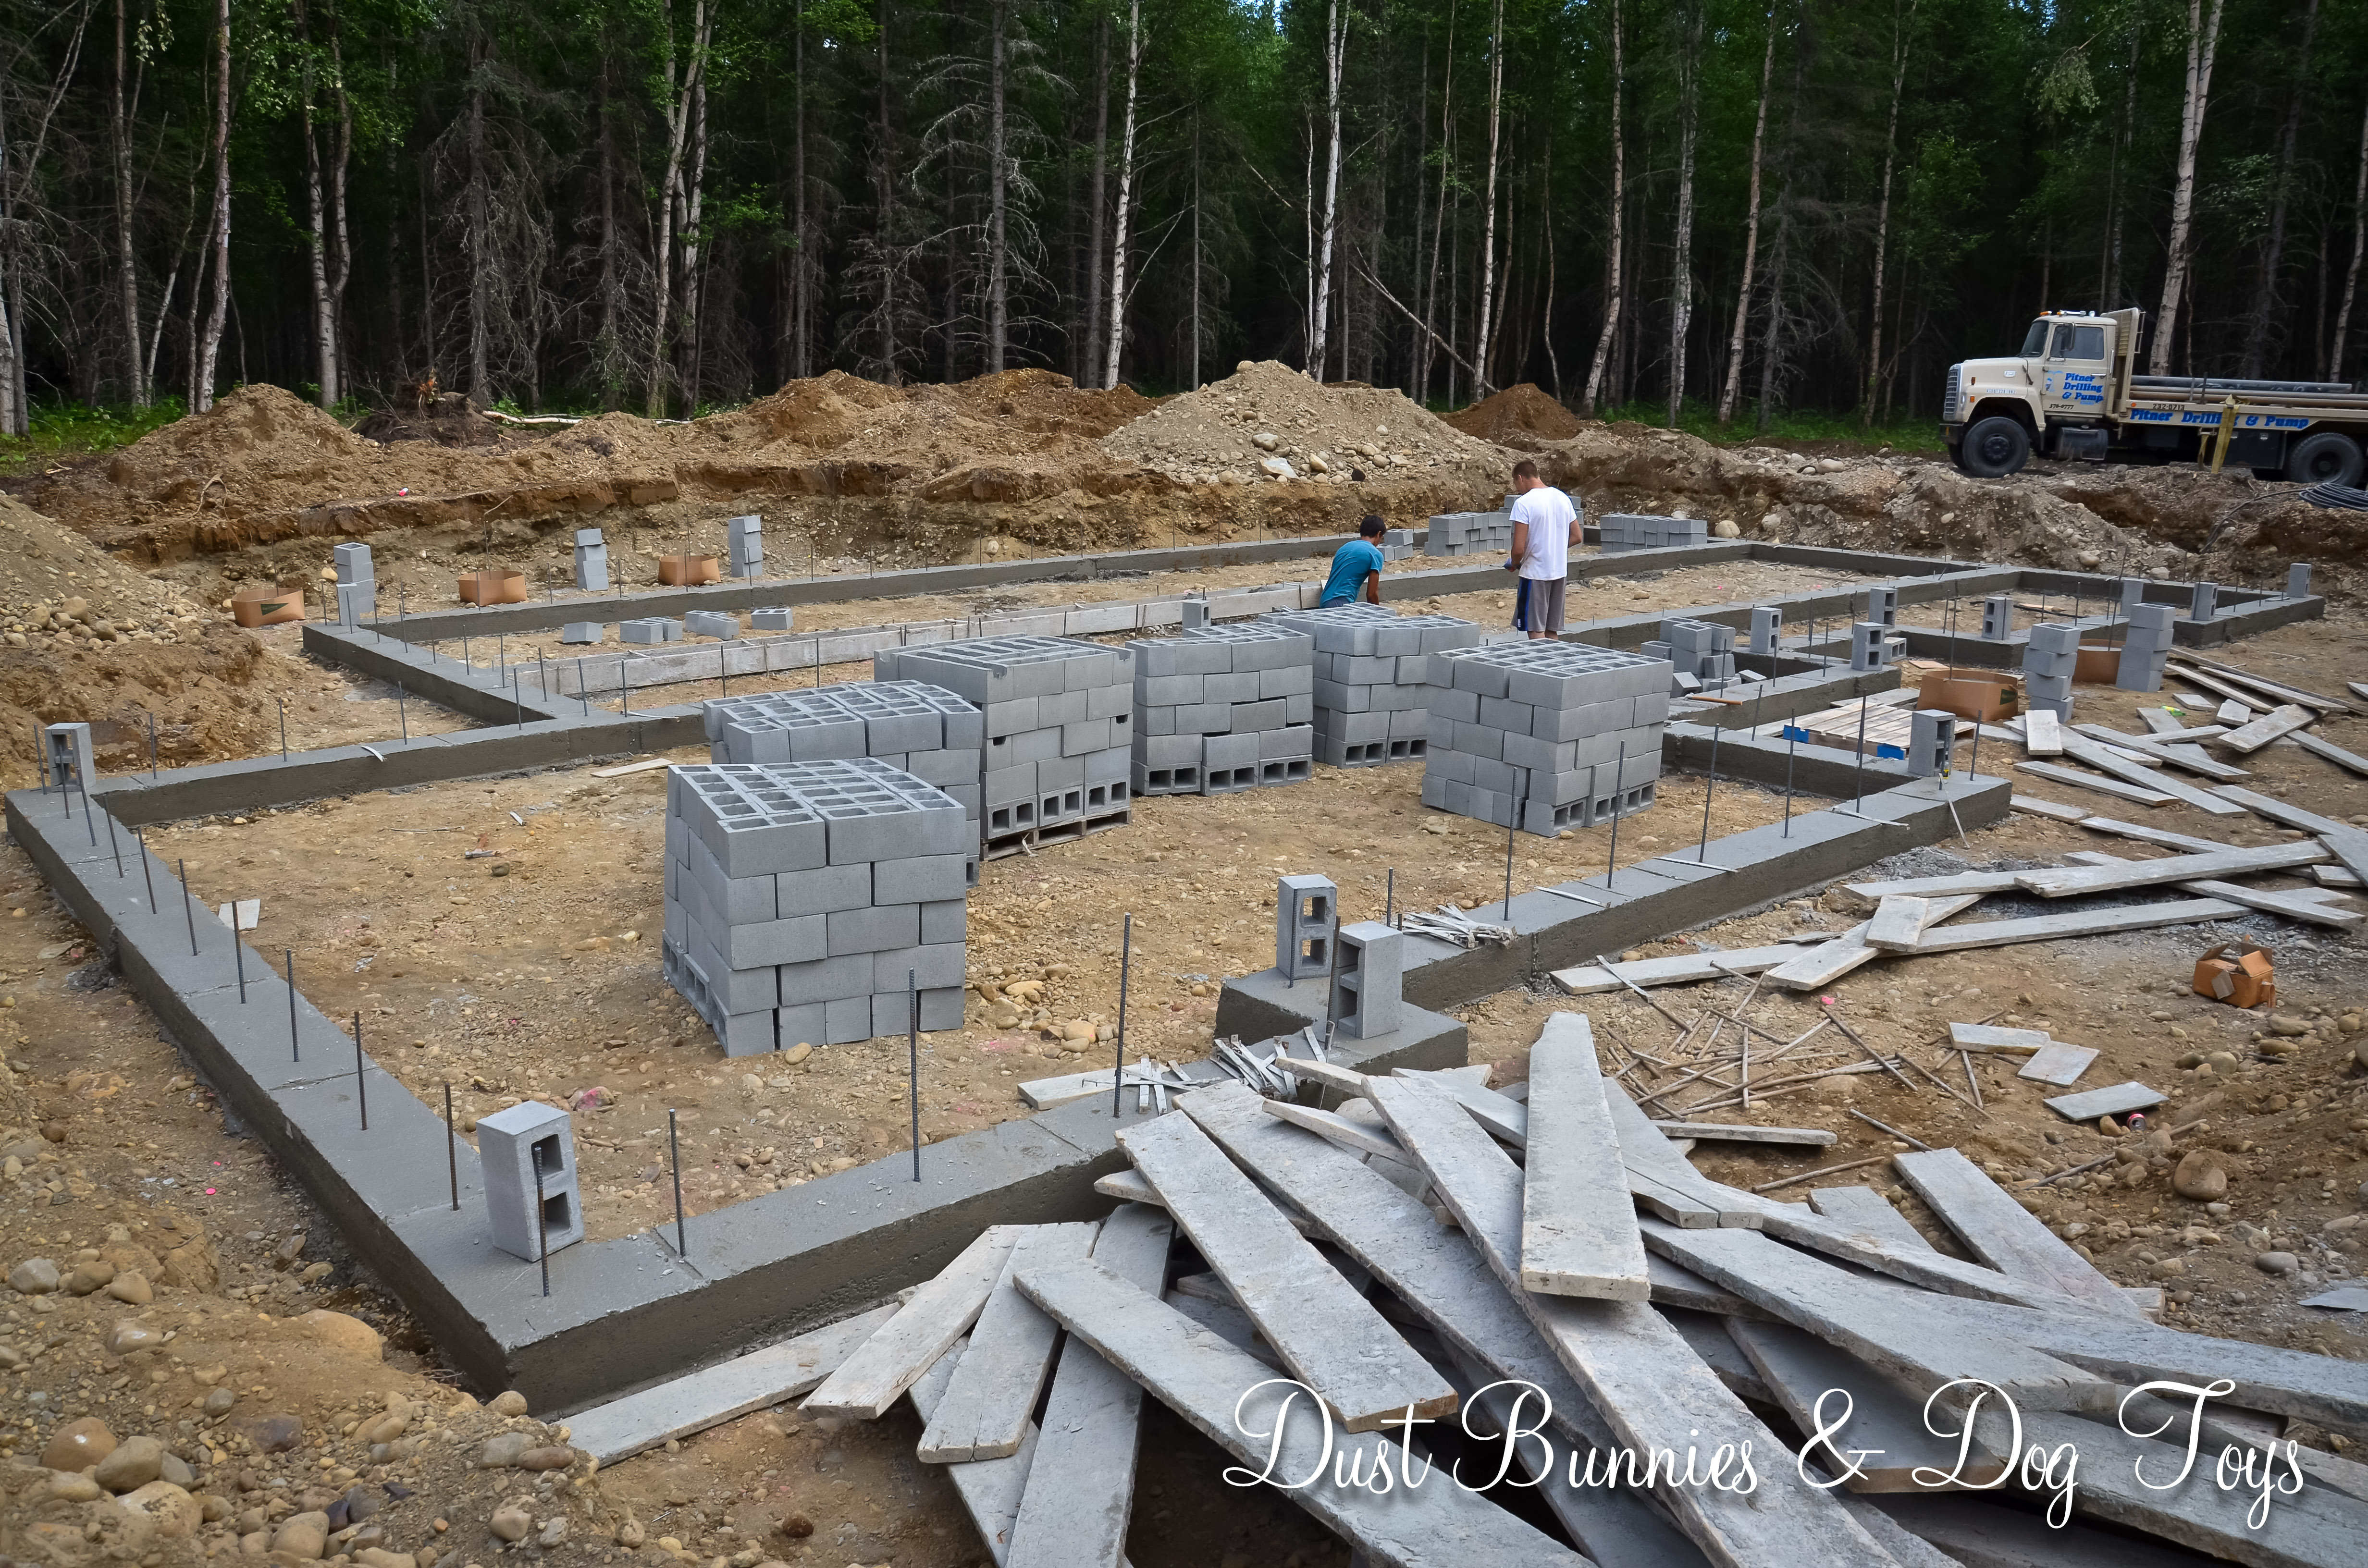
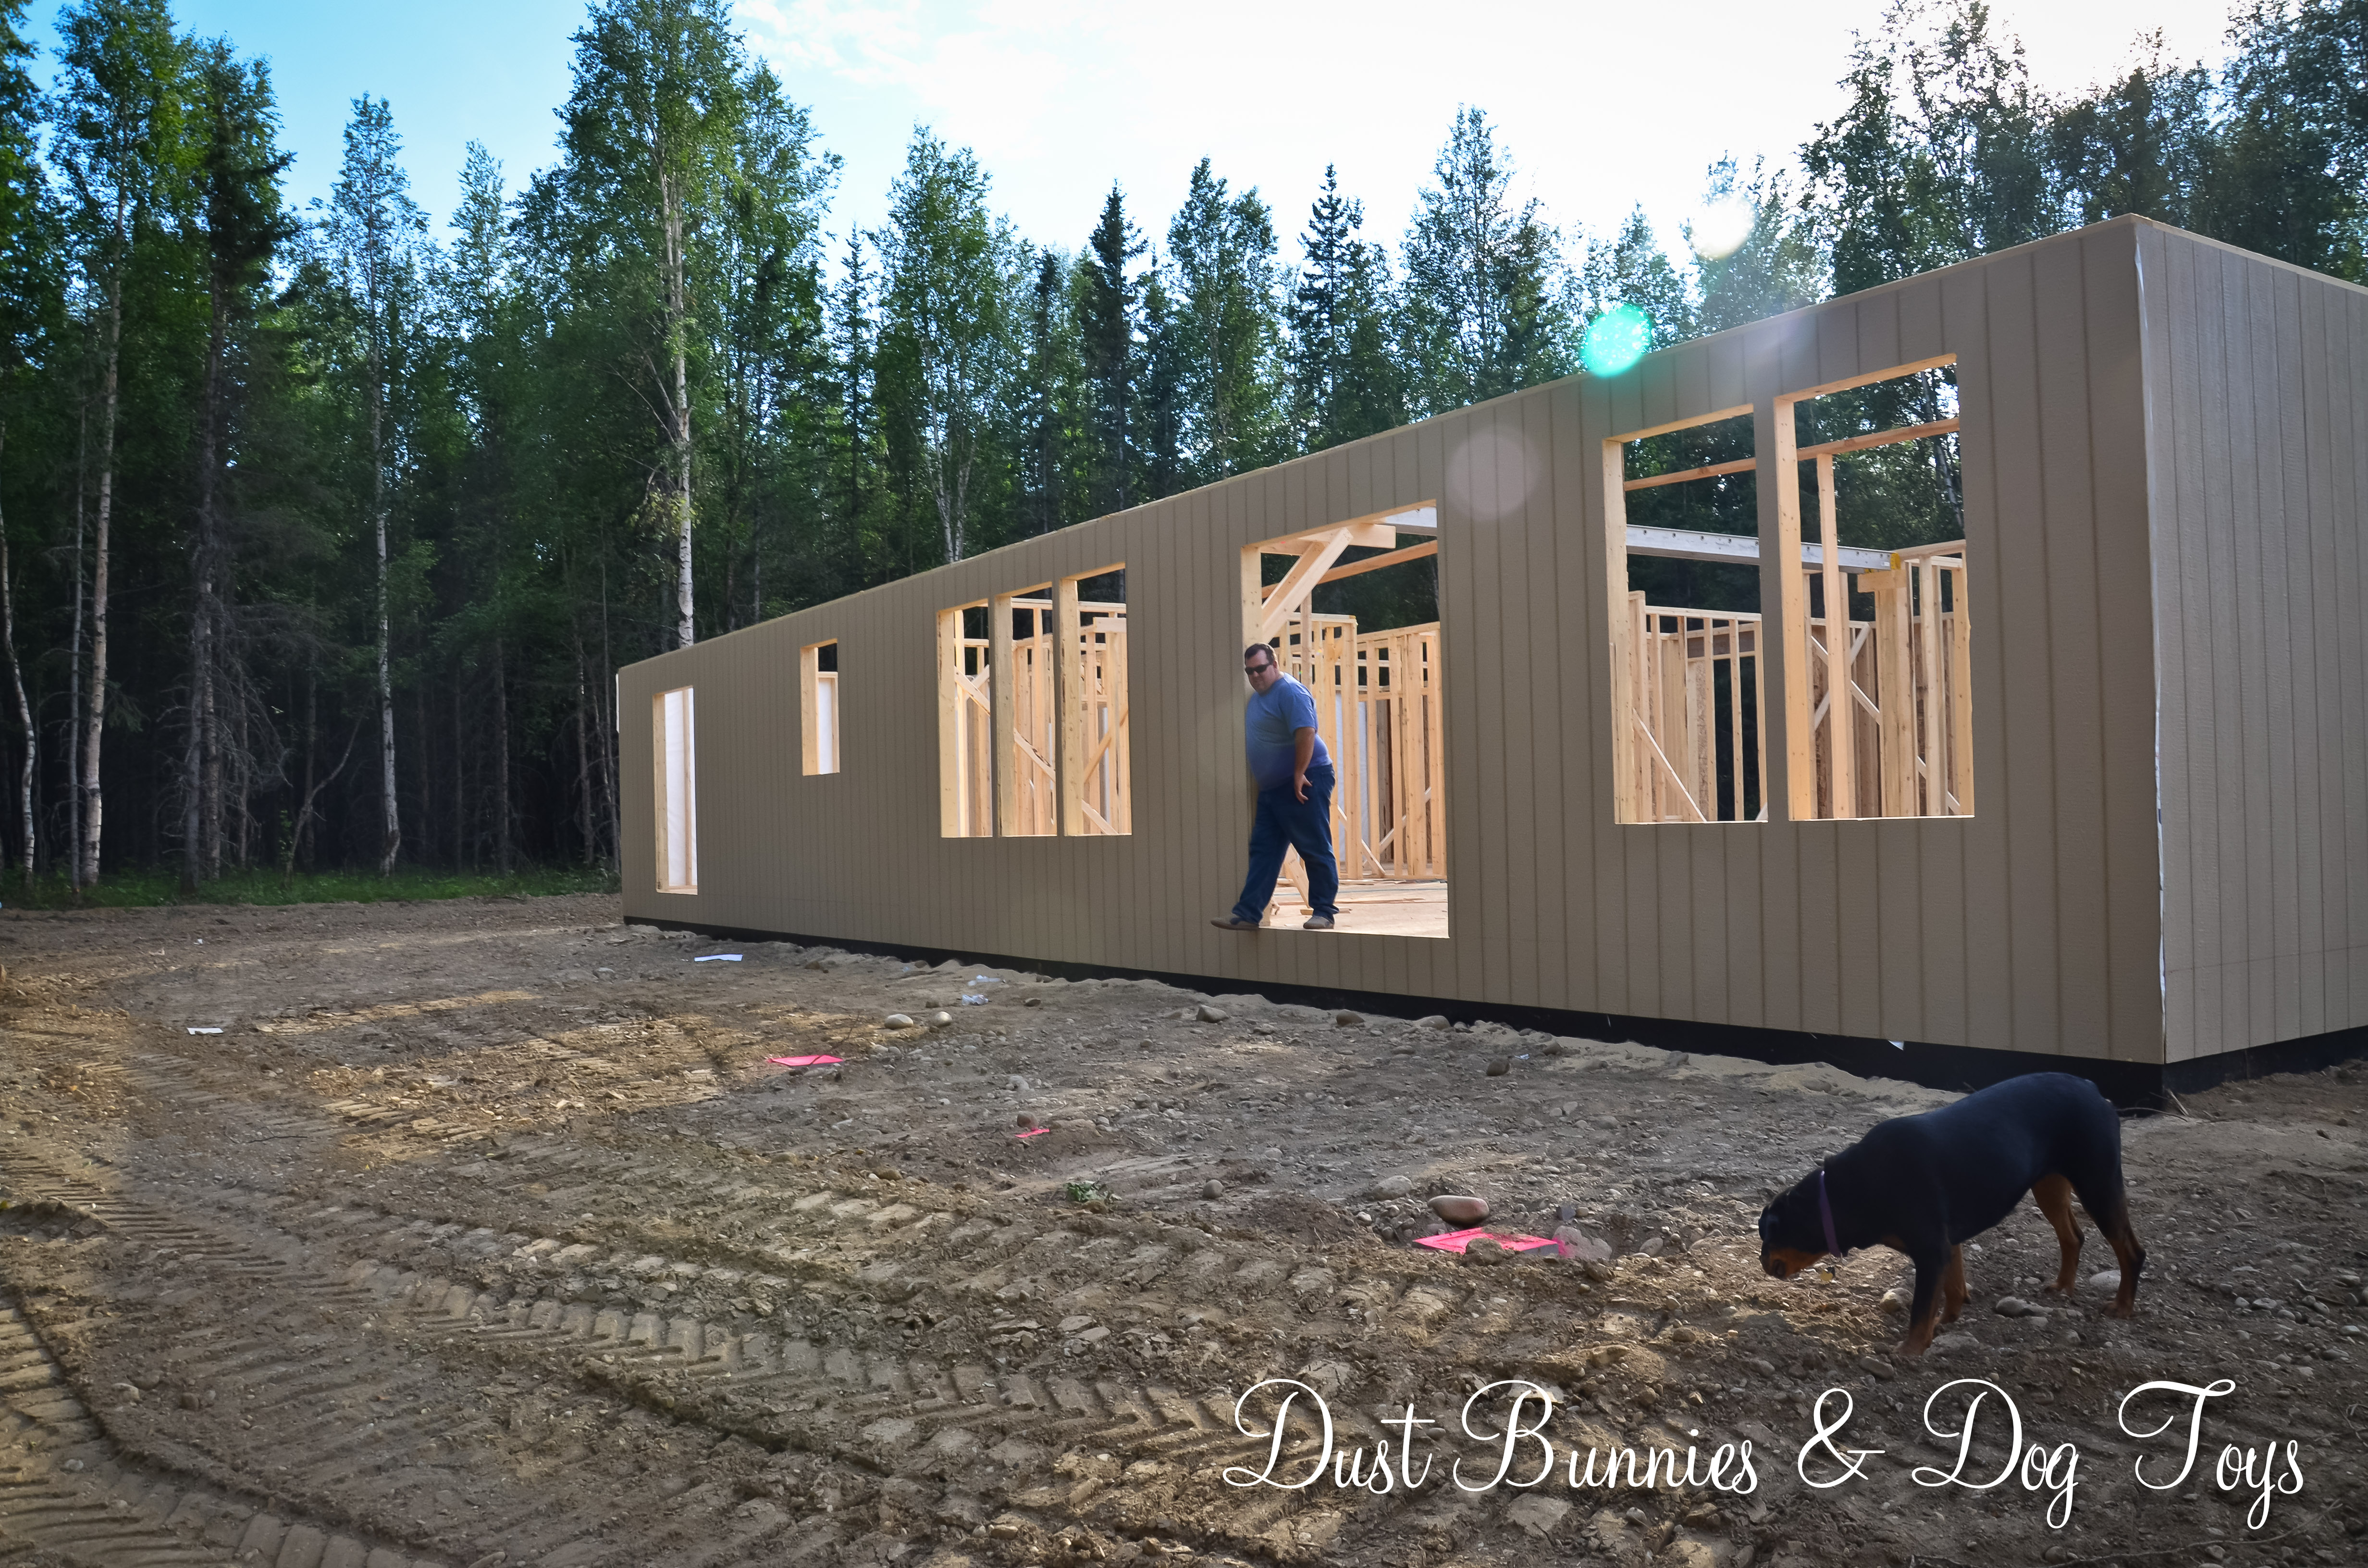
The last time I shared pictures of our home construction, it was little more than a hole in the ground with concrete footers.  A lot has changed in the 10 days since!  I went back to see the progress the following Saturday and found the floor joists finished and exterior walls going up.

1From the driveway.

2 From the back corner of the back yard.

I met the hubs at the site yesterday since I had the day off.  There had been quite a bit more progress!  All of the interior walls are up and they are set to begin installing the roof trusses.

3
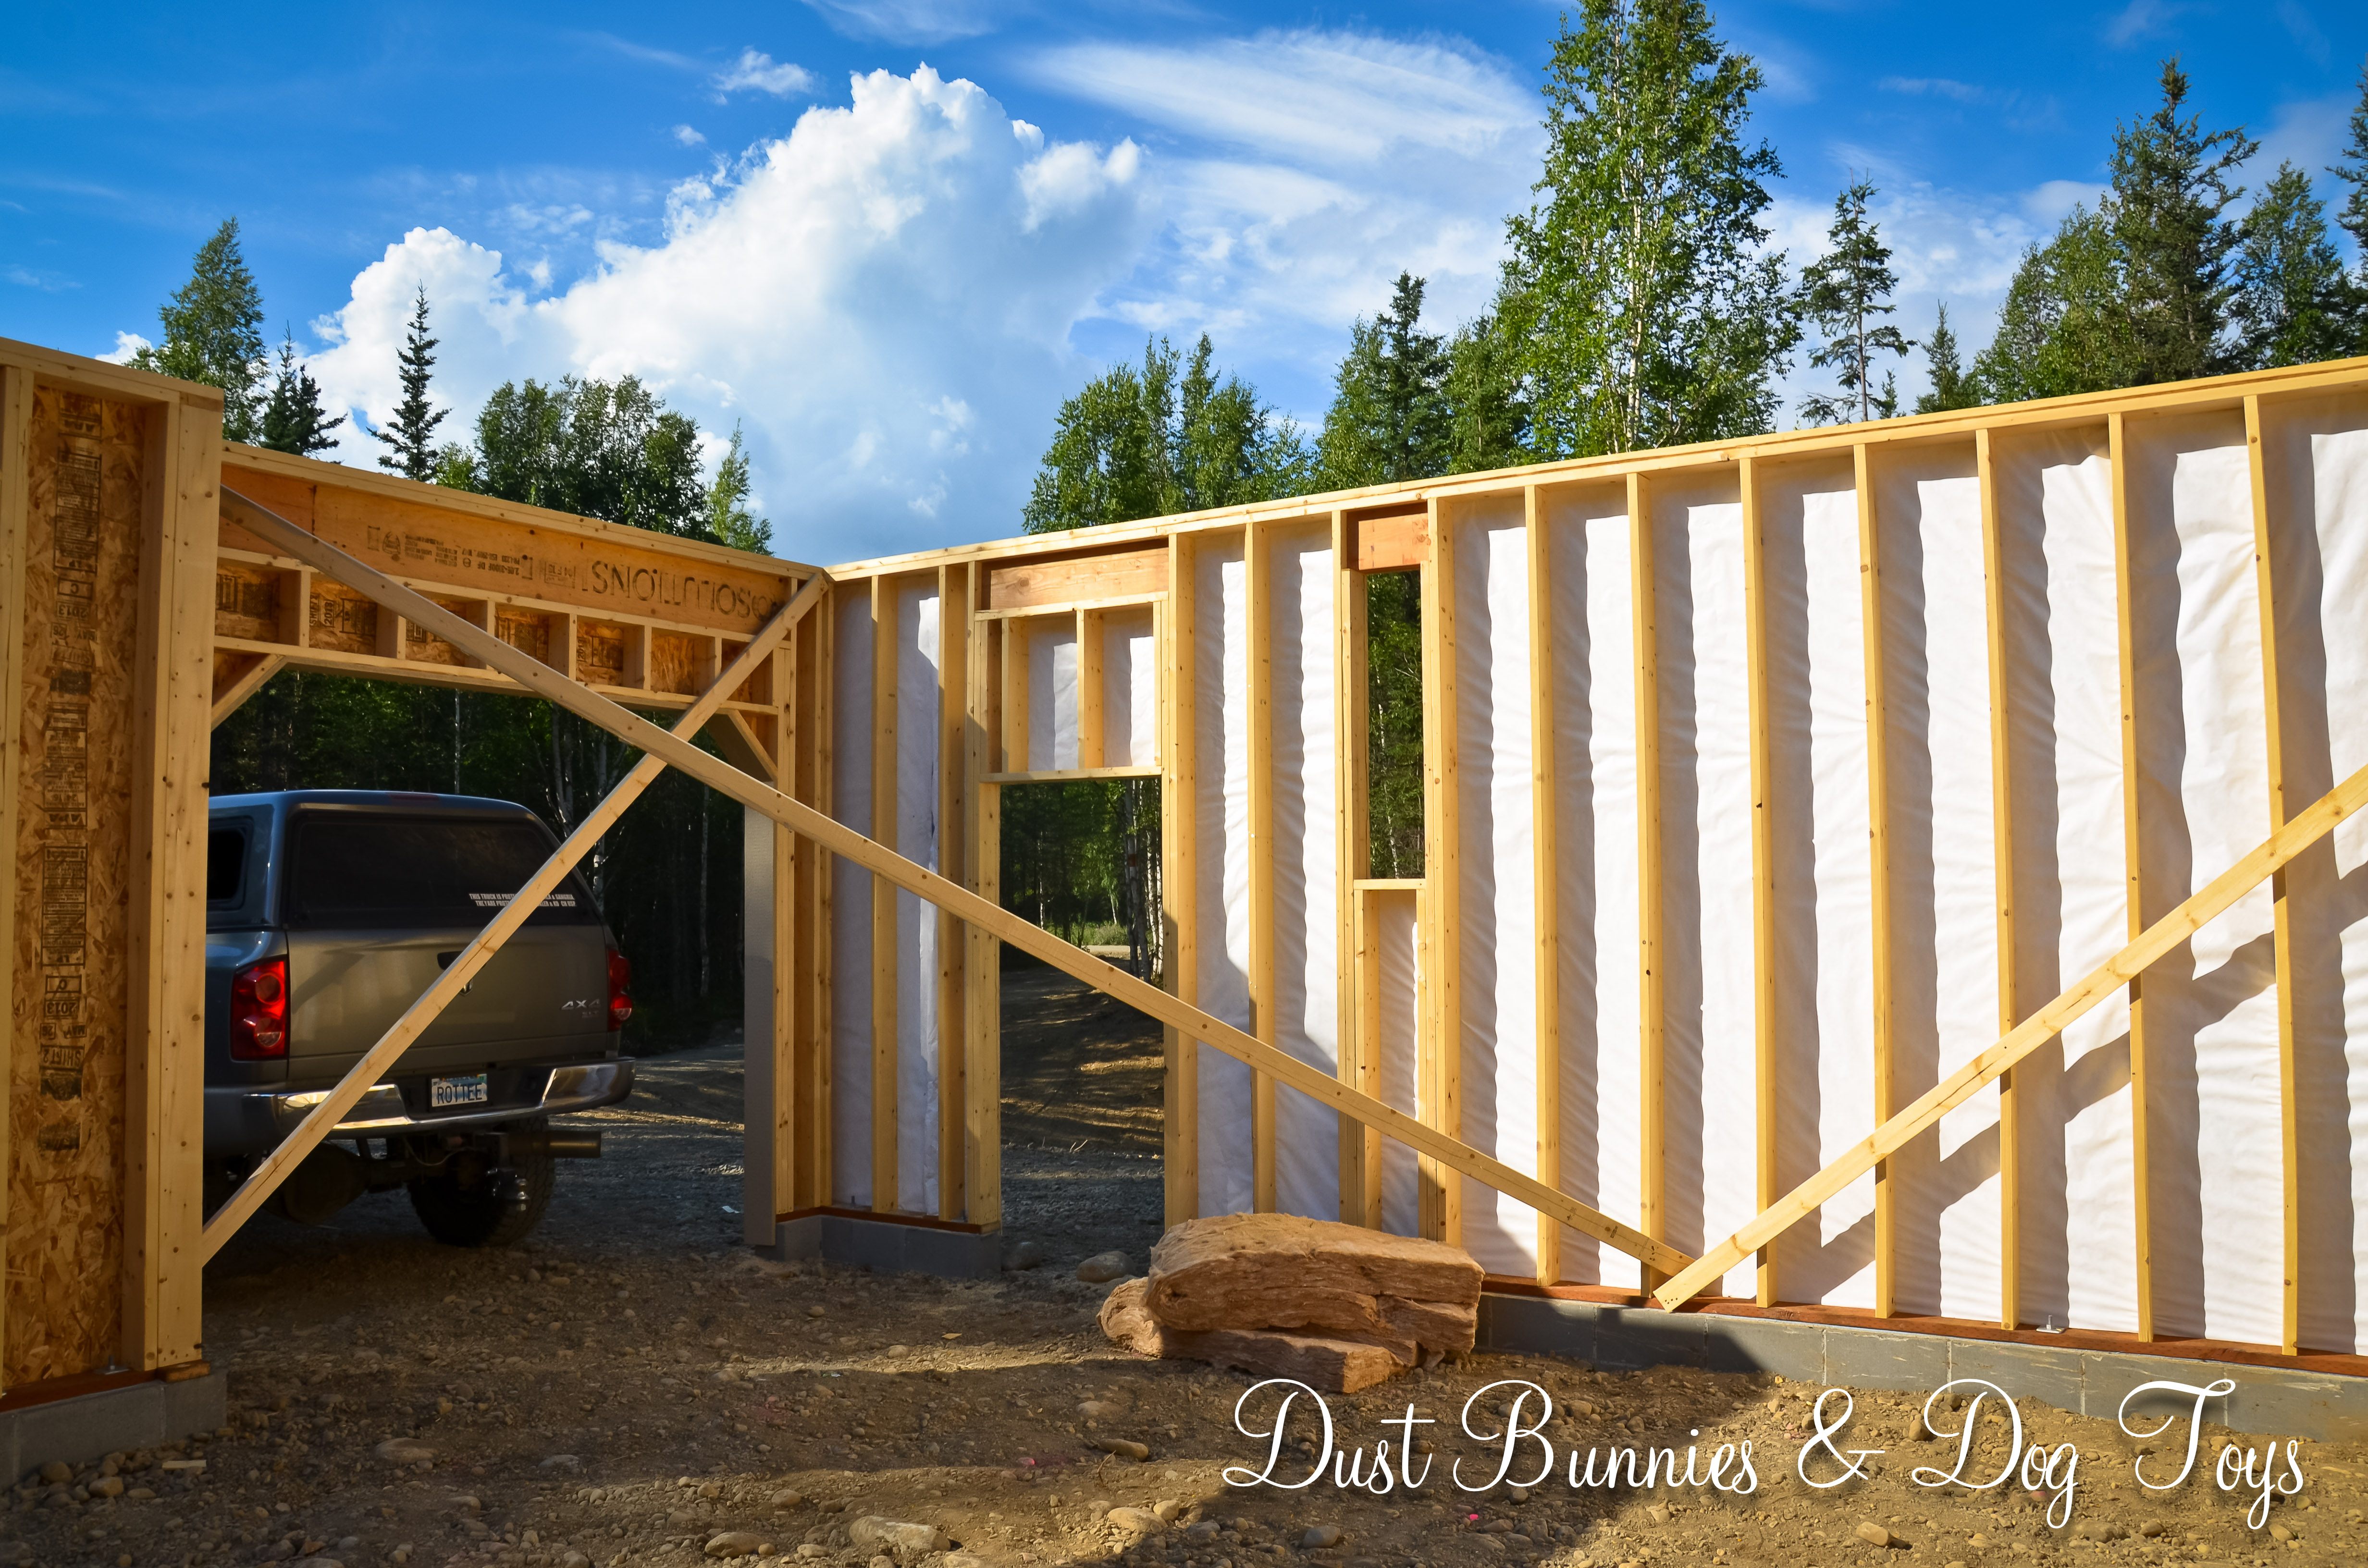
The garage.  I love how that huge door makes my truck look teeny tiny!

4The man door in the garage.  The other opening will be the electrical panel.

     b
Entering the house from the garage, where the laundry room will be and my new studio off the kitchen.

7The dining room and back door from the kitchen.

8The kitchen with my PANTRY framed in!

9
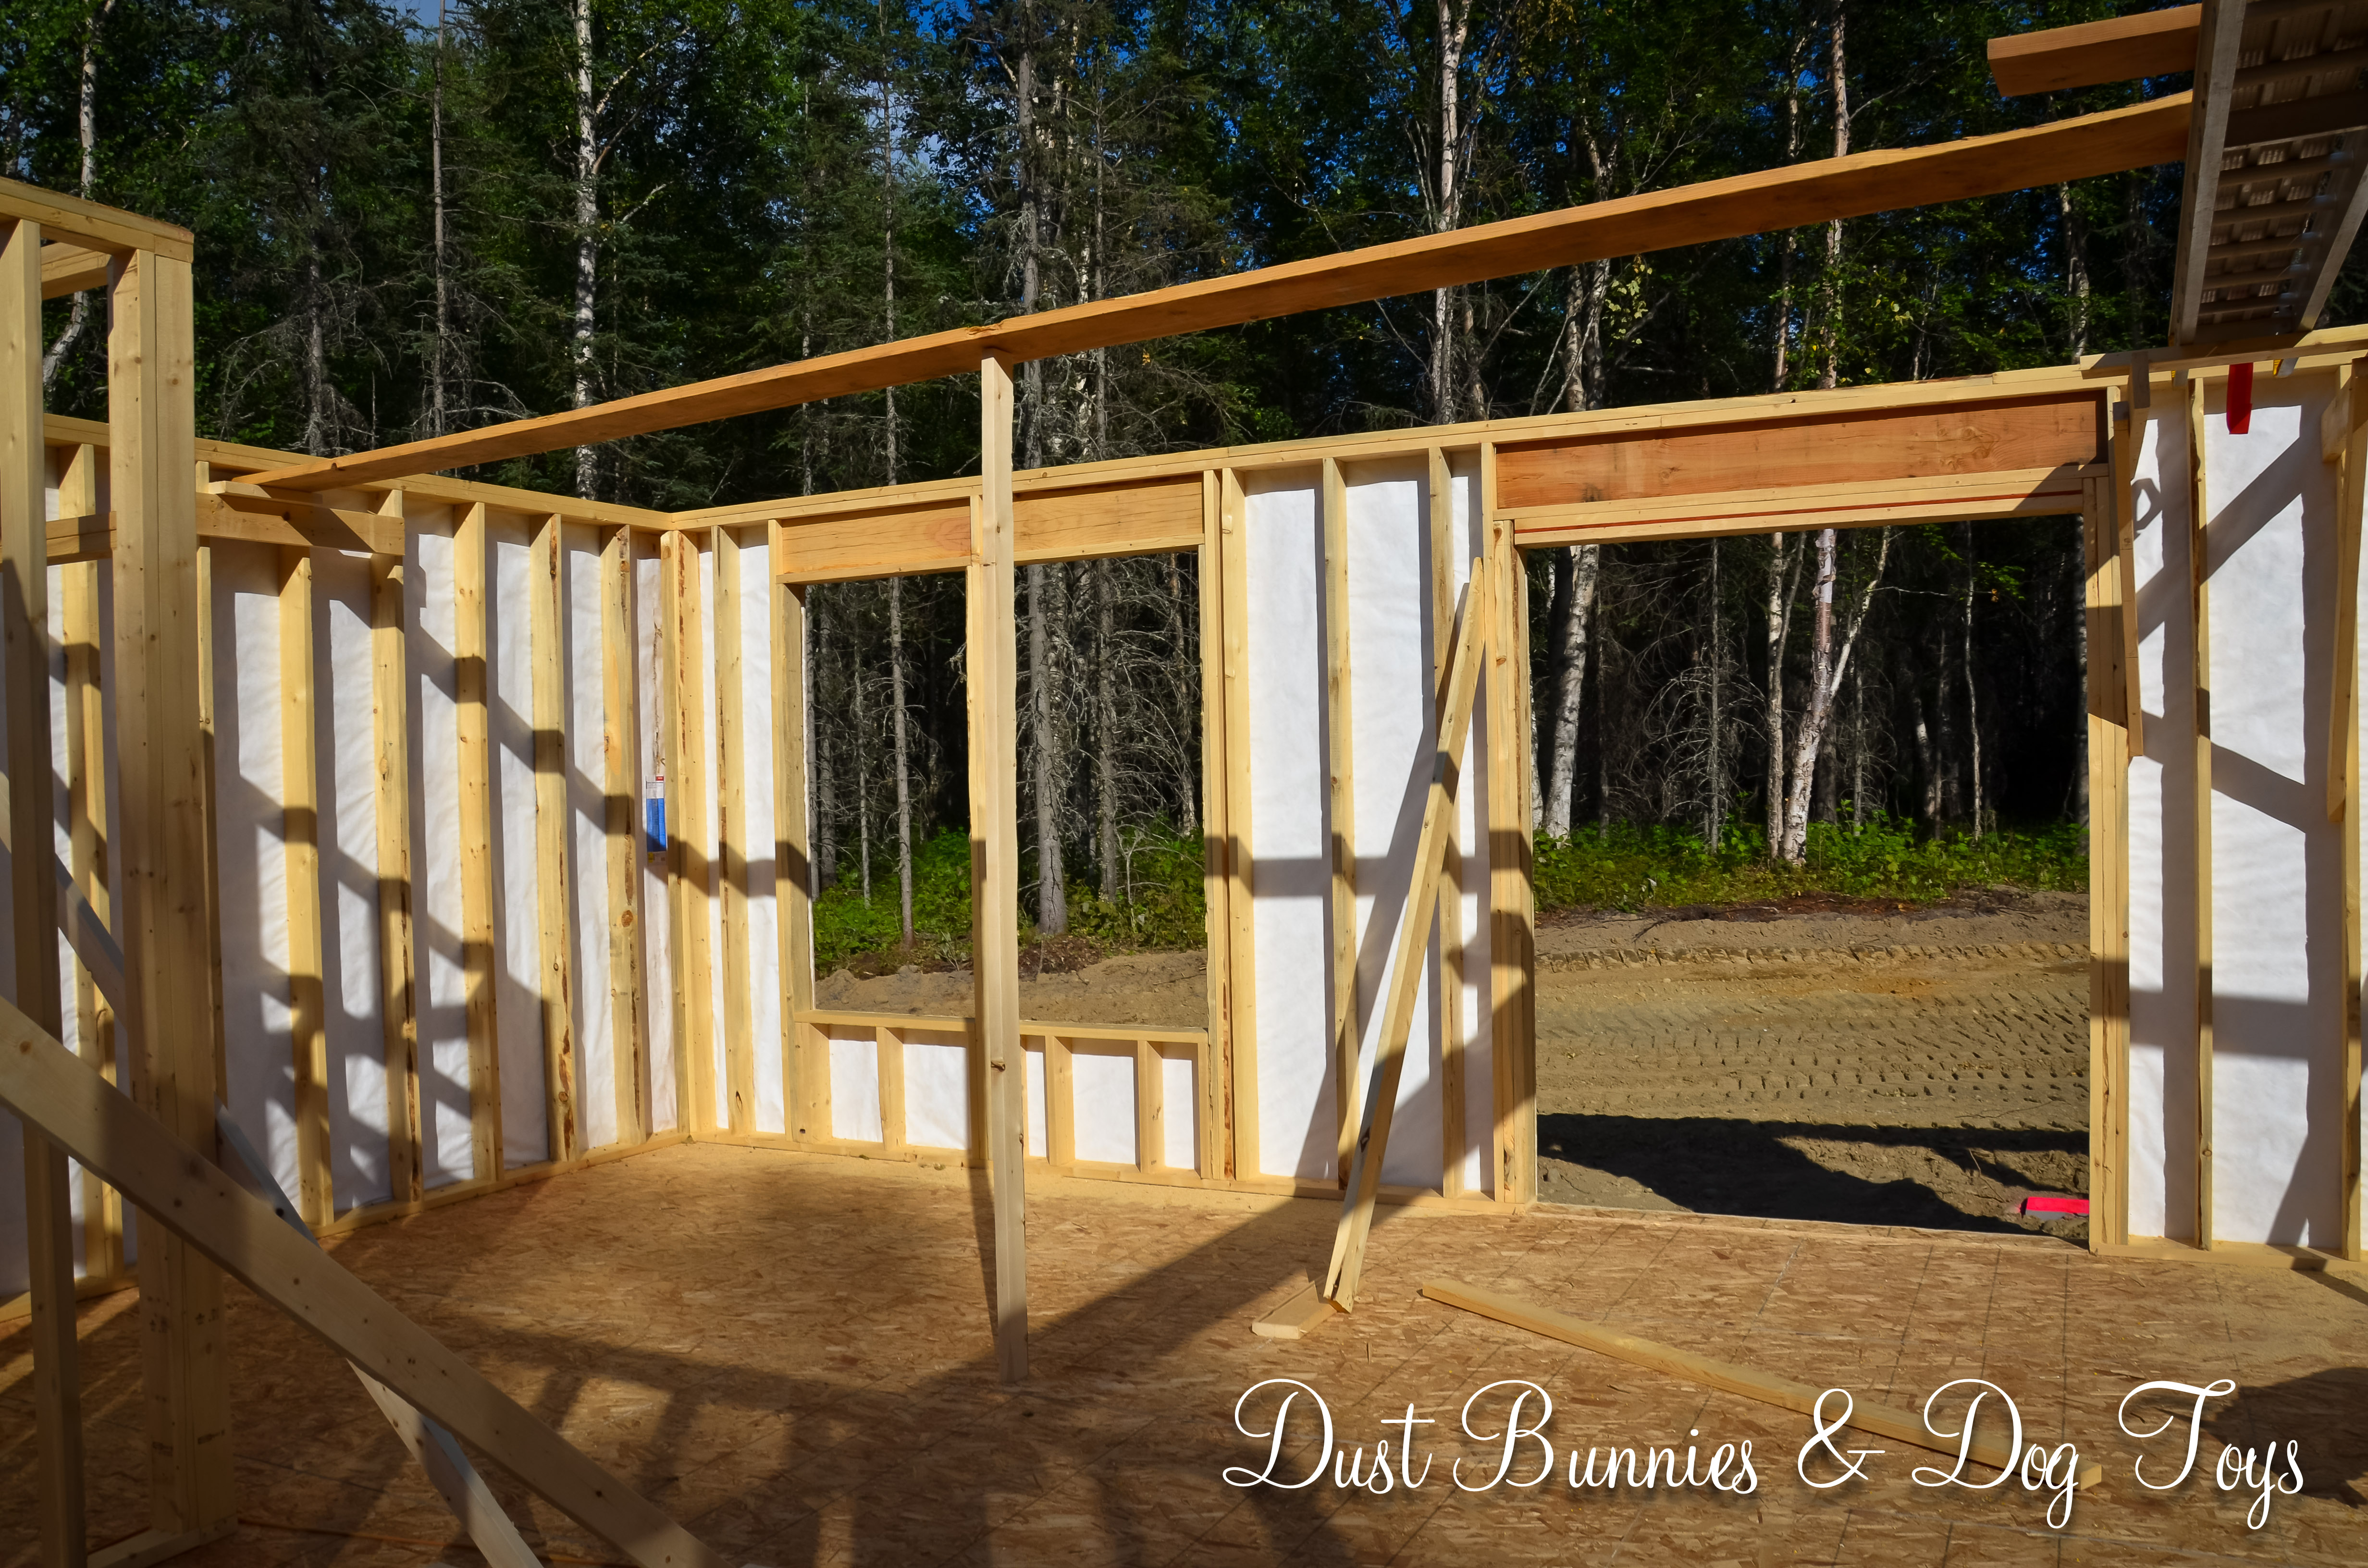
The great room from the dining room.

10   11
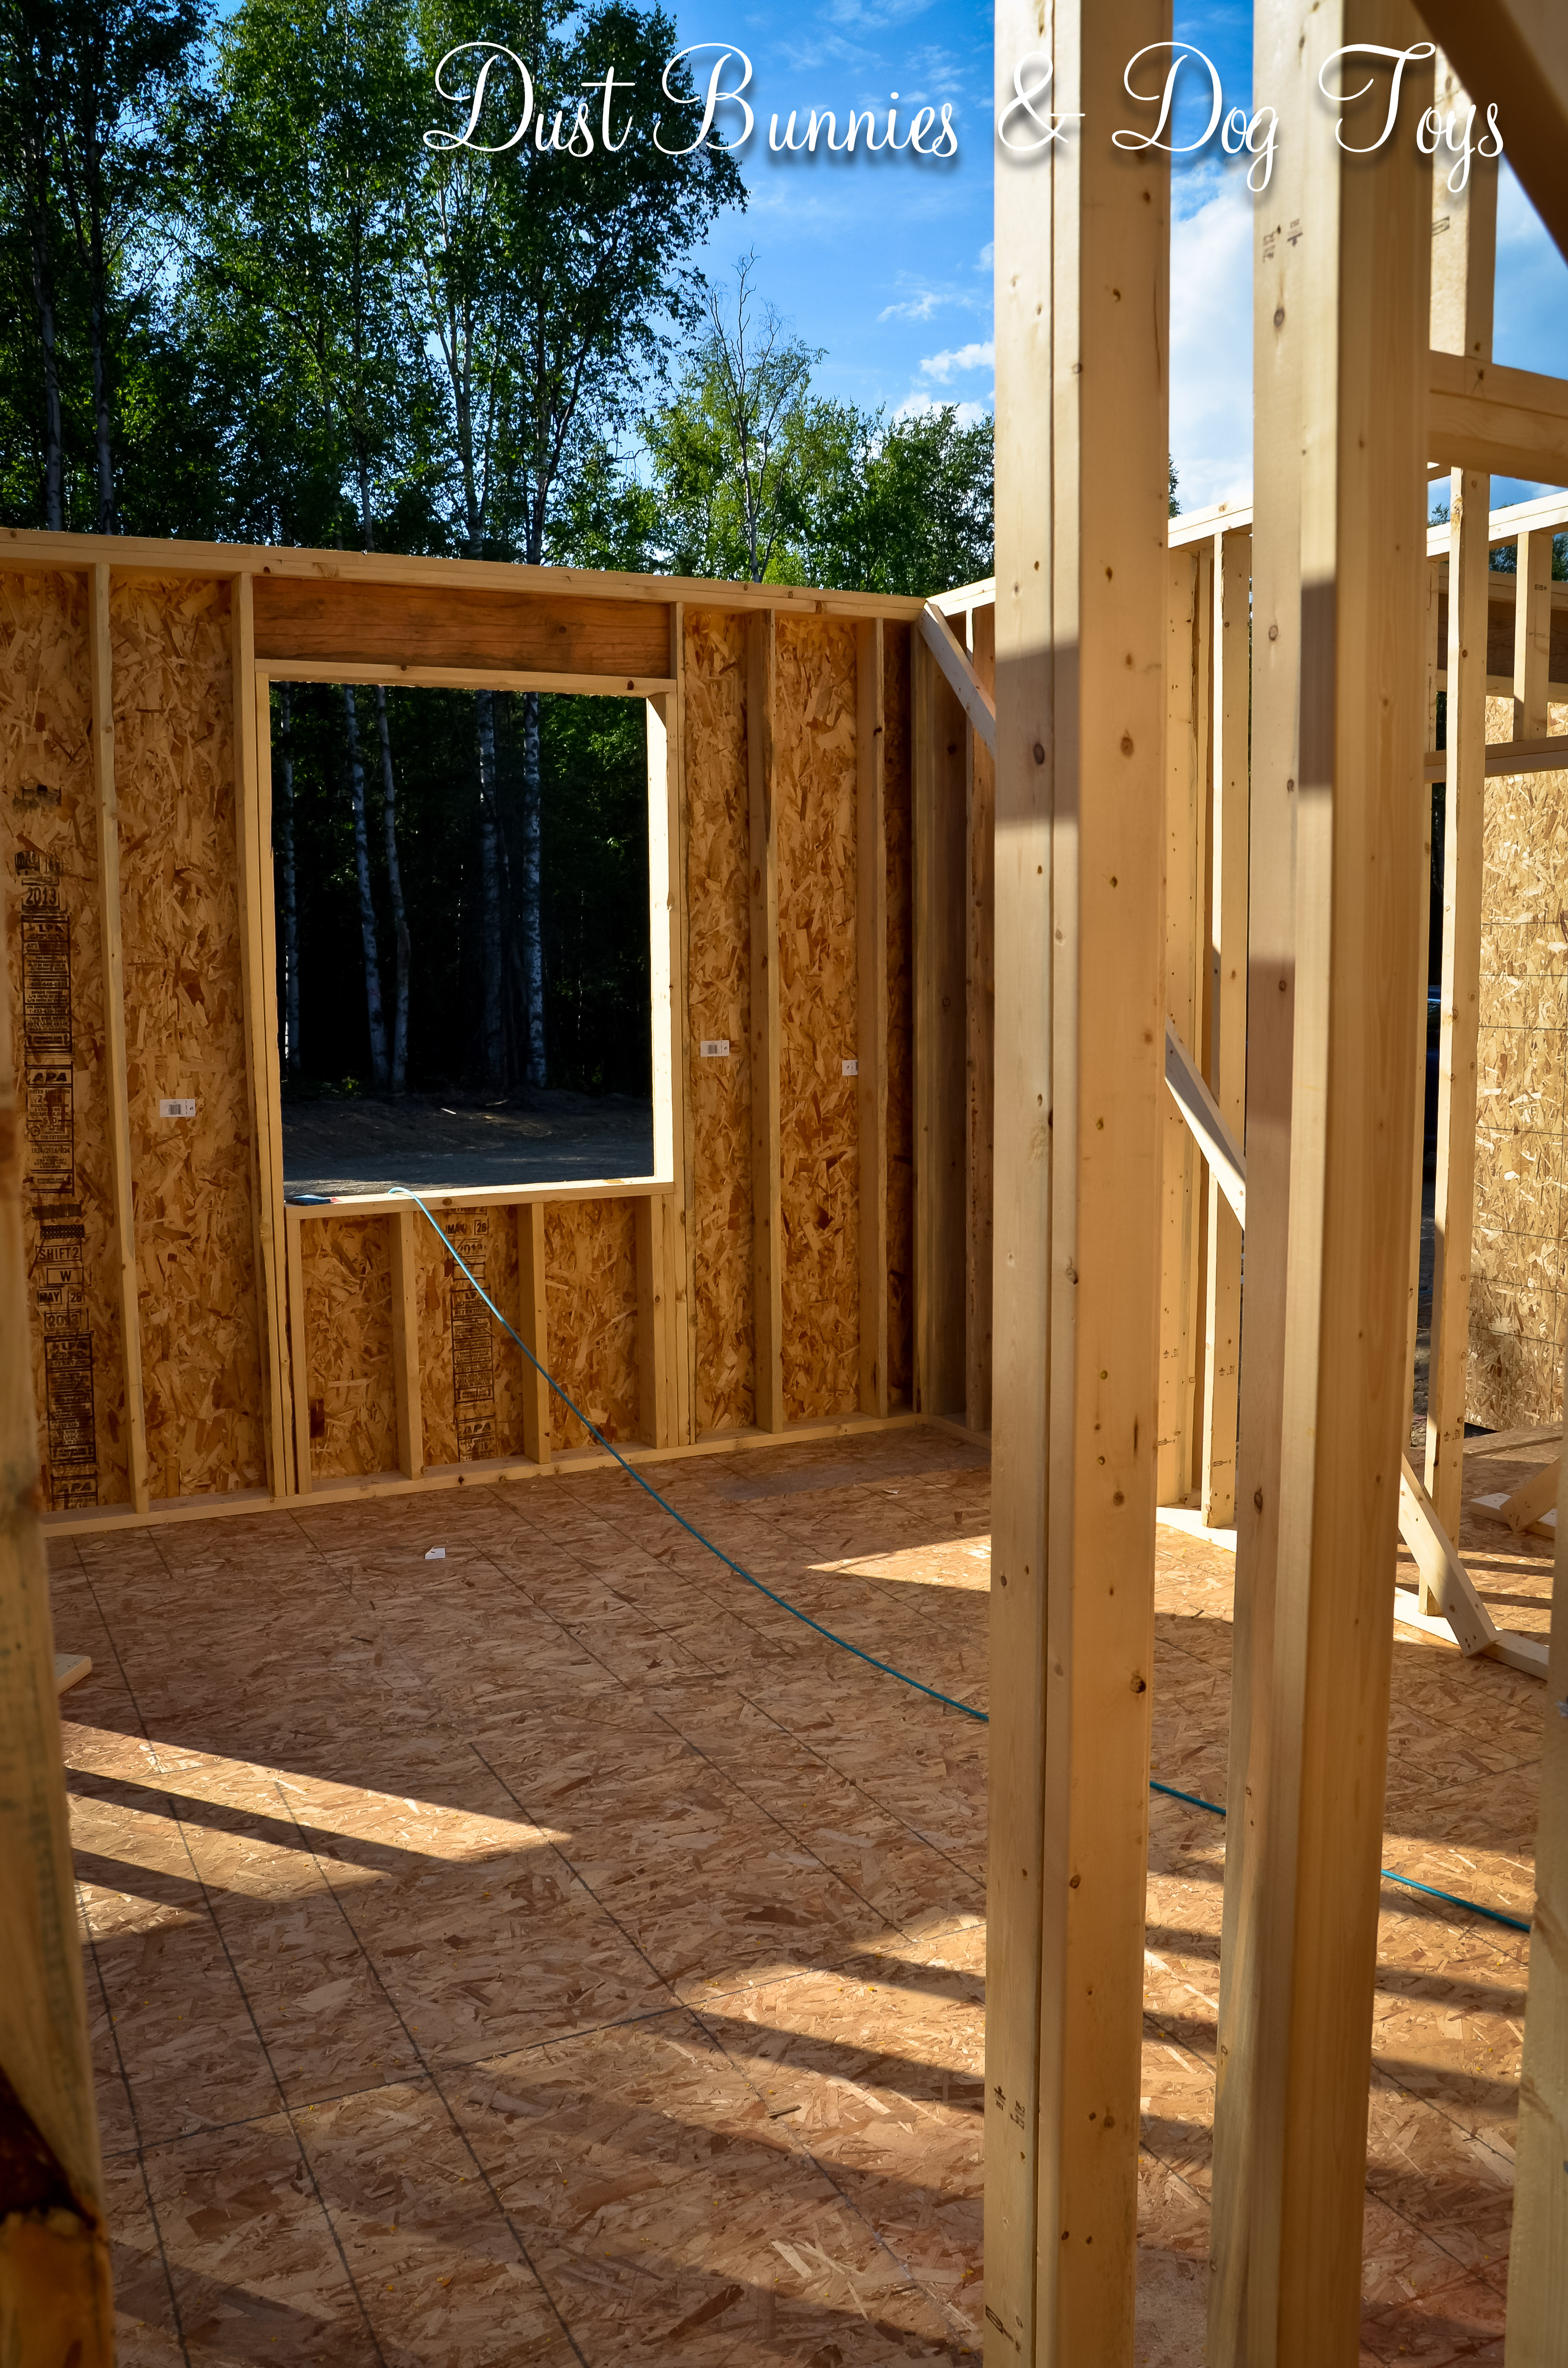
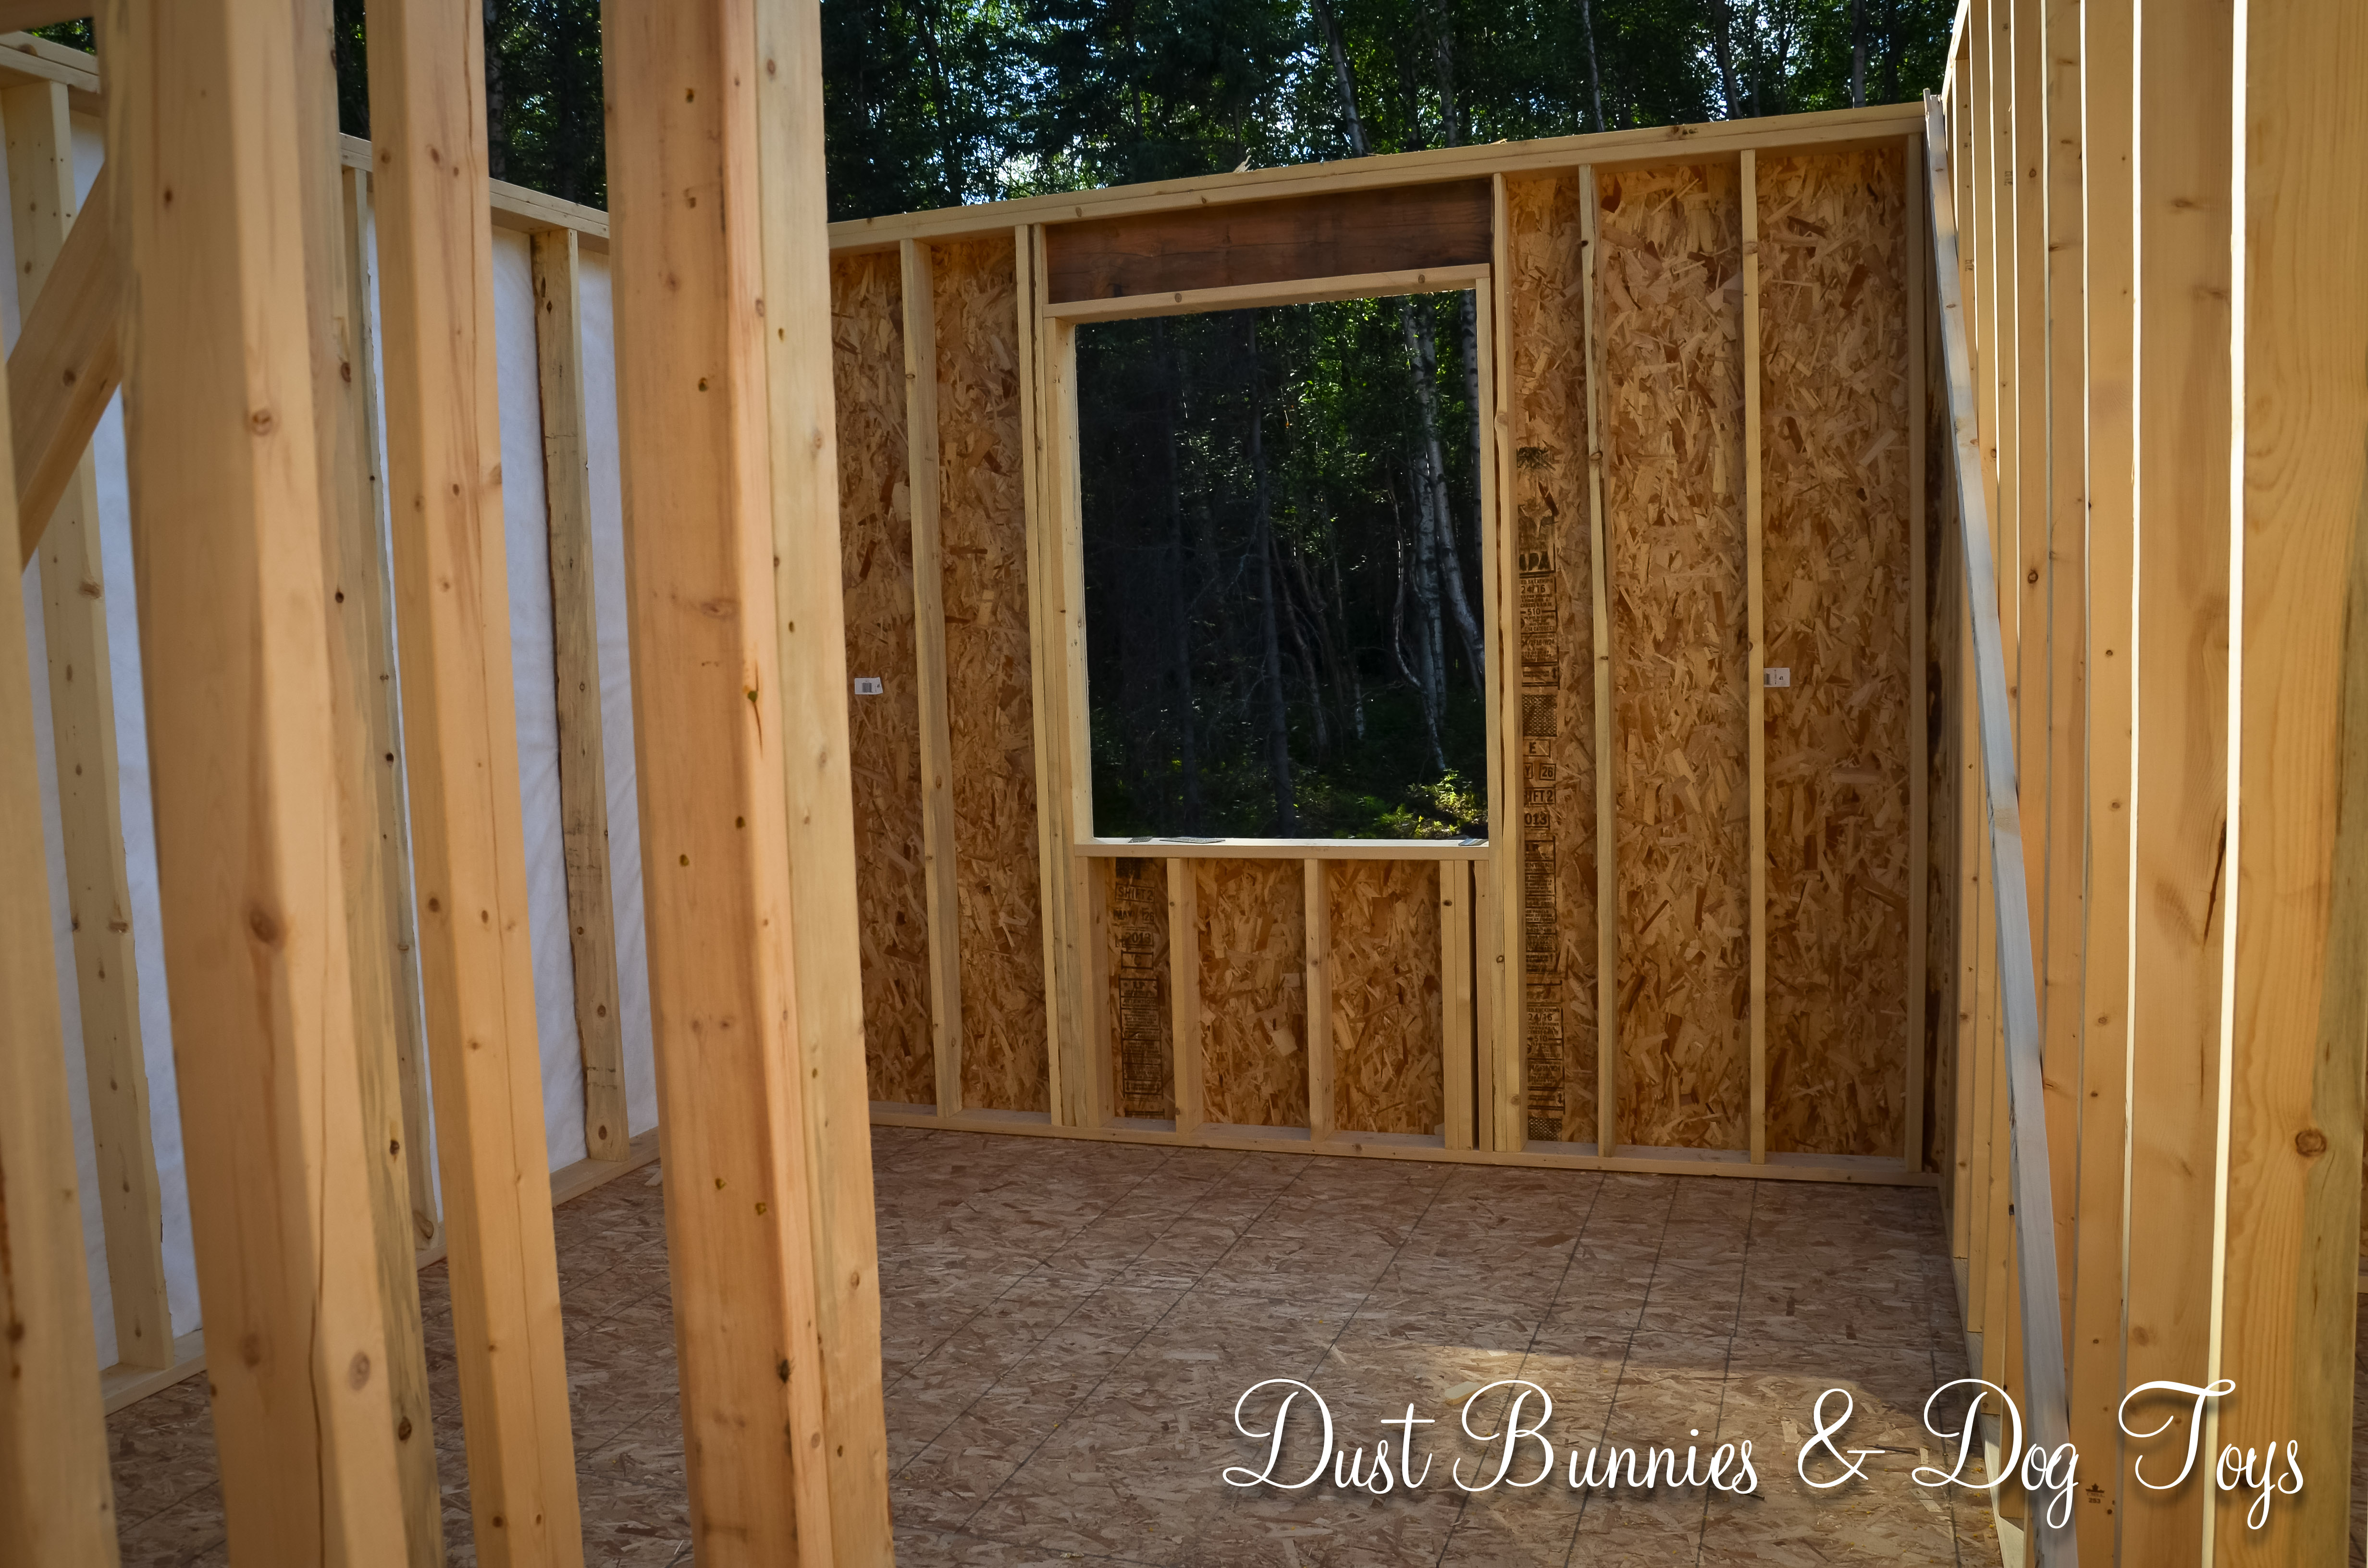
The hallway to the bedrooms off the great room and the entry way next to my studio.

12The hubs envisioning the ‘view’ from bed out the slider in our master.

13The other view from bed, the closet on the left and the bathroom on the right.

14   15
The master closet.  I’m already planning this space out to be as efficient as possible.  Watch for a post about that soon. And guest room #1.

16Guest room #2.

17The back side of the house.

18A more straight on shot of the back of the house so you can see ALL THOSE WINDOWS!

19And of course we had to make sure the garage door would be high enough to fit the hub’s big rig! 🙂

Stay tuned for more pictures of the progress and little projects of choosing things as we move on to the details.  I’m hoping to get some shots with the roof on in the next week!

My Top Tips On Shopping Smart

I consider myself a savvy shopper.  By no means am I one of those crazed coupon extremists, but I do love me a good bargain. Some call it being cheap or frugal.  I consider it just plain common sense.  Why pay more for something when you don’t have to?  Sure there are times when I will pay more than I might want to for an item because I need it right away or because it’s what will work the best, but overall I generally refuse to pay for convenience when it’s unnecessary.  However, I’m logical about the choice.

Just today I purchased yogurt at the grocery store during my lunch hour for .20 more than it sells for at the commissary.  Why?  Because in order to go to the commissary I’d have to rearrange my schedule to fit their less user-friendly hours and drive out of my way when I don’t have any other reason to go to that area.  So in the end the extra time, gas and hassle aren’t worth the .20/yogurt I’d save.  Now if I’d save enough to almost get them for free, I might reconsider.

Without doubt, I learned my thrifty ways from my parents, who found every way to stretch a dollar both at home and in their business.  Unfortunately, not everyone has had that type of an example.  For some the only experience they have with saving money is watching some unrealistic ‘reality’ show or a period when money was tight and they were forced to comparison shop to meet their needs.  Neither of those tend to create a lasting desire to shop smart.   But imagine what might happen to our country’s economy if more people adopted a thrifty mind-set or better yet if our government did!  Now I know that’s a pipe dream, but at least it’s a good one.

So although I don’t think it will change the course of our nation’s economic turmoils, I’ve decided to share my top tips on bargain shopping for those who might just be dipping their toes into the money saving pool.

  1. Make a list.  I rarely go any store without a list, even when I’m running in for a few quick items.  Why?  Because having a list keeps me focused so I end up leaving with the items I came for and less additional items.  Preparing a list ahead of time also allows me to pull coupons I might have for the items I plan to purchase so I don’t forget to take or use them.
  2. Stop and think about each purchase before making it.  Ask yourself, do I really need this or is this an impulse?  If you really do need the item, is there a better priced option available without consequences (reduced quality, additional time or effort required, etc.)?  It sounds simple and it really is.  Sometimes just taking a moment to consider why you are purchasing something will make you realize how that purchase will affect your budget and other needs.
  3. Comparison shop.  In today’s marketplace there are multiple options for almost any item we would buy.  I’m not just talking about choosing a store brand over a name brand.  I compare coupon values and store sales.  Although I might have a coupon for one brand doesn’t mean that’s the one I should buy.  I often find that the price after a coupon is still higher than the sale price of a comparable item from a different brand.  Or a coupon might require that I purchase multiples of an item that I know will go to waste, costing me more in the long run.  So break out the calculator on your smart phone or carry a pocket version with you and figure out which is the best option.
  4. Learn to use rewards, because it’s like getting paid to shop.  If a store I shop at often offers a reward program I’m using it because honestly, this is where I save the most.  One of my favorites is fuel points for each dollar spent at a company’s retail store, earning up to $1/gallon discount when you purchase fuel from their gas stations.  I also earn rewards on my credit cards which can be redeemed for gift cards, often for $5-10 more in value than the amount I’m redeeming – which is perfect for gift giving or choosing cards at retailers where I shop often for additional value.  Some of my ‘store’ credit cards offer 0% interest on some purchases or earn me reward certificates for a certain dollar amount each time I spend a specified amount.  Of course the goal of their program is to get you back into the store to buy more, but if you use tip #2 you won’t fall into that trap.  I often make purchases on a particular account because it offers me a reward that paying with another method doesn’t.  That doesn’t mean you should sign up for every card you hear about.  Weigh the value of the rewards offered and decide if it’s a good fit for your shopping habits, budget and credit.
  5. If you really love something, buy it.  I’m talking about shopping smart.  Sure that often means saving money, but if you truly love an item and will enjoy it in your life for years to come it’s worth the investment and that makes it a smart purchase.  I used to pass over an item I really liked because of the price tag, only to purchase a less expensive item which either didn’t last as long or I didn’t like as much and ended up replacing soon thereafter often compiling the cost to be more than the initial item I wanted.  Instead, if I purchase something that makes me smile every time I see it I got a bargain.

Of course there are other tips out there like asking retailers to price match, purchasing certain items at certain times of the year (Google it for the specifics), avoiding known over-priced convenience items like these and buying annual items at the end of a season when stores are closing out inventories.  But these 5 are my basic methods for saving money without a lot of effort.  I hope they help you become a smart shopper or improve on your budding thrifty skills.

To Cut or Not to Cut… That is the Question!

I’ve mentioned before that my hair and I have a love/hate relationship.  Maybe it’s the whole, “you always want what you don’t have” theory that makes me detest the limp, straight, baby fine hair I’ve been cursed with.  I seriously lust after the thick curls that seem to dominate Pinterest these days a’ la’ Kate Middleton’s gorgeous locks, but I know I’ll never achieve that exact look – unless I bite the bullet and get hair extensions to increase my skimpy strands.

Thankfully, I view my hair as an accessory in the way that if I don’t like it, I can change it and with my creative personality that tends to happen A LOT!  Although I was born blonde and remained so through high school, I’ve sported strawberry blonde, brunette, auburn and now red manes.  And my hair stylist knows I have a routine of growing my hair out and then chopping it, only to grow it out once again – which luckily is a fairly quick process for me.

I’ve spent the last several months growing my hair from a bob to below my shoulders and now I’m getting tired of the extra styling it requires so the itch to chop it all has returned.  My husband is that one strange man who prefers women to have short hair, so he of course would vote for me to give in and chop several inches.

However, I know full well that short hair styles can sometimes require more styling time than long hair does, which can be a big hiccup on the rare mornings when I wake up late.  Short hair also usually means you’re stuck with the same look all the time.  Plus, when I see pictures of myself with shorter hair I think my face looks very round which I don’t care for on myself.

Picture 2I’ve really liked some of my mid-length cuts, especially when layered for volume like this one, but they tend to be just short enough to not work for multiple styles so I end up wearing it the same way all the time and when I do pull it up the shorter pieces fall out, making the rest of the do more likely to ‘migrate’ on my head due to a lack of volume holding it in place.

So which look do you think I should sport?  Short, medium, or long?  Here are examples of me with each.

OLYMPUS DIGITAL CAMERA  Medium  Long

Granted the long picture isn’t much longer than the medium, but it looks shorter then it was because of the curls.  It’s now quite a bit longer than this.  One option I’ve been toying with is keeping the length, but having long layers added in, like this.

My concern is that fine hair tends to get super frizzy when layered.  But Jennifer Aniston seems to make it work, so there’s hope right? Maybe all I really need is a live in hair stylist like that stars! 🙂

The Life We Live

Picture 1
“I wrote this down and keep it near my desk to remind me every day. Thank you again for your encouraging words Jenna.”

During the past few weeks there have been a series of moments that remind me that I serve a bigger purpose than myself.  The first was when a friend posted a picture of a sticky note with a comment I’d left on her Facebook page the other day after she mentioned she was feeling insignificant.  The comment was the first thought I’d had when I read her status.  It wasn’t some profound, thought of the century.  But it obviously resonated with her.  Perhaps I was just the delivery channel for the message God wanted her to have that day.

That was soon followed by a call at work from a customer who just wanted to say thanks for supporting a local Farmer’s Market and that she enjoyed seeing our company in that setting.  As the event coordinator for this company I wouldn’t say that the market is a high priority.  And it’s probably one of the simplest events we do all  year.  Regardless it made an impact significant enough for this customer to reach out just to say thanks for being a part of it, which makes it important in an entirely different way.

Then I got a freelance inquiry from a couple who want me to photograph their elopement at Denali!  Seriously?!  Who in their right mind would turn that opportunity down? What I didn’t know when I first responded to the email was that they are flying in from Philadelphia for a weekend just for that purpose!  They’d seen my ad on Craigslist and liked my style, so they contacted me.  It was just the reinforcement I needed that the tiny voice in my head saying I’d finally found ‘my’ style was right.  It also confirmed that although I have a different editing technique than many photographers do these days, there are people out there who want their memories to have the look I create.

Smile
Source

Tonight, as I scrolled through Facebook I spotted this and it clicked.  This sums up my recent experiences.  I often feel that I’m not living up to my full potential, that I haven’t found that thing that will lead me to change the world.  This made me consider the idea that I don’t HAVE to complete some news worthy accomplishment to change the world.  Instead I can change the world in little ways.  Ways that matter individually, just when people need it. Granted I may never know that I’ve done so; but just when I need the reassurance that I’m making a difference I’m sure God will give me another spree of ‘signs’ to remind me.  This life we live – may it be the reason someone smiles today!

Broken Ground

At last we have broken ground on our new home!!  That’s what’s kept me so busy and unable to post regularly last week.  It sure is a lot of fun picking out all the details, but it takes a lot of time, especially when you’re working within a budget. 🙂

So here’s a little look at the progress thus far.  This is the view heading toward our property.  This is where the pavement ends.  We are still two more bends in the road away.  Notice all the fireweed lining the road?  Some of that is gonna end up in my garden!

1

And here’s the driveway from in front of the house.  Yes that is a slight bit of a mountain view through the trees!  Something I hadn’t expected, but absolutely love!

2

Here’s the foundation thus far from the front corner of the garage.

3

And from the side.  With the well going in just beyond.

4

This is the yard on the side of the garage.  The septic system will go here, so some of this will be filled in before construction is finished.  The rest will be filled in at some point later by us to make it more usable.  I’m thinking some of this area, possibly closer to the driveway, may end up being used for my rain garden due to the natural slope.

5

A little more mountain view from the back corner!
I’m thinking I’m going to need a bench out front to enjoy that!

6

This will be the view out the back of the house for now.
We will clear a bit more to create a yard for the dogs next summer.

7

Here is the view from the area near the well.  I love that you can just barely see the edge of the neighbor’s driveway, but not the neighbors themselves!  And that means they can’t see us either! Just how we planned it!

8

The view from the front of the house.  The pink flags on the trees are the property line.  But the lot next door is the same size as ours so it’s likely that when it sells and is built on the owners will build farther forward so we won’t really see them either.

9

And the best view of all.. our well hitting water at 135′!  Read more about that on my photography blog.

10Stay tuned.  There will be more pictures as things progress!

Bring On the Rain

Where has the week gone?!  It’s somehow Thursday and I have yet to do a post this week, but I guess I have good reason.  We were dealing with construction allowances for the house on Monday, drove to Whittier to drop off a trailer for a friend on Tuesday and had friends in town Wednesday so there just hasn’t been a spare moment to blog until now.

During my allowance budgeting I did do some research on a couple of things we’re looking at tackling right away when we move in.  I’d like to get some planting done, if we get in before the first frost, so that I have things started for next season.  I toyed with the idea of going to the nursery plant sales to snag up all the 40-50% off perennials and shrubs I plan to use, but I’ve held off just because I don’t want to be stuck with a bevy of potted greenery that I can’t plant because the ground is frozen and needs somewhere protected to winter over.  So instead I decided to research things I can prep for spring.  One of those things was rain chains from our eaves to a barrel which will collect run-off water.  I plan to snap up the supplies during the off season for less and prep them so everything is ready to be put in action as soon as weather allows.

While researching ideas for that project I discovered that our community has a Rain Garden program.  I had never heard of a rain garden, but it sounded interesting.  Described as a vegetated areas, built specifically to manage storm water runoff from driveways, sidewalks, roofs and other paved surfaces, it provides runoff an area to spread for removal of sediment and pollutants while also preventing flooding and erosion.

What a perfect complement to the rain chain and barrels I was already planning to use.  Plus the natural ravine we have on our property provides an excellent footprint for this type of garden.  If we can get it installed before winter takes hold it should be a big help in controlling spring’s thawing run-off.

What’s even better is that the local program encourages the use of rain gardens by paying home owners to install them!  They will reimburse up to $500 of the cost you incur to install your garden, green roof or porous pavement.  How awesome is that?  Check out these gardens that have been created around the community through this program.

The hard part will be deciding what vegetation to include in my rain garden.  Although I’m pretty sure the first round of plants will be those that are currently living in containers around my home now – iris, hydrangea, strawberries, lavender, marigolds, and daisies along with bulbs that I have not yet planted because I’m out of room. I’m sure not all of them will survive the transplant and impending winter, but those that don’t will create pockets of space to try new things come spring! And then I’ll be singing Jo Dee Messina’s “Bring on the rain” to watch our handy work in action!

Simple, Rustic Monograms

6I recently created these monogram wall hangings as inventory for a local craft show using materials I had on hand.  A cork square, a little burlap, some cord, my Silhouette machine and a sharpie is all I needed.  First I covered the 6” cork square with burlap, wrapping it around the edges and securing it on the back with hot glue.

1  2

Next I designed a variety of popular initials and cut them out on either paper or wax paper.  This was the first time I’d used wax paper to make a stencil and found that it tended to curl once removed from the cutting mat, so the regular paper seemed to work a little better, although I had to be careful not to tear it.

3  4

5I pinned the stencil to the board and traced an outline of the letter with my sharpie.  From there I just colored inside the lines to fill in the remainder of the letter.

Then I attached a bit of fabric cord in a loop at the top of the board on the back with some more hot glue to make a simple hanger.  I think they turned out pretty darn cute and priced them at just $5 due to their simple construction.  I still have several available in my Etsy shop and still have materials to make more if you need a letter I haven’t created yet.

I also made these fabric bulletin boards using the same method, sans the stenciling portion.  It makes them just a little prettier than the basic cork tile on the wall.

A B C

I just love quick, easy craft projects, don’t you?!

A Sneak Peek At Our New Kitchen!

We are finally breaking ground on our new home this week!  HALLELUIAH!!! Now that means we’ve been given the green light to get all of our materials chosen, including cabinets and counter tops for the kitchen.  We had these done up at Home Depot and even ended up almost $1,600 BELOW our cabinetry allowance!  Now we’re trying to work that same magic on the counter tops and flooring.

Picture 3Ignore the additional walls in the background.  They were used in the design software to plan out the bathroom vanities but the computer ‘sees’ them and renders them as plotted.

Picture 1 Picture 2
You’ll have to imagine our invisible pantry door on that corner wall, and our fridge will be a 3 door, but it’s close enough for a rendering.  We will also have a more mid-tone variegated flooring and a warm tan/beige wall color, so the contrast won’t be so pronounced.

Picture 4Picture 5

I left these two adjacent to give you a panorama effect of the back and side wall.  What’s scary great is that we’re such planners we already know what each cabinet shall hold!

And all of the drawers and cabinets are quiet close!  *Cue heavenly music*  Depending on when our builder orders them we may also get a free double cutlery divider in one of our drawers and roll-out bins rather than shelves in a few too!  Now we have to sit and count out how many knobs and handles we have to order.  We found some pretty ORB style hardware that run about $2.50 each so that shouldn’t break the bank either.

Lighting.  Check.  Cabinets.  Check. Counter tops.  In Progress.  Flooring.  Still the budget buster, final decision TBD.

I Can See The Light

Now that we are moving forward with construction on our new home – finally breaking ground THIS WEEK!! EEKK! – I’m starting to think  obsess about the little details we will soon be choosing.  Light fixtures are my current focus.  I know it’s one of the LAST things we will need to pick out, but it’s what my brain wants to think about apparently.

Ever since I heard someone on HGTV describe the basic builder grade fixture as a “nipple light” or “boob light” I’ve been obstinately prejudiced to them.   I also don’t want fixtures that will collect dust and require me to climb on ladders to constantly clean or suffer increased allergies if I’m lazy busy.  PropFanLuckily the hubs isn’t extremely picky when it comes to these types of details and lets me pretty much have free rein since I usually pick something he’s ok with.  I really love that we have such similar tastes!

I did drag him to a lighting store downtown that I’d spotted and wanted to check out, but in the end he’s glad I did because we found this!  A propeller styled ceiling fan!  How cool is that?!  (Sorry for the crappy iPhone pic, but that’s the best I could get looking up and trying to crop out the other displays.)  Yes, it’s a little spendy, but we can make it fit within our allowance and I think it’s a great fit for his love of flight and the craftsman style of our home.  At first he thought I was joking that I liked the prop style, but when he realized I wasn’t kidding the light bulb went on (pun intended) and he was suddenly more interested in the rest of the lighting choices.

The kitchen island will have pendant lights over it which sounds simple, but there are literally hundreds of styles of pendant lights out there these days.  I was originally thinking of doing mercury glass shades, but then stumbled upon this idea and found that the hubs really likes it and wants to help make them!  I guess we’ll be on the hunt for old insulators now! 🙂

I’ve been eyeing this pottery barn fixture for over year now for the dining room and found similar options like this at the big box stores for much more reasonable prices. Again the hubs liked my suggestion!  I’m sensing a trend here…

Then we spotted this ceiling fan at the big box store and both immediately liked it.  We thought it would be a nice compliment to the prop fan, but at a lower price tag for the Master Bedroom.  We plan to add a light kit the to the bottom, which seems pretty inexpensive and easy to do.  We just might have to spray paint a not so pretty brass light with ORB so it jives with the rest of the fan’s hardware.

Although I don’t love its hefty price tag, I absolutely ADORE this fixture and think it would be perfect in the entryway.  I didn’t see Entryit at the store the last time I was there and haven’t had much luck tracking it down online, so I might have to go back to the store and ask them to order me one.  This is where the hub’s enthusiasm wore out.  He apparently doesn’t have an opinion one way or another on this one other than the price.  If you know of where I can find something similar please let me know so I can compare!

Granted there are a few spots where I plan to have the builder install a basic fixture which we will change out with a creative DIY later like this little cutie I found on Pinterest.  I think it would look nice in the laundry room since I have a subtle rustic Americana theme in my laundry room décor – which is currently packed away since our rental has the washer and dryer in the garage!  I’d also like to create something like this for the Studio/Office if I can find some antique crystal decanters, or try my hand at making faux mercury glass with a tutorial I found online.

We have an appointment with a sales rep at the store downtown Monday evening so we’ll see if he can fit it all in within budget.  If not, we’ll get a few specialty pieces for the main traffic areas and then supplement basics elsewhere to be swapped out later as inspiration strikes.   We are also narrowing in on our final choices for cabinets and counter tops so watch for a post about that soon too!

DIY Patriotic Garland

1I spotted this How Does She tutorial and decided to give it a try since I had plenty of red, white and blue ribbon left over from my recent patriotic hair clip projects and have been looking for ideas I can use on a mantel when we move to our new house.  While watching a movie with the hubs, I cut a stack of 4″ pieces of each type of ribbon.  I had more of some and less of others since I was using up what I had on hand, but I had enough of each color to make it work so I figured I’d just spread out the pieces of the lower quantities more to make it appear even.

2I cut a 3′ piece of larger ribbon to be the base, then started tying the pieces onto this main ribbon, randomly choosing pieces of different varieties and colors – basically just eyeballing what I thought the next piece should be.  Luckily the base ribbon was the first piece I had cut off that spool and it had the sticker that held the end down still attached so I used that to hold the end away from me on the arm of the easy chair.  It did take the entire movie to complete but it wasn’t extremely difficult.

I’m tickled pink red, white and blue at the final product!  The one thing I would do differently next time is make it longer.  Three feet just didn’t seem to work for many of the places I thought of putting the garland.  I ended up placing it across this octagon window in our family room which seemed to work pretty well.  I also found that I liked it better when I twisted the direction of groups of the tied ribbons to give it a little more dimension.

4I’m planning to make more just like this but in different color varieties as photography props!  I’m thinking a pink one for girls, blue for boys, fall colors, maybe a rainbow or mardi gras colors, orange and black for Halloween and of course red and green for Christmas!

Once I get going I may even make a stock of them to sell to other photographers now that I’ve set up my own Etsy shop, (where I also have a stock of patriotic hair accessories!).  I just have to decide what to charge for this new item.  I saw a fabric garland done in the same tie-style at Michaels the other day for $14.99, but I don’t think it was a pretty or vibrant as this one.  I’m thinking $15 would be a fair price, especially if I custom make one with requested colors.  And because they are so light weight, it shouldn’t cost much more for shipping.

3

What do you think?  Would you use one at a photo session you were paying for or for decor at a party you were hosting and if so, do you think that’s a fair price?  What colors would you like to see?  Or better yet, anyone want to place a custom order right now? 🙂